Foodbuzz

Monday, January 26, 2015

Figgy Dickens Cookies


For some reason, the idea of figgy pudding has been swirling around in my head. Not really a popular dessert, but it does conjure up visions of Christmas and, of course, the Charles dickens classic - "A Christmas Carol." Anyhow, it was time to get baking and get the idea out of my head.

I decided to use figs in a cookie with a mix of oat as well as regular flour.  The oat flour paired with the figs make these a little bit more healthy than regular cookies. Also, they are more adult and tastier than Fig Newtons. Think about a little chewy cookie with burst of brandy flavor and sweet figs.  Second to that is the occasional crunch of walnuts.  You will not find vanilla extract in the recipe nor any spices such as cinnamon.  I did not want anything to overshadow the brandy soaked figs.

One of the key factors in making these cookies is the temperature.  If the dough is not cold enough they will have a tendency to run all over the pan.  The cookies should have some height to them, about like a ginger snap, so be sure to not skip the freezing step. Also, please allow for the soaking time for the figs when you plan to make these.  This recipe makes about 4- 5 dozen cookies.

Ready for cookie happy hour?  Let's get started....

Figgy Dickens Cookies
created by Floutrader

Ingredients
2 2/3 cup oat flour
2 tsp baking soda
3/4 cup all purpose flour
1 1/2 cups brown sugar
1/2 cup sugar
1 egg
3/4 cup or 1 1/2 sticks of butter, room temperature
3/4 cup of chopped dried figs
1/2 cup of brandy
3/4 cup chopped walnuts

Prepare two baking sheets by lining with parchment paper and preheat the oven to 325 degrees.

Place the fig pieces in a medium shallow bowl, preferably a pasta bowl. Pour in brandy and let sit for a minimum of four hours, so the figs will soften and absorb the brandy.  After soaking, drain off any remaining liquid. Set figs aside.

Fill the bowl of a stand mixer with the butter and both types of sugar.  Beat at medium speed until fluffy, occasionally scraping down the sides of the bowl.  Add the egg and beat to blend for about 30 seconds.  Remove bowl from stand mixer and set aside.

In another bowl, sift together baking soda and both types of flour.  Fold the sifted ingredients into the butter/ sugar mixture.  Then mix in the soaked figs and walnuts.  Scoop out batter and roll into one inch balls.  Then place on cookie sheet 1 1/2 inch apart.  Flatten with you hand so the cookies are about 1 1/2 inches diameter.  One the cookie sheet is full, place sheet in freezer for about 5-7 minutes.

Once the chilling process is complete, transfer cookie sheet to oven and bake until golden brown, about 12-15 minutes. Remove and place sheet on cooling rack and let rest for 3 minutes.  Then transfer cookies to a rack to finish cooling.
                                 **LAST YEAR: Gingerbread Whoopie Pies**
                        

Sunday, January 18, 2015

Lime in the Coconut Cake

This particular cake gets a lot of its flavor from the glaze.  The coconut lime glaze is actually put on both sides of each layer.  In addition to that, you poke holes to further insure that the great flavor seeps in.The actual cake only has coconut extract and coconut milk in it.  It has good texture and taste but it is very plain tasting without the glaze and frosting, so those additions should not be skipped.

Regarding the recipe itself, it had an error in which the correction note was made after a few reviews came in- the coconut oil was actually supposed to be coconut extract.  I have made the correction in the ingredient list and instructions below.
 
Yet, there are still a few questions.  Both are regarding "sweetened ingredients".  The recipe listed shredded coconut and coconut milk.  Each of those ingredients have a sweetened or unsweetened version.  Without the answers, I proceeded with 1/2 sweetened and 1/2 unsweetened for the shredded coconut and unsweetened instead of sweetened coconut milk.  A lot of the comments were that the cake was very sweet, so those bakers make have gone "full force" on the sweetened.

Another discovery was that there was way too much glaze.  The glaze makes over 2 full cups, which is a lot.  A glaze should be thin and flow over the cake and dry, not be thick and make a filling by itself.  I chose to use half of the recipe.  Another issue with the glaze is that there is a choice to use sour cream or yogurt.  The sour cream is a thicker consistency than yogurt, so if I make this again I will use yogurt.

Other than those few adjustments, the recipe has tasty results.  Note that the recipe below does not have any of the adjustments as noted in the 3rd and 4th paragraph above.  How sweet and how much glaze should be your preference, but bear in mind that the more glaze the longer it will take to dry before frosting.  Without it drying you will be mixing the glaze with the frosting as you frost the cake.

Lime in the Coconut Cake
adapted from Doreen Howarth found via Food Network

Ingredients/Cake
1 cup coconut milk
4 eggs
1 cup butter
1 tsp coconut extract
1/2 tsp baking powder
1 tsp baking soda
2 1/2 cups flour
2 cups sugar
1/2 tsp salt

Ingredients/Glaze
1/4 cup coconut milk
1 cup sour cream or yogurt 
1 cup shredded coconut
zest and juice only of 2 limes
1 cup sugar

Ingredients/Frosting
1 lb box plus 1 cup powdered sugar
1/2 cup butter
1/2 cup shortening
1 tsp vanilla
1/4 cup coconut milk
4 oz cream cheese
2 cups shredded coconut (optional for covering top and sides after frosting)

To begin, grease the interior of 2 nine inch round cake pans.  Then line the bottoms of the interior with parchment paper and grease the face up side.  Dust the interior of each cake pan with flour.  Preheat the oven to 350 degrees.

For the cake batter, add the butter and sugar to the bowl of a stand mixer.  Beat on medium speed, occasionally scraping down the sides of the bowl.  Beat for 1 full minute, so it has a fluffy consistency.  Pull out a small bowl and add one egg.  Pour in 1/2 tsp coconut extract.  Using a fork, scramble the egg in the bowl and then add to the butter/sugar mixture.  Beat on medium speed for 30 seconds.  Do the same with the second egg.  For the 3rd and the fourth egg, add each (one at a time) directly to the batter and beat each into batter for 30 seconds. Set aside.

Sift the flour, baking soda, baking powder and salt into a medium size bowl.  Add 1/3 of the sifted ingredients to the batter and stir with a wooden spoon until all is blended.  Then mix in 1/2 cup of coconut milk.  Stir in 1/2 of the remaining sifted ingredients.  Once smooth, add another 1/2 cup of coconut milk. Lastly, blend the rest of the sifted ingredients into the batter.

Pour the batter evenly into the prepared cake pans.  It measures out to a total of about 5 cups, so 2 1/2 cups per pan should be about right.   My batter was fairly thick, so I took a spatula to smooth out the top.  Place filled pans in oven and bake until a tester comes out clean, between 25-28 minutes.

Once baked, remove pans and place pans on cooling rack placed over a baking sheet.  Let cakes cool in pans for about 10 minutes.  Invert cakes onto cooling rack and then peel off parchment paper.  Cake will need to cool completely before proceeding.

 To make glaze, mix all ingredients in one bowl until fully combined.  Then poke holes in each of the layers of cooled cake. Spread glaze on tops of each cake. Let the glaze completely dry before proceeding.  This should take anywhere from 1-3 hours.  Once dried, invert cakes and repeat, poking holes and then spreading rest of glaze over top of cakes.  Cover cakes with cake domes and place in refrigerator for 2 hours. When ready, the glaze should be set and no longer sticky.

The last part is the frosting.  Cream together the shortening, butter and cream cheese until smooth.  Then sift in the powdered sugar in increments of 1 cup, beating on low to blend after each addition.   After all the powdered sugar is mixed in, add the coconut milk and extract.  Beat on medium speed for 30 seconds.  Then frost the surface of one of the layers and stack the other on top.  Frost the top and sides as normal. Lastly, you may opt to cover the surface of the frosted cake with sweetened coconut.
                                **LAST YEAR:Cream Bruleed Chocolate Bundt** 

Sunday, January 11, 2015

Schnecken/ Pecan Cinnamon Buns

It is a tradition of my mother to make cinnamon rolls at Christmas for breakfast. These rolls are light and airy, filled with cinnamon and nuts. However, there are other households which take the tradition to a sweeter level by having the cinnamon rolls topped with a sticky sweet caramel and toasted pecans.

In comparison, these have more of a pastry than "bread-like" quality to the dough when baked up.  While less filling than bread, each serving does hit the mark for your sweet tooth.  Instead of just cinnamon lovers, these rolls will have your pecan pie lovers taking notice.

I found the rolls quite easy to make. The dough did not require a lot of shaping and kneading.  Outside of the rise time, it is just a matter of rolling up the dough like a jelly roll and slicing.  Also, these rolls fell out of the pan easily when inverting and came out without leaving a lot of topping still sticking to the pan.  Topping in the pan is something I did not want to have to tangle with, so I was happy to see it in its rightful place.

The other good point about these rolls are that they can be prepared the night before and placed in the refrigerator. Follow everything as directed up to the end of the 40 minute rise time. Then cover and place in refrigerator. The next morning, remove pan from refrigerator and let rest at room temperature for about 1 hour. Then bake as directed.

Schnecken/Pecan Cinnamon Buns
adapted from The Dahlia Bakery Cookbook

Ingredients/ Dough
1 cup milk
1 egg and 1 yolk
1/2 cup or 1 stick of butter (more for greasing pan and bowl)
1 tbs active dry yeast
1 1/2 tsp kosher salt or 3/4 tsp regular salt
3 to 3 1/2 cups flour
5 tbs sugar

Ingredients/topping
3/4 cup packed brown sugar (light or dark-not specified)
3/4 cup chopped pecans
3/4 or 1 1/2 sticks butter
1/4 cup corn syrup

Ingredients/filling
1 cup sugar
1 tbs cinnamon

The first step to making the dough is to melt the butter in a saucepan over medium heat.  Once melted, pour in the milk and then add the sugar.  Mix the ingredients with a wooden spoon until there is no longer a grainy feeling when scraping the bottom of the saucepan, which means the sugar has all dissolved.  The ideal temperature for this is 110 degrees, so test the temperature with a candy thermometer and let cool or heat further according to the temperature it registers.

At the idea temperature, pour mixture in a heat proof bowl.  Sprinkle in the yeast and stir, making sure it is mixed evenly without clumps. Let rest 10 minutes and then stir in the salt.  Set aside.

In a separate bowl, place the egg and yolk and mix with a fork until all is blended.  Pour into the yeast batter and mix.  After the egg and yolk are thoroughly mixed in, prepare a flat surface by dusting with flour.  Then add 1 cup of flour to the batter and stir.  Continue to add the flour in one cup increments until 3 cups have been incorporated, stirring mixture after each addition.  Check for the consistency of the dough, it should be sticky.  Reserve the rest of the flour for dusting and kneading.

Place the dough on the prepared flat surface and knead about 5 times.  Your dough should now be smooth and elastic.  Butter the interior of a large bowl and a 9 x13 inch glass pan.  Shape the dough into a ball and place in the bottom of the prepared bowl.  Cover and let rise in a warm place until tripled in volume, which should take about 2 hours.

During the last 1/2 hour of rising time, prepare the topping.  Melt the butter in a saucepan over medium heat.  Then stir in the corn syrup and brown sugar.  Let thicken a little and remove from heat.  You will notice that there is some excess butter that does not blend in.  It is okay, the excess is what enables the saucepan to be cleanly emptied along with the pan when inverted.

Pour brown sugar mixture into the prepared pan and let run to the edges evenly.  Then sprinkle on the chopped pecans, being careful not to get too close to the edge.  The ones close to the edge will most likely fall off the outer edge of the rolls.  No worries though, these as well as topping spill over can be easily scooped up and placed on top of the rolls when inverted.  However, should you need to do this, do not delay after removing the glass pan or the mixture will set up and make it more difficult. After filling with topping, set pan aside.

Prepare the filling by mixing the cinnamon and sugar together.  Then melt the butter in a small saucepan and set aside to cool.

Once dough has risen, punch down and then place on flat surface dusted with flour.  Roll dough out to the size of 12x15 inches with an even thickness.  Brush with the melted butter and then sprinkle the cinnamon sugar over the surface. Press into the butter lightly with a spatula and make sure all is damp.  Dry cinnamon sugar will have a tendency to spill out when the dough is cut.

Take the longest edge and start rolling up.  Should you have any issues with sticking, use a bench scraper to ease it off the surface.  Roll the dough into a long cylinder with the seam facing down.  Then slice vertically into 12-14 inch pieces approx 1 inch thick.  Place each piece, cut side up, evenly in the pan.  Remember that these will rise some more, so do not place them too tightly together.   Tear off enough plastic wrap to cover pan.  Oil one side of plastic wrap and cover pan of rolls with the oil side face down.  Let rise in a warm place for about 40-50 minutes.

10 minutes prior to rise time completion, preheat the oven to 350 degrees.  After the rising time, uncover rolls and place pan in oven and bake for 17 minutes.  Then rotate pan and bake for another 17-20 minutes.  Check periodically to make sure they are not getting too brown.  If so, place aluminum foil over pan (do not fold tightly around edges but just let set on top loosely) and continue to bake.

Remove pan and place over rack and let rolls rest for 10 minutes.  During this time, line the bottom of a baking sheet with parchment paper.  After the 10 minutes have expired, invert the rolls on the paper lined baking sheet.  The easiest and cleanest way to do this is to hold the baking sheet with the paper inside and place face down on top of the glass dish.  Then grip the handles of the baking dish along with the baking sheet edges and invert.  Then lift glass pan off of rolls.

Serve warm and enjoy.
                                  **LAST YEAR: Kiwi Pomegranate Angel Pies**



Sunday, January 4, 2015

Candy Bar Tart


I am always excited to see a recipe that steers away from the tried and true.  The first thing that pops into our head when we think of tarts is fruit.  Nothing wrong with that, fruit and cream make for a wonderful filling to a sweet shortbread crust.  Besides fruit, recipes for the rich chocolate filled tarts come up now and again. However, this one caught my eye.  This recipe replicates the flavors of a long time favorite candy bar- Milky Way.

The crust is pretty much the standard, but the filling is unique.  As you know, the candy bar has a ribbon of caramel in it.  To support this flavor ingredient, the bottom part of the pastry crust is covered in caramel and the top is drizzled as well.  The fluffy nougat is imitated with the whipped cream filling flavored with melted chocolate.  Then the dessert imitation does take a unique turn with the addition of instant coffee added to the whipped cream. Lastly, milk chocolate curls dust the top.

This is another light and fluffy one with some very rich flavors.  Whipped cream is used in a lot of pastries and I think that this filling is very versatile. It would be an excellent filling for cream puffs or as a top layer to a chocolate cream pie or even an ice cream pie. 

The assembly comes together quite quickly.  However, the filling and the caramel require hours of cooling, so prepare those a day in advance and make the crust the day you plan to serve.

Candy Bar Tart
adapted from Flour by Joanne Chang

Ingredients/Mousse Filling
5 oz milk chocolate chips
2 tsp instant coffee powder
1/8 tsp salt
2 cups heavy cream

Ingredients/Caramel
1/3 cup water
2 tsp vanilla extract
3/4 cup heavy cream
2 tbs melted butter
3/4 cup sugar

10 inch tart shell, baked (see previous post sweet pastry project, it uses a flan pan but tart pan will do)
4 " slab of milk chocolate at room temp, for chocolate curl topping.

Start making the mousse by pouring the cream and adding the coffee powder to a saucepan.  Stir on medium heat until coffee powder dissolves.  Then turn up to medium high and let mixture come to a scalding temperature.  It has reached the right temperature when you see bubbles form around the edge of the inside of pan.  Watch closely so it does not burn.  Remove from heat.

Fill a heat proof bowl with chocolate chips.  Slowly pour the hot cream mixture over the chips.  Let sit undisturbed for about 1 minute.  Then whisk mixture until all the chocolate is melted and blended.  The mixture should have the same hue as the nougat in a milky way bar.  Strain mixture into another heat proof bowl and mix in salt.  Cover tightly and place in refrigerator for a minimum of 8 hours up to a maximum of 3 days.

For the caramel layer, fill a saucepan with the sugar.  Pour in the water slowly and mix until all the sugar is moistened.  Place over medium high heat and leave undisturbed to boil for about 3-4 minutes.  Then you will see the color change.  The mixture will start to darken.  As soon as you see a color change, swirl the pan to make sure it cooks evenly.  Keep swirling and cooking until mixture reaches a deep amber color. 

Remove from heat and pour in the heavy cream.  Let it bubble and steam.  Once it dies down, place the pan back over the heat, but this time at medium temperature.  Whisk constantly as the mixture cooks.  It will start to thicken and mixture will start to stick to spoon in a solid mass.  You want the mixture thicker than honey and thinner than peanut butter. This will take about 2-3 minutes.  Lastly, whisk in the vanilla and the butter. Remove pan and pour into a heat proof bowl.  Cover tightly and place in refrigerator for a minimum of 4 hours and a maximum of 1 week.

After the chilling time is completed, take out the bowl of caramel from the refrigerator.  Smooth 3/4 of the caramel on the bottom of prepared tart.  I had to get mine slightly warm again to smooth easily.  Set aside.

Remove mousse filling from refrigerator and empty into a bowl of a stand mixer.  Whip on medium speed until soft peaks form.  Spoon out the mousse into the prepared crust, smoothing the top so it is all even.  Drizzle the top with the remaining caramel.  Then, hold the chocolate bar over the top of the dessert and make chocolate curls by using a vegetable peeler, covering the surface as even as possible.  Once complete, let dessert chill about 30 minutes prior to serving.

This is best served and eaten within 8 hours.  Store in airtight container in refrigerator.
                           **LAST YEAR: Evergreen Shortbread Cookies**

Sunday, December 28, 2014

Graham Chocolate Chip Muffins

Life can be a series of changes, sometimes those changes are unexpected and sometimes planned. I feel lucky that 2015 is well planned and I am committed to make sure it is one of the best ever.  At this time my life is fuller and happier than in years past, so life's journey has taken a good turn in the road.  However even in the face of all kinds of change, my passion for creating in the kitchen still remains.

I had intended to make something lemony, but one of the taste testers indicated something chocolate was in order due to the change.  I still wanted to make muffins but I declined on the double chocolate. After reviewing several recipes, I found this one to be just enough chocolate to squelch a craving without an overload.

These muffins have graham cracker crumbs in the batter.  That had me thinking that they may be real dense.  However, they turned out to be typical in texture. I believe the use of oil instead of butter kept the muffins moist. The addition of the chocolate chips and crunchy streusel give the batter the sweetness and texture that was needed to bring it more into a delicious balance. This recipe makes 14-16 muffins.

This is the perfect way to tone down a bit from the big meal extravaganza most people have had this holiday season.  These muffins do not take a lot of time in the kitchen.  It is the first step, but the second step will find you relaxing with a cup of hot tea or coffee along with one of these tasty muffins.  Perhaps enjoying the early morning quiet as well as the pinkish orange hue of the sunrise of the first day of 2015......

Graham Chocolate Chip Muffins
adapted from Dwell on Joy via Michelle's Tasty Creations

Ingredients/ topping
1/4 cup brown sugar, packed
1/4 cup flour
1/2 tsp cinnamon
1/4 cup graham cracker crumbs
3 tbs melted butter

Ingredients/ Muffins
1 cup whole milk
1/3 cup vegetable oil
2 tsp vanilla extract
1 egg, room temp
2 cups flour
1 cup graham cracker crumbs
1 tbs baking powder
1/2 cup sugar
1/2 tsp salt
3/4 cup choc chips

Prepare a muffin tin by greasing the top edge of the muffin cavities and lining with cupcake papers. Then preheat the oven to 400 degrees.

Make the streusel topping first by blending all topping ingredients together until entire mixture is damp and comes together in clumps.  Set aside.

In another bowl, sift together flour, salt, baking powder and graham crumbs.  Some graham crumbs may remain in the sieve.  In that case, empty into the sifted ingredients.  Stir in the sugar.

Pull out another bowl for the wet ingredients.  Add the egg, oil, milk and vanilla extract. Whisk together until all is blended.  Then fold in the dry mixture until no dry streaks remain.  Lastly, mix in the chocolate chips. Scoop even amounts into muffin cavities.

Mix streusel again, making sure to break up any clumps.  Place a tablespoon of streusel on top of each cavity of batter.  Press down lightly.  Put in oven and bake for 16-19 minutes.  Let cool in tin for 10 minutes then transfer to rack to finish cooling.
                             LAST YEAR: Maraschino Snowball Cookies


Sunday, December 21, 2014

Eggnog Chiffon Pie

I had thought that the true "original" eggnog contained rum for the alcohol content.  In passing the eggnog case at the grocers I saw "Southern Comfort" eggnog, which means some people prefer bourbon or whiskey.  Then this got me thinking.  After some research, I found that the the choice of alcohol varied in the early years, depending on the location of the creator.  However, the most standout variation must have been George Washington's mix.  His recipe contained rye whiskey, rum and sherry.  It also seems that the egg part was a secondary component, for his original recipe did not list the exact number of eggs used.  No worries though, I declined to pursue making his stout recipe for this pie filling. This particular pie is made with rum and no other alcohol.  I have stuck with my original idea of what eggnog should be spiked with.

The photo above really makes this pie look like cheesecake.  It is far from cheesecake.  For those of you that have had any type of chiffon pie, you know all about that billowy and wonderful light as air texture. As a bonus, the rum eggnog filling is encased in a crisp cinnamon graham pecan crust. The crunchy flavorful addition is truly an asset to the whole dessert.

Instead of the heavy chocolate desserts this year, why not try this pie?  It may turn out to be a keeper that finds its way to your table every Christmas season.

Eggnog Chiffon Pie
adapted from Pie by Ken Haedrich

Ingredients/Graham Cracker Crust
1 cup plus 2 tbs graham cracker crumbs
1/4 tsp cinnamon
3/4 cup chopped pecans
2 tbs firmly packed light brown sugar
2 tbs flour
1/4 cup or 1/2 stick melted butter

Ingredients/ Filling
2 cups half and half
1/2 cup sugar
6 egg yolks
3 egg whites, room temp
2 tbs water
3/4 cup cold heavy whipping cream
1/4 cup dark rum
3 tbs sifted confectioners sugar
1 envelope plus 1 tsp unflavored gelatin

For the crust: Place all ingredients in a food processor except for melted butter.  Pulse until nuts are very finely chopped and all ingredients are blended evenly.  Pour into a bowl and stir, picking out and breaking up any large nut pieces the processor may have missed.  Then pour in the melted butter and mix until all crumbs are damp. You can use clean hands or a fork for this process. Set aside.

Prepare a pie pan by buttering the interior and preheat the oven to 350 degrees.  Dump the graham mixture into the pie pan and press evenly in bottom and up the sides.  Place in freezer for 3 minutes.

Remove pan from freezer and put in preheated oven and let bake until lightly browned. Crust should be done in about 7 minutes.  Remove and place on cooling rack.  Once completely cool put pan in refrigerator until ready to fill.

For the filling: fill a small bowl with the water and rum.  Then sprinkle the gelatin powder evenly over the top.  Set aside.  The next part of the filling will be making the creme anglaise.  Whisk the egg yolks with the sugar until blended.

Place a saucepan over medium heat and add the half and half.  Let the cream come to a simmer, taking care that it does not boil.  Remove from heat.  Whisk in 1/3 cup of the hot half and half into the egg yolk mixture.  Continue to whisk and stream in the rest of the warm half and half.  Pour mixture back into saucepan and place over medium low heat.  Continue to stir until it reaches a consistency thick enough to coat the back of a spoon.  Run your finger through the coating and if it leaves a path, it is done.  The time to complete the consistency change should be about 5 minutes. This batter is commonly called creme anglaise.

Remove from heat and mix in the gelatin mixture.  Let the batter come to room temperature and then transfer to a bowl and place in refrigerator.  While you are waiting, place a metal bowl and beaters of a hand mixer in the freezer for about 2 minutes.

Take out the bowl and beaters from freezer and set up your mixer to create the whipped cream.  Pour the heavy cream into the bowl and beat on high speed until soft peaks form.  Sift in the confectioners sugar and then beat the mixture until it becomes firm, about 1 minute.  Then place the bowl of sweetened whipped cream in the refrigerator.

Next, clean and dry your beaters to prepare for the egg whites.  Check your creme anglaise to see if it has reached the right consistency.  It should be as thick as raw egg whites.  If it is not, place back in refrigerator and check every 10 minutes until it reaches the right consistency.

Once the right consistency is achieved, remove the creme anglaise and the bowl of whipped cream from refrigerator.  Fold half of the whipped cream into the creme anglaise until blended.  Then blend in the rest of the whipped cream.  If lumps of whipped cream still remain after some folding, pour through a sieve to remove the lumps. Set aside.

In a separate bowl, add the egg whites and beat with handheld mixer until you have reached the stiff peak stage.  Then add 1/2 cup of the whipped cream mixture and beat for about 30 seconds.  Pour this into the rest of the whipped cream mixture and fold together with spatula.  Once blended, empty this filling into the prepared pie crust and smooth the top.  Tent with foil and place in refrigerator to set up for a minimum of 2 hours and maximum overnight.

You are welcome to serve with a dust of nutmeg on top with a side of whipped cream.

I wish you and yours a wonderful Christmas Holiday!
                                     **LAST YEAR: Gooey Butter Cookies**


Sunday, December 14, 2014

Spiced Honey Pecan Fingers


After last weeks post, I am still craving warm spicy treats.  Outside of the winter spices, the honey with the pecans make me think of sticky buns.  Calling these a bar would be a mistake because there is not much thickness to these.   However, do not let that discourage you, the bars are very big on taste.

Since they have such a wonderful taste, pairing with something like hot chocolate would be too much.  Team this treat with something lighter, like tea, so the flavor can really shine through.  The other great thing about this dessert is that it is easy to make and does not require any hard to find ingredients.

Spiced Honey Pecan Fingers
adapted from the Southern Cookbook

Ingredients
2 egg yolks
12 tbs or 1 1/2 sticks  butter
3/4 cup honey
3/4 cup chopped toasted pecans
1/2 tsp baking powder
1/2 tsp baking soda
1/4 tsp salt
2 cups flour
3/4 cup sugar
1 tsp cinnamon
1/4 tsp ground cloves

Prepare a 9x13 inch pan by greasing the interior and lining with parchment. Leave some parchment overhang along the two long sides and grease the face up side of the parchment paper.  Preheat the oven to 325 degrees.

Sift together cinnamon, flour, baking soda, baking powder, salt and clove.  Set aside.

In another bowl, cream the butter and sugar together by running the mixer on medium high for about 4 minutes.  The mixture should be light and fluffy. Beat in one of the egg yolks until thoroughly blended, about 30 seconds. Repeat with the second egg yolk and follow with the honey.  Once all is combined, fold in the sifted ingredients until there are no more dry streaks.  Then mix in the pecans.

Empty batter into prepared pan and smooth out evenly, making sure all edges and corners are covered.  Place pan in oven and bake for 20 minutes and rotate.  Then bake for about 20 minutes more or until top is lightly browned.

Place pan on rack and let cool in pan.  After cooling, cut into 36 even strips and leave in baking pan. Cover until ready to serve.
                                          **LAST YEAR: Fruits of the Forest Pie**

Sunday, December 7, 2014

Pineapple Upside Down Pumpkin Gingerbread


I think that one of the more difficult things in creating your own recipe is balancing the flavors.  I have posted and have seen other bloggers post comments regarding "subtle flavor" or that a certain flavor takes over the whole dessert which is not what is intended.  I think the worst I have seen is a recipe review stating "and after that dessert we all went to bed with upset stomachs".  It was not a blogger recipe but an actual comment regarding a recipe in a published cookbook.

This cake recipe, in reading the name itself, makes you think there is too much going on here. However, I give kudos to the collaboration of Gold Medal Flour and the Hawaiian Pineapple company in creating this recipe.  It came out back in the 1960's and proves that both knew a thing or two about balance of flavor.

This recipe is spot on when it comes to texture as well as flavor. As you can see by the above picture, this cake was moist and tender.  The cake brings all those wonderful winter flavors together, pumpkin, gingerbread and cinnamon.  Great as a stand alone, but even better with the pineapple caramel topping with an occasional bite of fresh pineapple on top.

This one does not require a lot of time or effort.  The biggest effort was only cutting out the circles of pineapple and most of the time used was in the baking of the cake.  The size of this cake is not real big.  Perhaps you and one of your loved ones should take some time out from all the holiday stress.  Time to crank up the fireplace, put on some Christmas music and kick back with a warm a cup of hot tea or coffee and a slice of this cake. Ahhh, I just feel better thinking about it...

Pineapple Upside-Down Pumpkin Gingerbread
adapted from Bon Appetit/ Oct 2008

Ingredients/Topping
1 ripe pineapple/ peeled
2/3 cup light brown sugar (packed)
1 tsp light or mild molasses
2 tbs frozen pineapple juice concentrate, thawed
1/2 cup or 1 stick of butter
Nonstick pan spray

Ingredients/Cake
1/2 cup light molasses
2 eggs
1/2 cup or 1 stick softened butter
1/2 cup canned pumpkin
1/2 cup boiling water
1 1/4 tsp ground cinnamon
3/4 tsp ground ginger
2 tsp baking soda
1/2 tsp salt
2 tsp baking powder
2 cups flour
1 cup sugar
Whipped cream (optional)

Start by cutting 1/3 inch round from the pineapple and core it.  Then stand the pineapple on end and cut 1/3 inch thick lengthwise slices, avoiding the core.  Take a small biscuit cutter (I used a 1 inch) and cut the slices into circles. 15-20 circles will be enough.  Place the slices in a bowl, cover and refrigerate.  Reserve the rest of the pineapple in the fridge for another use.

Preheat the oven to 350 degrees. Spray a 9 inch square or round cake pan with non-stick spray.

The topping will be prepared first. Place a saucepan on medium high heat and fill with butter, sugar and pineapple juice concentrate.  Stir and let butter melt and sugar dissolve until smooth.  Then stop stirring and let mixture boil for about 1-2 minutes. It should have the consistency of warm caramel. Remove and pour into prepared pan and swirl a little, to make sure it is even on the bottom.

Place the pineapple slices on top of the caramel mixture in a decorative design, making sure there is no overlap. For the cake, sift together the ginger, cinnamon, baking powder, baking soda, salt and flour. Set the filled cake pan as well as the bowl with sifted ingredients aside.

In another bowl, beat butter until smooth.  Pour in the sugar and beat on medium speed until all is incorporated.  Add one egg and beat for 30 seconds.  Repeat with the additional egg.  Continue to beat mixture and pour in molasses and spoon in the pumpkin.  Remove beater blades and if using a stand mixer, remove bowl from stand when all is blended together. Using a spatula, fold the dry ingredients into the batter until no dry streaks remain.  Lastly, pour the boiling water into the batter and mix until blended.

Empty batter into the prepared pan and smooth the surface, so it is even.  Place in oven and bake until tester comes out clean.  Bake time is approximately 50 minutes. Remove cake pan from oven and place over cooling rack.  Cake should cool in pan for about 45 minutes. Then invert pan over platter or cake board.  Let rest in place for 5 minutes, then remove pan. 

For serving, cake can be warm or room temperature.  Also, if you prefer, you can add a dollup of whipped cream on the side with each slice.

Tips and Notes:
1. Fresh pineapple on top does beat canned, for cutting the canned is way too mushy.  As noted above, you will have some left over.  I did not have an issue since fresh fruit is always eaten in this house.

2. Be aware that the cake bakes up very dark, so do not think it is burnt.  The above noted baking time was perfect for my oven 
                                        **LAST YEAR: Czech Nut Bars*

Sunday, November 30, 2014

Coconut Chocolate Chip Cupcakes

This particular recipe turned out to be a lesson in texture.  Whole wheat used in a recipe equates to dense and heavy, in my mind.  However, these were 50 percent whole wheat pastry flour and 50 percent regular flour, so I thought that they would be lighter. The mixture did result in a dense cupcake.  I prefer a lighter cupcake, so a repeat of this recipe would be a change to using cake flour.

As far as the flavor, the special ingredient of dried coconut milk was not very evident in the cupcake. It turned out to be a better addition for the frosting, which did have a coconut taste.  I like the flavor combo of coconut and chocolate, but I still feel that this recipe could be tweaked some to improve the flavor intensity and the texture.

Also, the recipe states to let the cupcakes rest 10 minutes in the pan after baking.  My cupcakes came loose from the paper liners and had to be transferred to clean paper liners.  So there is some adjustments needed in this area as well. The cupcakes should not cool in the pans and the liners should have been filled more.

Below is the recipe in its original form without changes. It was a section in the magazine that was promoting the use of whole grains in recipes.  This particular recipe makes approximately 20 cupcakes.

Coconut Chocolate Chip Cupcakes
adapted from Bon Appetit / Feb 2008

Ingredients/ Cupcakes
5 eggs
2 tbs milk
1/2 tsp vanilla extract
4 drops coconut flavoring or 3/4 tsp coconut extract
1 1/4 cups butter
3 oz cream cheese
1 cup flour
1 cup whole wheat flour
1 1/2 cups sugar
1/2 cup coconut milk powder
1 tsp baking powder
1/2 tsp salt
1 3/4 cups miniature  semis sweet chocolate chips (11 oz)

Ingredients/ Frosting
1/2 cup coconut milk powder
4-5 cups powdered sugar
1/2 cup butter, softened
1/2 tsp vanilla extract
3 drops coconut flavoring or 1/2 tsp coconut extract
1/4 tsp salt
4 tbs or more of milk
flaked sweetened coconut (optional for topping)

Prepare muffin tins by lining 20 cavities with paper liners.  Preheat the oven to 350 degrees.

In a medium size bowl, sift together the powdered coconut milk, flour, pastry flour, salt and baking soda.  Set aside.  In a second bowl, beat together cream cheese and butter until there are no more lumps.  Beat in 1/2 cup of sugar and repeat 2 more times with the remaining sugar.  Then add the coconut flavoring and vanilla extract.

Pour in the dry ingredients and stir until blended.  Add one egg and beat for 30 seconds.  Repeat the process of adding and beating for each of the remaining eggs.  Once smooth,  beat in the milk.  Then fold in the chocolate chips until evenly disbursed through out the batter.  Then fill the prepared muffin cavities 2/3 full of batter.

Bake until tester comes out clean, which is about 22 minutes.  Let the cupcakes rest in the pan for 10 minutes and then transfer to cooling rack.

As the cupcakes cool, create the frosting.  In a medium size bowl, add coconut milk powder, butter and salt.  Beat for about 45 seconds on medium speed, occassionally scraping down the sides of the bowl.  Add vanilla extract and coconut flavor or extract.  Mix on medium speed for about 30 seconds so the flavor is incorporated into the batter. 

Sift in 1 cup of powdered sugar to the butter mixture and beat until no dry streaks remain.  Repeat this process until all the powdered sugar has been mixed into the butter batter.  The beat in the milk in increments of 1 tablespoon until it reaches the desired consistency.

Spread frosting or pipe frosting onto cooled cupcakes.  If desired, sprinkle sweetened coconut on top.

Tips and Notes:
1. Even if using 2 pans, bake all at the same time so the batter does not sit and rise in the bowl while your first pan is baking.

2.  Also 20 is an odd number since muffin tins are in multiples of six and 12 cavity capacity.  Before baking, fill the empty muffin cavities with water. By filling with water, you have a more weight stable pan and it keeps your muffin tin cavities from discoloration.

3. If you are not using a scoop for the batter and use a spoon, tap your pan on the counter to get the air out of the batter before baking.
                                        **THREE YEARS AGO: Citrus Sri Lanka Cookies**


Sunday, November 23, 2014

Aunt Bills Brown Candy

The year was 1936. During this year: the Hoover Dam was finally completed, Joe DiMaggio made his baseball debut, the 40 hour work week law went into place and aviation gasoline was first produced commercially.  Along with all of this, was the creation of an unforgettable candy. The recipe was named after its creator, Aunt Bill, and is known as Aunt Bill's Brown Candy.

This candy falls mid-way between praline and fudge in consistency and flavor. However, it is not much until the pecans are added. Just imagine an 8 inch square that is 3/4 inch high that includes one pound of chopped toasted pecans. That makes the candy part more of just a coating to hold all those pecans together.  Also, it adds just enough sweetness to the pecans to have you craving for more than one piece.

We all have our own favorites we create for the holidays, but it is nice to add a little something different to the repertoire of desserts.  One bite and you will know why this recipe keeps popping up on the net and in magazines year after year.

Aunt Bills Brown Candy
adapted from Bon Appetit/ Dec 2008

Ingredients
1 lb or 4 cups of chopped toasted pecans
3 cups sugar, divided
1/2 tsp vanilla extract
1 cup half and half
5 tbs butter, cut into cubes
1/4 cup water
4 tsp baking soda

Prepare an 8X8 inch square pan by dotting the interior bottom with butter and buttering the interior sides.  Then line with parchment paper in the bottom and two sides, leaving a little overhang on each side.  Butter the face up side of parchment as well.

In one saucepan, add 2 cups of sugar and half and half.  Place over medium heat and stir constantly.  When the sugar has dissolved, remove from heat and set aside.

In the second saucepan, fill with remaining 1 cup sugar and water.  Stir and then place over medium low heat.  Continue to stir until sugar is dissolved.  Cease stirring and turn heat up to medium or medium high.  As the mixture boils, use a wet pastry brush to brush down the sides.  Within 8 minutes the sugar water will change to a deep amber color.  Remove caramel from heat and turn down heat to medium low.

Pour caramel into cream/sugar mixture and place over heat. Stir and cook until smooth. At the start the caramel will seize up, but this is fine.  After heating and stirring, the caramel will melt and meld with the sugar/cream.  

Once smooth, attach a candy thermometer to the side of the pan.  Turn heat up to medium and continue to stir and let cook, until mixture reaches a temperature of 244 degrees.  This should take about 12 minutes.  Remove from heat and stir in baking soda.

Then stir in butter cubes until melted.  Once the butter is melted, leave mixture to rest undisturbed until the temperature drops to 160 degrees.  The cooling process takes about 20 minutes.  After the candy has cooled, stir in the vanilla extract.

Transfer to a stand mixer bowl.  Using the batter blade, beat the candy on medium for about 4-5 minutes or until it becomes very thick and loses its gloss.  Stir in the nuts and then transfer to the prepared pan. Press lightly with wet hands until the candy evenly covers the bottom and all corners of the pan.  Let cool and cut into 30 squares with a sharp knife.
                              **LAST YEAR:Chocolate Orange Sweet Rolls*

Sunday, November 16, 2014

PBC Cookie Biscotti Sticks

There is something special about turning out something tasty from the kitchen in a short amount of time.  Yes, you can easily do that with a box mix, but creating it from scratch makes it so much better.  Recipes like these should be filed under "magic time". That way when you are in a pinch for time your resources are easy to get to. Outside of the two to three hours chilling time, these bars can be assembled and baked in a little over 30 minutes. That factor, as well as the taste, definitely qualifies for being special.

This particular recipe has 2 layers.  The bottom layer, much like a granola bar, is baked and consists of packed oats coated with a sweet mixture of brown sugar and peanut butter.  Topping it all off is sweet blend of butterscotch, chocolate and peanut butter.  The peanut butter and chocolate (PBC) combination does have quite a number of fans, so do not expect these to last long.

PBC Cookie Biscotti Sticks
adapted from Southern Living Christmas

Ingredients/ bottom layer
1 tsp vanilla extract
1/4 cup light corn syrup
2/3 cup butter
1/4 cup peanut butter
1 cup light brown sugar
3 1/2 cups oats (regular, not quick cooking)

Ingredients/ top layer
1 12 oz package semisweet chocolate chips
1 cup butterscotch chips
1/2 cup creamy peanut butter
2 tbs shortening
1/2 cup chopped peanuts

Preheat the oven to 375 degrees and line a 9 x 13 inch pan with foil.

For the bottom layer, melt butter in a large saucepan placed over medium heat.  Stir in brown sugar and corn syrup.  Let cook and continue to stir until sugar has completely dissolved. Remove saucepan and add peanut butter and vanilla extract to mixture. Stir until peanut butter has melted and and is evenly dispersed through the batter.  Then stir in oats in 1/2 cup increments, making sure that there are no dry oats left, all are coated with the batter.

Empty mixture into prepared pan.  Using the back of a spoon or clean hands, press the mixture evenly in the pan covering all edges and corners.  Place pan in oven and bake for 20 to 22 minutes.  When done, it should be a golden brown hue and the oats more solid and crisp.     

The other layer starts by setting up a double boiler.   Once the water starts to simmer in the lower pot, cover with the top pot. Fill pot with chocolate chips, butterscotch chips and shortening.  Once you see the chips starting to melt, mix with a spoon.  Then let the mixture rest 2-3 minutes and then stir again. Repeat that process until all the chips are melted and batter is smooth.  Add the peanut butter and stir until completely blended.

Pour chocolate mixture over bottom oat layer.  Smooth out evenly and top with chopped peanuts.  Place pan on cooling rack and let sit for 20 minutes.  Cover pan and place in refrigerator to firm up for a few hours.

Remove and let sit at room temperature for about 5 minutes.  Then cut into 12 one inch wide strips.
                                 **2 YEARS AGO: Chocolate Pumpkin Layer Cake**


Sunday, November 9, 2014

Blackberry Focaccia


It seems like I can never get out of the grocery store without blackberries.  While I do love to eat them as a snack, they make for a super item to have for breakfast or dessert. Since I had gone a little overboard in the quantity, I wanted to put them to use in a recipe.  Finding that special recipe that sparks my interest sometimes takes longer than the whole process of creating and posting.  After several hours of research, I was happy to come across this particular recipe.

This particular recipe makes me think of muffin tops.  We all know that muffin tops are the best part of the muffin.  There are times when that is all you want and the rest of the muffin seems to be too much sweet bread to devour.  If so, then it is time to consider converting the savory focaccia into something sweet.  Less bread, more topping---count me in.

This bread is still made with the original choice of olive oil but it is interesting in how this ingredient is incorporated into the topping.  The almond brown sugar streusel and the tart, juicy berries make for a perfect balance of flavor on top of the focaccia bread. Thicker than a pop tart but thinner than coffeecake, one piece will make you happy you stopped midway between the two.

Blackberry Focaccia
adapted from Baking For All Occasions

Ingredients/Bread
1 lb bread flour (approx 3 1/4 to 3 1/2 cups)
2 tsp salt
1 tsp yeast
1 tsp sugar
1 1/3 cups warm water (approx 90-100 degrees)
5 tbs olive oil

Ingredients/ Streusel
1/2 tsp nutmeg
1/2 tsp gnd cinnamon
1/8 tsp salt
1/4 cup granulated sugar
1/4 cup dark brown sugar
1/2 cup plus 2 tbs flour
5 tbs cold butter, cut up
1/2 cup whole almonds
1/4 cup olive oil
2 cups blackberries

To make the bread, start by pouring warm water in the bowl of a stand mixer.  Then sprinkle on the yeast and a pinch of sugar from the measured teaspoon.  Let rest for 10 minutes.  Pour in the olive oil first and then add the flour on top.  Sprinkle in the salt and remaining sugar.

Using a dough hook, beat the mixture on low speed for 12 minutes or more. Beat until the dough pulls away from the side of the bowl and balls up around the dough hook.  The dough should be smooth and elastic, but still retain a slight stickiness.  Take hook out of dough and remove bowl from the stand.  Cover lightly with a towel or plastic wrap.  Let set in a warm place until doubled in size.  This should take about 30-35 minutes.

While this is rising, complete the process for infusing the olive oil.  The initial step is to preheat the oven to 350 degrees.  Then pour the almonds on a baking sheet and place in oven.  Let them toast for about 8 minutes in the oven.  Remove the pan and pour nuts into a small ramekin or bowl.  Pour 1/4 cup of the olive oil over the almonds, making sure all are submerged.  Set aside to cool. Turn off the oven. Once the nut mixture cools, strain out olive oil and reserve nuts in a smaller bowl.

After the dough has completed the first rising session, you will need to prepare a baking sheet.  The baking sheet size should be 15 1/2x 10 1/2 x 1 inch, like a jelly roll pan.  Grease the interior of the pan and then line the bottom with parchment paper.  Brush the surface of the parchment paper with some of the reserved almond infused oil.  Punch down dough and then stretch to fit evenly in the bottom of pan.  You may have to stop at a few intervals to let the dough rest for a minute if it seems to resist the stretching. However, it should not take long to get the dough stretched evenly, covering the bottom of the pan.  Cover lightly and place in a warm place for the 2nd rising.  For the 2nd rising , it should take about 60-70 minutes to double its original size.  The end result is dough that does not spring back when a light indention is made.

During second rise, pull out a food processor for preparing the streusel.  Fill the bowl with the reserved almonds and salt.  Pulse about 4 times, chopping the nuts in two.  Add the flour to the nuts.  Then sprinkle in sugar, cinnamon and nutmeg.  Drop the cubes of butter on top.  Pulse the mixture repeatedly until it has a coarse texture and forms small pebble-like clumps. Pour in 1 1/2 tsp of almond infused oil and pulse 10 times. Add mixture to a smaller bowl and refrigerate until 2nd rising is completed.

Uncover dough after 2nd rising and brush with some of the reserved almond/olive oil.  Press blackberries into dough at 1 inch intervals.  Lastly, sprinkle the streusel evenly over the surface.  Cover again and place in a warm location and let rise its final and 3rd time until double.  This should take about 30-35 minutes.  While dough is rising, preheat the oven to 375 degrees.

Once the 30-35 minutes rise time has passed, place another indentation in dough with your finger.  As before, it is ready if the dough does not spring back once your finger is removed.  Place in oven and let bake until edges are golden and blackberries are bubbly, about 40-45 minutes.  Be sure and rotate pan at the half way point of baking.  Let pan cool on rack about 30 minute before cutting into 3 inch squares.  These can be served warm or at room temperature.

Tips and Notes:
1. It is important to have the correct size pan and making sure the dough is evenly stretched over the bottom of the pan. Otherwise it will be crisper in some areas and fluffier in others.

2. How much spread and bubbliness you have with the blackberries depends on if you use them at room temperature or right out of the refrigerator.  As you can see by the picture, mine were used right out of the refrigerator.

3. The original recipe states that weighing the flour makes a difference from the cup measurements, so use your scale if you have one. Also, it makes note that ingredients should be added in order as stated.

4. Be patient on the beating of dough at low speed, it may take sometime to get to the right consistency, but running your mixer on high will make for very tough bread.
                                 **LAST YEAR:Peppermint Patty Cake**


Sunday, November 2, 2014

Roman Holiday Cream Cake


If you could see my liquor cabinet you would think having a cocktail or two is part of a daily routine. In reality, most of it is for the sake of baking. Recently I found myself in a outlet liquor store- that's right - outlet.  There were grocery carts at the front and it seemed like endless aisles of varieties to choose from.  I did not go to the cool case section with the beer, but I am sure it covered the all the beer brewers on the planet.

There are a lot of delicious recipes out that us booze as an ingredient but I was drawn to this recipe of a cake infused with almond liqueur. I have always enjoyed Italian cream cake and the addition of the almond liqueur proved to be a delicious benefit. Fluffy cake studded with chunks of pecans and coconut topped with a cream cheese amaretto icing.. it is quite a nice addition to afternoon tea as well as a sweet ending to a meal.

Besides the wonderful taste, this cake has such an elegant appearance it gives quite an impression. Now let's get down to baking!

Roman Holiday Cream Cake
adapted from Big Oven

Ingredients/Cake
1 cup buttermilk
1/2 cup almond liqueur
5 eggs, separated
1 cup or 2 sticks butter (room temp)
1 tsp vanilla extract
1 tsp coconut extract
1 cup chopped pecans
1 cup sweetened coconut
1/2 tsp salt
1/2 tsp baking powder
2 tsp baking soda
3 cups flour
2 1/2 cups sugar

Ingredients/Frosting
1 tsp vanilla
1 1/2 sticks or  3/4 cup butter (room temp)
12 oz cream cheese
1/4 cup amaretto
4-5 cups powdered sugar
Whole pecan halves ( for decoration, optional)

Prepare 3 nine inch round cake pans by buttering interior and lining the bottom with parchment.  Butter the face up side of the parchment.  Dust the whole interior of each with flour.  Preheat the oven to 325 degrees.

Sift together flour, baking powder and salt.  Set aside.  In another bowl cream together butter and 2 cups of the sugar.  Once mixture is fluffy, add 1 egg yolk and beat 30 seconds on medium high speed.  Continue to add each egg yolk and beat until all have been incorporated into the batter.

Pour egg whites into the bowl of a stand mixer.  Using a clean dry batter blade, beat egg whites until soft peaks form.  Then, while the mixer is still running, slowly pour in the remaining 1/2 cup of sugar. Continue to beat until you reach the stiff peak stage.  Then set bowl aside.

Using a small bowl, stir together both extracts, baking soda and buttermilk. Set this bowl aside also.

Divide out 1/3 of the sifted ingredients and fold into the creamed butter batter.  Stir in 1/4 cup of almond liqueur and 1/2 of the buttermilk mixture.  Then fold in 1/2 of the remaining sifted ingredients.  Add the remainder of the buttermilk and almond liqueur, stir and finish by folding in the last bit of sifted ingredients.

Add the egg whites to the batter and carefully fold in, using a spatula.  Lastly, stir in the coconut and pecans.

Pour the batter evenly into each of the round cake pans.  Place all three in the oven to bake for about 40 minutes or when tester indicates done.  Once done, remove from oven and let cakes rest in pan for about 10 minutes.  Invert cakes onto rack and let completely cool prior to frosting.

For the frosting, place butter, vanilla extract and cream cheese in the bowl of a stand mixer and beat on medium speed until smooth.  Sift 2 cups of powdered sugar into batter and mix until all is evenly distributed.  Then stir in the almond liqueur.  Add the remaining 2 cups of powdered sugar and beat again.  Should it be too thick, add some more almond liqueur.  Once the desired consistency is reached, fill and frost the cooled cake. Decorate as desired, placing the pecan halves around the top edge of the cake making a complete circle.  

Tips and Notes:
1. I had to mix up another 1/3 of the frosting recipe to finish covering the cake.  How much frosting
    you need is personal preference.
2. It states to store the cake in the fridge, but be sure that it is at room temperature when serving.
3. Measuring your batter and dividing by three will insure that each layer will be consistent in height.
                                 **LAST YEAR: Brandy Apple Cake**

Sunday, October 26, 2014

Banana Nutella Bars


I have made banana bars before, but I felt that they needed a stronger, additional flavor.  Chocolate would have been a nice pick, but when I saw this recipe using Nutella, I had to make them.  It is easy to find people that do not eat Nutella because of nut allergies.  However, finding someone that purely does not like the taste is not that easy.

I have been on a banana kick lately.  Especially because it seems to be the main component of smoothies.  I recently had an "Elvis" smoothie but it was more like a milkshake- Peanut butter cup ice cream, bananas, protein powder and low fat milk.  Very filling and very good.

Back to the bars...this recipe had compliments concerning the great moist texture of the cake part and , of course, there were requests for more icing.  The recipe comes from the UK so there are quite a bit of modifications. The first being baking in a 9 inch square pan vs 7 inch.  A seven inch pan is too small for the number of servings I needed.  I have a seven inch pan but have not found much occasion to use it.  The second would be the measurement type (cups vs grams) and amount.

Banana Nutella Bars
adapted from uktv.co.uk

Ingredients/ Bars
1/2 cup plus 5 tbs butter
4 eggs
3 pureed medium size ripe bananas ( should yield about 1 cup)
1 tsp vanilla extract
1/2 cup brown sugar
1/4 cup white sugar
1 cup self rising flour
3 tbs Nutella

Ingredients/Icing
1tbs plus 1 tsp cocoa
1 cup powdered sugar
1tbs plus 1 tsp butter
2 tbs milk
2 tbs Nutella
2/3 cup coarsely chopped hazelnuts

Preheat oven to 350 degrees.  Prepare a 9 inch square pan by greasing the interior and lining the bottom and 2 sides with parchment paper.  Leave some overhang on the sides to use as handles to pull the bars out of the pan after they cool.

Using a stand mixer, beat the butter until smooth.  Then add both sugars and the extract and beat on medium high for about 1 minute.  Mixture should be fluffy.

Add one egg and 1/4 of the flour and beat until incorporated, about 30 seconds.  Add the next egg and beat again for 30 seconds.  Continue with adding the rest of the eggs, beating 30 seconds after each addition.  Using a wooden spoon, fold in the remaining amount of flour, until no dry streaks remain.

Stir in the pureed bananas.  Measure out the batter and pour half into the prepared pan.  In a small bowl, warm the Nutella in the microwave for about 10 seconds.  Then dot or drizzle the Nutella onto the first layer of batter in the pan.  Then use a toothpick or small knife to marble it evenly.  Add the second layer of batter and smooth the top.

Place pan in oven and bake until done, about 45-50 minutes.  When done, cake would have just started to pull away from the edge of pan, but you can use a toothpick tester to detect when done as well.  Place pan on rack to cool.

Melt the butter in a small bowl and set aside.  Using the bowl of a standard mixer, sift cocoa and powdered sugar together.  Then add the melted butter, stir until blended.  Once blended, add the milk and Nutella. Beat on medium speed, until the mixture is smooth.

Pull the cooled cake out of the pan by using the excess parchment paper sticking above the sides of the pan.  Then remove parchment and place on a cake board or serving platter.  Smooth the Nutella icing on top.  Lastly, evenly scatter the chopped nuts on top of the Nutella icing.  Now its ready to cut and serve.

Tips and Notes:

1. The more ripe your bananas are the stronger the flavor, so keep that in mind when you are shopping for bananas or considering the ones that have been sitting on the counter awhile.

2. The recipe could have used more Nutella between the layers, but consideration must be made regarding the sinking factor.  The nut spread is thicker than the cake batter.  You want the layer of Nutella in between the batter, not at the bottom.
                                    **LAST YEAR: Chocolate Sugar Cookies**


Sunday, October 19, 2014

Pineapple Cottage Cheese Pufflets


Through the years of blogging, I have seen lots more dairy products incorporated into recipes.  Goat cheese has been cropping up in pies and even ice cream.  However, one dairy product that never comes to mind is cottage cheese.  I am not one to eat cottage cheese on its own, but I was curious about how it would do as an ingredient.

It turns out that cottage cheese adds some wonderful flavor to pastry.  To me, these little pufflets remind me of a fried donut.  While a fried donut is good, a filled, fried donut is even better- so I decided to go all out and reach for some pineapple jam at the grocers for filling these dainty pastries.  A lot of my recipes in the past have used raspberry jam, so pineapple was a good change.

As far as taste, let me first state that this recipe comes from Dorie Greenspan.  In the preface to the recipe, she made a note that these were addictive.  Turns out that she was absolutely right.  This recipe has landed on my "keeper" list.  I had to put these baked morsels away up before they were all eaten by my company, exclaiming they could not stop.  I am glad I saved some dough back and put in the freezer for another time.

Lastly, do not let the above picture fool you in size.  These are little filled pastries made with 2-3 inch squares of dough folded in half. Using a 2 1/4 inch square cookie cutter, this recipe makes about 4 dz pastry cookies.  Be sure to allow for the chill time of 3 hours or more for the dough when planning to make these.

Pineapple Cottage Cheese Pufflets
adapted from Baking From My Home to Yours

Ingredients
1 tsp vanilla extract
1 cup or 2 sticks of butter (room temp)
3/4 cup or 8 oz cottage cheese
1/4 cup pineapple jam (or any favorite jam, marmalade or preserves)
2 tbs sugar
1/4 tsp salt
1 2/3 cup flour
confectioners sugar (for dusting)

First, the butter, salt and sugar will need to be creamed together.  Place those ingredients in the bowl of food processor or bowl for a hand or stand mixer.  Run the food processor or mixer on medium high for one minute.  Then scrape down bowl and run again for another minute.  The mixture will turn from lumpy to smooth.  Add the cottage cheese and vanilla extract to the bowl and repeat the beating process as outlined in the previous sentences.

Fold in the flour in 3 increments with a wooden spoon or the pulse function on your food processor.  Once a dough is formed and there are no streaks of flour, it is ready to be chilled.  Place dough on plastic wrap and form into a flat rectangle, then cover completely and place in refrigerator for a minimum of 3 hours.

While the dough is chilling, dust a flat surface with flour. Line 2 baking sheets with parchment paper.  15 minutes prior to taking the dough out of refrigerator, preheat the oven to 400 degrees.

Remove dough and divide in half.  Place one half on the floured surface and cover one half with plastic wrap and return to the refrigerator.  Dust a rolling pin and lightly dust the surface of the dough.  Roll out until the dough is only 1/8 " thick.  Then cut the dough using a square cookie cutter.  The square cutter can range anywhere from 2 1/4 inches to 3 inches.  The dough should be cut and rolled into about 2 dz cookies, if you are using a 2 1/4 cutter and less with a larger cutter.

Place the dough squares about 1/2 an inch apart on the prepared cookie sheets.  Place about 1/4 tsp of jam off center onto each dough square.  Moisten all  the dough edges with water using your fingers. Then fold dough over and press down to seal.  The end result is little pastries that look like miniature turnovers.  Also, since the dough does puff during baking, poke the center of each with a toothpick to allow the air to escape. 

Take one filled baking sheet and put in oven and let bake until done.  When done, the pastries will be golden brown on the edges. The bake time is approximately 10-15 minutes.  Once the pastries are done baking, remove pan and transfer pufflets to a cooling rack.  While still warm, dust with confectioners sugar.  Complete the same forming, filling and baking process until all the dough is baked into pastries.  Then finish dusting the baked pufflets with confectioners sugar.

Tips and Notes:
1. Be careful using the jam filling, taking care so that you do not overfill the pastry and the dough edges are sealed.  If any filling seeps out it will either carmelize or burn. The measurement of jam suggested above is based on the 2 1/4 inch square cookie cutter.

2. The recipe states you can create the pufflets in advance and freeze them.  Just pull them out of the freezer and bake, adding only 2 more minutes for baking.  Advance freezing can be up to 2 months as long as they are sealed tightly.

3. If I made these again, I would probably make them larger so I could use more filling.

4. A flat, floured surface is the easiest method for rolling. Rolling between 2 sheets of wax or plastic wrap (as the recipe suggests) makes for easy clean up, but there is more chance that the dough may stick, especially to the sheet that covers the top of the dough.

5. These can be served warm or room temperature.

                               **THREE YEARS AGO: Cinnagrog Pie**

Sunday, October 12, 2014

After Eight Cupcakes


The so called "after dinner mint" in the form of creme de mint and dark chocolate has always been just a tease to me.  At restaurants, I find myself looking at the little green foiled morsels and passing on getting one.  My thought has been....let's not get started on those because one does not satisfy.  As far as the red/white peppermints, I can deal with one of those.  A simple breath freshener.

Since most restaurants are not creating chocolate mint desserts nor do they have any plans to, time to get to work in the kitchen!  These cupcakes are all about those extra components.  You have the chocolate mint cake part, which is tasty enough to stand alone.  Moving on, you will find the baked in goodness of cream de mint/chocolate chips studded on top.  Then, the slight crunch from the minty butter cream frosting that supports a pool of ganache.   Yum..but wait, (l almost forgot)- the cupcake is finalized by floating a mini peppermint patty on top.  

This recipe makes about 1 dozen cupcakes. The original instructions for creating the cupcakes are stated below, however the tweaks I enlisted for success are at the end. After reading this post all the ways through, the other initial step would be to have all your ingredients out and ready for use.

After Eight Cupcakes
adapted from Cupcakes Galore

Ingredients/Cupcakes
3/4 stick or 6 tbs butter
2 eggs
2/3 cup half and half 
Mint extract
1/2 cup sugar
2 tsp baking powder
1 tsp salt
1 1/3 cups flour
1/3 cup unsweetened cocoa powder
1/2 cup miniature chocolate mint chips

Ingredients/ Frosting
2 tbs milk
Mint extract
1 1/2 sticks or 3/4 cup butter(cubed and at room temperature)
2 cups powdered sugar
Green food coloring (optional) 

Ingredients/Topping 
2/3 cup heavy cream
5 oz dark chocolate
1 dz mini peppermint patties

Prepare a one dozen cavity muffin tin by greasing the upper edge of the cavities and lining with cupcake papers.  Preheat oven to 350 degrees.

In a medium size bowl, sift together flour, salt, baking powder and cocoa powder.  Set aside.  Place butter and sugar in another bowl and beat for two minutes on medium high or until fluffy. Add in one egg and beat for 30 seconds. Repeat with the second egg.

Using a wooden spoon, mix in sifted ingredients and half and half in increments.  Stir in 1/3 of the flour mixture, then 1/3 cup of half and half and repeat, ending with the last 1/3 of the sifted ingredients.  Stir in a few drops of mint extract.

Fill cupcake papers evenly with batter.  Sprinkle the top of each cavity of batter with the chocolate mint chips.  Place muffin tin in oven and bake for 20-25 minutes, turning pan at the halfway point. Cupcakes are done when tester comes out clean.

Let cupcakes rest in pan for 2 minutes then transfer to a rack to finish cooling.

For the frosting, add the butter to a large bowl and beat until smooth.  Add 1/2 cup of powdered sugar and mix with a wooden spoon.  Continue to add 1/2 cups of powdered sugar and stirring until all is blended together.  Then stir in the milk and mint extract.  Lastly, add a few drops of green food coloring if desired. Spread frosting evenly on top of cooled cupcakes.  Let sit in a cool place until the frosting has hardened.

For the ganache, set up a double boiler and let it come to a simmer.  Then add chocolate and cream to the top pot.  Once the chocolate is completely melted and the cream is mixed in, remove from heat.   Let the ganache cool for about 20 minutes.  Then dip the tops of the cupcake in the chocolate, making sure that there will still be a frosting border around the edge of the cupcake.  Lastly, top each with a miniature chocolate mint patty.  Once the chocolate has completely set up, they are ready to serve.

Tips and Notes:

1. To make sure the mint flavor is easily distributed in the batter and frosting, mix it with the cream or milk instead of adding separately.

2. Sift the powdered sugar into the batter, it will eliminate issues with lumps in the frosting.

3. For a better presentation, use the back of a spoon dipped in water and make well in the center of the frosting on the cupcake, then spoon the ganache into the well.

4. Dip the tops of the peppermint patties in the ganache before putting on top for a more blended look of the two.

5. The amount of frosting was spot on, however, due to the method change in topping the cupcakes with ganache, I ended up with extra.  The rule is you can always make more, but you cannot go back and separate your mixture into its original state, so start with 1/2 the recipe of the ganache.  That would be 1/4 cup and one tablespoon or 2.5 oz of dark chocolate and 1/3 cup of heavy cream.

6. No need to buy all the separate types of dairy.  Skip the half and half and use a mixture of 1/3 cup of heavy cream and 1/3 cup of milk in your cupcake batter.
                            **LAST YEAR:Pineapple Coconut Squares**

Sunday, October 5, 2014

Pistachio Schoolboy Cookies


These particular cookies are french and the title has been translated from "Petit Ecolier" (Little Schoolboy).  My original intention was to make pistachio bars, but I found this recipe a little more interesting.

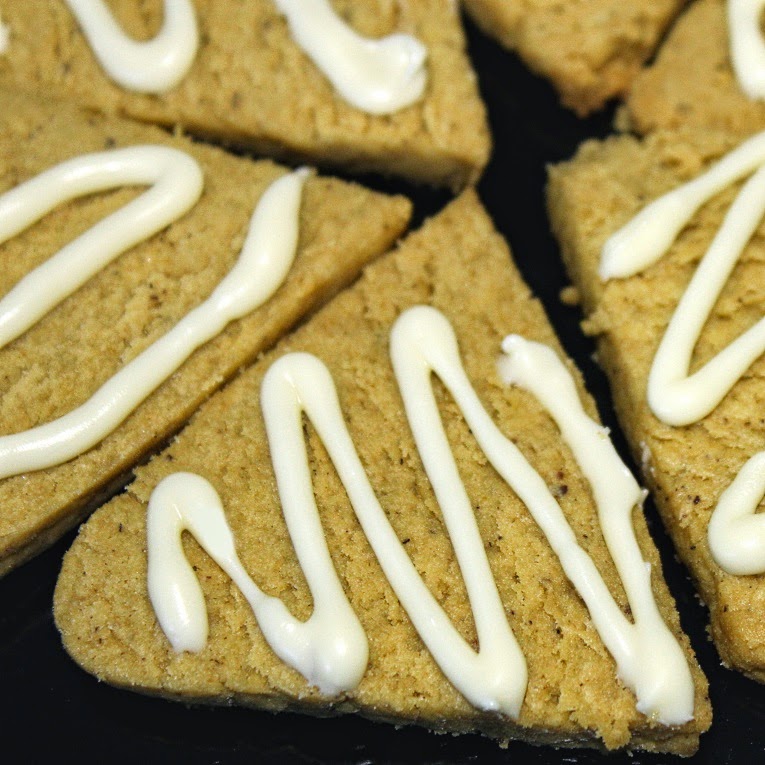
The cookie itself is like a shortbread and has very little sugar in it.  The topping of the white chocolate is the added sweetness.  Originally, the recipe stated to cut into squares and place chocolate pistoles or callet squares of dark chocolate on top. Since I was unable to easily find this type of  formed chocolate, I used a cut up chocolate bar.  I also opted for white chocolate instead of dark.  The chocolate was to be placed on top of the cookie after baking.  The chocolate did not melt as expected, so my modicfication was to melt the chocolate in a double boiler.  Then I used a squirt bottle to drizzle on white chocolate.  The recommended chocolate must much thinner than the regular chocolate bars. Also, I did a triangle instead of square shape.

Pistachio cookies are not commonplace, however that does not change the fact that these are delicious enough to add to your list of tea time treats.  In addition, they are basically a slice and bake cookie, so they do not require a lot of time to make.  This recipe makes about 3-4 dozen cookies.

Pistachio Schoolboy Cookies
adapted from Love N Bake via Amercianalmond.com

Ingredients
4-6 oz white or dark chocolate (see note in 2nd paragraph above)
3 cups flour
1/4 cup sugar
1/2 cup pistachio nut paste
1 and 1/2 egg (1/2 egg = 2 tbs whisked egg)
1 1/2 sticks or 6 oz butter
1 tbs milk
1/4 tsp salt
1/2 tsp vanilla or almond extract

Place butter, salt, pistachio paste and sugar in the bowl of a stand mixer.  Cream together until smooth, stopping occasionally to scrape down the side of the bowl.  Then add the milk, extract and eggs and beat until all is blended together.

Then using a wooden spoon, stir in the flour in one cup increments until no dry streaks remain.  Then divide the dough into 4 equal pieces.  Form each piece into a log 1 1/2 inches in diameter.  Wrap the logs in plastic wrap, place on cookie sheet and put in the refrigerator for about 1 hour, or until firm.

While the dough is chilling, prepare 2 cookie sheets by lining with parchment paper.  Preheat the oven to 375 degrees.

Once dough is firm, take out one log and unwrap.  Place on cutting board and slice dough into rounds 1/4 to 1/3 of an inch thick.  Place each slice on prepared cookie sheet, about 1 inch apart.  Bake cookies for about 8-10 minutes.  They will be set and be lightly toasted on the bottom when done.  Remove pan from oven.  If using the specialty chocolate, place one square on top of each cookie.

Let cookies rest on pan for 2 minutes and transfer to cooling rack.

Repeat this process until all dough logs are sliced and baked into cookies.  If drizzling the cookies,  the process can be started once all cookies are baked and cooled.  Set up a double boiler and melt chocolate.  Drizzle on cooled cookies by using a fork or a squirt bottle.  Let cookies rest until chocolate is set prior to serving or storing.

Tips and Notes:
1. If you are in a hurry, cooled cookies with chocolate can be placed in refrigerator to help the chocolate set up faster.

2. For something less sweet, just sprinkle some sparkling sugar on top prior to baking. These will be perfectly dunkable in tea or coffee.

3. Be sure to really mix up the pistachio paste prior to using it.  The kind I purchased was just like natural peanut butter- upon opening, there was a pool of oil on top.

4.  Be aware that the cookies do not expand much or change color upon baking.

5. For even more festive looking cookies, instead of drizzling chocolate on top, try dipping 1/2 of cookie into chocolate and sprinkling on finely ground pistachios.  Place on wax paper to let set up.
                                    **LAST YEAR:Chocolate Caramel Candy**

Sunday, September 28, 2014

Chocolate Liqueur Suicide Cheesecake


This one is for those that choose a plain chocolate bar over all the other varieties.  Kind of like a chocoholic purist. You know "their" kind - they feel that then only way to enjoy chocolate is when it is stand alone.  Adding things such as peanut butter or coconut is considered nothing but a crime in that particular group of people.

Cheesecake is commonly recognized as a very heavy and rich dessert.  I have seen several recipes for cheesecake and find this one to to be beyond the standard- richer and higher in fat.  In summation, this is not an "everyday" snack.  It is something you would have on a special occasion.  Also, one small sliver is so rich,  it will take care of your chocolate craving for quite sometime.

For those that are still game for the indulgence, you will not be sorry.  One bite contains the tang of cream cheese , bittersweet rich chocolate and then a note of Irish cream all chased by a chocolate coated graham nut crust.  The mix of silky smooth filling and crunchy crust makes for heavenly texture hitting your tastebuds.  So it is time to get your chocolate fix!

As always, please be sure to read all the way through, prior to starting.  The tips and notes at the end will help your dessert be a success.

Chocolate Liqueur Suicide Cheesecake
adapted from Cakes by Readers Digest

Ingredients/Crust
6 oz of semisweet chocolate  (chips or chopped)
7 tbs of melted butter
1/4 cup sugar
3/4 cup toasted almonds or hazelnuts, finely chopped
1 1/2 cups graham cracker crumbs

Ingredients/Filling
1 cup sugar
1 lb bittersweet chocolate (chips or chopped )
4-8oz packages of cream cheese (softened)
4 eggs (room temp)
1 tsp vanilla extract
3/4 cup Irish cream liqueur
1 1/2 cups heavy cream
1/4 cup cocoa powder

Ingredients/Topping
2 tbs sugar
1 cup heavy cream
1 1/2 tsp vanilla extract

Prepare a 10 inch spring form pan by buttering the interior.  Preheat the oven to 350 degrees.

In a medium size bowl, mix together the graham crumbs, sugar and nuts.  Stir in the melted butter. Empty the mixture in to the prepared pan.  Press evenly into the bottom and up the sides.  The crumbs should be pressed up the sides, leaving a 1/2 or 1/4 inch border of the top edge of the pan. Bake crust until golden brown, about 8-10 minutes.  Let cool on rack.

While crust is cooling, set up a double boiler and add the 6 oz of chopped semi sweet chocolate.  Melt chocolate in the double boiler then remove to cool.  After about 15 minutes, pour chocolate in cooled crust and make sure it covers the bottom evenly.  Then place in freezer for at least 15 minutes.

To make the filling, clean out the double boiler and set up again.  This time you will melt the 1 lb of bittersweet chocolate.  Once melted, remove and set aside to cool.

Place a saucepan over low heat and pour in 1/2 cup of cream.  Once warm add the cocoa.  As the mixture cooks, whisk constantly.  The mixture will thicken to a pudding like consistency.  Remove from heat and stir in the liqueur and the remaining cream. Let cool completely.

Fill the bowl of a stand mixer with the cream cheese, vanilla and sugar.  Beat mixture on medium speed until smooth and blended.  Add one egg and mix on low speed for about 30 seconds.  Continue with the process for each egg until all four have been mixed in.  Then stir in the cocoa mixture as well as the melted chocolate.   Once completely blended, take out graham crusted pan from freezer and empty filling into crust. Smooth the surface, making sure all is even.

Place in oven and bake for 50-60 minutes.  Cheesecake is done when completly set.  Let cool in pan on rack and then refrigerate for at least 6 hours. After cooling time, remove outside ring or pan side.

Lastly, prepare the topping by beating cream, vanilla and sugar together until it holds stiff peaks.  Fill a pastry bag and decoratively pipe on top of the cheesecake.

Tips and Notes:
1. Do not beat mixture at high speed nor beat for an excess amount of time.  This will cause your cake to have too much air and rise beyond the height of the pan.  If this happens, level the cheesecake after it cools.  Then cover that area with the decorative topping.

2. Use a squirt bottle to put the melted chocolate on top of the crumb crust.  The less pressure on the crust will insure that it does not crack.

3. When adding the cocoa, sift it in.  If you still notice cocoa chunks after mixture has cooled, add it to the cream cheese using a sieve so no dark chocolate flecks of cocoa appear in the filling.

4. I used almond flour instead of chopped nuts, it is much easier to make sure the flavor gets distributed evenly and saves some chopping time.

5. The topping is optional.  I chose to have the eater spoon on what they wanted of the whipped cream mixture rather than to decorate the cheesecake.  The other suggestion is serving with Raspberry coulis.

                              **LAST YEAR:Chocolate Ding Dong Cake**