Foodbuzz

Sunday, May 27, 2018

Port Cherry Coffee Cake


Today, society is faced with a variety of drinks. Instead of black coffee and ice cold milk, now there is half-caf soy lattes and walnut milk. Faced with so many choices, we find ourselves trying them all. Some are good and some not so good. However, it is nice to go back to those plain "old school" drinks.

Ice cold milk or black coffee (even though considered "old school") deserves a side of pastry or cookies. The plainest of each drink calls out for a pairing of a sweet breakfast treat. After all, there is a reason some cakes are called coffee cake and these cakes contain no coffee.

This particular cake has a special blend of port wine and cherries swirling through a fluffy vanilla batter. Aside from the flavor, the moist texture derived from the sour cream and the contrasting sweet almond streusel on top is very pleasing to the palate.

So let's go into the kitchen to create a delicious side line for an "old school" beverage. One tasty slice with plain black coffee may cause you to permanently give up that Caramel Mudslide drink from the coffee house.  

Port Cherry Coffeecake
adapted from Chowhound

Ingredients/Swirl
1 cup diced dried cherries
2 cups port wine
1/4 cup sugar
1-3 inch cinnamon stick
1 vanilla bean, split and opened up flat
1/4 tsp sea salt

Ingredients/Almond Streusel
4 tbs melted butter
1 cup cake flour
1/2 cup slivered almonds
1/8 tsp salt
3 tbs dark brown sugar
3 tbs granulated sugar
 
Ingredients/Cake
3 eggs
3/4 cup or 1 1/2 sticks of butter
1 cup sour cream
1 cup sugar
1/2 tsp salt
2 1/2 cup cake flour
2 tsp baking powder
1/2 tsp baking soda
1 vanilla bean 

For the first component (swirl), start by filling a saucepan with all the ingredients. Place over medium high heat and let cook. Mixture should come to a low boil or simmer. Stir constantly to make sure it does not stick or burn. Once it reduces down to having only 1/3 to 1/4 a liquid amount, remove from heat and take out cinnamon stick and vanilla bean. Discard the two. Transfer cherry mixture to a heat proof bowl and place in refrigerator to cool for a minimum of 20 minutes.

As that cools, create the streusel. Preheat the oven to 350 degrees and insure that one rack is on the middle tier of the oven. Using a medium size bowl, mix together the warm melted butter with both types of sugars. Then stir in the salt. Add the flour and combine until no dry streaks remain. Lastly, mix in the almonds. Set aside.

The cake batter starts with the preparation of the 10 inch tube pan. Grease the pan's interior and dust with flour. Fill a sieve (place over a large bowl) with flour, baking powder, baking soda and salt. Sift dry ingredients into the bowl. Set aside.

Add butter to a bowl of a stand mixer and beat until nice and smooth. Stop at intervals to scrape down the sides. The butter should be lighter in color after beating. Continue to run the mixer at medium high speed and add the sugar in separate intervals. Beat time should be about 5 minutes.

Take the vanilla bean and split down the middle and scrape the seeds into the batter. Mix until well distributed. Add one egg beat for 30 seconds to combine. Repeat the process until all eggs are blended into the batter. Remove the bowl from the stand mixer.

Using a wooden spoon, fold 1/3 of the sifted ingredients into the batter. Add half of the sour cream and stir. Mix in 1/2 of the remaining dry ingredients and then the the rest of the sour cream. Then add the last of the sifted ingredients and blend together. Top the batter with spoonfuls of the cherry swirl, spacing the dollops apart. Carefully fold the swirl mixture into the batter, using only about 4 or 5 strokes. The cherry mixture should be blended to the point of only streaking the batter, not be fully mixed into it.

Transfer the batter to the prepared pan and smooth out evenly. Cover the surface of the batter with the streusel, making sure it is evenly covered. Using clean hands, lightly press streusel against the batter.

Place pan in oven on middle rack an bake until tester comes out clean. This should take about 50 minutes to bake. Once baked, place pan over a rack to cool for about 1 hour. Run a knife around the edges and flip the cake onto a cake board. Flip once again so that streusel is face up. Let cool completely before serving.
                          **LAST YEAR: Italian Cream Filled donuts**         

Sunday, May 20, 2018

Chocolate Dream Cake


When I was little, the things I wanted were sold as separate, never complete as is. I could get the Barbie, but still wanted the car and the Barbie house. It seems as if someone has caught on to this trend, because everything you buy has the option to buy additional things that make it more complete.

Crazy as it may be, the lady at the cosmetics counter swears that there are 3 purchases to make perfume complete. Buy the base (perfumed lotion), then the perfume itself and lastly, the sealer of perfumed dusting powder. We all thought that the perfume purchase was enough, but now we know better, right? Well, I still have yet to be convinced to buy all three.

Unlike separate entities, this cake has it all. The layers are much like brownies, very moist and with a deep chocolate flavor. Coating these decadent layers is a fluffy cream filling and a Marscapone buttercream frosting with the crunch of cookies. Lastly, it has ganache on top and running down the sides. That component is nothing but dark chocolate candy. Hmmm... brownie, cookie, candy- that about sums up this three layer dessert tower. Rest assured, you will not want any chocolate sauce or ice cream with your slice-just a fork!

This cake requires three 8 inch round cake pans and a dropper since the coconut oil is measured in drops. When planning, make sure you allow enough time to create the cake. Consider the baking time of approximately 50-55 minutes. Also, remember that there are 3 components covering the outside of the cake.

Chocolate Dream Cake
adapted from pennlive.com

Ingredients/ Cake
3/4 cup vegetable oil
1/2 cup milk
1 1/2 cup buttermilk
1 1/2 cup hot coffee
3/4 tsp vanilla extract
3 eggs
3 cups sugar
4 oz chopped semisweet chocolate
3/4 tsp baking powder
1/2 tsp salt
2 tsp baking soda
2 1/4 cup flour
1 1/2 cups Dutch processed cocoa powder

Ingredients/Filling
1/2 cup powdered sugar
1 1/2 cup chilled heavy cream
1/2 cup Marscapone cheese
1 tsp vanilla extract
10 drops coconut oil
one 8.5 oz box of coconut dream cookies (crushed)

Ingredients/Frosting
1 lb of powdered sugar
1 cup or 2 sticks of butter (room temp)
1 tsp vanilla
15 drops of coconut oil
1/2 of an 8.5 oz box of coconut dream cookies (crushed for coating sides)

Ingredients/Ganache
1 tsp vanilla extract
1/2 cup heavy cream
1/2 cup semi-sweet chocolate (chopped)

Preheat oven to 300 degrees. Prepare 3 eight inch cake pans by greasing the interior. Then line the bottom with parchment paper and grease the surface. The first component will be the cake.

Stir together the buttermilk, milk and vanilla extract and set aside. Sift together the flour, baking powder, baking soda and salt. Then sift in the cocoa and whisk the mixture together. Lastly, stir in the sugar and form a well in the center of the mix.

Fill a small bowl with the eggs and whisk until foamy on the surface and set aside. In another bowl, add the chopped chocolate and spread evenly. Then pour the hot coffee into the bowl and let sit undisturbed for 2 minutes. Whisk coffee and chocolate together until smooth.

Fill the center of the well (formed in the dry ingredients) with the eggs, oil and melted chocolate. Then stir until smooth. Pour in the milk mixture and blend into the batter. Divide the mixture into thirds and fill each pan.

Place pans in oven and bake for 25 minutes. Then rotate and bake for an additional 25 minutes. At this time, use a tester to see if done. If not, let cakes cook for an additional 2 minutes and check again.

Let cakes cool in pans on rack for 10 minutes. Then run a butter knife around the edges and invert onto rack. Peel off parchment and let cool completely on rack.

The next component will be the filling. In the first bowl, sift the powdered sugar. Use a second bowl to beat the Marscapone cheese until smooth. Then fill a bowl of a stand mixer with the whipping cream. Whisk the cream until stiff peaks form. Add the Marscapone cheese, oil and vanilla extract. Blend ingredients together with mixer on medium speed, scraping down the sides at intervals. Once combined, beat in the powdered sugar. Lastly, fold in the cookie crumbs. Empty into a bowl with a lid, place lid on top and refrigerate until ready to use.

Using a small bowl, start creating your frosting by stirring the oil and vanilla together. Then fill the bowl of a stand mixer with butter and beat until light and shiny, scraping down sides as needed. Add the vanilla/oil blend and beat again until evenly distributed. Beat in the powdered sugar in 1/4 increments until the mixture is fluffy and smooth.

Place one cake layer on a plate, stand or cake board. Using a spatula, smooth a thin layer of buttercream frosting on the surface. Take the filling out of the refrigerator and divide in half. Place half of the filling onto the surface of the cake layer and smooth out evenly, covering the flat surface of the cake from edge to edge. Repeat the frosting/filling process after you stack the second layer on top. Then stack the last layer.

At this point, you will cover the cake in a thin coating of the frosting, which will be the crumb coat.

The create the ganache by filling a bowl with the chocolate and smoothing out to an even layer. Heat the cream to a simmer (either using a saucepan or microwave). Pour the hot cream over the chocolate and let rest for 2 minutes. Then stir until smooth and set aside.

Frost the cake with the remaining buttercream. Using clean hands, lightly press hand fulls of cookie crumbs on the sides of the cake, making sure all of it sticks and all sides are evenly coated.

Once the above task is complete, check on the chocolate ganache for consistency. It should not be like water, but is should be pour-able. This mixture will get thicker as it stands. After the consistency is achieved, our the ganache over the cake. Start by pouring along the outer edges then towards the center. If too much drips off, just keep spooning it back on top of the cake.

Tips and Notes:
1. The cake is very moist and fluffy. This means it is very fragile, so be careful when stacking your layers together. If it cracks, push the pieces together, the moisture will hold them together along with the frositing and filling.

2. I used an offset spatula to crumb coat cake. Dipping the spatula in water while you frost helps smooth the frosting without tearing the cake.

3. The frosting will set up with time, so do not delay in pressing the crumbs on the sides. If they do not stick, use a wet spatula on the surface of the frosting to make it sticky for the cookie crumbs.

4. Refrigerate cake to store if not serving right away.

5. The filling did stay fluffy for awhile. You may consider adding whipped cream stabilizer to the filling if you know the cake will be sitting at room temperature for hours.

                                       **LAST YEAR: Sour Cream Donuts**

Sunday, May 6, 2018

Banana Nut Cream Pops


When making frozen items you always have to consider the temperature gauge. On dipped ice cream pops, the outside coating and the inside ice cream vary in how much time is required in the refrigerator. In addition, a photo shoot will always influence the temperature, so you must act quickly or the items may melt in the process.

To avoid melting, I took the picture of these pops laying in the freezer. However, the open door on the freezer did cause some melting, but only after I was done with my photo shoot.

Aside from the picture taking, tasting these creamy cold confections was the real reward for my efforts. Roasting the fruit prior to blending with the cream really heightened the banana flavor. The roasting idea/method was adapted from the book Paletas.

There are some other elements that I included and developed that really enhanced the cream pops. Just like frozen dipped bananas, I tossed in some toasted walnuts and dipped the cream pops into chocolate to finalize before freezing. One taste and you will be really happy that each of these are for one individual. The idea of sharing one is out of the question!

As I was doing the dipping, I thought that this process would be a nice spin on the typical ice cream social. It would be fun freezing up these ice cream pops and having some friends over for dipping in their favorite coating (ie butterscotch, white chocolate are a few more varieties). The coating is the recipe for magic shell. It is easy to make and can sit at room temperature.

Even if you are not into the ice cream social event, these pops are a perfect way to escape from a hot afternoon. This recipe makes about 7 or 8 cream pops with leftover magic shell.


Banana Nut Cream Pops
by flourtrader

Ingredients/Ice Cream
1 cup milk
1/2 cup heavy cream
3/4 tsp vanilla extract
1 tbs banana liqueur
1 cup chopped toasted walnuts
1/4 cup dark brown sugar
2 tbs granulated sugar
3 ripe bananas
1 tsp lemon juice

Ingredients/Magic Shell
1/3 cup coconut oil
5-6 oz of chocolate (or other flavored morsels or chips)

Start by preheating the oven to 400 degrees. Wrap each of the bananas (leave skins on)tightly in foil and place on parchment lined baking sheet. Place pan in oven and bake for 30-35 minutes. Remove and let cool slightly. As they cool, fill a large bowl with both sugars and whisk together.

Scoop the roasted banana out of their skins and place in the bowl with the sugar. Mash and blend until the sugar has dissolved. Empty the mixture into a blender and add all the additional ingredients, except the walnuts. Blend mixture together until smooth. Empty into an ice cream maker and follow manufacturers directions until the ice cream reaches a soft serve consistency. Fold in the toasted walnuts.

Cut one corner off of a freezer bag and fill with the ice cream. Pipe into the molds, stopping occasionally to press out air bubbles with a butter knife. Fill each mold 1/4 inch below top edge. Place top on mold and insert stick. Put mold on rack and place in freezer. Let freeze overnight.

The next day, create the magic shell by placing chocolate (or morsels) and coconut oil in a microwave safe bowl. Microwave for 30 seconds and then stir. Repeat process until all the chocolate is melted and blended with the oil.  Let cool and then empty into a tall plastic cup.

Remove the ice cream bar from the mold (per manufacturer's instructions) and dip into cooled magic shell. Pull out of liquid and let the chocolate drip off of the top of the cream pop. Place in freezer for about 3 minutes and dip again. Repeat this process for additional cream pops. Wrap in plastic and store in freezer.

Tips and Notes:
1. I roasted the bananas without placing them on a baking sheet and liquid oozed out and dripped onto the bottom of the oven. Using a baking sheet may increase the roast time, but you will avoid the mess on the oven.

2. To make sure that the chocolate coating stays unmarked when freezing, take a thin cardboard box (like a cereal box) and cut small slits in the side or bottom. Push the ice cream stick in the slot to prop it up.

3. Make sure that the shell has cooled to room temperature or the cream pop will melt when dipping.
                            **LAST YEAR:Marbled Chocolate Raspberry Cookies**

Sunday, April 29, 2018

Homemade Pop Tarts


New ideas come from the internet and new recipes do as well. I realize that once a fantastic thing pops up in the way of recipes, several posts from various bloggers of the same item will follow. I usually wait until the popularity subsides. After all, no one is interested in reviewing several posts at one time representing the same thing.

I have been holding back on making Joanne Chang's pop tarts for some time. After making them, I can really understand why this recipe is such a favorite on the net. The filling can be made or jam can be purchased, but the real winning component is the pate brisee or pastry crust. Based on the buttery and flaky result, I have decided that this recipe is my "go to" when it comes to making any pastry or pies.

You can make a homemade filling or buy one that is pre-made, such as jam or canned pie filling. The picture above is with an apple filling. The recipe below contains only the homemade crust instructions. The purchased jam or pie filling has instructions on how to use the component for the tarts. The recipe makes 8 pop tarts or one 9 inch double crust pie. The dough has to chill for at least 4 hours before forming, so take this into consideration when planning.

Homemade Pop Tarts
adapted from Flour by Joanne Chang

Ingredients/Pate Brisee
3 tbs milk
2 egg yolks
1 3/4 cup flour
1 tbs sugar
1 tsp salt
1 cup or 2 sticks of butter (cubed into 12 pieces)
1 lightly beaten egg

Ingredients/Filling
1 cup of purchased filling of choice (jam, pie filling...)

Ingredients/Glaze
2-3 tbs water
1/4 tsp vanilla extract
1 cup confectioners sugar

Start by making the dough. Fill the bowl of a food processor with the flour, sugar and salt. Pulse the ingredients about 10 times to evenly distribute. Drop in chunks of butter and pulse again, minimizing the butter into pea sized chunks. Do not pulse until smooth.

Fill a small bowl with the 2 egg yolks and milk. Whisk together. Pour mixture into the butter/flour blend. Pulse a few times, making sure the liquid is mixed into the dough. Gather the dough together into a mound and place on parchment paper on a flat surface.

At this time, you will turn the butter chunks in the dough into streaks. Slide your palm down the sides of the mound, smearing the butter into the dough. Fold the dough and form another mound. Follow the same process, smearing the butter into streaks. Once it is cohesive and streaked with butter, form dough into a flat disc (about 1 inch thick) and cover with plastic wrap. Place in refrigerator for a minimum of 4 hours or a maximum of 4 days.

After the chilling time is complete, remove the dough and divide in half. Place one half on lightly floured parchment paper. Cover and return the other half to the refrigerator until ready to use. Preheat oven to 350 degrees. 

Roll dough into a 14x11 inch rectangle. Cut rectangle into 8 pieces, measuring about 3 1/2 by 5 1/2 inches. Line a baking sheet with parchment paper and place a sheet of waxed paper on a flat surface. Put a cooling rack over the wax paper.Transfer 4 pieces of the dough to the baking sheet, spacing evenly. Brush the surface of the 4 pieces with the beaten egg.

Place about 2 tablespoons of jam or filling onto the center of each of the 4 pieces. Spread filling out evenly, but leave about a 1/2 inch border. Place the remaining 4 cut pieces of dough on top of the the others that have the filling on top. Using your fingers, press down on all the edges of the dough to seal the 2 pieces together.

Put baking sheet in oven and bake until pastries are golden brown. This should take about 40-45 minutes, but check at the 35 minute interval to insure that they do not get too brown. Remove baking sheet, place on rack and let pastries cool for about 30 minutes. Then transfer to rack to cool completely. Repeat the same process of preparing and forming pastries with the additional dough in the refrigerator.

Prepare the glaze by sifting the confectioner's sugar into a bowl. Then whisk in vanilla extract and 1 tsp of water. Add water until desired consistency is met for drizzling or glazing. Brush the surface of the cooled pop tarts with the glaze and let set for 15 minutes to allow the glaze to dry.

Tips and Notes:
1. Make sure the filling you are using is fairly thick, so it will not run when put on pastry dough.

2. The dough is very flaky, so it is important that the roll-out thickness of the dough is consistent.

3. Be very careful when transferring tarts to rack, they are fragile until completely cooled.

4. If the dough starts to stick when forming and rolling, place back in the refrigerator to cool and dust surface and rolling pin with more flour.

5. Depending on the filling, the glaze can be flavored with a complimentary extract (other than vanilla) such as lemon, cinnamon...etc.

                              **LAST YEAR:Brazilian Ombre Cake**

Saturday, April 21, 2018

Coconut Chocolate Chip Cookies


As a food blogger, the definition of comfort food is very clear. For a certain food to be referred to as a comfort it has to meet several requirements. First (and most obvious) is that it has to have an amazing taste. However, sometimes the aroma of baking or cooking a particular food has a special power all its own. The food usually conjures up pleasant places, thoughts or memories. For example, a person might recall having a terrible day at school when they were a child, but got home only to find mom with some homemade cookies. Those cookies eased the situation back then and continue to retain that power, irregardless of the day or age of that same person. Sometimes just the aroma of the food baking or cooking.

So when you find yourself in the kitchen creating-never underestimate the power that food can have on your guests, family or friends.

Today I bring you the most favorite comfort food of all-chocolate chip cookies. Sure, these cookies are wonderful just with chocolate chips, but they get an extra boost of chewiness from coconut. This recipe makes about 3 dozen cookies.

Coconut Chocolate Chip Cookies
adapted from The Institute of Culinary Education 

Ingredients
2 1/4 cups flour
1 tsp baking soda
1/2 tsp salt
2 cups semisweet chocolate chips or 10 oz chopped chocolate
1 cup of sweetened coconut 
1 cup butter (room temp)
1 egg
1 tsp vanilla
3/4 cup packed brown sugar
3/4 cup sugar

Prepare 2 cookie sheets by lining with parchment paper and preheat oven to 375 degrees.

Fill the bowl of a stand mixer with butter and both kinds of sugar. Cream together by beating on medium high speed for 4 minutes, stopping occasionally to scrape down the sides of the bowl.

In a separate small bowl, whisk together the egg and the vanilla. Set aside. For the third bowl, sift together the baking soda and flour. Then whisk in the salt.

Pour the egg/vanilla mixture into the butter/sugar blend and beat for about 30 seconds. Remove the bowl from the stand mixer and fold the sifted ingredients into the batter. Once the dough is formed, add the chocolate chips and coconut. Use a wooden spoon to distribute the add ins throughout the dough.

Using a scoop or spoon, place tablespoon sized mounds of dough on the prepared baking sheets. The mounds should be about 2 inches apart. Place in oven and bake until cookies are golden on the edges and bottom. This should take about 8-10 minutes and the center will still be soft.

Remove from oven and let rest on baking sheet for one minute, then transfer to a rack to finish cooling.

Tips and Notes:

1. The coconut only imparts texture to these cookies. If you want these cookies to have a coconut flavor, add about 1 tsp of coconut extract.

2. I tried these cookies with milk and semi sweet chocolate and both types turned out tasty. However, my preference will always be semi-sweet.


Sunday, April 15, 2018

Italian Tomato Loaf


The one particular vegetable that equates to Italian cuisine is the tomato. My favorite kind of tomato is one called beefsteak. The beefsteak tomato is well known for its meaty texture and wonderful flavor.

I recall one dining experience in which I ordered Margherita pizza. Authentic and very much Italian, the pizza only had 4 components: crisp crust, tomato sauce, tomato slices and mozzarella. I have seen a lot of recipes for this type of pizza, but never with whole slices of tomatoes. All this typing makes me want another piece! It was quite a long time ago in a restaurant out of town, but I am ready to go back.

Between my love of bread and my thoughts about tomatoes, I found a base a recipe for tomato bread from My Recipe Cards and tweaked it by adding and eliminating elements until I created a recipe that produces a very Italian flavored tomato loaf.

This tomato bread has the same density of sourdough bread and includes Italian seasoning, mozzarella cheese and two types of flour. Due to the chewy texture and flavor, the bread has many tasty uses. A few slices for a sandwich or an accompaniment for a pasta dish, are just to list a few. This recipe makes a smaller loaf, about 7-8 inches in diameter.

Italian Tomato Loaf
by Flourtrader

Ingredients
3/4 tsp Italian seasoning
1/3 cup grated mozzarella
1 tsp sugar
1 pkg yeast
1/4 cup snipped herbs (optional rosemary, basil, thyme in small pieces)
2 tbs butter
1 cup canned tomatoes (drained with 1/2 juice reserved)
3-4 cups flour
1 egg white (whisked)
topping (Italian seasoning or snipped herbs)

Fill a food processor with the tomatoes and the reserved juice. Pulse until tomatoes are blended, but not pureed, the mixture should still have some chunks of tomato.

Transfer to a saucepan and place a candy thermometer inside. Turn the heat up to medium and let the liquid warm up to 105 to 115 degrees. Remove from heat. Stir in the yeast and the sugar. Let the mixture sit until the surface is foamy.

Pour the mixture into the bowl of a stand mixer and beat in the herbs (if using), Italian seasoning, butter and cheese. Once blended, fold flour into batter, 1 cup at a time. After the 2nd cup, let dough rest for 10 minutes. Remove dough from bowl and place on a flat, floured surface. Knead in the additional cup and then check for consistency. It should be a very stiff dough. If not, knead in more flour until the correct consistency is reached.

Place dough in a greased bowl and cover lightly. Let rise in a warm place until doubled in size. After an hour, check the dough by making a half inch indentation in the center. If the indention remains, the rising time is complete. If not, let it rise for additional time as needed.

After the first rise time, punch down dough. Shape into a round loaf and place on a parchment lined baking sheet. Cut a few slits in the top and then let rise again. As it rises, preheat the oven to 375 degrees. Check the dough after 1 hour of rise time by lightly pressing on top. The rising time is complete if the imprint remains.

Brush the surface with the egg white and sprinkle with fresh herbs or dry Italian seasoning. Bake until the surface is toasty and tapping the loaf emits a hollow sound, approximately 35-40 minutes. Remove from oven and place on rack to completely cool.
                              **LAST YEAR:Blackberry Ginger Kouign Amann**


Friday, April 6, 2018

Dark Chocolate Truffle Tart


Father time has a way of running things when it comes to spices and ingredients. Some things hold up against time and others deteriorate quickly. I read somewhere that poppy seeds are bad when we buy them here in the US. This means that we have no idea of what a fresh seed tastes like.

Today, I realized that my espresso powder became a victim. That big plastic jar with the screw on lid was no match to the Texas weather. Instead of a powdery substance like cocoa, I opened to find a brick. Even though it said store in a cool dry place, I thought that my damp clay round that I used to keep brown sugar from getting hard would do the trick. Now I have a clay piece stuck to the espresso brick as an indication that humidity is the enemy.

This recipe requires a touch of espresso powder, so I just scraped off enough of the brick to get what I needed. I will have to look into storing and packaging the next time I purchase. Considering how much I used versus how much was wasted- I was not at all pleased.

Diverting my attention, I moved forward with the task of creating a chocolate tart. At the end of the project, one bite of the rich chocolate filling and crispy crust of this decadent dessert made me forget all about the espresso issue. Pairing the the vanilla whipped cream topping with the rich dark chocolate filling that was laced with a hint of coffee flavor truly was nothing short of being a deliciously genius idea.

Ah, the powers of chocolate-not only a tasty indulgence, but a bit magical in the way it makes a person feel. I do recommend that we all experience the magic of chocolate every once in a while and this particular tart is a great choice. This recipe makes one 9 1/2 inch or 3 five inch tarts.

Dark Chocolate Truffle Tart
adapted from Sur La Table

Ingredients/Dough
2 1/2 tbs Dutch cocoa
1 cup flour
1/3 cup sugar
4 oz or 1 stick unsalted butter (room temp)
1 egg yolk

Ingredients/Filling
16 oz chopped bittersweet chocolate
1 tbs espresso powder
1/2 tsp sea salt
1 cup heavy cream

Ingredients/Cream
1 tbs sugar
1/2 cup heavy cream
1 tbs cream stabilizer ( optional)
1 tsp vanilla bean paste
1 tbs cocoa nibs (optional garnish)

For the crust, start by filling the bowl of a stand mixer with sugar and butter. Cream mixture together by beating on medium high speed for a total of 3 minutes, stopping at one minute intervals to scrape down the sides of the bowl. Beat in the egg until blended.

Using another bowl, sift together the flour and cocoa. Then fold it into the sugar mixture until no dry streaks remain. Shape dough into a flat disk and place in tart pan. Press and form the dough into the sides and on the bottom-covering all areas evenly. Then take a long sharp knife and cut off the excess dough from the top edge of the tart. Once completed, place in refrigerator 1 hour or chill in the freezer for 30 minutes. During this time, preheat the oven to 350 degrees Fahrenheit.

Take chilled tart out. Using the tines of a fork, make small holes in the bottom of the dough. Then cover the surface of the dough with parchment paper and place pie weights on top. Place tart in the oven and let bake for 15 minutes. Take tart out of oven and remove weights and parchment paper. Return tart to the oven and let bake for an additional 15-17 minutes. Remove and place on rack to completely cool.

The filling starts with placing the chopped chocolate in a heat proof bowl, preferably a pasta bowl. Smooth the chocolate pieces evenly in the bottom of the bowl. Take a small saucepan and whisk the cream, salt and espresso powder together. Place the saucepan over medium high heat and whisk as it cooks. Once the mixture has come to a boil, remove saucepan from heat and pour over chopped chocolate pieces. Let the mixture rest and then stir until all the chocolate is melted. Pour the filling into the tart shell. Let cool to room temperature and then cover with plastic wrap. Place in refrigerator and let chill for a minimum of one hour and up to 8 hours or overnight in order for filling to set.

After the tart filling is set, prepare the whipped cream topping by beating together all the topping ingredients, with the exception of the cocoa nibs. Beat until soft peaks form or the cream holds its shape. Top tart with whipped cream as desired and then sprinkle on the cocoa nibs, if using.
                                  
                                 **LAST YEAR:Walnut Mini Loaves**

Sunday, April 1, 2018

Triple Lemon Cupcakes


Here in Texas, the weather is sort of "on the fence"- not really spring and not really winter. It is mostly days ranging from 80 and 50 degrees. Also, the wind factor is high-indicating that the ceiling fans on the porch were really unnecessary.

Frankly, I am looking for spring days with no variance. I am hoping that the bluebonnets will sprout here and the butterflies will come out. Another thing that marks spring is that my consumption of lemonade increases. Come to think of it, I am ready to see a few of the kids' lemonade stands set up around the area.

Today's post is not a recipe for lemonade, but instead a special citrus cupcake. With the moist lemon infused cake, luscious lemon cream/curd and sweet tangy lemon syrup, I consider this cupcake the next best thing to a refreshing lemonade. If you do not have a special dessert item for the picnic table - this recipe may just become a springtime tradition.

The recipe is adapted from several component recipes: the cake-rock recipes.com, the syrup-Saveur Magazine, the filling-So Good Recipes. This recipe makes about 2 dozen cupcakes.

Triple Lemon Cupcakes

Ingredients/Lemon Cream
6 oz sugar
2 large eggs
3 oz lemon juice
3 oz butter (room temp and cubed)
zest of 2 lemons

Ingredients/Cake
3/4 tsp lemon oil
1 1/2 cups buttermilk
2/3 cup vegetable oil
1/3 cup of vegetable shortening
3 eggs
1 tsp vanilla extract
zest from 1 large or 2 small lemons
1 1/2 tsp baking powder
1 1/2 cups cake flour
1 1/4 cup regular flour
1/2 tsp baking soda
1 1/2 cups sugar
1 tsp salt

Ingredients/Syrup
3 tbs sugar
4 tbs lemon juice

Ingredients/Italian Buttercream
5 egg whites
1 cup plus 1/4 cup sugar
1/4 cup water
2 cups unsalted butter (room temp and cubed)
1 tbs vanilla extract

The first component is the lemon cream. Fill a saucepan with all ingredients, with the exception of the butter. Whisk together and place over medium heat. Stir constantly as it cooks and comes to a boil. This process should change the liquid into a thick shiny substance. At this point, remove the saucepan from the heat. Add a few butter chunks and then whisk until melted. Repeat this process until all the butter has been melted and mixed into the lemon batter.

Transfer to a sieve placed over a heat proof bowl and strain out all the zest, using the back of a spoon to push the mixture through. Place the bowl in an ice bath for 20 minutes and then cover with plastic wrap and refrigerate until ready to use.

For the cake, preheat the oven to 325 degrees Fahrenheit. Grease the top cavity edges of 2 muffin tins, each with 12 cavities. Line the cavities with cupcake papers and set aside.

Fill the bowl of a stand mixer with the vegetable oil, lemon oil and shortening. Beat with paddle blade until it becomes smooth. Then add the sugar and vanilla extract. Blend with the mixer on medium high speed for about 3 minutes, stopping at intervals to scrape down the sides of the bowl. Once the mixture is fluffy, add an egg and combine. Repeat the process, blending in each remaining egg, one at a time. Then mix in the lemon zest.

Take out another bowl and sift together both types of flour, baking soda, baking powder and salt. Fold 1/3 of this mixture into the lemon batter. Then stir in half of the buttermilk. Repeat the process, using half of the remaining dry ingredients and the rest of the buttermilk. Lastly, fold in the last bit of the sifted ingredients until no dry streaks remain.

Using a scoop, fill each of the muffin cavities with the batter. Each cavity should be 3/4 of the way full. Place in oven and bake for 10 minutes, then rotate pans and bake for an additional 7-12 minutes. Cupcakes are done when tester comes out clean and edges are golden. Remove from oven and place pan on rack and let cool for 2 minutes. Then transfer cupcakes to rack and let cool completely.

To prepare buttercream, fill a saucepan with 1 cup of sugar and water. Whisk together and place over medium high heat and clip a candy thermometer to the side of the pan. Let mixture cook until it registers a temperature of 245 degrees Fahrenheit, then remove from heat.

Fill the bowl of a stand mixer with the egg whites and beat until it reaches a soft peak consistency. Then add the 1/4 cup of sugar and beat for 30 seconds. At this point, continue beating on medium speed and stream in the sugar/water mixture. Then turn the speed to high and beat for 8 minutes or until the bottom outside of bowl is room temperature. Turn the speed back to medium and drop in the butter cubes, one at a time, letting each meld with the batter before adding the next cube. Once all the cubes are beaten in to the batter, blend in the extract. At first, the mixture will look a bit like cottage cheese. Continue to beat and it will eventually come together into a thick airy frosting.

For the syrup, whisk the sugar and the lemon juice together in a small saucepan. Place saucepan over medium high heat and let come to a boil. Remove from heat and let cool for 10 minutes.

To assemble the cupcakes, begin by brushing the syrup onto the surface of the cakes. Continue to brush on until no more syrup remains. Let it soak into the cake for about 30 minutes. Then use a paring knife to core out a dime sized hole in the middle of the cupcakes. Remove the filling from the refrigerator and prepare a piping bag with a plain tip. Fill the cupcakes with the lemon cream until the cream comes to the surface. Refrigerate the remaining filling.

Frost the cupcakes as desired and then pipe the top center with a puddle of lemon cream. Refrigerate cupcakes if you need to store and then let set at room temperature 10 minutes before serving.

Tips and Notes:
1. The Italian buttercream can be flavored with any extract of your choice.
2. For another variation, fruit jam can be used in place of the lemon cream.
3. The flavors of the syrup and frosting develop fully after 1 day.
4. You can use 2 tsp of lemon extract in place of the lemon oil.
5. When brushing on syrup, be careful to make sure that it does not drip down the sides of the cupcake papers.
6. Be prepared to run your mixer quite a long time, this is the typical process for Italian buttercream.

                                              **LAST YEAR:Spicy Date Filled Cookies** 


Sunday, March 25, 2018

Raspberry Almond Ice Cream Sandwiches


It has been a long time since I have indulged in an ice cream sandwich. When I was a kid, I ate the ones that had the chocolate rectangle cookies with holes in them and vanilla ice cream on the inside. Back then, they were pretty delicious. However, time and blogging has changed my thoughts on those specific sandwiches. Now, they just look bland and very manufactured. They do not get my interest.

I believe that ice cream sandwiches should have lots of flavor and be very appealing to the eye. So in order to mimic that thought, I came up with these raspberry almond sandwich cookies.

When I was thinking about the components, I wanted to make sure that the cookies were chewy. No one likes a sandwich cookie that shatters into pieces when you bite into it, especially if ice cream is in the center. The buttery almond cookies are just the texture I was looking for.

The other component, the raspberry ice cream, has a smooth mouth feel and a touch of tartness. Putting the two elements together, sweet cookies and tart ice cream, created a good balance of flavor. I did not want it to taste too sugary or too tart.

The last touch to these delicious disks are the candy coated almond pieces encircling the outer edges of the ice cream-a major crunch factor with all the colors of Easter. The recipes below make 1 quart of ice cream and about 24-26 cookies. How much ice cream you put into the center of the cookies will determine the number of ice cream sandwiches and if you have any of one component left over.

Since I do not have a big family, I only formed 6 sandwiches. I stored the remaining ice cream and cookies separately.

Raspberry Almond Ice Cream Sandwiches

Ingredients/Cookies
by Flourtrader

2 cups flour
1/2 cup almond flour
1 cup or 2 sticks of butter
1/2 tsp vanilla
1 tsp almond extract
2 tsp baking soda
2 eggs
1/2 tsp salt (optional)

Ingredients/Ice Cream
adapted from The Perfect Scoop

4 pints raspberries
1 cup sugar
1 1/2 cups half and half
1 1/2 cups heavy cream
4 egg yolks (room temp)
1 tbs lemon juice
1/2 cup crushed candy coated almonds

Since the ice cream requires chilling time, this component is to be made first. Start by placing the raspberries in a food processor and pulse until pureed. Then take the puree and place in a sieve set over a large bowl. Push the puree through the sieve, separating the seeds from the fruit. Discard the seeds. Cover the bowl of puree (approx 1 1/2 cups) and place in refrigerator.

Fill the bowl of a stand mixer with the egg yolks. Mix until blended together and set aside. Also, place the heavy cream in a large bowl and balance a sieve over the bowl.

Take out a saucepan and fill with half and half and sugar. Whisk together and place saucepan over medium heat. Stir until sugar is dissolved and mixture comes to a simmer. Using the wire whisk attachment, run the mixer on medium speed, beating the egg yolks. Continue to beat and stream in the sugar/milk mixture. Once blended, pour the liquid back into the saucepan and place over medium heat.

Using a wooden spoon, stir the mixture as it cooks. It will thicken and turn into a custard. Test for proper consistency by checking the back of the spoon. The custard will remain there as a coating and running a finger through it should leave a mark.

Set up an ice bath and prepare your ice cream machine as per the manufacturers' instructions. Pour the custard into the sieve placed over the heavy cream. Once strained, mix the cream and custard together. Then blend in the raspberry puree along with the lemon juice. Set the bowl in the ice bath and let chill until cool in the center. Transfer to ice cream machine and follow churning instructions. Once the mixture has set up, empty ice cream into a medium sized bowl. Cover and place in freezer.

While the ice cream is chilling, proceed with making the cookies. Fill the bowl of the stand mixer with butter and sugar. Beat for about 3 minutes on medium high speed, stopping at intervals to scrape down the sides of the bowl. This process should result in a fluffy, ivory-colored batter.

Add one egg and mix into batter, beating for about 30 seconds. Scrape down the sides of the bowl and repeat with the second egg. Add the vanilla extract and the almond extract, running the mixer on medium high speed for about 2-3 minutes to blend the flavors into the batter. Remove the bowl from the stand mixer and set aside.

Take out a medium sized bowl and sift in the regular flour, baking powder. If using salt, sift that into the mix. Then whisk in the almond flour until blended.

Preheat the oven to 315 degrees and line 2 baking sheets with parchment paper. Using a wooden spoon, fold the dry blend into the wet batter, until no dry streaks remain. Leave the dough in the bowl, but scrape it all together to form a mound. Cover bowl and refrigerate for 15 minutes.

After the chilling time is complete, remove the bowl of cookie dough. Separate the dough into 24 to 26 equal pieces.Roll each into a ball (they will be about the size of golf balls) and place on baking sheet spacing about 2 inches apart. Flatten the circles slightly, forming a thick disk.

Place filled cookie sheet in the oven and let bake for 13-16 minutes. The end result will be a flat cookie that is golden on the edges and bottom. Remove and let cool on pan for 1 minute and then transfer to a cooling rack. Prepare another baking sheet by lining with parchment paper.

For assembly, remove the ice cream and check the consistency. It should be easy to mold, not runny and not hard. If it is too hard, let it sit for awhile and periodically scrape the ice cream from the edges of the bowl and on the surface to help it reach the correct consistency. Then, pair up the cooled cookies by matching them in size. Also, flip one cookie in each of the pairs with bottom facing up.

Using an ice cream scoop, mound the ice cream on one of the cookies with the bottom facing up. Take the other cookie in the pair and place on top of the ice cream, applying light pressure until ice cream comes to the outer edges of the cookies. Then press the crushed candied almonds into the ice cream, covering the outer edge. Place sandwich cookie on prepared baking sheet and put in freezer. Continue with the process until all the sandwich cookies are formed and in the freezer. Let chill for about an hour before serving.

Tips and Notes:
1. For more flavor, you can melt some candy coating or white chocolate in a double boiler and coat the bottom side of each cookie prior to assembly. Be aware that it makes the cookie have a slick coating that may cause some sliding when sandwiching the ice cream.

2. Since it is Easter, there are white chocolate pastel colored candies in the grocers that you might want to use in place of the almonds.

3. The cookies do spread quite a bit, a few of mine had a little bit of the edges sticking together. This was not a major issue, but it is something to consider when placing the dough on the baking sheets.

4. Since my kitchen was warm from baking, I had to act quickly on using the crushed candied almonds. The ice cream started to get runny on the edge.

5. If you plan to store these for a week or more, it is probably best to use some invert sugar in the ice cream to prevent it from forming an icy texture. The directions for this component can be found here.                    
                                   **LAST YEAR:Frozen Maraschino Cream** 

Sunday, March 18, 2018

Baked Apple Donuts


We all have a weakness or "kryptonite" when it comes to certain foods. That certain food may be a favorite, but we are very well aware that they are not something to be consumed on a regular basis. The item may have too many carbohydrates or too much fat, but we have a difficult time avoiding the indulgence.

So we are always on the lookout for an alternative, something that would give us all the flavor and texture that we love, less those naughty extras. We have to be careful in this endeavor because sometimes the manner in which food is promoted can be tricky. Sometimes one ingredient is eliminated for the sake of being "low fat" only to be replaced by something that creates another issue for flavor. For example, it has no fat, but 3 times the sodium you will need in one day.

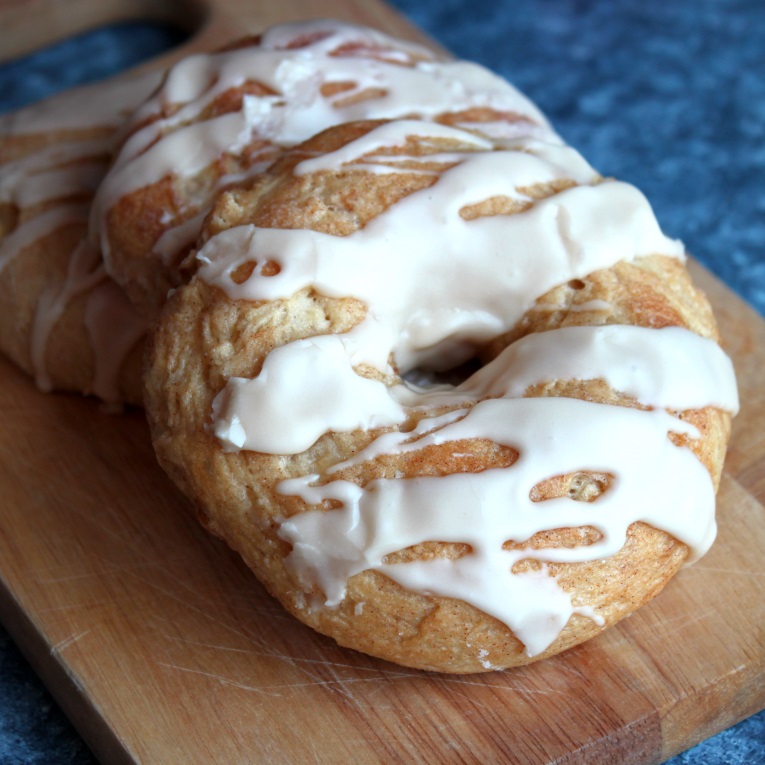
Finding the perfect alternative is like losing 5 pounds when you eat cake! Now that would be a wonderful thing. While eating these donuts are not a way to diet, they do make a delicious substitute for the classic fried apple fritter. Since these donuts are baked, they do not contain all the fat and oil that fried donuts have. Instead of all the oil, you get a fluffy donut with a moist texture. Also, you can taste the diced apples that are baked into the dough. The unmistakably delicious apple flavor is prominent in each and every bite. To further enhance the taste, there is a drizzle of maple icing on top.

Even if donuts are not your "kryptonite", the flavor factor alone qualifies this recipe as a keeper. The dough requires five hours of rest time after it is created, so be sure to plan for this extra time. This recipe makes 1 1/2 dozen donuts.

Baked Apple Donuts
adapted from Artisan Bread in Five

Ingredients/Donut
3 eggs (lightly beaten/room temp)
3/4 cup melted unsalted butter
3/4 cup lukewarm water
2 tsp active yeast
1/2 cup brown sugar, lightly packed
2 tsp salt
3 3/4 cup of flour
2 small peeled/cored/diced apples (I used Granny Smith)

Ingredients/Glaze and Topping
1/4 cup sugar
1/2 tsp cinnamon
1 tsp vanilla extract
2 tbs heavy cream
2 tbs maple syrup
1 1/2 cup confectioner's sugar

Prepare 2 baking sheets by lining with parchment paper. These donuts are to be formed by hand and placed on the sheets, about 6 per sheet.

Whisk together the sugar, flour and salt in a medium size bowl. Set aside. Sprinkle the yeast over the warm water and stir. Then let sit until it foams up.

Make a well in the dry ingredients and pour in the yeast mixture. Then add the butter and eggs. Mix with a wooden spoon until all is combined. Lastly, fold in the apples, making sure the pieces are distributed evenly throughout the dough.

Form the dough into a ball and leave inside the bowl. Cover and let sit at room temperature for 2 hours. After this initial rise time, place in refrigerator. The dough must chill a minimum of 3 hours. However, it can be stored for later use, but only up to 5 days.

Take out a small bowl and whisk together the cinnamon and sugar. Also, lightly flour a flat surface. Remove the dough from the refrigerator and separate out 6 pieces of dough, each weighing 3 ounces. Cover and return the rest of the dough to the refrigerator. Using floured hands, place one of the dough pieces onto the floured surface and roll into a log (about 6 inches long) and then create a circle, pinching the ends together. Stretch the circle of dough so it has a 3 inch wide hole. Place the circle of dough into the cinnamon/sugar mixture, flipping to cover each side. Put the donut round on the prepared baking sheet. Continue with this process until all 6 pieces of donuts are formed and evenly spaced on the baking sheet. Let the dough rest, uncovered, for 30 minutes.

As the dough rests, preheat the oven to 350 degrees. Also, you can prepare another baking sheet of 6 donuts, repeating the instructions above. Once the rest time is complete, place baking sheet in the oven and bake donuts until airy and golden. This will take about 18 minutes.

Prepare a cooling rack by placing wax or parchment paper underneath. After the donuts have baked, place pan on rack and let cool on pan for about 3 minutes. Then transfer to cooling rack and let cool completely before glazing.

To make glaze, whisk together vanilla, maple syrup and cream. Then sift in the powdered sugar and mix together. You may need to stir in additional cream for the correct drizzling consistency. Lastly, drizzle the glaze on top of the donuts and let rest until glaze has set.

Tips and Notes:
1. The longer the prepared dough sits in the refrigerator, the more apple juice is released from the fruit. Should you find some pockets of dough to be too wet, use additional flour to absorb the excess when forming the donuts.

2. Another consideration for the apple juice problem is to coat the apples in lemon juice and let set overnight and drain off the excess the next morning.

3. You can coat the apples in cinnamon sugar or add cinnamon sugar to the batter if you want to have a stronger cinnamon flavor. However, be careful of the balance or you will gain cinnamon flavor and lose apple flavor.

4. Feel free to experiment with the non-citrus types of fruit, such as pears or mangoes. The ones with the least amount of juice are the best choice.

5.These donuts are hand formed due to the apple chunks and tacky consistency of the dough. I do not recommend piping out the dough into rounds.

6. Due to the rising in baking, the 3 inch hole in the center is important or the dough with bake up without a hole.
                                   **LAST YEAR:Amaretto Latte Bars*


Sunday, March 11, 2018

Saint Patrick's Mocktail Cheesecake


Format conversion...very popular in the realm of food bloggers and the food industry in general. We enjoy creating cupcakes with the flavor of cookies or cakes that taste like (and made with) vanilla ice cream. Also, if you have not tried Southern biscuits and gravy-you can now try the flavor in a potato chip.

Today's recipe is a conversion of a bar drink into a cheesecake. The inspiration comes from a drink called "Rude Boy" and is very appropriate for St Patrick's day. The drink is made up of Irish stout, coconut rum and coffee. For the cheesecake, the bottom starts with a coconut graham crust. The first layer of cheesecake is a combination of chocolate and Irish stout. This layer came out fluffier than most cheesecakes, but the dominating flavor of the combination is a rich chocolate. The top layer is the dense texture you would expect in a cheesecake. It reflects a rum flavor with a subtle undertone of coconut and the usual tang of cream cheese.

To further add to the flavor (as well as the presentation), the top edge is laced with espresso whipped cream and garnished with chocolate shamrocks.

This creation is my first time at melding the flavors and some tweaking is still needed to have more balance of flavor with the two layers. The recipe and instructions tie to the original creation. After making it and doing a taste test, I have put some tips and notes at the end of the instructions that would further enhance the dessert.

The recipe has been adapted from 3 recipes from the following different websites:
Allrecipes.com-bottom layer of cheesecake
lovetripper.com-top layer of cheesecake and crust
throughherlookingglass.com- whipped cream topping

Saint Patrick's Mocktail Cheesecake

Ingredients/Crust
1 1/4 cup graham cracker crumbs
1/4 cup coconut flakes
2 oz melted butter

Ingredients/Chocolate Stout Layer
1 egg plus 2 tbs of one beaten egg
1/4 plus 2 tbs of Irish stout beer (I used Guinness)
1 tbs heavy cream
1 tsp vanilla extract
1/2 cup sour cream
1/2 cup sugar
4 oz semi-sweet chocolate chips
pinch of salt
1 1/2 packages or 12 oz cream cheese (softened)

Ingredients/ Coconut Layer
1/2 cup sour cream
2 eggs
1/2 cup coconut rum
2 packages or 16 oz of cream cheese (softened)
1/2 cup sugar
1/2 cup coconut flakes
1 tbs plus 1 1/2 tsp flour

Ingredients/Topping
1 1/2 tsp espresso powder
1/8 cup powdered sugar
1 cup plus 2 tbs heavy whipped cream
1 tbs whipped cream stabilizer (optional)
4 oz chopped semisweet chocolate

Start with a 9 1/2 or a 10 inch springform pan. Fill a small bowl with all the crust ingredients and whisk together. Test to see that it clumps easily. If not, add a little bit more melted butter to reach the correct consistency. Press the mixture into the bottom of the pan and halfway up the sides. Set aside.

For the stout layer: fill the bowl of the stand mixer with cream cheese. Using a low speed setting, beat for about 1 minute and scrape down the sides of the bowl. Repeat this process 2 more times. The resulting texture will be smooth and free of lumps. Continue to beat on low speed and slowly pour in the sugar. Once blended, add the egg and 2 tbs of the beaten egg. Run mixer for another 30 seconds and scrape down the sides of the bowl. All the sugar and eggs should be evenly distributed into the batter.

Place the cream and chocolate chips in a microwave safe bowl. Heat for 30 seconds and then remove and stir. Repeat this process until all the chocolate has been melted. Turn mixer on medium speed and slowly pour in the melted chocolate. Beat mixture, stopping occasionally to scrape down sides of the bowl, until chocolate is fully mixed into the cream cheese batter. Then whisk in the remaining ingredients (beer, salt, sour cream and vanilla). Pour batter into prepared springform pan. Place in freezer for 45 minutes and then remove and preheat the oven to 350 degrees. Now you can start on the coconut layer.

For the coconut layer: fill the bowl of the stand mixer with cream cheese and follow the stout layer instructions for combining the sugar and cream cheese. Then beat in the flour. Remove bowl from mixer. Using a wooden spoon or spatula, blend one egg into the batter. Then stir in the other egg. Carefully fold in the additional ingredients, one at a time: sour cream, coconut and coconut rum.

Prepare a water bath by covering the bottom of the springform pan with foil. Place it in a larger pan and fill the larger pan with water. The water should come to the halfway point up the side of the pan. Place in oven and bake for one and 1/2 hours, up to 2 hours. The indicators for baking completion is when the cheesecake is golden on top, no longer glossy and it barely jiggles when moved. The frozen layer is what requires the additional bake time. Once completely baked, remove cheesecake and let come to room temperature and then place in refrigerator to set. Let chill for a minimum of 4 hours before adding the decorative topping.

For the topping, the decorative chocolate pieces should be made first. Start by drawing your design ( I did shamrocks) on a piece of paper. Depending on your skills, the design can be as simple or as intricate as you want. One drawing is needed, for you will slide this paper around under a sheet of wax paper after you make each chocolate piece. Place your paper drawing under a sheet of wax paper (leave some of the drawing paper sticking out underneath the wax paper) on a baking sheet. Melt the chocolate in a double boiler and remove top pot. Let cool for about 5 minutes and then transfer to piping bag or squirt bottle. Pipe your design using the drawing as a guideline. Continue to pipe and move the drawing until you have made the desired number of decorations. Let the decorations sit for about 5 minutes and then go back over them with some additional chocolate, making sure they are thick and sturdy so they will not break when handled. Once completed, place baking sheet in freezer.

For the whipped cream, start with cold equipment (beaters and bowl). Place espresso powder and 2 tablespoons of heavy cream in the bowl and let set for 10 minutes and then whisk together. Then add the heavy cream, whipped cream stabilizer (optional) and sift in the powdered sugar. Beat until it reaches piping consistency. Assemble a piping bag with a large decorating tip and fill with the whipped cream. Also, take out the decorative chocolate pieces from the freezer and peel them off of the waxed paper. Pipe the whipped cream along top edge of cheesecake and stand chocolate decorations up in the whipped cream, spacing as desired. Now the cheesecake is ready to serve. Refrigerate when not serving.

Tips and Notes:
1. The coconut layer was more dense than the chocolate stout layer. When making this again, I would try the coconut layer below the chocolate stout layer.

2. Since the stout layer was fluffier, perhaps having the stout set out so it is flat (no carbonation bubbles) may create a more dense cheesecake layer and it may even out the depth of the two layers. The chocolate layer in the above picture is much thicker than the coconut layer.

3. The chocolate in the stout layer is very rich and intense. To bring out more flavor in the coconut layer I would add coconut extract. This would balance the flavors more.

Wishing you a great Saint Patrick's day..Cheers!
                                **LAST YEAR:Palm Harvest Cake**

Tuesday, March 6, 2018

Sugar cookies aka Biscochitos


Back when I was little, my mom used to bake quite a bit. We always seemed to have lots of cookies on hand. However, it was not just cookies that we enjoyed. My mom made use of every last scrap of pie dough. She would bake it up in long slivers and would always sprinkle on some cinnamon sugar before baking.

These cookies remind me of those cinnamon slivers. These tasty gems are made with lard, which is the key to that flaky, pie crust-type texture. They are perfect with a cup of tea, coffee or milk. If you think that pie crust is the best part of pie, then you have landed on the correct recipe. This makes about three dozen cookies, depending on your preferred thickness.

Biscochitos
adapted from All Recipes Website

Ingredients/Cookies
1 egg
2 tbs Brandy
1 cup lard
1 tsp anise seed
3/4 cup sugar
3 cups flour
1 1/2 tsp baking powder
1/8 tsp salt

Ingredients/Topping
1/4 cup sugar
1 tbs ground cinnamon

Preheat the oven to 350 degrees and line 2 baking sheets with parchment paper. In a medium bowl, whisk together the 3/4 cup of sugar and the anise seed. Set aside. Using another bowl, sift together the baking powder, flour and salt. In the next bowl, whisk together the egg and Brandy.

Fill the bowl of a stand mixer with the lard and sugar/anise mixture. Beat on medium speed until thoroughly blended, about 3 minutes. Be sure to stop at intervals to scrape down sides of bowl. Next, mix in the egg/Brandy blend. Lastly, fold in the sifted ingredients until a dough is formed and no dry streaks remain. If it seems a little dry, try adding a few more drops of Brandy so it will bond together in a dough.

Lightly dust a flat surface and a rolling pin with flour. Roll out dough to 1/4-1/2 inch thickness. Take a cookie cutter and cut out dough to desired shapes. Dust the bottom edges of the cutter at intervals to make sure it does not stick. Place cut outs on cookie sheet, spacing evenly. Continue with this process, re-rolling scraps and cutting until baking sheet is full.

Then whisk together the topping ingredients and sprinkle on top of the cookies.

Place pan in oven and bake for about 10 minutes or until golden on the edges. As the first pan bakes, cut out more dough, filling the second pan. Once the first sheet of cookies are baked, let rest on pan 2 minutes and then transfer cookies to the cooling rack. Repeat the forming and baking process until all the dough is baked.

                                      **LAST YEAR: Cake of Leaves**

Sunday, February 25, 2018

Pecan Wedding Cake


These days I am reviewing so many recipes, sometimes the obvious gets overlooked. When I came across this recipe, I read the title and ingredients and it struck me as unique. As a food blogger, anything of that nature, I simply have to make. I marked this and went and got the ingredients.

Finally, a few days before making, I realized that this recipe was very close to a recipe for Italian Cream Cake. Also, Italian Cream Cake was very close to a recipe for Hawaiian Wedding Cake. Then  there is Hummingbird Cake and so forth. In the end, this is not such a unique recipe. However, since I love Italian Cream Cake, I still decided to make this cake-in spite of it being a common favorite. 

This is not identical to Italian Cream Cake. It has 3 add in components instead of one. In addition to coconut, it has pecans and pineapple baked in. The most prominent add in is the crunchy pecans, while the coconut and crushed pineapple are each a close second. The frosting is the traditional cream cheese/buttercream style that everyone knows is the perfect topping for this type of cake.

Sometimes familiarity is a good thing. There is a reason recipes are called traditional favorites- they are always tasty and get everyone's approval. This three layer 9 inch cake makes a perfect addition to any dinner party or a simple dinner with family. If you love Italian Cream Cake, you will find that the extra add-ins make it even better.

Pecan Wedding Cake
adapted from 1001 Classic Recipes

Ingredients/Cake
5 large eggs (whites separated from yolks)
1/2 cup buttermilk
1 tsp vanilla extract
1/2 tsp almond extract
1/2 cup fresh pineapple
1/2 cup flaked coconut
1 cup chopped pecans
1/2 cup vegetable shortening
1/2 cup butter (room temp) plus 3 tbs melted
2 cups sugar
2 cups flour
1 tsp salt
1 tsp baking soda

Ingredients/Frosting
1/2 cup chopped pecans
2 tsp vanilla extract
4 cups of confectioners' sugar
3/4 or 1 1/2 sticks butter (room temp)
8 oz cream cheese (room temp)

For the cake, prepare three 9 inch cake pans by using a pastry brush to cover the interior of each pan with butter. In addition, place a parchment round on the bottom of each pan and butter the surface. Preheat the oven to 350 degrees.

Take out a small bowl and whisk together the buttermilk, salt and baking soda. Set aside. This mixture should thicken as it sets.

Fill a bowl of a stand mixer with the butter and shortening. Beat on medium high speed for about 3 minutes, stopping at intervals to scrape down the sides of the bowl. The mixture should be smooth and silky when done. Add the sugar and both extracts and beat until thoroughly combined and fluffy.

Add one egg yolk and beat for 30 seconds to blend. Scrape the sides of the bowl. Repeat this process until all egg yolks are incorporated into the batter. Remove bowl from stand mixer and fold in 1/3 of the flour, then 1/2 the amount of the buttermilk mixture. Continue at intervals adding flour and adding buttermilk, blending after each addition. End with mixing in the last of the flour.

Drop the pineapple by tablespoons into the batter and mix until distributed. Do the same with the coconut. Lastly, add the pecans to the batter and stir until all add-ins are evenly dispersed. Set aside.

Add the egg whites to a clean bowl. Then beat on high speed until stiff peaks form. Add this to the existing batter by folding in, until whites are completely blended.

Divide batter into 3 equal parts. Add 1 part to each prepared pan and smooth the surface. Place each pan in oven-2 on one rack and 1 on the other. Bake for about 13 minutes, then rotate pans and bake for an additional 12 minutes. Use a tester to see if fully baked, if not let cook a few minutes more and check again. Bake time may take up to 10 minutes more.

Once fully baked, remove pans and set on rack to rest for about 5 minutes. Then invert each one onto the rack. Remove the parchment paper. Let cool completely before stacking and frosting.

To make the frosting, beat together the cream cheese and butter until smooth and silky. Add the extract and beat again, stopping occasionally to beat down the sides of the bowl. Then sift in 1 cup of confectioners' sugar. Beat, starting with low speed and then increasing so all sugar is blended. Scrape down sides of the bowl. Repeat process until all sugar is incorporated into frosting.

Place one layer on a cake board or serving platter. Using a spatula, smooth about 1/4 of the frosting onto the top surface. Stack another layer on top and repeat frosting process. Once all layers are stacked, frost the sides and sprinkle the top with pecans.

Tips and Notes:
1. You can toast the nuts if you prefer more crunch in and on the cake.
2. When frosting the sides, put a thin crumb coat on first, let set and then frost sides as normal.
3.  The frosting between layers was not very thick. If doing this again, I would increase the frosting recipe amount by 1 cup of confectioners sugar and 3 tbs of butter.
                                   **LAST YEAR:Snickerdoodle Pie**

Sunday, February 11, 2018

Nusstaler Cookies


Sometimes we need a diversion or a way to unwind the day. For bloggers, I believe, that diversion is to head to the kitchen and bake. A project in the kitchen allows your mind to focus on creating and discard the other events of the day. The end result is a clear mind as well as a tasty treat.

Today, cookies have been chosen as the diversion. Not just any cookies, but a form of shortbread. Shortbread...the unmistakable, buttery and melt in your mouth texture is hard to resist. In addition to that, the dough is quite open to variations. Some of the variations include chocolate chips and/or nuts.

This particular version is a traditional German shortbread cookie. The recipe incorporates hazelnuts and dark chocolate. Quite a winning combination. The yield is about 2 dozen cookies and does not require much time.

Nusstaler Cookies
adapted from Brooklyn homemaker 

Ingredients
1 tsp cocoa powder
1/2 tsp baking powder
1 cup flour
1/2 tsp salt
1 1/2 cups hazelnuts
6-8 oz dark chocolate
1/3 cup sugar
1/2 cup or 1 stick butter
1 egg
1 tsp vanilla extract

The first step is to create the hazelnut flour. Preheat the oven to 350 degrees. Spread the hazelnuts on a baking sheet in one layer. Place pan in preheated oven and let nuts toast for about 10 minutes. As they toast, dampen a clean kitchen towel. Remove nuts from oven and place a handful of nuts on towel and rub vigorously to remove hazelnut skins. Rinse skinned nuts and place in a separate bowl to dry. Repeat the process until all the nuts have been skinned. Turn oven off.

Once the nuts have dried, place 1 cup of the nuts in a food processor and pulse until a nuts are fine, reserving the remaining 1/2 cup of whole nuts for garnish. After grinding the nuts, sift the flour, cocoa powder, salt and baking powder together. Using a spatula, scrape the bottom and edges of the food processor bowl, so the nuts do not cling to the crevasses. Then add the sifted ingredients to the food processor and pulse until all is blended together.

Take out another bowl and fill with the butter and sugar. Beat together for 30 seconds and scrape down sides of bowl. Repeat process 3 more times until mixture is light and fluffy. Then mix in the egg and vanilla, distributing evenly. Take out a wooden spoon and blend in 1/2 of the dry ingredients. Repeat with the remaining half until no dry streaks remain. Once thoroughly blended, cover bowl and place in refrigerator to chill for 1 hour. After about 45 minutes, preheat the oven to 350 degrees.

After the chill process is complete, prepare 2 baking sheets by lining with parchment paper. Take out cookie dough and scoop batter into mounds (about 1 inch in diameter with 1 1/2 tsp of dough ) and place one dozen evenly on baking sheet. Then carefully flatten the mounds slightly, either using your hands or the bottom flat side of a glass or bench scraper. Place one hazelnut in the center of each mound.

Place in oven and bake for 10-13 minutes, or until golden on bottom and edges. Remove and let cool on baking sheet for 2 minutes then transfer to cookie sheet to completely cool. Repeat the process of forming and baking the rest of the cookie dough.

After the cookies have cooled, prepare a double boiler and place over medium heat. Then line 2 baking sheets with parchment paper. Chop 6 ounces of the dark chocolate and place in top pot of the the double boiler. Once all is melted, use tongs to carefully lower the bottom of each cookie in the chocolate. Let chocolate drip off and then place cookies on baking sheet. Once the chocolate is set, the cookies are ready to serve.

Tips and notes:
1. Grinding the nuts at home does not pulverize them, so there is a different result when using hazelnut flour. The home grind leaves the nuts in bigger pieces which affects the texture. Which you use is a personal preference.

2. Skinning the nuts is not a perfect process, so there will be some skin that remains. You can purchase the hazelnuts either with or without skins.

3. Cookies do not expand much in baking.

4. Flatten cookies to about a 1 to 3/4 inch height, otherwise the dough will remain as the round scoop when baked.

4. Due to the chocolate on the cookies, I store them in an airtight container in the refrigerator.
                                  **LAST YEAR:Mulled Wine Jammers**

Sunday, February 4, 2018

Blue Corn Zucchini Bread


As I look out into the back yard, I can see all my dog's toys. There they lay, some very much chewed on and some not so much. However, there is evidence that she is not the only occupant that strolls into the yard. Something has made regular visits and has not bothered to leave the area without a trace.

There in the back yard, lies a corn cob. In fact, there are still some kernels on the cob. This must be their food of choice. Since my dog believes that the back yard is hers, a recent battle took place with the invader. Based on the evidence, their only option to escape was to give up the food and sneak back on a better day. It must have been a squirrel, because I later that day I saw one in the top of a tree. Not just sitting there, but chattering and teasing my dog in retaliation due to the loss of the corn cob.

So today's post includes a form of corn. Not the kernels and not regular corn, but actually blue cornmeal. That is why the slice pictured above has a wonderful blue hue. The recipe includes flour, but the addition of the cornmeal gives it a nice texture. In addition to that, the loaf includes grated zucchini. The bread is moist and slightly sweet. It is tasty eaten plain, but slathering it with butter does enhance it even more.

This recipe makes one 9x5 inch loaf and the ingredient list is in grams.

Blue Corn Zucchini Bread
adapted from The Cooking Channel

Ingredients
283 grams zucchini (peeled and grated)
121 grams buttermilk
2 eggs
100 grams butter (melted)
100 grams sugar
94 grams coarse blue cornmeal
187 grams flour
1 tsp baking powder
1 tsp baking soda
3/4 tsp salt

Prepare a 9x5 inch loaf pan by greasing the interior. Line the bottom and long sides with parchment paper, leaving some overhang. Preheat the oven to 350 degrees.

Start by sifting together the flour, baking powder, baking soda and salt. Then whisk in the cornmeal and set aside. Using a medium size bowl, stir together the eggs, buttermilk, melted butter and sugar. Then fold in the grated zucchini.

Add the sifted ingredients to the batter in increments, stirring to combine after every addition. Lastly, transfer the batter to the prepared loaf pan and smooth out evenly.

Place the pan in the oven and bake until tester comes out clean. This should take about 30-40 minutes. The edge of the bread should have a golden hue. Remove the bread from the oven and place on a rack. Let cool in pan for about 15 minutes. Then invert on to rack and remove parchment paper. Invert again so the loaf is upright and let cool completely before slicing and serving.

Tips and Notes:
Due to the moist texture, this bread only keeps for a few days.
                            **LAST YEAR:Cappuccino Cheesecake**

Saturday, January 27, 2018

Chocolate Tequila Sundae


There was a time when I thought that liquor and ice cream would never go together. After all, liquor is an item that freezes at subzero temperatures. This is why you always see someone grabbing the ice cold tequila from the freezer instead of the cabinet.

This particular sundae is not for the martini types like James Bond. However, since it is made with rum and tequila it may have the approval of someone like Jack Sparrow. Outside of the adult spirits, there are flavors of cinnamon and chocolate. The rum is paired with the cinnamon and the chocolate is paired with the tequila.

Both types of ice creams contain egg yolks and follow the same preparation instructions. While the mixtures come together pretty easily, the freezing step takes the longest. While sundaes do contain ice cream, it is the fudge, nuts and buttery slices of bananas on top that really locks it into that delicious category.

This recipe makes about 8-10 servings, depending on the size of the ice cream scoops. Since there are two flavors of ice cream, make sure that you consider the advance freezing time required prior to serving.

Chocolate Tequila Sundae
adapted from Bon Appetit

Ingredients/Cinnamon Rum Ice Cream
1 cinnamon stick
1-2 inch piece of vanilla bean (split lengthwise and opened)
1/4 tsp ground cinnamon
1 1/2 tsp vanilla extract
1 1/2 tsp light rum
3/4 cup half and half
1 1/2 cups whipping cream
3 large egg yolks (room temp)
1/2 cup sugar

Ingredients/Chocolate Tequila Ice Cream
3 tbs cocoa (not Dutch processed)
1/4 cup of sugar
1 cup whipping cream
1 1/2 cup half and half
3 large egg yolks (room temp)
5 oz semi sweet chocolate (chopped or chips)
1/4 cup honey
1/4 tsp vanilla
3 tbs tequila

Ingredients/Sundae Layers
1 1/2 cups chopped toasted pecans
4 sliced bananas (sliced into rounds and, if preferred, slice rounds in half)
12 oz semi sweet chocolate (chopped or chips)
3/4 cup whipping cream
1 tbs vanilla extract
1/2 cup melted butter

The required equipment, per the recipe instructions, is an ice cream maker. Prepare the machine prior to creating the sundaes.

For the cinnamon ice cream, start by filling the bowl of a stand mixer with the sugar and egg yolks. Using a spatula, blend the two together. Place the bowl in the stand.

Fill a saucepan with the cinnamon stick, vanilla bean, whipping cream, half and half and ground cinnamon. Stir until ground cinnamon is distributed into the liquid. Place over medium high heat and let cook, mixing until it reaches the boiling point and remove from heat. Take out the cinnamon stick and the vanilla bean. Stir again and turn on the stand mixer to medium speed.

As the mixer is running, slowly stream the cream mixture into the egg yolk/sugar blend. Once all is mixed together, transfer to the saucepan. Place over medium heat. As the liquid cooks, continue to stir. The mixture should thicken to the correct consistency after cooking for about 7 minutes. Make sure that it stays below the boiling point. Remove from the heat and stir in the vanilla extract and rum.

Pour into a heat proof bowl and place in refrigerator for at least 2 hours to chill.

Once the mixture is cold, process in an ice cream maker according to manufacturer's instructions. Then transfer to a container and cover and freeze.

Prior to making the next flavor, make sure that your ice cream maker is at the stage to freeze ice cream again.

Start on the chocolate tequila ice cream by setting up a double boiler. Fill the top pot with chocolate and let melt, stirring occasionally. Once completely melted, remove from heat and set aside.

Fill the bowl of stand mixer with egg yolks and sugar. Stir together until blended and place bowl in stand.

Take out a saucepan and fill with half and half, cream, honey and cocoa. Stir until blended and place over medium heat. Let cook, stirring constantly until it reaches a boiling point. Remove from heat and add tequila and vanilla. Then mix together.

Turn mixer on, blending sugar and yolks together. Continue to run the mixer and slowly stream in the cream/cocoa mixture. After it is combined, pour into saucepan and place over medium heat. Stir the mixture until it thickens and turns to custard, about 10 minutes. Remove from heat and add melted chocolate, vanilla extract and tequila. Mix together and transfer to a heat proof bowl and place in refrigerator to chill for about and hour. Then transfer to ice cream machine and follow manufacturer's instructions. Then remove from machine, cover and place in freezer to firm up.

To make the fudge sauce, fill a saucepan with cream. Place over medium heat and let come to a boil. Remove from the heat. Add chocolate and vanilla and then whisk until smooth.

For the banana topping, place the banana pieces on a baking sheet. Turn the oven on the broiler setting. Once the broiler has heated up, brush the banana pieces with the melted butter and place under broiler. Let the bananas cook until golden, about 4 minutes. Watch carefully so they do not burn. Remove from oven and set aside.

To assemble, place 1 tbs of warm chocolate sauce in the bottom of serving goblet/dish. Sprinkle on 2 teaspoons of nuts. Using an ice cream scoop, place one scoop of the cinnamon ice cream in the dish and then a scoop of the chocolate tequila ice cream. Add some more nuts and bananas to the top, either covering the bananas or leaving them for last. Serve immediately.

Tips and Notes:
1. Sauce can be refrigerated for later use, just rewarm.

2. Due to the melted chocolate, that flavor will freeze faster than the cinnamon.

3. Feel free to make this ice cream using different flavors of chips and different spices.
                                **LAST YEAR:Upside Down Banana Cake**
   

Sunday, January 21, 2018

Bear Claws


Finding a good flaky pastry can be difficult, sort of like the fable of Goldilocks and the three bears when she went to try the bears' porridge. Some you bite into and they shatter into a million pieces because each layer is crispy and brittle. Others just do not seem to have any layers at all, the pastry is just bread. Yet, once in a while, you find one that is just right.

The secret to landing on the thin line of perfection is butter. Toss in some cold chunks of butter and roll out, fold, turn one quarter turn and repeat the process. It may be a little time consuming, but the end result is well worth the time. The dough in this recipe has a minimal chill time of 4 hours and rising time of 1 hour.

This particular recipe is the traditional bear claw. If you have never tried one of these delicious pastries, it is time to taste one and add it to your recipe box. Each flaky claw is filled with a confection of almond paste and cinnamon. The distinct flavor of almond can also be found in the dough. If that has not hooked you, then the buttery layers will. This recipe makes 18 bear claws.

Bear Claws
adapted from Panera bread at home website 

Ingredients/Dough
5 cups flour (plus additional for rolling/forming dough)
1 pkg yeast
1 1/2 cups cold butter (cubed)
1/4 cup sugar
1 1/4 cups half and half
1 egg
1 tsp vanilla extract
1 tsp almond extract
1/4 tsp salt

Ingredients/Filling and Topping
1/2 cup almond paste
3/4 cup powdered sugar
1 egg white
1 egg
1/4 cup sugar
1/2 tsp cinnamon
sliced almonds for sprinkling

For the dough, start by filling a bowl with 2 cups of flour. Then sprinkle the yeast on top and stir, so the yeast is evenly distributed. Set aside. Fill another bowl with 3 cups of flour and add the butter cubes and toss until evenly coated. Cover bowl and place in refrigerator until ready to use.

Fill a saucepan with the sugar, covering the bottom of the pot evenly. Then add the half and half, salt and vanilla and almond extracts. Place over medium heat and let cook to a temperature of 120F to 130F degrees. As it cooks, stir with a whisk or spatula.

Add the egg to the bowl with the flour/yeast mixture and stir. Then, using a spatula, empty the cream/sugar blend into the same bowl. Mix together until fully combined. Lastly, remove the cubed butter and flour mix from the refrigerator and fold into the batter. Stir just until no dry streaks remain.

Prepare a flat surface by dusting with flour. Then line 2 baking sheets with parchment paper. Place the dough on the floured surface and roll out into a rectangle, measuring 21 inches by 12 inches. As you roll, you will run into sticky chunks of butter. Use more flour to patch over the butter. Lift the 12 inch side and overlap 7 inches of the dough, making a fold at the 7 inch mark. Lift again and overlap, ending with a 12 x 7 inch rectangle. Make a quarter turn of the dough and roll into a 21 x 12 inch rectangle. Fold dough into thirds (like the previous folding) and make a quarter turn and roll out again into a 21x12 inch rectangle. Lastly, fold into thirds again. Cover with plastic wrap and place on baking sheet. Put in refrigerator to chill for a minimum of 4 and maximum of 24 hours. The dough must be very firm to work with.

To make the filling, start by slicing slivers of the almond paste into a small bowl. Using another bowl, whisk the egg white until foamy. Sift in the powdered sugar and add the slivers of almond paste. Beat the mixture for 2 minutes, scraping down the sides of the bowl after 1 minute. The mixture should be fairly smooth in consistency.

Remove the dough from the refrigerator and divide in half. Place one half in the refrigerator and the other half on a flour dusted surface. Roll the dough out, forming a 12 inch square. Measure out 3 strips, 4 inches by 12 inches and cut the dough accordingly. Divide out 2 tablespoons of filling and spread down the center length of 1 strip. Then sprinkle with about 1 1/2 tsp of the cinnamon sugar mixture. Fold long edges together. Crimp ends and edges together forming a seal. Cut into 3 equal pieces and place on prepared baking sheet. Repeat the process with the other two strips.

Each claw will have a folded edge and a crimped edge. Using scissors or a knife, cut the crimped edge into 4 strips, cutting towards the folded edge and leaving about 1/2 inch border with no cut. Curve the claw and spread the strips apart so there is about a 1/4 inch space in the middle of each strip. Remove the other half of the dough from the refrigerator and repeat the process, cutting and forming into claws.

Lightly cover the bear claws and let rise in a warm place for about 1 hour. Preheat oven to 375 degrees. Once the rising time is complete, whisk the egg with 1 tablespoon of water and brush over the top of each claw. Sprinkle a little of the cinnamon sugar on top and lightly press some slivered almonds on the surface. Place in oven to bake for about 15-18 minutes or until golden brown. Remove and place on rack to completely cool.

Tips and Notes:
1. This recipe makes 18 bear claws and may require 4 baking sheets. Due the the rising time, the best thing is to either split the measurements and only make 9 or bake the 9 and then start forming and baking the other half of the dough.

2. Since the sides of the bear claws are not sealed, some of the filling may seep out when baking.

3. Be prepared to use a lot of flour to patch the dough when rolling. There may be several areas of butter that comes to the surface of the dough during this process. 
                             **LAST YEAR:Inside Out German Chocolate Cake