Monday, October 29, 2012

Cappuccino Torte

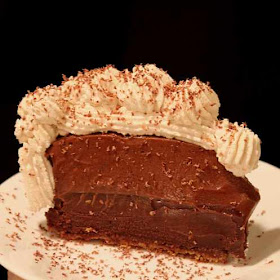
Since I have been baking things and bringing them to work there has been one person that has not been able to enjoy any of them and that is someone that is allergic to nuts.  There are tons of desserts with nuts but I had a hard time finding something without.  Most of them I ran across were very plain.  However, I ran across this particular delectable recipe that I could not pass up.

I changed the crust recipe to just a graham crust because the original did have nuts in it.  The recipe below does include the original for the crust.

The rich confection below is made up of two layers, one of fudgy chocolate and the other of a creamy cappuccino blend.  Then the torte is laden with whipped cream and grated chocolate.  This one is sure to impress family and friends.

Cappuccino Torte
adapted from Bon Appetit

Crust
5 tbs melted cooled butter
4 whole graham crackers
pinch of salt
1/4 cup of sugar
1/2 cup slivered almonds
1/2 cup chopped walnuts

Fudge Layer
1/2 cup or one stick unsalted butter, cut into 8 cubes at room temp
2 cups heavy whipping cream
1 lb of semi sweet chocolate ( finely chopped)
2 tbs light corn syrup

Cappuccino Buttercream Layer
1 tbs instant espresso powder
2 1/2 cups brown sugar, packed
4 oz unsweetened chocolate, chopped
1 tsp hot water
1/2 cup water
6 egg yolks
1 1/2 cups or 3 sticks butter, room temp

Coffee Whipped Cream
1 1/4 cups chilled whipping cream
1/2 tsp vanilla extract
2 tbs powdered sugar
2 tsp instant espresso powder
2 oz semisweet chocolate, grated

Prepare a 10 inch springform pan by buttering all the interior.  Preheat the oven to 350 degrees. Grind the graham crackers into a powder using a food processor.  Add the nuts, sugar and salt and pulse on and off until the mixture turns into coarse crumbs.  Put the butter in and continue to process until all is evenly distributed.

Press the mixture evenly into the bottom of the spring form pan. Bake for about 15 minutes or until edges start turn a darker hue.  Remove and let cool.  Turn off oven.

To make the first layer, which is the fudge layer,  pour cream in a heavy saucepan and let come to a boil. Then turn the temperature down low.  Mix in the chocolate until all is melted and smooth.  Remove from heat and stir in corn syrup.  Taking one cube of butter and stir.  Continue to add butter, one piece at a time until all is mixed in.  Remove from heat and let cool 20 min. Pour the fudge into the prepared pan and place in refrigerator to cool for 2 hours. After the two hours, start on the next layer.

In a small bowl, dissolve the espresso powder in the tsp of hot water.  Also, melt the unsweetened chocolate in a double boiler.  Set both aside.

For the cappuccino layer, place sugar and 1/2 cup of water in a heavy saucepan over low heat.  Stir until the sugar dissolves and avoid scraping sides of the pan.  Then turn the temperature up to medium and  let come to a boil for 2 minutes.  Remove from heat.

Using a stand mixer, beat the egg yolks at high speed for 3 minutes.  Yolks should be lighter in color and thicker than the original.  Leave the mixer running and pour a slow, steady stream of the sugar water into the egg yolks. Do not scrape sides of bowl.  Run mixer for about 12-15 minutes.  Then change to medium speed and add one tablespoon of butter.  Continue to mix as each single tablespoon is tossed into the batter one at a time.

With the mixer on low, stir in the espresso mixture as well as the melted chocolate until blended.

Take the torte from the refrigerator and pour the cappuccino layer on top.  Lay a piece of wax paper on top and refrigerate overnight.

The next morning, run a knife around the inside edge of the pan to loosen the torte.  Release the pan sides.  Place back in the fridge.

Prepare the coffee whipped cream by mixing 1 tbs of whipping cream into a bowl with the espresso powder and the vanilla extract. Stir until the powder dissolves.  Pour the rest of the cream into a separate bowl and beat for 30 seconds. Add the espresso mixture and powdered sugar.  Beat until it forms firm peaks.

Take torte out of the refrigerator and cover sides and surface with 2/3 of the whipping cream.  Press grated chocolate around the sides.  Then use the remaining whipped cream to pipe rosettes around the top edge.  Feel free to garnish the top with chocolate curls and/or chocolate covered coffee beans.
                           **LAST YEAR: Chocolate Yam Cake*

Monday, October 22, 2012

Bourbon Maple Bars


I have had this recipe tucked away for some time now.  It was actually one of the recipes I got when I first started in G+.   Since then I have pulled a couple more from the site.  The recipes are from Micheal Recchiuti, that has a lot of talent when it comes to confections.  His site has a lot to offer in the way of treats as well as recipes.

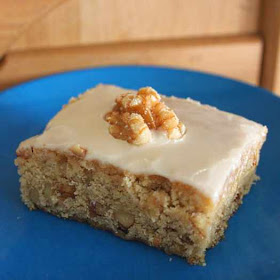
As far as this recipe, I am glad I found something a little bit upscale and unique in comparison to all the blondie and brownie recipes floating around out there.  The moist maple and bourbon cake along with the crunchy toasted walnuts turned out to be a pretty tasty bar.  The only change I made to the recipe was making 1/2 a batch more of the glaze.  The original recipe amount left too much of the bar showing through, so it was not enough in my opinion.  

Due to the fact it was late and I was unable to get in touch with Micheal prior to this post for permission to post the recipe details here, I have provided a direct link to his site for the recipe:
Dad's Bourbon Maple Bars

Outside of the fantastic recipes, I am thinking that I may splurge for Halloween and try some of his chocolate candy. However, for right now I am splurging on these maple bars!
                             **LAST YEAR: Chestnut Chocolate Muffins***

Monday, October 15, 2012

Strawberry Mousse with Joconde Cake

This particular week I felt the need to make something tasty, but be a new project as well.  The mood does not strike all the time, so I did take some time to decide.  This particular recipe has something called stencil paste. In this recipe a design is done on parchment and then a cake batter is spread over the top.

Since this was the first time dealing with this type of medium, I kept it very simple with the stripes.  I am sure with practice designs can become more intricate.  Also, the end result was actually three different assemblies from the same recipe.

Regarding the taste, I really did like the combo of the cold strawberry mousse with the chocolate almond cake.  The ratio of mousse to cake was just right.

Please be sure to read all the recipe completely before starting, especially the tips and notes.  One note is crucial to making your decision on the form of your dessert. If making round cakes, you will need 8 stainless steel 3 inch pastry rings.

Strawberry Mousse with Joconde Cake
adapted from the book Sprinkle Bakes

Ingredients/Chocolate stencil paste
1 1/2 tbs cocoa powder
1 cup confectioners sugar
1 cup flour
3 egg whites, room temp
4 tbs butter, room temp

Ingredients Joconde Sheet Cake
2 tbs melted butter
3 eggs
1 egg yolk
3 egg whites
1/4 cup sugar
3/4 cup confectioners sugar
1 cup almond flour
1/4 cup all purpose flour

Strawberry Mousse
1 1/4 cups heavy cream
2 cups strawberry puree
1/4 cup cold water
2 tbs unflavored powdered gelatin
3/4 cup sugar
8 extra whole strawberries for garnish

The stencil paste will need to be made first.  Prepare a jelly roll pan by greasing the interior and then lining with parchment.  Also, grease the face up side of the parchment.

Using a stand mixer, beat together the confectioners sugar with the butter.  Scrape down the sides occasionally and beat until it becomes smooth and creamy.  Then beat in the egg whites.  The batter may look lumpy at first, but continue to beat until the lumps disappear.

With a wooden spoon, fold in the flour and cocoa powder until just combined.  Take the paste and spread thinly over the parchment paper, covering all corners and sides.  Once all is spread evenly, take the tip of a spatula and remove long strips of chocolate, moving down the shortest length of the pan.  Clean the spatula after every stripe, before starting another.

Once all the stripes are complete, place  pan in the freezer. Then preheat the oven to 450 degrees

For the cake, fill a stand mixer bowl with whole eggs, egg yolk, confectioners sugar and both types of flour. Beat together until smooth, stopping a few times to scrape down the sides of the bowl. Set aside
when all is blended.

Fill another bowl with the egg whites and beat until they reach a foamy consistency.  Continue to beat, adding the sugar slowly.  The mixture should turn into a shiny meringue.  Fold this into the almond flour batter until no streaks remain.  Then stir in the melted butter.  Take care not to deflate the egg whites.

Take the pan out of freezer and smooth the batter on top of the stripes, making sure all is even.  Place in oven and bake until top springs back when lightly touched, which is about 5-8 minutes.  Put a sheet of parchment paper ( slightly longer than the jelly roll pan) on a flat, heat tolerant surface. Remove cake and let cool for 3 minutes and then invert onto parchment paper.  Remove top sheet of parchment and let cool completely.

For the strawberry mousse, start by sprinkling and mixing gelatin powder in a bowl with the cold water.  Let stand for about 5 minutes.  It will become spongy.  Set aside.

Blend the strawberry puree with the sugar.  Then heat the gelatin mixture in the microwave for 15 seconds.  Stir and then pour into the puree.  Let sit for 20 minutes to thicken.

While that is thickening, pour the whipping cream in a bowl and whip until thick and fluffy.  Give the puree a stir at the 20 minute mark.  Blend in 3 tbs of whipping cream. Then fold in the rest of the cream until pink hue is consistent throughout.

To assemble, place pastry rings on a flat plate and line with parchment paper.  Then cut cake strips that are the same inside diameter and about 1 1/2 inch wide.  Be sure to cut so stripes are parallel to the 1/1/2 inch width.  Line the inside of the rings with the cake, stripes facing outward.  Then fill with about 1/2 cup of mousse, which should bring it to a height of about 1/2 inch beyond top edge of cake.
Refrigerate for about an hour.

To serve place cake ring on a small plate, remove steel ring and parchment paper.  Then garnish with one sliced strawberry on top and serve immediately.

Tips and Notes:
1. Cake was not very flexible, so it broke upon trying to line the rings.  I pieced it around but it was more of a box. Based on that, I tried the assembly as a sandwich, which turned out quite nicely.  If I had to do over again, I would make entire sandwich cakes by making two pans of cake and putting mousse between the layers.
2. Getting the thick stencil paste on the parchment was a difficult task, the parchment slid around while I was trying to smooth it out.  This does take some patience.  Also, I used the handle straight end of a measuring spoon to scrape the chocolate off to make stripes.
3. My cake had more of a milky look to the chocolate stripes, next time for a darker contrast I may use a darker cocoa. The recipe never stated which to use.
4. If making sandwiches, leave a overhang of parchment when preparing the bottom layer of cake.  It will need to be lifted out and placed in a cool jelly roll pan instead of being inverted.  Then you can put the mousse on top.  Let set up in fridge before placing cake layer on top.  Then cut in squares, perhaps it can be frozen first before adding the top layer so there is a clean sharp cut.
                          **LAST YEAR: Cinnagrog Pie***

Monday, October 8, 2012

Chocolate Chunk Pumpkin Bread Pudding


I finally decided it was time to take advantage of all the fall flavors that are hitting the market right now.  I had pretty much narrowed down the choice between butternut squash or pumpkin.  However, once I landed on this particular recipe-the decision was made.

This dessert starts with pumpkin chocolate chip bread.  Once I made the bread, I had some serious thoughts about not moving forward with the bread pudding.  Luckily I have ample pumpkin left to make another loaf of bread.

The bread pudding really does have a deep spicy taste which goes quite well with the pumpkin and chocolate.   This is the first time I have used cayenne in a baked good but that little bit of heat in there turned out to be a bonus in this dessert.  This definitely delivered when it came to fall flavor and I can't wait to share this with some of my friends.

Chocolate Chunk Pumpkin Bread Pudding
adapted from Baked Elements

Ingredients/Chocolate Chunk Pumpkin Bread
2 eggs
1/2 tsp vanilla extract
1/2 cup vegetable oil
1/2  tsp vanilla extract
3/4 cup plus 2 tbs pumpkin puree
2/3 cup water
6 oz dark chocolate (60-72% cacao)
1/4 tsp ground ginger
1/4 tsp ground allspice
1/4 tsp grated nutmeg
1 tsp cinnamon
1 tsp salt
1 tsp baking soda
1 1/2 cups plus 2 tbs flour
1 tbs melted butter

Ingredients/Pumpkin Custard
1/2 tsp salt
1/4 tsp ground cloves
1/4 tsp ground cayenne
1/2 tsp ground allspice
1/2 tsp grated nutmeg
1/2 tsp cinnamon
3 cups half and half (room temp)
4.5 oz of unsalted butter (1 stick plus 1tbs), melted and cooled
2 large eggs & 4 egg yolks
1 cup firmly packed dark brown sugar
1 tbs vanilla extract
1 3/4 cup pumpkin puree

For the chocolate chunk pumpkin bread, preheat the oven  to 350 degrees.  Using a pastry brush or paper towel, dip into melted butter and coat the inside of a a 9X5X3 inch loaf pan.  Then dust the inside with flour.

Sift together, into a large bowl, the flour, baking soda, salt, cinnamon, nutmeg, allspice, and ginger. Set aside.

In another large bowl, mix together the pumpkin puree and the oil until completely blended.  Then stir in the sugar.  Add one egg and mix into the pumpkin batter.  Continue and add second egg, mixing after each addition.  Do the same for each egg then mix in the water and vanilla extract.  Lastly, stir in all the chocolate pieces.

Using a wooden spoon, mix all the sifted ingredients into the liquid batter.  Empty the batter into the prepared loaf pan and smooth the top.  Bake 65-85 minutes or until tester comes out clean, stopping and rotating pan half way through baking time.

Place pan on rack and let cool for 15 minutes.  Then invert loaf onto the rack and let cool completely. This should take about 45 minutes.

Once cooled, preheat the oven to 325 degrees.  Line a few baking sheets with parchment paper.

Cut the pumpkin loaf into 1 inch cubes.  Place each cube on the parchment paper, spacing evenly.  Let bake for 10 minutes.  Remove pan and turn cubes over and let bake an additional 10 minutes. Continue with the process until all cubes are toasted.  Let cubes sit and cool for about 20 minutes.

To make the custard, stir together the eggs, egg yolks and brown sugar until blended.  Mix in the half and half, pumpkin puree and only 5 tbs of the melted butter.  Once well combined, stir in the 5 different spices listed on the ingredient list as well as salt and vanilla extract.  Fold in all but one cup of toasted pumpkin bread cubes.  Let sit for 30 minutes, stirring at 10 minute intervals, to allow the bread cubes to absorb the custard.

During the last 10 minute interval, butter the inside of a 9X13 inch glass pan and preheat the oven to 325 degrees. Toss the reserved cup of the bread cubes into the remaining melted butter.  

Pour the custard mixture into the pan and make sure all the lumps are distributed evenly.  Then toss the buttered bread cubes on top.  Place pan in oven and bake until tester comes out clean, which should be about 45-55 minutes.

Remove and place pan on wire rack to cool for about 30 minutes, then serve warm.  For an extra special treat, you can top the dessert with whatever you prefer.  The recipe suggests: powdered sugar, whipped cream or caramel. Enjoy!
                         **LAST YEAR:Midnight Tropic Cupcakes**

Monday, October 1, 2012

Red Velvet Cake Roll


I have made many cakes but this would be the first time that I have actually made a cake roll.  My hesitation has always been that it would crack and the filling seep out.  However, when I read through this particular recipe, it stated that the compression of the roll would take care of the cracks- if any exisited.

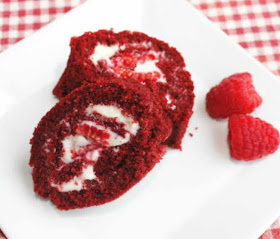
Also, the blend of cake, fruit and cream quickly got my attention. In looking at my photo, I realize that the omission of the raspberries would have given it a more distinctive white swirl.  Since you cannot eat a perfect picture of food, I chose to include the raspberries and forgo the stunning picture.

There were a few methods/tips in the recipe that were new to me.  One was beating the egg before adding it to the batter.  The method of tenting the cake with foil while cooling is something I have never come across. It is a great way to keep the cake from drying out in the cooling process, so I will use this method on all layer cakes in the future.

Red Velvet Cake Roll
adapted from Baking for All Occassions

Ingredients/Cake

1 egg
1/2 cup milk
1 tsp vanilla extract
1 tsp apple cider or white vinegar
1 tbs liquid red food coloring
1/2 cup or 1 stick of butter plus 1 tbs, room temp
3/4 cup of sugar
1/2 tsp baking soda
1 cup of flour
2 tbs cocoa powder
1/8 tsp salt

Ingredients/ Filling
1/3 cup sifted powdered sugar
1 cup red raspberries
1/2 tsp almond extract
8 oz cream cheese, room temp
1/4 cup or 1/2 stick of butter
5 oz melted white chocolate (see tip below)

Optional for decorating
powdered sugar
red raspberries

Preheat the oven to 375 degrees.  The spray non stick spray in the center of a jelly roll pan (15 1/2 X 10 1/2).  Line with foil creating a 2 inch overhang on the short sides.  Then melt one tbs of butter and brush all of the inside with the melted butter.  Dust with flour and tap out excess.

Take a small bowl and whisk together the vanilla extract, milk and vinegar (or cider-whichever you are using).  Set aside.  Then lay out a sheet of wax paper and sift cocoa, flour, salt and baking soda onto the wax paper.

Fill the bowl of a stand mixer with the remaining 1/2 cup butter.  Beat for one minute until smooth and then increase the speed to medium.  As the mixer is running, slowly pour in the sugar.  Beat for about two minutes, scraping down the sides every 30 seconds.  Continue to beat and add the egg slowly.

On low speed, beat in 1/3 of the sifted ingredients, then 1/2 of the milk mixture.  Repeat the process and end with the last 1/3 of the flour mixture, occasionally scraping down sides of the bowl.  Then continue to beat and add the food coloring.  Once all is an even hue, spread batter into the prepared pan.

Bake until cake springs back when lightly touched, this should take about 10 minutes.  Place pan on a rack and run a knife around the two long sides if needed.  Then take out of the pan using the excess foil on the sides and place on rack. Let cool for 45 minutes before assembly.

While the cake is cooling, prepare the filling.  Place the cream cheese in the bowl of a stand mixer and beat until smooth and creamy.  Then add 1/2 of the white chocolate and beat for 30 seconds. Scrape down the sides and then add the rest and beat for another 30 seconds.  Add the butter,  powdered sugar and almond extract and continue to beat until it has a smooth and creamy consistency.

The  length of the cake should run from the left to the right.Using a small offset spatula or a knife,  smooth 1 cup and 2 tbs (you will have a small amount remaining) of the filling over the cake.  Leave a half inch border on the top edge of the length of the cake. 

Then place raspberries randomly along the length of the cake.  Take the edge of the cake closest to you and roll it over.  Using the aid of the foil (the cake will stick to your hands) roll the cake into a log.  Then place it on the bottom third of a 24 inch long piece of parchment paper.  Fold the paper over the top of the roll and use a baking sheet at a 45 degree angle over the top.  Pull on the parchment and push down with the baking sheet.  This will help compress the cake and also get rid of any cracks that may have formed. 

Then lift the aluminum covered cake log and place it, seam down, on a clean sheet of wax paper. Place on baking sheet and refrigerate for 30 minutes to an hour before serving.  Lift out of foil and if using, sprinkle with powdered sugar.  Cut into 1/2 inch thick slices and serve with raspberries on the side.

Tips and notes:
1. Use good quality white chocolate and be careful when melting. The water in the double boiler should not exceed 110 degrees or the chocolate will seize and form lumps.  The smaller you chop the chocolate the easier it should melt.  Let the chocolate start to melt on its own without stirring.  Then remove from bottom double boiler pan and stir, the residual heat will help finish the melting process.  If your chocolate seizes, there is no recovery.

2. I have found that chilling the cake for 2 hours creates a more stable filling.

3. Using whole raspberries does give quite a juicy pop to the cake when you bite into it, however, halving them may help your rolling process go smoother. 
                               **LAST YEAR: Banana Crunch Cookies***