Saturday, December 26, 2015

Cherry Pie Bites


Slicing and serving a big fruit pie can get a bit messy.  Not only messy, but it seems as if equality in the slice is never achieved. One person gets more crust or streusel and another gets more filling.  To curb all of those issues, I found a recipe for the cherry pie bite.

This is a tassie with a pie filling. When I started this project, it was based on me having cream cheese in the refrigerator. I soon found out I had none. However, I still had some goat cheese from the last baking session,so I decided to substitute it for the cream cheese. It worked out quite well for the dough.

I do not make pies all that often, but I was surprised that the only spice in these little treats is nutmeg. Streusel usually has cinnamon, which I like, but the nutmeg/cherry flavor combo is a now also a hit in my book. This recipe made about 2 dozen, but be sure to anticipate that each person will eat at least 2.

Cherry Pie Bites
adapted from BH&G 100 Best Cookies

Ingredients/Crust
3 oz cream cheese or soft goat cheese
1 cup flour
1/2 cup butter, cubed

Ingredients/Streusel
2 tbs chopped, toasted walnuts or pecans
1/8 tsp of nutmeg
2 tbs flour
2 tbs brown sugar
1 1/2 tbs butter

Ingredients/Filling
2 tsp cornstarch
1/3 cup sugar
2 cups fresh (pitted) or frozen (unsweetened,pitted, thawed) cherries

For the crust, beat the cream cheese (or goat cheese) for about 1 minute. Continue to beat, dropping in the cubes of butter. Once all the cubes are in, beat for an additional minute. Then fold in the flour with a spatula, forming a smooth dough. Divide the dough into 24 equal pieces and shape into balls. Place each ball into the cavity of an ungreased mini muffin pan (1 3/4 inch cavity size). Press each ball in the cavity to form a shell, covering the base and up the sides. Preheat the oven to 325 degrees.

In a small bowl, mix together the flour, nutmeg, nuts and brown sugar. Using the tines of a fork, cut in the butter until the dry ingredients can be clumped together like sand. Set this streusel mixture aside.

The last component of this dessert is the filling. Start by placing the cherries and sugar in a saucepan.  Then sift in the cornstarch. Place the pan over medium heat. Stir the ingredients together and let cook. The mixture should cook until it becomes the thickness of honey. You should be able to scrape the back of the spoon onto the edge of the pan and have it leave a streak. Remove from heat.

Fill each cup with a heaping teaspoon of the filling until all crusts look like fruit pies and no filling remains. Then sprinkle the streusel evenly on top of the little pies.

Place in oven and bake for 25-30 minutes. Pans should be rotated halfway through the baking time. Bites are done when crust is crispy and streusel turns a golden brown. Let pie bites cool in pan on rack for 5 minutes. Then transfer to rack to finish cooling.

Tips and Notes:
1. I grated my nuts for the streusel, so the nuts would be evenly distributed in the topping.
2. I used non-stick mini muffin pans, so I cannot comment on the recommended ungreased pans.
3. Be prepared for the filling to run a little bit over the cavities, but it will not run over the pan into the bottom of the oven.
                         **LAST YEAR:Graham Chocolate Chip Muffins**


Sunday, December 20, 2015

Dark Chocolate Fingers


I do like to dunk cookies and donuts into coffee. However, one is not to take the whole "dunking" thing too lightly when it comes to cookies.There is special consideration to be taken before you undergo this task. The first choice you have to make is the beverage...an ice cold glass of milk or tea versus hot tea or coffee. Then choose a cookie that will withstand the dunk. It will need to have some snap and crunchiness to it. No one enjoys soggy cookies crumbs floating in their drink.

With these crispy cookies, you will have the best of both ends.They have is a plain end for dunking and the another end for enjoying double the chocolate. The chocolate coated end is a not only delicious but the texture clash of creamy vs crunchy is hard to resist.

This recipe makes about 26 cookies. Now let's move on to the recipe so you will have that chocolate fix....

Dark Chocolate Fingers
adapted from The Perfect Afternoon Tea Recipe Book

Ingredients
4 tbs corn syrup
1/4 cup butter/cubed
5 oz dark chocolate (bar or chips)
chocolate sprinkles
1/4 cup sugar
1 cup flour
pinch of baking powder
2 tbs dutch cocoa powder

Whisk together the cocoa powder, baking powder, flour and sugar in a medium size bowl. Pour in the corn syrup and add the butter cubes. Combine using a pastry cutter or wooden spoon. Mixture should form a chocolate dough. If it is too dry, add 1 tsp of corn syrup and blend until dough consistency is achieved.

Preheat the oven to 325 degrees. Then cover the bottom interior of 2 baking sheets using parchment paper. Also, roll out 20 inches in length of parchment paper and cut. Fold over and place on a flat surface.

Place the dough between the folded parchment paper. Roll dough until it forms an even 7 x 9 inch rectangle. Unfold parchment and trim edges of dough so it is a perfect rectangle. Take the scraps and place on top of rectangle and roll lightly to smooth out top. This will keep you from wasting dough.

Next, cut the dough in half by running a sharp knife across the center, parallel to the longest side. The cut each half into 13 slices. Each slice will be a little under 3/4" wide and 3 1/2 inches long. Place 13 slices on each baking sheet, spacing evenly apart.

Place each sheet in oven to bake until crisp, which is about 15 minutes. Rotate pans halfway through baking. At the end of the baking time, transfer cookies from sheet to cooling rack.

Set up a double boiler to melt the chocolate. Once the water starts to simmer, fill the top pot with the chocolate. Also lay a sheet of wax paper on a flat surface. After the chocolate is melted and the cookies have cooled, dip one end of the cookies into the chocolate. Then lay on the flat surface to dry and put some chocolate sprinkles on top, you are ready to dunk and enjoy some chocolate!
                                              **LAST YEAR: Eggnog Chiffon Pie**

Sunday, December 13, 2015

Red Velvet Twinks


Individually packaged baked goods...we have all had them at one time or another, for they were usually stuffed inside our school lunch bag or purchased upon impulse at the convenience store. They are also found on shelves in the grocery store. Here in Texas, the Little Debbie brand is the most popular and has the most variety. However, I think the start up of these type of things began with the Hostess company back in 1919.

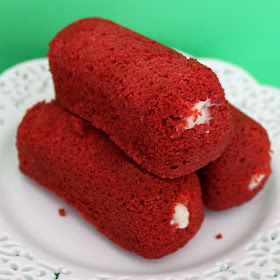
Twinkies were one of the little cakes that were created by Hostess in 1930. The creation of a sponge cake filled with cream became a sweet success. Yet, this recipe tops that original idea. It is actually a red velvet cake filled with cream. Not just any cream, but a blend of goat cheese and cream cheese which add a great dimension of tangy flavor to the cake.

You could make these into cupcakes as well and double the recipe for the filling and put it on top of the cupcake. Either way, your taste buds will thank you for taking the time to bake these little cakes. There are several methods to combine the filling with the cakes. The original instructions are below and at the bottom are my tips and notes. This recipe makes 16 "twink" cakes.

Red Velvet Twinks
adapted from Baking Out Loud

Ingredients/Cake
2 tsp white vinegar
1 1/2 cups canola oil
1 cup buttermilk
2 eggs
2 tsp vanilla bean paste or extract
1 1/2 tsp baking soda
2 1/2 cups cake flour
1 1/2 cups sugar
2 tbs Dutch processed cocoa powder
1 tsp salt
2 tsp red food coloring

Ingredients/Filling
1 1/2 cups confectioners sugar
1 tsp vanilla extract
4 oz goat cheese (room temp)
4 oz cream cheese (room temp)
6 tbs unsalted butter
1/2 tsp salt
1 cups chopped toasted pecans or shredded coconut (optional)

Prepare canoe baking pans by greasing the interior cavities and top edges of 2 pans with 8 cavities. Preheat the oven to 350 degrees.

For the cakes, start by pouring the sugar and oil into a medium size bowl and blend using a hand mixer. Add food coloring, one egg and vanilla extract. Beat for about 30 seconds. Add the other egg and beat again for 30 seconds. Set aside.

Using a separate bowl, sift together the cocoa, flour and salt. Add 1/3 of this dry blend into the bowl of red batter and fold mixture together using a spatula. Then stir in 1/2 cup of buttermilk. Repeat the process starting with 1/2 of the sifted dry ingredients. After the remaining buttermilk is mixed in, fold in the last of the dry ingredients.

Fill a small bowl with the vinegar and mix in the baking soda. Stir this mixture into the red batter until evenly distributed.

Spoon or pour the batter evenly into the prepared pan cavities.  Place pans in oven and bake for 8-9 minutes and rotate pans. Bake for an additional 8-9 minutes or until tester comes out clean. Cakes will have a slightly firm top center when done. Remove from the oven and place pan on rack to cool. Cool completely before removing cakes from cavities.

For the filling, cream together the goat cheese, cream cheese and butter using a hand mixer. Your batter should be void of lumps. Add then vanilla extract and beat again for 30 seconds. Take out another bowl and sift together the confectioners sugar and salt. Measure out 1/2 cup of the dry ingredients and beat into batter. Repeat the process with the sifted ingredients until all has been blended into the batter. If you choose to decorate the cakes, reserve 1/4 of the filling in a separate bowl. Prepare a piping bag with 1/4 inch tip. The remaining 3/4 of the filling will be used with the piping bag.

Remove the cakes from the pan.  Both sides will be rounded, so the side that was face up in the pan should be flattened so the cake will sit properly on a plate. Trim that side with a serrated knife.

The filling will be piped into the cake via the flat trimmed side. Pipe the filling into the bottom of the cake by making separate, even 3 holes with the tip. Make sure that there is sufficient space from each end of the cake. Each hole should be filled with about 1 tablespoon of filling. As an additional option, frost the flat side of the twink with a thin layer of the remaining filling. Pour the coconut or pecans evenly onto a flat plate and dip the frosted bottoms of the cake into the plate, coating the bottom.

Tips and Notes:

1. The perfect shape is hard to achieve. I had some cakes came cleanly out of the pan and some that did not. If your cake shrinks from the sides of the cavity when cooling, that is a good indicator that they will keep their shape. For no worries on this issue, cupcakes are the answer.

2. For filling, I preferred to use a skewer to make the holes at each end and piped from the sides and one hole in the bottom. The picture of the dessert did not show that there was a cake bottom, just a filling bottom sitting on the plate. This lead to my interpretation...cutting the sealed surface of the cake would expose the lighter crumb of the interior, making it victim to oozing filling.  I did not cut the cakes to have a flat surface.

3. Spreading the filling onto the cakes and dipping them makes for a better presentation and adds an additional flavor layer.  I kept mine basic to the original idea of a Twinkie and found it to be a good ratio of cake to filling.

4. Not ready for a big Twinks project? Try cupcakes instead for the same flavor, just without the cute shape.
                                       **LAST YEAR: Spiced Honey Pecan Fingers**

Sunday, December 6, 2015

Holiday Cheesecake Swirl Bars


I was watching Food Network the other day, where cooks compete for a grand prize. One of the judges advised a contestant that while her food was tasty, they were really looking for something more creative and a stand out. I guess if you stay with the tried and true, you are playing it too safe. I have always believed that it is the risk takers that are usually the most successful. If in the end you lose, would you rather have taken the risk or played it safe?

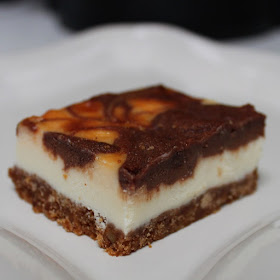
This particular recipe can be classified as a successful risk. It is very different from the image and flavors we think of when the subject of a cheesecake dessert comes up. I think of the NY slice with strawberries on it or the caramel turtle cheesecake. This recipe is definitely not those.

Firstly, it is a bar recipe instead of the round cheesecake made in a springform pan. The are several other factors which deem this recipe unique. The bottom is actually a blend vanilla wafers (sometimes called "Nilla" as stated on the package) and pecans. As you taste the creamy layer, there is that unmistakable tang of cream cheese. Then you experience some seasonal flavors such as eggnog and rum. Lastly is the top layer, of sweet swirled white and dark chocolate, which pulls it all together.

I am sure you agree that the title of this recipe does not reveal all the great flavors in these bars. Now let's get to baking...

Holiday Cheesecake Swirl Bars
adapted from My Recipes

Ingredients
1/4 cup of eggnog
6 tbs melted butter
1 1/2 tsp of rum extract
2 eggs
1/2 cup sugar
crushed vanilla wafer cookies (about 55)
1/2 finely chopped toasted pecans
16 oz softened cream cheese
1/2 cup or 4 oz white chocolate
1/2 cup or 4 oz semi-sweet chocolate


Grease the interior of an 8 or 9 inch square pan.  Line the bottom and up 2 sides of of the pan, leaving some overhang. Preheat the oven to 350 degrees.

To make the crust, mix together the pecans and cookie crumbs in a small bowl. Pour in the butter and stir, making sure everything is dampened. All of it should be able to clump together. Empty mixture into the prepared pan and press evenly into the bottom of the pan. Place pan in oven and bake for about 8 minutes. Remove and set aside on rack to cool.

Fill another bowl with the cream cheese, rum extract and sugar and combine, using a mixer. Beat batter for about 1 minute. The resulting batter will be thick and smooth. Add one egg and mix just until blended. Repeat the process with the second egg.

Separate out 1 1/2 cups of batter. Pour it on top of the prepared crust in the pan. For the remaining batter, mix in the eggnog. After blending, measure batter and divide in half.  Set each bowl of batter aside.

Set up a double boiler and once the bottom pot of water starts to simmer, fill the top pot with the white chocolate. Let the chocolate melt, stirring a few times. After it is completely melted, empty chocolate into one bowl with the eggnog batter and stir. Drop by spoonfuls on top of the cream cheese layer in the pan, leaving space between each.

Repeat the above process with the semi-sweet chocolate and spoon into the spaces left between the white chocolate blend. Marble the two together using a knife or skewer to make swirls.

Place pan in the oven and bake for about 30-35 minutes.When done, the surface will no longer be shiny. After baking, place pan on cooling rack. Once completely cool, cover and chill for a minimum of 1 hour. Using the parchment overhang, lift dessert out of pan and cut into bars and serve.
                                 **LAST YEAR: Pineapple Upside Down Gingerbread*