Sunday, July 24, 2016

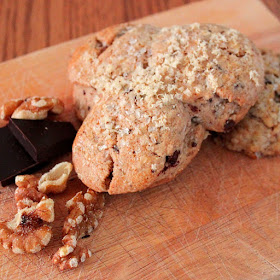
Chocolate Walnut Scones


This scone is more on the cookie side than biscuit/bread side. In fact, the mouth feel and texture remind me of the same sensation you get when you bite into a cookie. Not just any cookie, but the Mexican wedding or Russian teacakes in particular. That buttery, melt in your mouth crumb is nothing short of amazing.

Part of the texture can be contributed to the ground walnuts in the batter. The combination of nuts and rich bittersweet chocolate makes for a delicious way to start the day. Pair this treat with tea, coffee or a tall ice cold glass of milk for a wonderful mid-day snack or morning brunch.

The dough comes together quickly with basic ingredients. The most time you will spend is forming and freezing the dough prior to baking. This recipe makes about 1 dz scones.

Chocolate Walnut Scones
adapted from La Brea Bakery

Ingredients/Dough
1/4 cup sour cream (or cream fraiche)
1 cup plus 2 tbs whipping cream
1/2 cup (1 stick) plus 2 tbs cubed frozen butter
1 tbs vanilla extract
1tbs and 1 tsp baking powder
2 3/4 cups pastry or cake flour
6 tbs sugar
pinch of salt
1 cup walnuts (toasted and cooled)
1 cup finely chopped bittersweet chocolate

Ingredients/Topping
1/4 cup walnuts, grated with a microplane
2 tbs sparkling sugar
2 tbs whipping cream

Prepare 2 baking sheets by lining with parchment paper. Dust a flat surface lightly with flour.

Fill a food processor with the nuts and 3 tbs of sugar. Pulse until it becomes sandy and fine. In another bowl, sift together the salt, baking soda, and flour. Stir in remaining 3 tbs of sugar.  Pour dry flour mixture into the food processor and combine in pulses until evenly distributed.  Once all is blended, drop in butter cubes and run processor until mixture can be clumped together, like damp sand. Empty into a large bowl.

Fold in chocolate pieces and make a well in the center of the mixture. Then take out a small bowl and stir together the whipping cream, sour cream (or cream fraiche) and vanilla extract.  Pour the liquid into the well and fold together until just combined. Mixture will still be a bit crumbly.

Empty contents onto prepared flat surface. Lightly dust your hands and knead the dough a few times and shape into a ball. Roll out the dough, forming a disc 1 1/2 inches thick. Dust a 1 1/2 inch cutter with flour or spray with non-stick oil. Cut dough into circles, re-rolling scraps as needed.

Once all the circles are made, take 3 circles and form a shamrock by pressing them together on the baking sheet. Continue with this process, spacing the shamrocks 1 inch apart.

Take the filled baking sheets and place them in the freezer for an hour. At the halfway point, preheat the oven to 350 degrees. Once the freezing time is complete, the scones will need to be topped. Brush each with whipping cream, sprinkle on the sparkling sugar and walnuts.

Bake for 30 to 35 minutes or until lightly toasted on the edges. Place pan on rack to cool for 10 minutes. Transfer to rack until completely cool.
                            **LAST YEAR: Almond Marzipan Roulade**   
 

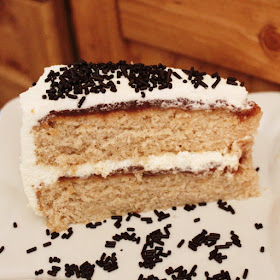
Chestnut Cake


I have to admit, this one is a violation of the seasons. However, the can of chestnut spread has been calling from the pantry ever since I purchased it. I decided to put an end to it by finally making this cake. Also, I seem to be stuck in the realm of duo layers when it comes to icing or frosting my cakes. I like the taste as well as appearance, but that does not mean that I will not go back to the traditional buttercream.

The issue with the duo flavors is that the white layer is a whipped cream frosting, which is not the best type of icing in the heat of the summer. The remedy for that is some stabilizer and refrigeration.

Regarding taste and texture, this cake was a success. The blend of chestnut flour and butter created a tender and moist slice of heaven. Should you be a cake lover and not one for icing, I suggest making this in a 9x12 inch pan and just dusting with confectioner's sugar. If you like all the components of a layer cake, then you will find that the sweetened chestnut spread with the light whipped cream frosting is nothing less than delicious. Chestnut spread was new to me, but it has now been added to my "special" flavors list.

This is not an "everyday" recipe due to the specialty ingredient of chestnut, however, it is definitely one worthy enough to be at the top of the list when it comes to holiday baking.

Chestnut Cake
adapted from Chestnut Hill Tree Farm

Ingredients/Cake
1 or 2 sticks of butter
2 cups sugar
4 eggs, separated
1 1/2 tsp vanilla extract
1 cup milk
2/3 cup chestnut flour
2 1/4 tsp baking powder
2 cups all purpose flour
1/2 tsp salt

Ingredients/Topping
12 oz sweetened chestnut spread
2 cups heavy cream
2 tbs of stabilizer (optional)
2 tbs of sugar
1 tsp vanilla extract
chocolate sprinkles (optional)

Preheat the oven to 350 degrees and grease the interior of  one 9x12 pan or two 9 inch round cake pans. If making layers, Line the bottom interior of the round pans with parchment paper and grease the face up side.

In a small bowl, sift together the two types of flour, baking powder and salt. Set aside. Fill the bowl of a stand mixer with the butter and sugar. Beat until mixture is fluffy and light. Add one egg yolk and blend on low speed for 30 seconds. Repeat the process with each egg yolk until all 4 are mixed into the batter.

Empty 1/3 of the sifted ingredients into the batter and fold in, using a wooden spoon. Then, using a small bowl, mix together the vanilla extract with the milk. Pour half of that mixture into the batter and stir together. Follow with 1/2 of the remaining dry mixture. Mix in the rest of the milk/vanilla blend and fold in the last of the sifted ingredients. Set aside.

Place all the egg whites in a bowl of a stand mixer and beat until stiff. Fold the stiff egg whites into the batter, gently, so volume is not lost. Fill prepared pan(s) with batter. For the two round cakes, the batter should be divided equally. I found that it worked out to 3 cups of batter for each pan.

Put pan(s) in oven and bake until top springs back when lightly touched and tester comes out clean. This takes about 30-35 minutes. If making a layer cake, let cake cool in pans about 10 minutes and invert onto to rack to finish cooling. Parchment paper can be removed right after cake is inverted onto rack. Regarding the 9x12 inch cake, it is served from the pan, so it cools completely in the pan.

During the cooling time, the sweetened whipped cream icing can be prepared. Pour the cream and vanilla extract into a bowl. Add the sugar and stabilizer (if using). Using clean/dry beater blades, beat mixture until cream is fully whipped and light. Cover and refrigerate until ready to use.

For the layer cake, spread 6 oz of the chestnut puree onto the top of one round cake, leaving a 1/4 inch border around the edge. Then spread the whipped cream frosting over the top, covering all the way to the edge. Place the other cake layer on top, the cover the top surface the same way as the other cake layer. Smooth the remaining whipped cream frosting on the sides, covering all the cake. As a last touch, if you prefer, cover the top of the cake with the chocolate sprinkles.

Frosting the 9x12 inch cake is just a matter of smoothing the chestnut spread on the surface and then topping with the whipped cream frosting.

Refrigerate until ready to serve.

Tips and Notes:
1. The cake sides can be also covered with the puree, but special care has to be taken when frosting with the whipped cream so you do not mix the two. Refrigerating the cake for about an hour after being covered with the puree before frosting with the whipped cream to help stabilize it more.

2. I added 1 tbs of oil to the batter to insure a moist texture.

3. Chocolate is a great pairing with chestnuts, so covering the whipped cream topping with chards of chocolate is also an option.

4. The batter could be baked up in individual servings as well, using rings or muffin tins. Just be sure to adjust the bake time accordingly.
                           **LAST YEAR: Brownie Bread Pudding**

Sunday, July 17, 2016

Hummingbird Cookies


There are cake spin offs from cookie recipes and vice versa. Some of the spin offs prove to be a delicious genius idea and some miss the mark all together. Most of the cake to cookie recipes result in cookies with a cake-like texture. I have to admit, that type of texture is usually not my preference, but this recipe is tasty enough to make me reconsider that.

The special combination of flavors and texture in this recipe offers the best of both worlds. Without icing, the are subtly sweet with crunchy pieces of pecans and chewy bits of dried pineapple. If you are in the mood for something sweeter, top these gems with cream cheese frosting and sprinkle on some banana chips and pecans. Whichever way you decide to prepare them, they will quickly disappear. This recipe makes about 4 dozen cookies.

Hummingbird Cookies
adapted from Southern Living

Ingredients/Cookies
1 1/2 cups of regular oats
2 tsp cinnamon
2 cups flour
1 tsp baking soda
1/2 tsp kosher salt
1 cup firmly packed light brown sugar
2 eggs
1 cup or 2 sticks of butter
1 tsp vanilla extract
1/2 cup finely chopped dried pineapple
1 cup finely chopped pecans
1/2 medium sized ripe banana (mashed)

Ingredients/Frosting and Topping
1/4 cup cream
1 tsp vanilla extract
4 oz cream cheese
1/4 tsp salt
2 cups powdered sugar
1/2 cup crumbled banana chips
1/2 cup chopped toasted pecans

Preheat the oven to 350 degrees and line 2 baking sheets with parchment paper.

Sift together the salt, flour, baking powder and cinnamon. Set aside. Fill the bowl of a stand mixer with the butter, vanilla extract and brown sugar. Cream together until fluffy, beating for about 3-4 minutes, stopping occasionally to scrape down the sides. Add one egg and mix at medium speed for about 30 seconds. Repeat the process with the other egg.

Using a wooden spoon, stir in the mashed banana until evenly distributed into the batter. Pour in the sifted ingredients and fold into the batter until no dry streaks remain. Mix in the oats. Lastly, fold in the pineapple and nuts.

Place mounds of the batter 2 inches apart on the prepared baking sheets, using a tablespoon or small  melon ball scoop. Using a glass with the bottom dipped in water, press down mounds into flat circles, about 1 3/4 to 2 inches in diameter. Place prepared sheet in oven and bake for 10-12 minutes or until done. Cookies will have a golden edge and be firm on top when done.

Let cookies cool for 10 minutes on baking sheet prior to transferring to a rack. Frost cookies once completely cooled.

To make frosting, mix together salt, heavy cream and vanilla extract. Add cream cheese and beat for 3 minutes, stopping to scrape down sides of bowl when needed. Sift 1/2 cup of the powdered sugar into the cream cheese mixture and beat until blended. Repeat the process until all the powdered sugar has been mixed in.

In a small bowl, mix together the pecan and banana pieces. Using a knife or spatula, spread frosting onto the cooled cookies. Once a dozen have been frosted, sprinkle pecan/banana chip blend on top of the frosting and lightly press to adhere. Repeat the frosting and sprinkling process until all the cookies are covered.

Tips and Notes:
1. The recipe states to use a glass that is floured on the bottom to flatten the dough. The water method works much better.

2. I am in a high humidity area and the moist surface of the cookies (unfrosted) had me cautious about stacking them together, so I let them dry out overnight before storing. Also, I waited until the night before serving to frosted them.
                                **LASAT YEAR:Banana Fudge Bundt Cake**

Sunday, July 10, 2016

Bourbon Cherry Bars

In the heat of summer, a lot of us are taking advantage of the fresh berries at the store. A dessert made with fresh berries is always welcome, however, these types of items must be kept cold or served right away. The alternative to that is turning to the "dried" form of fruit. I am very picky when it comes to dried fruit. It must be somewhat chewy and gummy, not hard. Some brands miss the mark and the fruit part of your dessert is leathery instead of chewy.

Regardless if I plan to plump the fruit in a type of liquid or use it as is, I look for the biggest and freshest prepared pieces. I know the size is not an option when it comes to berries, but a bag that is clumped or stuck to the dried fruit inside is better than the alternative to a package that is loose and airy. Also, spending the time to seeking out big slices of dried apples or pineapple is well worth it.

Some people may see this recipe as a little "off season" but when it comes to tasty desserts, but seasonality has little influence on the decision to eat or not. One bite of the delicious layer of pecan topped with bourbon soaked cherries and a nutty glaze will give you the realization that eating a piece is the only thing to do.

Bourbon Cherry Bars
adapted from The Oregonian


Ingredients
1/4 cup orange juice
1 egg
1/4 cup bourbon
3/4 stick or 6 tablespoon of butter
1/2 tsp cinnamon
1/2 tsp salt
1 cup flour
3/4 cup brown sugar
1 cup plus 1/4 toasted, cooled pecans
2 cups dried cherries
3/4 cup powdered sugar

Preheat the oven to 350 degrees. Butter the interior of an 8 inch square baking pan. Line bottom and two sides of the pan with parchment, leaving an overhang on 2 of the sides.

To make the bottom layer, start by creaming the butter with the salt and only 1/2 a cup of brown sugar. Blend in the egg. Set aside.

Using a blender or food processor, pulse together the flour with only 1 cup of the pecans. Pulse until the mixture has fine pieces of pecans in the flour. Be careful not to over process the mixture causing the pecans to become a nut butter. Once the processing is done, empty the contents into the creamed butter/sugar batter and blend with a wooden spoon.

Put all of the pecan dough into the prepared pan and press into the bottom. Form it into a smooth, even layer covering all along the bottom of the pan. Place pan in oven and let bake for about 20 minutes. It will have a golden brown hue when done.

While the first layer is baking, create the second layer. Empty the cherries into a blender or food processor and pulse until cherries are chopped into 1/4 inch pieces. Take all the cherry pieces and place in a saucepan. Add the bourbon, remaining 1/4 cup of brown sugar, cinnamon and orange juice. Cook over medium heat, stirring constantly until all sugar is dissolved and mixture resembles pie filling. All the liquid is to be cooked out.

Smooth the cherry mixture over the pecan layer. Let cool completely before icing. Mix powdered sugar with 3-4 tablespoons of water and drizzle over the top. Then sprinkle the remaining 1/4 cup of nuts evenly on top. Once icing has set up, remove from pan by using the parchment. Then cut and serve.

Tips and Notes:
1. Using bourbon or a bourbon/water mixture for the icing is an option. Remember the bourbon will remain strong since the icing is not cooked, so do not over do it.

2. Don't panic because the bottom layer (prior to baking) is like a very thick frosting instead of a dough, that is the way it is supposed to be.
                                      **LAST YEAR: Peach Kolaches**
                              

Sunday, July 3, 2016

Neopolitan Zebra Cheesecake


This fourth of July finds me looking forward to a leisurely day without anything in particular scheduled. Sometimes the lack of a schedule is the best way to spend a holiday. It makes me think of the scene in the Crocodile Dundee movie. You know the one..where the tour guide is talking with Mick Dundee about time. Of course, Mick has no watch and is clueless to what time or even what day it is. Face it, just the idea of anyone leading such a carefree life does make us all jealous.

A lot of people are running around today, getting ready for guests. Since it is sweltering hot outside, a cold dessert can be a delicious escape. This ice cold creamy cheesecake, has a trio of the favorite flavors you find in a Neopolitan.

While this recipe has a lot of flavor to offer, it also includes an instruction for achieving the "artsy" zebra effect. Creating the flavor batters is a snap. The steps required for making the zebra effect requires time, especially if you measure each layer of batter. I initially started by measuring, but soon was pouring the layers without measuring. It turned out with a "zebra" effect, but not with 10 or 15 stripes as would measuring the batter by 1/4 cup increments.

As with any cheesecake, it requires several hours of chilling time prior to serving. Take this into consideration if you intend to make this 9 inch cake.

Neopolitan Zebra Cheesecake
adapted from Something Sweet

Ingredients/Crust
6 tbs melted butter
1 1/2 cups graham cracker crumbs
1/4 cup sugar

Ingredients/ Filling
Chocolate Layer:
1/4 cup unsweetened cocoa powder
1/4 cup flour
1/2 cup sugar
1/4 cup milk
8 oz cream cheese (room temp)
2 eggs
1/2 cup sour cream
1 tsp vanilla extract

Vanilla Layer:
6 tbs flour
1/2 cup sugar
2 tsp vanilla extract
2 eggs
8 oz cream cheese (room temp)
1/2 cup sour cream
1/4 cup milk

Strawberry Layer:
1/2 cup strawberry puree (derived from 1 cup frozen strawberries, defrosted prior to puree)
1/2 cup sour cream
8 oz cream cheese (room temp)
2 eggs
1/2 cup sugar
1 tsp natural strawberry extract
1/4 cup flour
red food coloring

To make the crust, stir together all the ingredients in a small bowl. Pour the crumbly mixture into a 9 inch springform pan and press evenly, forming a crust in the bottom and up the sides. Place pan in freezer until ready to fill.

For the chocolate layer, add all ingredients to a medium size bowl and beat until blended. Place in refrigerator. Then do the same with the vanilla layer and strawberry layer. The end result is three bowls of batter.

Preheat oven to 350 degrees. Remove crusted springform pan from the freezer. Pour 1/4 cup of the chocolate batter into center of the pan. Follow that with 1/4 of the vanilla batter, pouring it into the center of the chocolate pool of batter. Then do the same with the strawberry batter. Repeat this process until all the batter is in the pan. The end result will be several concentric circles, with hues of white, milk chocolate and pink.

Bake for 55-65 minutes. Cheesecake is done when the center barely moves when jiggled and it is no longer shiny. As you can see by the picture, the surface turns a golden brown. Once baked, turn off oven and leave cheesecake inside for about 1 hour. Then remove and place in fridge to chill for at least 3 hours prior to slicing and serving.

Tips and Notes:
1. Cream cheese is a solid mass, so when mixed with the liquids the end result is not a smooth batter. It will be very liquid with lumps of cream cheese. The batter resembles a watery cottage cheese. Even after baked, slices reveal little white dots of cream cheese (as shown in the picture). While it does not affect the taste, this situation does detract a little from the appearance.

2. For a less ivory look to the vanilla layer, try using clear vanilla extract.
                             **LAST YEAR: Key Largo Cupcakes*