Friday, December 29, 2017

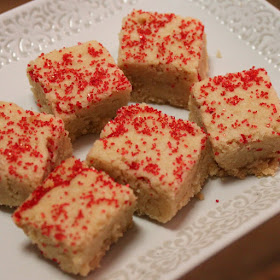
Shortbread Squares


If you have been the host for the holidays this year, I am sure you are ready for some time to relax and unwind. The manner in which we do this varies from person to person. Some of the methods people have chosen may be bizarre or unbelievable. You will not find me building small houses out of pennies or washing my car. My method is actually pretty simple- enjoying a hot cup of coffee or tea with a shortbread cookie while sitting in a comfortable chair. The whirlwind of stress and anxiety just melts away.

If you have not found the key to unwind yet or are just looking to take a break from your day, these cookies may be the right choice. Outside of that special buttery, melt in your mouth factor that shortbread cookies have to offer, they are easy to make with a few simple ingredients. A great return for such a little investment of time. This recipe makes about 10 dz one inch squares and uses a 9x13 inch pan.

Shortbread Squares
adapted from My Great Recipes

Ingredients
4 cups and 2 tbs of flour
2 cups or 1 lb of butter (room temperature)
1 cup sugar
Sprinkles, decorative sugar or powdered sugar for topping (optional)

Prepare a 9x13 inch cake by by buttering the interior. Preheat the oven to 275 degrees. Reserve a sheet of wax paper, a size just big enough to cover the bottom of the pan.

Cut the butter into cubes and place in the bowl of a stand mixer. Pour in the sugar and beat for about 2 minutes on medium speed, stopping at intervals to scrape down the sides of the bowl. Once the blend is smooth add all of the flour.

Combine the flour with the sugar mixture by using a wooden spoon. After all the flour is incorporated into the dough, empty it into the prepared baking pan.  Take the wax paper and use it as a barrier between your hands and the dough as you press the dough down to fit the pan. Make sure the dough is even and reaches all sides and corners.

Remove wax paper. Using the tines of a fork, make small indentations on the top of the dough. This will keep the dough from bubbling up when baked.

Place pan in oven and bake until golden on sides and bottom. This should take about 1 1/2 hours. After the bake time, turn the oven off and remove the pan. Cut the shortbread into squares or triangles (depending on your preference) about 1 inch wide. Place pan back in the oven and let rest until the oven has cooled.

As a last step, sprinkle sugar topping on the surface of the shortbread. Let cool completely before removing from pan.
                                     **LAST YEAR:Chocolate Tangerine Cannoli Cupcakes** 

Sunday, December 17, 2017

Savory Kalacs


Since it is getting so close to Christmas, wrapping gifts, decorating and planning is underway. Hopefully you have many helpful hands during all this activity, but everyone needs to take a snack break. With all the holiday cookie and dessert baking, something savory is a tasty change of pace.

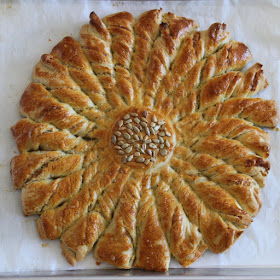
The sunburst of twisted dough (pictured above) may take a few hours to make due to the rising time, but the end result is well worth it. Sandwiched in between the 2 layers of dough is the bold flavor of Gorgonzola cheese. To compliment the flavor of the cheese is a mixture of onions, pancetta and mustard. Not ordinary-but extraordinary..as well as unique. Not only will this satisfy your taste buds, but the great presentation makes it a feast for the eyes.

This recipe hails from a blogger in New Zealand, so measurements are in grams and milliliters. Baking temperature is in Celsius. Conversion charts to cups and ounces are available through the internet.

No matter what occasion- happy hour, football watching party or just a friendly get together, this appetizer is the one thing that should be on your table. So set the sugar aside and pull out the cheese- let's get baking! My tweaks on this process can be found in the tips and notes at the end. They are helpful hints to for you to have baking success with this recipe.

Savory Kalacs
adapted from atdownunder blogger 

Ingredients/Dough
4 tbs of olive oil
a few pinches of salt
1 tsp of sour cream
200 ml of milk (room temp)
300 g flour
15g of yeast

Ingredients/Filling
1/4 cup crumbled Gorgonzola (or your cheese of choice)
1 tsp mustard
2 heaping tbs of sour cream
2 green onions/scallions, sliced thin
25g pancetta, diced
salt and pepper to taste
nutmeg to taste (optional)

Topping
1 egg yolk, whisked or lightly beaten
1 tsp sunflower seeds

Prepare a baking sheet by lining with parchment paper. Set aside. Also, dust a flat surface with flour.

Sift the flour and salt into a large bowl and sprinkle the top with yeast. Form a well in the center. Using another bowl, whisk together the milk and the sour cream. Pour the liquid into the sifted ingredients. Fold mixture together until a dough is formed. Transfer to prepared surface and knead for about 5 minutes. Shape dough into a mound and cover lightly. Let rise for 20-25 minutes.

Once first rising time is complete, punch down dough and form a well in the center. Pour 2 tablespoons of olive oil in the center and knead for about 30 seconds. Make another well and fill with the remaining amount of oil. Knead the dough for 5 minutes. Form into a round disc and cover lightly. Let rise for another 30 minutes.

As it rises, create the filling by mixing all listed ingredients together in a small bowl and set aside.

Preheat the oven to 200 degrees Celsius. Punch down dough and divide into 2 equal pieces. Take the parchment paper from the baking sheet and roll out one piece of the dough into a circle, about 25 cm in diameter. Using a small spatula, spread the filling over the surface the dough, leaving a 1/2 centimeter border on the edge.

Lightly dust a flat surface and roll out the second piece of dough, measuring the same size as the previous one. Place this second piece, making sure to center it, over the dough with the filling on top.

Invert a drinking glass over the center of the disc, slightly indenting the dough. Score the dough into four equal pieces (like cutting a pie) using the back of a knife. Score the four pieces into two equal segments and then score each of the two segments into three equal portions. After scoring, cut through dough with the back of a knife, following the score lines.

Take each portion of dough (there should be 24) by the outer tip and twist three times. Remove the glass and brush the surface with the egg yolk. Top the center circle of dough (as marked off with the drinking glass) with sunflower seeds.

Place in oven and bake until it has a golden hue. This should take about 20-30 minutes. Remove from oven and invert onto large platter. Remove parchment paper and invert bread again, this time onto a cooling rack. Let cool completely.

Tips and Notes:
1. Filling ingredients were combined in a blender, to make it into spreading consistency.

2. I increased the ingredient amount by half to make sure there was enough to cover the dough

3. Take care to not stretch the dough when twisting, so it will remain the same diameter and hold together.

4. After cutting with the back of the knife, re-cut with a sharp knife. The back of the knife process is to make sure the dough does not stretch when cutting.


                                      **LAST YEAR:Chocolate Custard Tart** 

Sunday, December 10, 2017

Chestnut Pie


Gardeners and tree farmers are all too familiar with blight, which is a disease than can kill flowers, vegetables and trees. Overall, I believe that the most destruction it has caused would be the extinction of chestnut trees in the US.

Before the blight took over, chestnut trees were quite plentiful here. They spanned from Maine to Georgia and the amount of trees were too many to count. Sadly, blight can kill a tree in about 5 days. The Christmas song lyrics of "chestnuts roasting on an open fire" no longer applies here in the US. That is, unless you go to the expense of having them shipped to you from another country in order to roast them.

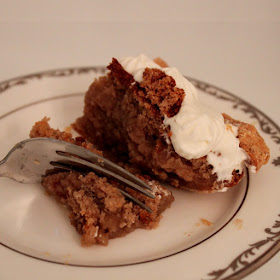
In scanning my pantry, I did find a can of chestnut puree from France. It was an import I ordered previously. With the holidays coming up, I decided to put it to use and make a chestnut pie. This pie is much like a pecan pie, without the chunks of nuts. However, the filling is not as sweet and has a thicker consistency. Regarding flavor, it has the unmistakable earthy taste of chestnuts with a touch of orange.

Outside of crust preparation, the pie comes together easily and only has about 6 ingredients. The crust is not par-baked so you can prepare the dough days before rolling and forming.

If you like chestnuts, do not be discouraged by the fact the trees are extinct in the US. Seek out the chestnut puree on line or at specialty grocers this season. You will be glad you went to the extra trouble. As always, reading the whole recipe along with the tips prior to creating are helpful in order for your efforts to be successful.

Chestnut Pie
adapted from Mrs Rowe's Southern Pies
Ingredients/Pie Pastry
2 1/2 cups flour
2/3 cup plus 2 tbs vegetable shortening
6 to 8 tbs milk
1 1/4 tsp salt
1 egg white (depending on form of pie edge)

Ingredients/Pie Filling
3 egg yolks
2 egg whites
1 cup heavy cream
1 tbs orange liqueur
1 tbs orange juice
1 1/2 cups sweetened chestnut puree ( about 1 pound)
ground nutmeg (optional for sprinkling)
sweetened whipped cream (optional for topping serving)

For the crust, start by whisking together the flour and the salt. Then add the shortening and use a pastry blender to cut and mix it in with the sifted ingredients. This will result in a dough that has several small, "pebble sized", clumps. At that point, sprinkle in 1 tablespoon of the milk and blend by folding the dough over several times with the fork. Once the liquid is absorbed, continue with the process by adding one tablespoon of milk at a time. Test for consistency at 6 tablespoons, mixture should easily clump together leaving no dry crumbs behind.

Dust a flat surface and a rolling pin lightly with flour. Flatten the dough into a disk and roll out to 1/8 of an inch thick. It should be between 13 and 14 inches in diameter. Once rolled out, carefully roll dough around rolling pin. Then unroll over the top of a 9 inch the pie plate or dish. Lightly press the dough into the plate, smoothing out evenly.

If you are using the fold under and shape type of edge, trim the dough, leaving a 1/2 inch overhang. If you intend to decorate edges with cut out dough, trim leaving only a 1/4 inch overhang.When adding decorative toppings to the edges with cut outs from the excess dough, be sure to brush top of dough edge in pan prior to placing the extra layer of the cut out dough on top. As you can see by the picture, the pie edge has layers of overlapping rectangles. This is the decorative edge that I created with the excess dough.

After you have formed the pie crust, mark the bottom with the tines of a fork to prevent bubbling up when baking. Then place in the refrigerator while you make the filling. Preheat the oven to 350 degrees.

The filling starts with 2 egg whites. Beat the whites until they are very stiff. Set aside. Using a large bowl, whisk the egg yolks together. Then stir in the cream, orange liqueur and orange juice. Add the chestnut puree and sugar. Using a wooden spoon, blend the mixture together until it comes together, creating a thick batter. Lastly, carefully fold in the egg whites.

Remove the pie crust from the refrigerator. Pour the filling in the prepared pie crust and smooth the surface until even. At this point you can opt to sprinkle the surface with some nutmeg, if you prefer. Place in oven and bake until center is set and a knife inserted into center comes out clean, about 45-50 minutes. Remove from oven and let cool for 1 hour on rack and then transfer to refrigerator for an additional hour to chill. Then it is ready to slice and serve. Feel free to top each serving with sweetened whipped cream.

Tips and Notes:
1. The original crust recipe was modified, so the above reflects a 1/4 increase in the amount of each pie crust ingredients. This gave me enough to do a nice edge on the crust. The original quantity did not roll out big enough to make a nice edge.

2. I used a stoneware pie dish instead of aluminum. The refrigeration time and the type of pan used added an extra 15 minutes to the baking time.

3. My decorative topping made the back crust too heavy and it collapsed upon serving. Next time I will just make a formed, fold over edge.

                                     **LAST YEAR:Oatmeal Raisin Sandwich Cookies*

Sunday, December 3, 2017

Samoa Bundt Cake


There are just some girl scout cookie flavors that are such favorites that they have crossed the cookie boundary into everything from mixed drinks to ice cream. The most common replicated flavor has been from the Samoa cookie. We just can't seem to get enough of that crunchy cookie base that is laden with caramelized coconut and chocolate made famous by the Girl Scouts.

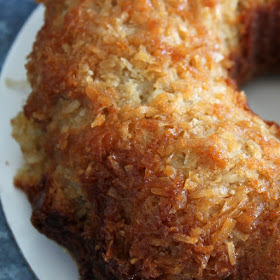
In this post, the flavor of the Samoa cookie can be found in a delicious Bundt cake. The cake has the tender crumb you know to be a great quality of the traditional Bundt. Each piece has a tasty blend of brown sugar and coconut flavor in the base with a caramelized coconut topping. The flavor is good enough to stand on its own. However, I could not resist to add some ganache drizzle to a slice.

While the cake was pretty tasty, there was a problem issue. The recipe calls for a blend of coconut/brown sugar and butter to be pressed into the bottom of the Bundt pan. I used a black bundt pan. After baking, quite a bit of the coconut stuck to the pan and the cake was difficult to release. The original recipe was posted noting that the pan used was a new, cast aluminum non-stick Bundt pan. Baking with this particular equipment turned out to be crucial to insure that the cake releases with a thick and toasty layer of coconut on top.

I would not make this recipe again without the specific type of cake pan as noted in the recipe. Cooking the coconut mixture in a saucepan until it caramelizes is another option. Then the cake batter can be split and the coconut mixture put in between the two cake layers. The coconut would bake with the mixture as a tunnel in the cake instead of on the surface. Another idea is to eliminate the recipe for the coconut topping and use another Bundt recipe that includes a coconut filling.

The recipe is listed below as I originally baked, adapted from the author. I have included the ganache topping recipe as well. Even though you may not have a non-stick cast aluminum pan, the website link below does have numerous Bundt cake recipes that can accommodate different types of Bundt pans.

Samoa Bundt Cake
adapted from Food Lust People Love 

Ingredients/Topping
1/2 cup brown sugar
1/4 cup melted butter
2 cups sweetened coconut

Ingredients/Cake
6 eggs, room temperature
1 cup canned unsweetened coconut milk
1 cup or 2 sticks of butter, room temperature
1 tsp vanilla extract
1 tsp coconut extract
1 1/2 cups brown sugar
1 cup white sugar
2 tsp baking powder
2 1/2 cups flour
1/2 tsp salt

Ingredients/Chocolate Glaze
1 tsp vanilla extract
1/2 cup heavy cream
4 oz chopped dark chocolate
pinch of salt

Start by melting a few tablespoons of butter. Brush the interior of a 12 cup Bundt pan (specific type of pan as noted above) with the melted butter and dust with flour. Tap out excess flour and make sure all areas are completely covered. Then place pan in refrigerator. Preheat oven to 350 degrees.

For the cake, place the butter and both types of sugar in the bowl of a stand mixer. Beat on medium high for about 5 minutes, scraping down the sides of the bowl in intervals. The mixture should be very light and fluffy after this process. Set aside bowl.

In another bowl, sift together the salt, baking powder and flour.

Add one egg to the butter/sugar mixture and beat for about 30 seconds and scrape down the sides of the bowl. Repeat this process, adding one egg at a time, until all 6 eggs are incorporated into the batter. Using a separate bowl, pour in the coconut milk and stir in both extracts. Pour the coconut mixture into the butter/sugar mixture and beat until thoroughly blended. Lastly, using a wooden spoon, fold in the sifted ingredients.

Fill the cake pan with the batter and place in oven and bake for about 60-70 minutes or until tester comes out clean. Place cake pan on a rack to cool for about 20 minutes and then invert onto rack and let cool completely before covering with ganache.

To make ganache, place chopped chocolate in a heatproof bowl. Then fill a saucepan with the heavy cream and place over medium high heat. Let the cream heat up just to the point of simmering and remove from heat. Stir in vanilla extract and salt. Pour mixture over the chopped chocolate and let sit, undisturbed for 2 minutes. Whisk until smooth and then pour over cake evenly, covering the top and letting drip down the sides. Once the ganache is set, the cake is ready to serve.
                                 
                                      
 Tips and Notes:
1. The ganache is optional, but remember that dark chocolate is a strong component and may overpower the flavor of the cake. You can put it on the side when serving so your guests can choose how much or how little they want.

2. Again, the success of the coconut topping requires the specific pan. The top surface of the cake will have a crispy chewy layer when baked, resulting in a mix of caramel and toasted coconut.

3. You are welcome to bake this in a 10 cup bundt pan. The pan is to be filled 3/4 full, so there may be batter left over. Also, baking time may need to be adjusted.

3. The cake lasts for about 3 days when stored in an air tight container.
                                    **LAST YEAR: Peanut Butter Bundt Cake**