Sunday, May 27, 2018

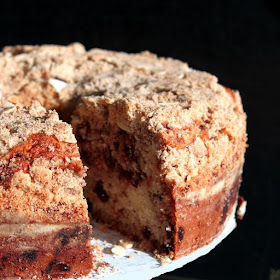
Port Cherry Coffee Cake


Today, society is faced with a variety of drinks. Instead of black coffee and ice cold milk, now there is half-caf soy lattes and walnut milk. Faced with so many choices, we find ourselves trying them all. Some are good and some not so good. However, it is nice to go back to those plain "old school" drinks.

Ice cold milk or black coffee (even though considered "old school") deserves a side of pastry or cookies. The plainest of each drink calls out for a pairing of a sweet breakfast treat. After all, there is a reason some cakes are called coffee cake and these cakes contain no coffee.

This particular cake has a special blend of port wine and cherries swirling through a fluffy vanilla batter. Aside from the flavor, the moist texture derived from the sour cream and the contrasting sweet almond streusel on top is very pleasing to the palate.

So let's go into the kitchen to create a delicious side line for an "old school" beverage. One tasty slice with plain black coffee may cause you to permanently give up that Caramel Mudslide drink from the coffee house.  

Port Cherry Coffeecake
adapted from Chowhound

Ingredients/Swirl
1 cup diced dried cherries
2 cups port wine
1/4 cup sugar
1-3 inch cinnamon stick
1 vanilla bean, split and opened up flat
1/4 tsp sea salt

Ingredients/Almond Streusel
4 tbs melted butter
1 cup cake flour
1/2 cup slivered almonds
1/8 tsp salt
3 tbs dark brown sugar
3 tbs granulated sugar
 
Ingredients/Cake
3 eggs
3/4 cup or 1 1/2 sticks of butter
1 cup sour cream
1 cup sugar
1/2 tsp salt
2 1/2 cup cake flour
2 tsp baking powder
1/2 tsp baking soda
1 vanilla bean 

For the first component (swirl), start by filling a saucepan with all the ingredients. Place over medium high heat and let cook. Mixture should come to a low boil or simmer. Stir constantly to make sure it does not stick or burn. Once it reduces down to having only 1/3 to 1/4 a liquid amount, remove from heat and take out cinnamon stick and vanilla bean. Discard the two. Transfer cherry mixture to a heat proof bowl and place in refrigerator to cool for a minimum of 20 minutes.

As that cools, create the streusel. Preheat the oven to 350 degrees and insure that one rack is on the middle tier of the oven. Using a medium size bowl, mix together the warm melted butter with both types of sugars. Then stir in the salt. Add the flour and combine until no dry streaks remain. Lastly, mix in the almonds. Set aside.

The cake batter starts with the preparation of the 10 inch tube pan. Grease the pan's interior and dust with flour. Fill a sieve (place over a large bowl) with flour, baking powder, baking soda and salt. Sift dry ingredients into the bowl. Set aside.

Add butter to a bowl of a stand mixer and beat until nice and smooth. Stop at intervals to scrape down the sides. The butter should be lighter in color after beating. Continue to run the mixer at medium high speed and add the sugar in separate intervals. Beat time should be about 5 minutes.

Take the vanilla bean and split down the middle and scrape the seeds into the batter. Mix until well distributed. Add one egg beat for 30 seconds to combine. Repeat the process until all eggs are blended into the batter. Remove the bowl from the stand mixer.

Using a wooden spoon, fold 1/3 of the sifted ingredients into the batter. Add half of the sour cream and stir. Mix in 1/2 of the remaining dry ingredients and then the the rest of the sour cream. Then add the last of the sifted ingredients and blend together. Top the batter with spoonfuls of the cherry swirl, spacing the dollops apart. Carefully fold the swirl mixture into the batter, using only about 4 or 5 strokes. The cherry mixture should be blended to the point of only streaking the batter, not be fully mixed into it.

Transfer the batter to the prepared pan and smooth out evenly. Cover the surface of the batter with the streusel, making sure it is evenly covered. Using clean hands, lightly press streusel against the batter.

Place pan in oven on middle rack an bake until tester comes out clean. This should take about 50 minutes to bake. Once baked, place pan over a rack to cool for about 1 hour. Run a knife around the edges and flip the cake onto a cake board. Flip once again so that streusel is face up. Let cool completely before serving.
                          **LAST YEAR: Italian Cream Filled donuts**         

Sunday, May 20, 2018

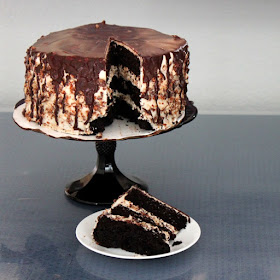
Chocolate Dream Cake


When I was little, the things I wanted were sold as separate, never complete as is. I could get the Barbie, but still wanted the car and the Barbie house. It seems as if someone has caught on to this trend, because everything you buy has the option to buy additional things that make it more complete.

Crazy as it may be, the lady at the cosmetics counter swears that there are 3 purchases to make perfume complete. Buy the base (perfumed lotion), then the perfume itself and lastly, the sealer of perfumed dusting powder. We all thought that the perfume purchase was enough, but now we know better, right? Well, I still have yet to be convinced to buy all three.

Unlike separate entities, this cake has it all. The layers are much like brownies, very moist and with a deep chocolate flavor. Coating these decadent layers is a fluffy cream filling and a Marscapone buttercream frosting with the crunch of cookies. Lastly, it has ganache on top and running down the sides. That component is nothing but dark chocolate candy. Hmmm... brownie, cookie, candy- that about sums up this three layer dessert tower. Rest assured, you will not want any chocolate sauce or ice cream with your slice-just a fork!

This cake requires three 8 inch round cake pans and a dropper since the coconut oil is measured in drops. When planning, make sure you allow enough time to create the cake. Consider the baking time of approximately 50-55 minutes. Also, remember that there are 3 components covering the outside of the cake.

Chocolate Dream Cake
adapted from pennlive.com

Ingredients/ Cake
3/4 cup vegetable oil
1/2 cup milk
1 1/2 cup buttermilk
1 1/2 cup hot coffee
3/4 tsp vanilla extract
3 eggs
3 cups sugar
4 oz chopped semisweet chocolate
3/4 tsp baking powder
1/2 tsp salt
2 tsp baking soda
2 1/4 cup flour
1 1/2 cups Dutch processed cocoa powder

Ingredients/Filling
1/2 cup powdered sugar
1 1/2 cup chilled heavy cream
1/2 cup Marscapone cheese
1 tsp vanilla extract
10 drops coconut oil
one 8.5 oz box of coconut dream cookies (crushed)

Ingredients/Frosting
1 lb of powdered sugar
1 cup or 2 sticks of butter (room temp)
1 tsp vanilla
15 drops of coconut oil
1/2 of an 8.5 oz box of coconut dream cookies (crushed for coating sides)

Ingredients/Ganache
1 tsp vanilla extract
1/2 cup heavy cream
1/2 cup semi-sweet chocolate (chopped)

Preheat oven to 300 degrees. Prepare 3 eight inch cake pans by greasing the interior. Then line the bottom with parchment paper and grease the surface. The first component will be the cake.

Stir together the buttermilk, milk and vanilla extract and set aside. Sift together the flour, baking powder, baking soda and salt. Then sift in the cocoa and whisk the mixture together. Lastly, stir in the sugar and form a well in the center of the mix.

Fill a small bowl with the eggs and whisk until foamy on the surface and set aside. In another bowl, add the chopped chocolate and spread evenly. Then pour the hot coffee into the bowl and let sit undisturbed for 2 minutes. Whisk coffee and chocolate together until smooth.

Fill the center of the well (formed in the dry ingredients) with the eggs, oil and melted chocolate. Then stir until smooth. Pour in the milk mixture and blend into the batter. Divide the mixture into thirds and fill each pan.

Place pans in oven and bake for 25 minutes. Then rotate and bake for an additional 25 minutes. At this time, use a tester to see if done. If not, let cakes cook for an additional 2 minutes and check again.

Let cakes cool in pans on rack for 10 minutes. Then run a butter knife around the edges and invert onto rack. Peel off parchment and let cool completely on rack.

The next component will be the filling. In the first bowl, sift the powdered sugar. Use a second bowl to beat the Marscapone cheese until smooth. Then fill a bowl of a stand mixer with the whipping cream. Whisk the cream until stiff peaks form. Add the Marscapone cheese, oil and vanilla extract. Blend ingredients together with mixer on medium speed, scraping down the sides at intervals. Once combined, beat in the powdered sugar. Lastly, fold in the cookie crumbs. Empty into a bowl with a lid, place lid on top and refrigerate until ready to use.

Using a small bowl, start creating your frosting by stirring the oil and vanilla together. Then fill the bowl of a stand mixer with butter and beat until light and shiny, scraping down sides as needed. Add the vanilla/oil blend and beat again until evenly distributed. Beat in the powdered sugar in 1/4 increments until the mixture is fluffy and smooth.

Place one cake layer on a plate, stand or cake board. Using a spatula, smooth a thin layer of buttercream frosting on the surface. Take the filling out of the refrigerator and divide in half. Place half of the filling onto the surface of the cake layer and smooth out evenly, covering the flat surface of the cake from edge to edge. Repeat the frosting/filling process after you stack the second layer on top. Then stack the last layer.

At this point, you will cover the cake in a thin coating of the frosting, which will be the crumb coat.

The create the ganache by filling a bowl with the chocolate and smoothing out to an even layer. Heat the cream to a simmer (either using a saucepan or microwave). Pour the hot cream over the chocolate and let rest for 2 minutes. Then stir until smooth and set aside.

Frost the cake with the remaining buttercream. Using clean hands, lightly press hand fulls of cookie crumbs on the sides of the cake, making sure all of it sticks and all sides are evenly coated.

Once the above task is complete, check on the chocolate ganache for consistency. It should not be like water, but is should be pour-able. This mixture will get thicker as it stands. After the consistency is achieved, our the ganache over the cake. Start by pouring along the outer edges then towards the center. If too much drips off, just keep spooning it back on top of the cake.

Tips and Notes:
1. The cake is very moist and fluffy. This means it is very fragile, so be careful when stacking your layers together. If it cracks, push the pieces together, the moisture will hold them together along with the frositing and filling.

2. I used an offset spatula to crumb coat cake. Dipping the spatula in water while you frost helps smooth the frosting without tearing the cake.

3. The frosting will set up with time, so do not delay in pressing the crumbs on the sides. If they do not stick, use a wet spatula on the surface of the frosting to make it sticky for the cookie crumbs.

4. Refrigerate cake to store if not serving right away.

5. The filling did stay fluffy for awhile. You may consider adding whipped cream stabilizer to the filling if you know the cake will be sitting at room temperature for hours.

                                       **LAST YEAR: Sour Cream Donuts**

Sunday, May 6, 2018

Banana Nut Cream Pops


When making frozen items you always have to consider the temperature gauge. On dipped ice cream pops, the outside coating and the inside ice cream vary in how much time is required in the refrigerator. In addition, a photo shoot will always influence the temperature, so you must act quickly or the items may melt in the process.

To avoid melting, I took the picture of these pops laying in the freezer. However, the open door on the freezer did cause some melting, but only after I was done with my photo shoot.

Aside from the picture taking, tasting these creamy cold confections was the real reward for my efforts. Roasting the fruit prior to blending with the cream really heightened the banana flavor. The roasting idea/method was adapted from the book Paletas.

There are some other elements that I included and developed that really enhanced the cream pops. Just like frozen dipped bananas, I tossed in some toasted walnuts and dipped the cream pops into chocolate to finalize before freezing. One taste and you will be really happy that each of these are for one individual. The idea of sharing one is out of the question!

As I was doing the dipping, I thought that this process would be a nice spin on the typical ice cream social. It would be fun freezing up these ice cream pops and having some friends over for dipping in their favorite coating (ie butterscotch, white chocolate are a few more varieties). The coating is the recipe for magic shell. It is easy to make and can sit at room temperature.

Even if you are not into the ice cream social event, these pops are a perfect way to escape from a hot afternoon. This recipe makes about 7 or 8 cream pops with leftover magic shell.


Banana Nut Cream Pops
by flourtrader

Ingredients/Ice Cream
1 cup milk
1/2 cup heavy cream
3/4 tsp vanilla extract
1 tbs banana liqueur
1 cup chopped toasted walnuts
1/4 cup dark brown sugar
2 tbs granulated sugar
3 ripe bananas
1 tsp lemon juice

Ingredients/Magic Shell
1/3 cup coconut oil
5-6 oz of chocolate (or other flavored morsels or chips)

Start by preheating the oven to 400 degrees. Wrap each of the bananas (leave skins on)tightly in foil and place on parchment lined baking sheet. Place pan in oven and bake for 30-35 minutes. Remove and let cool slightly. As they cool, fill a large bowl with both sugars and whisk together.

Scoop the roasted banana out of their skins and place in the bowl with the sugar. Mash and blend until the sugar has dissolved. Empty the mixture into a blender and add all the additional ingredients, except the walnuts. Blend mixture together until smooth. Empty into an ice cream maker and follow manufacturers directions until the ice cream reaches a soft serve consistency. Fold in the toasted walnuts.

Cut one corner off of a freezer bag and fill with the ice cream. Pipe into the molds, stopping occasionally to press out air bubbles with a butter knife. Fill each mold 1/4 inch below top edge. Place top on mold and insert stick. Put mold on rack and place in freezer. Let freeze overnight.

The next day, create the magic shell by placing chocolate (or morsels) and coconut oil in a microwave safe bowl. Microwave for 30 seconds and then stir. Repeat process until all the chocolate is melted and blended with the oil.  Let cool and then empty into a tall plastic cup.

Remove the ice cream bar from the mold (per manufacturer's instructions) and dip into cooled magic shell. Pull out of liquid and let the chocolate drip off of the top of the cream pop. Place in freezer for about 3 minutes and dip again. Repeat this process for additional cream pops. Wrap in plastic and store in freezer.

Tips and Notes:
1. I roasted the bananas without placing them on a baking sheet and liquid oozed out and dripped onto the bottom of the oven. Using a baking sheet may increase the roast time, but you will avoid the mess on the oven.

2. To make sure that the chocolate coating stays unmarked when freezing, take a thin cardboard box (like a cereal box) and cut small slits in the side or bottom. Push the ice cream stick in the slot to prop it up.

3. Make sure that the shell has cooled to room temperature or the cream pop will melt when dipping.
                            **LAST YEAR:Marbled Chocolate Raspberry Cookies**