Sunday, June 24, 2018

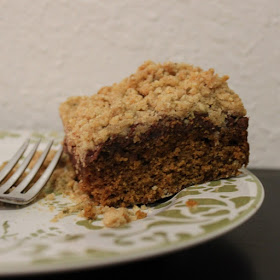
Pumpkin Nutella Bars


As food bloggers, we sometimes have a habit of segregating food and recipes seasonally. I believe that if the food is available all year round, we should enjoy it anytime. One thing that remains on the shelf all year round is pureed pumpkin.  While fresh is always better, when it comes to pumpkin I feel that canned is acceptable.

Today, I pulled out the can of pumpkin and also a jar of Nutella..which is a great combo to start. Then spices were added and a crunchy streusel was made. The end result is a delicious bar with the flavors of hazelnut, chocolate and pumpkin. The streusel is the crowning touch. The bars are worth waiting on until the fall, but there is no reason to not to enjoy them any time of the year. Forget seasonality on this one and enjoy a bar today!

Pumpkin Nutella Bars
adapted from ice.edu

Ingredients/Pumpkin layer
1 tsp cinnamon
1/2 tsp nutmeg
1/2 tsp ginger
1/4 tsp cloves
1/4 tsp allspice
1 tsp baking soda
2 1/4 cup flour
1 tsp salt
3/4 cup dark brown sugar
1/2 cup granulated sugar
1 egg
1 tsp vanilla
3/4 cup pumpkin puree
1/2 cup or 1 stick butter
1 cup of Nutella (chocolate hazelnut spread)

Ingredients/Streusel
1 tsp cinnamon
1/2 tsp nutmeg
1/2 tsp ginger
1/4 tsp allspice
1/4 tsp cloves
1/2 tsp salt
1/2 cup chopped pumpkin seeds
1/2 cup light brown sugar
1/2 cup granulated sugar
2 cups flour
3/4 cup or 1 1/2 sticks of butter

Preheat oven to 350 and grease a 8 inch square pan and line with parchment paper. Sift together flour, salt, baking soda and spices. Set aside.

In a separate bowl, cream together butter and both sugars. Then add the egg and vanilla, mixing until blended. Scrape down the sides of the bowl. Using a wooden spoon, mix in 1/3 of the sifted ingredients until no dry streaks remain. Add 1/2 of the pumpkin puree to the batter and stir to blend. Repeat the process and end with last amount of sifted ingredients. Transfer batter to prepared pan, smoothing the surface until even. Place in oven and let bake for 15 minutes.

Create the streusel as it bakes. Whisk all the ingredients together, except for melted butter. Once everything is evenly distributed, pour in the melted butter and mix until all the dry ingredients are damped by the butter, it should have a crumbly consistency. Set aside.

Once the bars have completed the 15 minutes bake time, remove from oven and let cool for 15 minutes. Also, drop the temperature of the oven to 325 degrees.

After the bars have cooled for the allotted time, warm up the hazelnut spread in the microwave- heating for two 15 second intervals, mixing after each. Then pour the spread onto the bars and smooth with a on offset spatula. Lastly, sprinkle the streusel evenly over the surface. Bake until golden brown and tester comes out clean, about 30 minutes.

Cool about 15 minutes before cutting.

Tips and Notes:

1. This recipe was not specific about 2 things, the pan size (it stated it makes 18 bars 1 1/2 inch square) and how much of the hazelnut (Nutella) spread (it stated 1 jar). Without specifics, I used a 8 inch square pan and 1 cup of hazelnut spread. These two items you can change according to your preference but the baking time may need to be adjusted. The bars I made were 1 1/2 inch in height.

2. As you can tell by the amount of ingredients, the streusel is very thick. This can be modified.

3. If you do not want the distinct layers, you can marble the hazelnut spread into the slightly cooked batter when added to the pan.

4. The combination of spices, with the exception of the cloves, equate to pumpkin pie spice. Feel free to substitute it.
                                      **LAST YEAR:Passion Fruit Tart**

Sunday, June 17, 2018

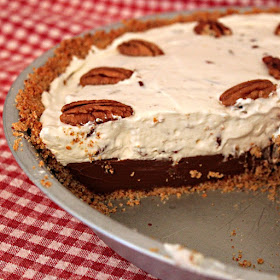
Black Bottom Pecan Cream Pie


Today, I am wondering when history will repeat itself. The specific history I am concerned with is the days when going to the movies and finishing the evening with a slice of pie at the corner diner was considered the perfect date. Clearly, everything I have read about the 50's era indicates that it was a simpler time even though the US was in a growth mode in manufacturing.

You can still find some of these diners in existence and they now are referred to as "retro" diners. However, do not let the passing of history deter you from experiencing one of the favorite diner desserts of all time-Chocolate Cream pie.

With little assembly time and a small amount of ingredients that can be found at any grocers, making this at home is fairly easy. The chilling time is what takes the longest.

This classic pie is perfectly balanced with a rich chocolate filling and a light whipped cream topping. The slight twist on this traditional favorite is the addition of pecans that gives it a nice crunch and a subtle nut flavor. So let's head to the kitchen so you can experience an ice cold slice of this decadent pie....

Black Bottom Pecan Pie
adapted from Maida Heatter

Ingredients/Crust
1/3 cup pecans, chopped fine
1 1/4 cups graham cracker crumbs
1/4 cup sugar
2 oz melted butter

Ingredients/Chocolate Filling
4 eggs yoks
8 oz chopped chocolate (semi-sweet, dark or sweet)
1 tbs instant coffee
1 cup of light cream (regular whippping cream, not heavy)

Ingredients/Cream Topping
1 cup of pecans (medium chopped)
1/2 cup powdered sugar
2 cups heavy cream
1 dz large pecan halves (for decorating surface)
2 tsp vanilla extract
2 tsp of whipped cream stabilizer (optional)

For the crust, whisk the sugar with the graham crumbs and then whisk in the nuts. Pour the melted butter in and stir until all the dry ingredients have been dampened. The mixture should be crumbly but you should be able to clump it together. Preheat oven to 375 degrees.

Empty the crumb blend into a 9 inch pie plate. Using your fingers, create the side edge first by pressing the crumbs up the inside outer wall of the pie plate. Do not afraid to be generous, about 1/4 inch thick. Once the side has been formed, press the remaining crumbs evenly into the bottom. The interior of the pie plate should be completely covered with an even top edge. Place in oven and bake until golden, about 8 minutes. Remove and let cool.

Start on the filling by pouring the cream into a saucepan. Place the saucepan over medium heat. Once the cream is lukewarm, add the chocolate pieces. Using a whisk, stir the mixture and let heat up until all the chocolate is melted. Then whisk in the instant coffee. Once dissolved, remove from heat. Let cool for about 10 minutes.

After the cooling time, whisk one egg yolk into the chocolate cream until blended. Repeat the process until each egg yolk has been incorporated into the mixture. Let cool for an additional 10 minutes, stirring frequently. Then pour mixture into the crumb crust and place in refrigerator until set, about 2-3 hours.

During the last 15 minutes of the chilling time, create the topping. Chill a bowl and mixer beaters for about 10 minutes. Remove all chilled utensils from refrigerator. Fill the bowl with heavy whipping cream, powdered sugar, vanilla extract and stabilizer (if using). Beat the mixture on medium speed until cream is very thick and holds its shape. Fold in the nuts.

Remove pie from refrigerator and drop spoonfuls of the cream on top. Smooth the surface of the pie starting from the outer edges to the center. Cover all the chocolate filling evenly. Decorate the top with pecan halves. Refrigerate for another hour and then slice and serve.

Tips and Notes:
1. Recipe suggests foiling pie pan for crust. Crust is to be frozen after cooling for about 1 1/2 hours. Then foil is to be removed and crust placed back in pan. The purpose is to keep pie shell from sticking. I tried this method and the frozen crust crumbled before I could get it in the pan. I created the crust again without the foil and found that I did not have an issue with sticking anyway.

2. For more crunch, toast your pecans before using.

3.Try experimenting with the add in. For salty sweet, consider chopped pretzels or salted peanuts instead of pecans. You can also use milk chocolate if dark is not your preference.
                                  **LAST YEAR:Blueberry White Chocolate Muffins**

Tuesday, June 5, 2018

Persian Pistachio Shortbread Cookies


Spices can be the number one priority when it comes to a successful dish. I am one that prefers the freshest of them and that can be an issue, since most spices are not generated here in the US. I wonder that by the time a spice hits the shelf here, if it really is that fresh.

The resolve on that would be to travel the world and pick up every spice produced based on the country. What a wonderful trip that would be! The fresh spice may have a whole different flavor than the spices I get from the jar. Until I take a trip, I am resigned to at least buying at the store and making the dish that requires these ingredients all on the same day.

This particular shortbread cookie contains the exotic spices of cardamon and saffron. The resulting flavor is the earthy, pungent taste that comes from the spices that contrasts with the sweet buttery shortbread base. To tie it all together is the crunch of the pistachio nuts.

This is a far cry from chocolate chip cookies, but sometimes the exotic can break up the monotony. Once you sit down and enjoy a few of these tasty little rounds with some Turkish coffee, you may find yourself shopping for a Persian rug and some fresher spices! This recipe makes about 4 1/2 dozen small cookies.

Persian Pistachio Shortbread Cookies
adapted from Silverland Bakery

Ingredients
1 tsp saffron
1 tsp cardamon
1 cup pistachios (salted or unsalted, chopped)
1 tsp rosewater
3/4 cup powdered sugar
2 cups flour
1 cup butter

Prepare 2 baking sheets by lining with parchment paper.

Place a sieve over a bowl and sift together the powdered sugar, saffron and cardamon. Set aside. Fill the bowl of a stand mixer with the butter. Beat until smooth, about 1 minute. Add the sifted ingredients and rosewater. Mix on low speed, scraping down the sides of the bowl as necessary. Once combined, beat dough at medium speed for 3 minutes. The mixture will become light and fluffy.

Using a wooden spoon, fold in the flour until no dry streaks remain. Then mix in the pistachios to distribute evenly throughout the dough.

Shape the dough into 2 round logs and wrap each in plastic film and twist or fold over the end edges of the plastic. Place in fridge for about 2 hours. After the chilling time, remove one log from the refrigerator and unwrap. Slice the log into 1/4 inch rounds and place each round on the prepared baking sheet. Bake at 325 for 18-20 minutes or until golden on bottom and edges. Remove from oven and transfer cookies to a cooling rack.

Tips and Notes:
1. Pistachios are fresher when you shell them yourself instead of buying already shelled.

2. Cookies do not spread, so you can bake a number of them on one cookie sheet.

3. Do not leave dough sit out after slicing, awaiting for first batch of cookies to bake. When not in use, keep in refrigerator.

4. If you do not like saffron or find it too expensive, you can make the cookies without it.

5. The cookies are about 2-2 1/2 inches in diameter. You can make them larger, but be sure and adjust the baking time.

6. I opted to push the saffron threads through a sieve with the powdered sugar to disperse it throughout the dough. However, the saffron can be crumbled into little threads instead. The crumble method will give the dough an occassional "pop" of saffron flavor as you eat the cookie.
                                     **LAST YEAR: Spudnut Donuts**