Foodbuzz
Showing posts with label spice. Show all posts

Monday, March 12, 2012

Stoutly Gingerbread Cookies

These cookies have two very special components that make perfect for St Patrick's.  First is the cake part which is made with Guinness, molasses and spices.  The second is the decorated part in which the idea comes from the brain of Darla at Bakingdom.com.

This is my first time at using fondant, so I still do need some more practice.  I was hoping that I could use disco dust on the border of the fondant, but I ran out of room.  Hopefully with more practice I will be at ease and be able to make my cookies more eye catching in the future.

Regarding the taste of the cookies, they are great without any topping.  Not so pretty, but very tasty.  I did leave a few dozen plain to enjoy with coffee or tea. The dough is a good base and can be personalized to your own tastes (ie sandwich cookies, drizzled with chocolate, etc)

In the listing below, I have included the original recipe along with the Bailey's glaze recipe.  Also, you will find the link to Darla's specific post which is an excellent tutorial on how to use regular rubber stamps and fondant to make some festive looking cookies.

This particular recipe does yield quite a number of cookies, depending how big or small you want to make them.  It was published with the thought that gingerbread men would be made, so it states that it makes 20 six inch cookies. Also, using the Guinness requires you to start the night before on making these.

Stoutly Gingerbread Cookies
adapted from The Sophisticated Cookie

Ingredients/Cookies
5 cups flour
1 tsp nutmeg
1 tsp baking powder
1 tsp ground cloves
1 tbs ground cinnamon
1 tbs ground ginger
1/4 cup of Guinness Stout
1/2 cup blackstrap molasses
1 egg
1 cup butter, softened
3/4 cup packed light brown sugar

 Put Guinness in a small bowl and cover with a paper towel.  Let sit overnight in a cool place.

The next morning, sift together the flour, baking powder and all 4 spices and set aside.  In another bowl, cream together the butter and sugar until light and fluffy.  Then take the bowl of Guiness and stir in the molasses.  Once blended, add it to the butter/sugar mixture and beat for 30 seconds.  Then beat in the egg until everything is blended.

Beat 1/3 of the sifted mixture into the batter.  Add another 1/3 and beat until no dry streaks remain.  Then knead in the last 1/3 of the sifted ingredients until all is blended.  Cover and chill for one hour.

While chilling, preheat the oven to 350 degrees and grease or line cookie sheets with parchment paper.

Once chill time is complete, take and roll out dough on a lightly floured surface.  Dough should be rolled to an 1/8 inch thickness.  Cut out dough with the cookie cutters of your choice.  I used a square biscuit cutter.  Transfer cut outs to cookie sheet, spacing about one inch apart.  Place in oven and bake until done.  Baking time is about 12-15 minutes.  Cookies are done when they are firm to the touch.  Let cool before icing or frosting.

Ingredients/Glaze
1/2 cup powdered sugar
2 tbs Baileys Irish Cream

Place irish cream in a bowl and sift powdered sugar into the bowl.  Mix until no dry streaks remain. Then lightly ice cookies with the glaze.

Decorated Stamp Fondant
The things I found out when trying to complete the process:
-The cookie is thin, so the fondant needs to be thin.
-the less handling of the fondant the less risk of fingerprints and tearing.
-I used a bench scraper to move the fondant squares
-the less detailed the stamp the better
-finding that "perfect" size as well as less detail of a stamp is not very easy
So without further delay, here is the link to Darla's tutorial: Stamped Halloween Cookies
                   
                               **LAST YEAR: Honey Almond Cakes**


Friday, March 2, 2012

Caramel Apple Cakes

I decided this go around I wanted to do a project, not just a regular cake.  I had saved this recipe a few years back from a Disney website but never made it. That site actually has some pretty cool crafty ideas for cupcakes as well as cakes.  This particular recipe was actually for one giant cake.  I made this with a mini ball pan instead and it made about 8 cakes.

The cake part is a spice applesauce cake.  The taste is wonderful and the aroma when baking was enough to make anybody hungry.  This would be a good cake, even if you did not want to got to all the trouble to make the "caramel apple look".  The cakes are covered with caramel and rolled in finely chopped walnuts. I used a specialty caramel-Celtic Sea Salt.  It was not packed with salt, but every once in a while a bite would yield a salty, crystal crunch.

I have listed the original cake recipe for the large caramel apple cake as well as instructions for the mini cakes. I did have a lot of fun making them!.  Also, I finished off my baking session by eating the cut out slice from the one mini cake above, which was the perfect ending to a day in kitchen!  We have visitors coming this evening, so the cakes will be served then.  I have included some helpful tips at the end of this recipe should you decide to make these.


Caramel Apple Cake
adapted from Family Fun Go website 

Special Equipment:
1 ball cake pan  or  2 oven safe 1 1/2 quart bowls (2 mini ball pans)
1 large craft stick (1 package of lollipop sticks)

Ingredients/Cake
2 cups unsweetened applesauce
2 tsp vanilla extract
2 eggs
1 cup vegetable oil
1 1/2 cups light brown sugar
2 tsp cinnamon
1/2 tsp allspice
2 tsp baking soda
1 tsp ground cloves
1 tsp salt
3 1/2 cups flour

Preheat the oven to 350 degrees.  Grease and flour the top edge as well as the cavities of your pans.

Sift together the cinnamon, allspice, baking soda, cloves, salt and flour.  Set aside.  In another bowl, beat together the eggs, sugar, vanilla extract, applesauce and vegetable oil until smooth.  Fold in the sifted ingredients.

For the mini ball pans, fill  cavities 2/3 full and bake for about 18-22 minutes.  For the big cake, bake for 60-70 minutes.  Cakes will be done when tester comes out clean.

Once the cake is done and removed from oven, let cool in pan for 10 minutes.  Then invert onto cooling rack and let cool completely.  Then trim the flat sides of cake or cakes so the two pieces match together, forming a ball.

Ingredients/Topping
3/4 cup finely chopped toasted walnuts
60 caramel candies
2 tbs water

In a microwave safe bow, place unwrapped caramels and add the water.  Microwave in 30 second intervals, stirring after each interval for about one and a half minutes. The mixture should drip off of a spoon.

Place about a tablespoon of caramel in the middle of  8 of the mini cakes or 1/4 cup in the middle of one half for the large cake. Place 1 sheet of wax paper on a flat surface for the large cake and 2 sheets for the minis. Place cake or cakes on top of one sheet.  Spoon the warm caramel over the top, letting it drip down the sides.  Continue until all is covered except for the part directly on top of the wax paper.  Wait 20 minutes for the caramel to cool on the large cake and then scatter nuts along the bottom half of the large cake.  If making minis, let cool for 10 minutes and scoop with a spatula.  Then roll the bottom half of the cakes in the nuts to coat.  Place mini cakes back on clean sheet of wax paper.

Cover the large craft stick with wax paper and insert into top center of the cake.  For the mini's insert one lollipop stick into top center of each cake.

To serve, mini cakes, have guests remove stick and cut with a knife to eat.  The large cake, just remove stick and cut slices.  Each slice should be split again from the top or bottom half of the cake, unless you want to serve long half moon slices.

Tips:
Do not use the center stick to move the cake, it will not hold.
Cooling time is crucial on the caramel, you want the nuts to stick but not to drip off with the caramel
Excess caramel will be on the wax paper.  To create less waste, scoop and re-heat to pour over cake or cakes again.
Since the bottom half of the cake is round, you may have to spoon the caramel to get that part all coated.
The best way to plate these and also help in moving them from one place to another is to take a jumbo muffin paper and cut about an inch off the top and place one cake on top.  Also you can just take a standard cupcake paper and fan it open.

                  **LAST YEAR::Peanut Butter Pretzel Cookies**
 

Friday, December 9, 2011

Gingerbread Latte Cupcakes

Coffee combos have been popping up everywhere in baked goods since the cold season has hit.  I was slated for another donation, so I was looking for something that had a little pizzaz rather than just a standard chocolate cupcake.

I had saved this recipe a few years ago, but it was originally posted in a blog back in 2007.  It has a nice blend of spices as well as a touch of chocolate and coffee.  Definitely packed with flavor and the cupcake texture is just right.  The only ingredient change I made was to sub espresso powder for the coffee extract.  The recipe below does not have that reflect any ingredient changes but I have switched around some of the steps which I feel makes things easier.

The special process with the baking soda on the cupcakes is a must, I made the mistake of sifting it in with the flour on the first batch and had poor results.  This recipe makes 1 dozen, but I made 4 batches so I am now quite familiar with the process!

Oh and those specks in the frosting is none other than coffee grinds.  So coffee lovers rejoice!  For those that are no so keen on the coffee, you can skip the syrup and coffee frosting.  Just use double the amount of the spice frosting.

Today, I am off to Central Market for some great produce and specialty food and ingredients for this holiday season!  While I have a list, I am sure there will be a few impulse buys as well.  While it is a long drive, the visit has always been well worth it.

Gingerbread Latte Cupcakes
adapted from Cupcake Project 

Ingredients/Simple Syrup
2/3 cup water
1 tsp coffee extract
2/3 cup of sugar

Mix sugar and water in a saucepan and then place over medium high heat.  Stir constantly until the sugar is dissolved and mixture comes to a boil.  Remove from heat and stir in extract.  Let cool.

Ingredients/Cupcakes
1/4 tsp salt
1/2 tsp allspice
1/2 tsp nutmeg
1 1/4 tsp ginger
1 tsp cinnamon
1 tbs Dutch cocoa
1 1/4 cup flour
1 egg yolk
1 egg
5 tbs unsalted butter, room temp
1/2 cup molasses
1/2 cup white sugar
1/2 cup milk
1 tsp baking soda

Preheat the oven to 350 degrees.  Grease top edges of muffin cavities of a 12 cup muffin pan and line with paper liners.

In a medium size bowl, sift together the first 7 ingredients and set aside.  In another bowl, beat together the sugar and the butter until light and fluffy.  This should take about 2 minutes.  Then beat in the egg yolk, egg and molasses until evenly distributed.

Fold the sifted flour mixture into the batter, making sure no dry streaks remain.  Take out a small microwavable bowl and add milk.  Heat in microwave about 30 seconds.  Sprinkle the baking soda into the milk and let foam up and then stir once and pour into batter.  Blend milk mixture into the batter until smooth.

Fill the 12 muffin cavities evenly with the batter.  They should be about 3/4 full.  Place muffin tin in oven and bake until tester comes out clean.  Mine were done in exactly 20 minutes.

Remove tin from oven and let cool for 2 minutes and transfer cupcakes to rack to finish cooling.  While they are cooling, you can start on your frosting.

Ingredients/Coffee Frosting

1/2 cup mascarpone
1/2 cup whipping cream
2 tsp of coffee extract
2 tbs coffee grinds
1 1/2 cups powdered sugar

With a mixer on high speed, beat cream until it reaches a soft peak consistency.  Then fold in the mascarpone with a wooden spoon. Add the coffee grinds and extract, stirring so all is evenly distributed.  Sift 1/2 cups of powdered sugar into cream mixture and beat on low speed for 30 seconds.  Repeat process 2 more times until powdered sugar is mixed into frosting.  Cover and place in fridge while you prepare other frosting.

Ingredients/Spice Frosting
1 tsp cinnamon
1 tsp nutmeg
1 tsp allspice
1 tsp ginger
1 tsp Dutch cocoa
1/2 cup whipping cream
1/2 cup marscapone
1 1/2 cups powdered sugar

Regarding the measurements for the first five ingredients, the instructions say to use only a total of 2 teaspoons of the whole mix..  Instead of wasting anything, I halved the measurements on those 5 and had 2 1/2 teaspoons total and used it all.  You can decide which and then blend those first five ingredients together in a small bowl and set aside.

Whip the cream and fold in the mascarpone as stated in the first frosting recipe.  Stir in 2 or 2 1/2 teaspoons of the spice mix.  Sift in 1/2 cup of the powdered sugar and beat on low speed for 30 seconds.  Continue with the same process until all the powdered sugar is blended.  Cover and place in fridge.

Assembly

Using a wooden skewer, poke holes in the top of each of the cupcake and ladle about 2 teaspoons of the syrup on top.  Let soak in for about 15 minutes.

Now, if you have a special piping bag that allows for duo frosting, fill as instructed with both frostings.  If you do not, follow the instructions below. While the method below is not perfect, it can help in making the two separate frostings flow together evenly. 

Cut a small corner out of a gallon freezer bag and place a large piping tip inside the bag and poke part of it through the hole.  Put the bag in a large cup, fold it over the top and lay the cup on its side..  Take out one of the bowls of frosting and spoon it all into the bottom side, being careful not to touch the opposite side.  Take out the other bowl of frosting and spoon the frosting into the bag and on top of the other.  Set cup upright and unfold top edges and squeeze icing down to tip.

Now your are ready to frost the cupcakes and enjoy!
                             **LAST YEAR: Red Velvet Cupcakes**

Friday, October 21, 2011

Snappy Rhizome Cake

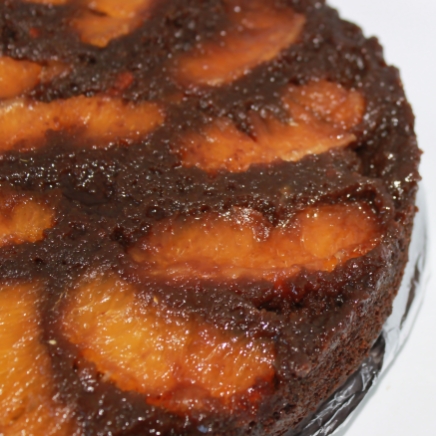
A rhizome is defined as a horizontal, usually underground stem that often sends out roots and shoots from its nodes. Also called a root stalk.  One type of rhizome is ginger which is the main flavoring for this cake.

Ginger does have a very distinct flavor and I feel it is one of the stronger spices in my spice rack.  I was reading an inquiry about the taste of ginger. This spice would be one you have to taste for yourself, there is no proper description since it is so unique.  The replies on the inquiry were not so great-someone said that it tasted like soap and there was one weird reply saying it tasted like shame and self loathing.  Well Queen Elizabeth would not have been happy with that comment-history has it that she invented the "gingerbread man" cookies for gifts!

Anyhow, besides ginger, I have managed to squeeze in cinnamon chips, molasses and a few other spices.  The top is laden with orange segments and brown sugar.  This cake is moist and has a deep rich spicy flavor that does linger after eaten. I used regular molasses, but for those fans of the strong stuff, you are welcome to use "blackstrap" style.  Cream or ice cream on the side is a great pairing against the strong spices. 

Snappy Rhizome Cake
by flourtrader

Ingredients/Topping
2 oranges (separated into segments, seeds and membrane removed)
2/3 cup brown sugar
1/4 cup butter melted

Ingredients/Cake
3/4 cup of buttermilk
3/4 cup molasses 
6 tbs maple syrup
1 tsp vanilla extract
1/2 cup butter, melted
2 eggs
1/2 tsp nutmeg
1 tsp baking soda 
3/4 tsp salt
1 1/2 tsp ground ginger
1 tsp ground cinnamon
2 cups plus 1 tbs flour
3/4 cup cinnamon chips


Preheat the oven to 325 degrees.  Pour the melted butter into a 10 inch cake or springform pan.  Sprinkle the inside of the pan with brown sugar.  Then lay the orange segments in a circular pattern (see picture above) on top of the brown sugar.  Set aside.

Sift together 2 cups of the flour, baking soda, cinnamon, salt, nutmeg and ginger.  Set this aside also.

Using an electric mixer, beat together molasses, egg, extract, butter and maple syrup until well blended.  This should take about 2 minutes.  Fold in half of the flour mixture.  Then mix in the buttermilk and fold in the remaining flour mixture until no dry streaks remain.

In a small bowl, mix the remaining 1 tablespoon of flour with the cinnamon chips.  Then fold into the batter. Spoon out the batter into the pan, smoothing it evenly over the orange segments.

Place in oven and bake until tester comes out clean, approximately 40 minutes.  Remove pan and let cool for 5 minutes.  Then run a knife around the edge and invert onto a platter.

Cake tastes best served the next day slightly warmed up with a dollup of whipped cream or ice cream on the side.
                          **LAST YEAR: Teriyaki Pork Sliders**

Friday, September 2, 2011

Harvest Spice Bites

I have been working at making donuts for awhile and I finally decided just to drop the dough in the oil instead of trying to make picture perfect donuts.  I am glad I did because these are now more of a bite size item than a big donut.

This particular recipe has some ingredients that you probably will not find in your kitchen.  The first is pureed butternut squash.  I found a bin of this in my freezer.  As we get further into the season you should be able to make your own fresh puree or purchase it canned.  Note that the puree used is a simple blend of cooled, cooked squash and a little water.  Do not use the puree that most people consider a side dish, it is a recipe that has additional ingredients such as butter. The other specialty ingredient is liquid pie spice extract.  That is a combination of nutmeg, cinnamon, allspice and ginger flavors.  You can use traditional powdered spices, which are a blend of 1 tsp cinnamon, 1/2 tsp ginger, 1/4 allspice and 1/4 nutmeg.

These donut bites turned out much like a cake donut, fluffy on the inside with a crispy outside.  Without the sugar coating, they do have the slightly sweet taste of the squash with light undertone of the spice flavors.   These are a special treat with morning coffee or tea. This recipe makes about 2 1/2 dozen donut bites.

Harvest Spice Bites
by flourtrader

1 1/2 cups pureed butternut squash
3 tbs melted butter
3/4 cup milk
3 eggs, room temp
1 tsp vanilla extract 
2 tsp pie spice extract (or mix of powdered spices noted above)
4 tsp baking powder
1/2 tsp baking soda
1 tsp salt
3 1/2 cups flour
1 cup sugar
Canola oil for frying

Sift together baking powder, salt, baking soda, flour and spice blend (if using powdered spices).  Set aside.

In another bowl, beat together eggs, sugar and butter until smooth.  Add vanilla extract, milk, butternut squash puree and pie spice extract (if using).  Beat for 30 seconds on medium speed or until evenly blended.

Fold the flour mixture into the bater with a wooden spoon and mix until no dry streaks remain.  Cover and place in the fridge.

Prepare a pan by filling with 1 1/2 inches of canola oil.   Layer 3 sheets of paper towels on top of 2 baking sheets for the donuts to drain on. Place a deep fry thermometer in the oil and heat the oil to 365-370 degrees Fahrenheit.

At this time, you will need to decide on a topping for the doughnuts.  Joy the baker has compiled several options from Bon Appetit, which you can find here.   I just opted to roll them in white sugar.  Prepare your topping and place in a bowl beside the baking sheets.  If you are using a glaze, place a cooling rack over a flat surface covered with wax paper.

Once the oil reaches the correct temperature, drop batter by round spoonfuls into the oil.  A soup spoon is a great size to use.   Only drop four at a time to cook at once.  Let cook for about 2 minutes on each side and then remove and place on paper towels to cool.  Let cool for 3 minutes and roll in sugar mixture or dip in glaze.  After coating the sugar ones, you can place on a plate.  If you dip them in glaze, place the donuts on a cooling rack to set.  Repeat process with the remaining batter.