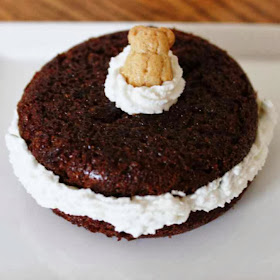
I settled on a recipe that produced a deeply spiced cake, but only reflected the traditional flavor. The unique thing about this recipe is the use of stout beer. The cakes turned out crispy on the edges and very moist. Perhaps it was the beer, but I believe that the oil was actually the main factor for the texture. The filling may be a basic cream cheese frosting, but I could not think of a better pairing.
The recipe is actually one for a 2 layer, 7 inch cake but the batter turned out to be the perfect amount for 12 whoopie pies. So dig out all those ground spices from your cabinet for this recipe, you will be glad you did.
Gingerbread Whoopie Pies
adapted from Miette
Ingredients/Cakes
1/2 cup vegetable oil
1/2 cup plus 2 tbs stout beer (Guiness is recommended)
3/4 cup molasses
2 eggs
1/4 tsp salt
1/8 tsp cardamon
1/4 tsp cloves
1/4 tsp nutmeg
3/4 tsp cinnamon
1 tbs and 2 tsp ginger
1 tsp baking powder
1/2 tsp baking soda
1/2 cup packed light brown sugar
3/4 cup granulated sugar
1 1/4 cup flour
Ingredients/ Filling
1/4 cup (1/2 stick) and 1 tbs and 1 1/2 tsp unsalted butter at room temp
1 cup cream cheese
1/2 cup sifted powdered sugar
Topping
Mini Honey Teddy Grahams
1 cup heavy cream
1 tbs powdered sugar
Preheat the oven to 350 degrees and grease the cavities of 2-12 cavity non stick whoopie pie pans.
Stir together the molasses and stout in a small saucepan. Place over medium heat and continue to stir as the mixture comes to a boil. While still stirring after the boil stage, sprinkle in the baking soda. This will cause the consistency to become very foamy. Remove from heat and set aside to cool. Mixture is ready to use once it reached room temperature.
In a medium bowl sift together the dry ingredients: 5 different spices as listed above, salt, baking powder and flour. Also put this aside.
In the bowl of a stand mixer, add 2 types of sugars and eggs. Beat on medium speed until light in color, about 3 minutes. Keep the mixer running and slowly pour in the oil. Once the oil has been blended into the batter, change mixer speed to low. Pour a steady stream of the molasses mixture into the batter. Once blended, remove bowl from mixer stand.
Fold the sifted ingredients into the batter. Once there are no streaks of flour, strain mixture into a bowl. Then fill each pan cavity with 2 tbs of batter. Place pans in oven and bake for 4 minutes, then rotate and switch racks with each pan. Bake for an additional 4-6 minutes. The cakes are done when they spring back when lightly touched in the center.
Remove pans and let cakes cool for about 10 minutes. Then take a plastic fork and go around the edges of each cake and slip underneath to remove cake from cavity. Place cakes on rack to cool.
Once completely cool, place 12 cakes on individual squares of wax paper. Cakes will need to be refrigerated for at least one hour before filling.
To make the filling, beat together butter and powdered sugar until smooth and creamy. This should take about 3 minutes on medium speed. Then remove cream cheese from package and place in microwave safe bowl. Microwave for 2 intervals of 10 seconds each. Add cream cheese to butter mixture and beat for 2 minutes.
Place 1 heaping tablespoon of filling on top of the cakes on the wax papers. Smooth the filling evenly over the cake. Repeat process until all cakes are filled. Then place one cake on top, creating a sandwich.
Then beat the cream and sugar together until it becomes very thick and holds its shape. Using a star tip, pipe the whipped cream in the seam of where the edges of the two cakes meet. Then pipe a rosette on top and place 1 mini honey graham bear on top.
Tips and Notes:
1. These cakes are very moist and stick to parchment. I served each of them on the square of wax paper and they did not stick.
2. The pans I used were non stick and the recipes with them stated grease and flour the pans. I did not want flour residue on cakes, so I just used grease in pans.
3. Use caution when removing cakes from pan, they are delicate and moist.
4. The cakes, without filling, can be stored tightly wrapped for up to 3 days in the refrigerator.
5. The filling, tightly covered, will last up to 2 weeks in the fridge. However, it will need to be beaten for about 2 minutes prior to using.
6. The amount of filling for these cakes is based on personal preference, so feel free to increase it if you want more.
**LAST YEAR: Tunnel of Fudge Bundt Cake**

