Foodbuzz

Sunday, November 29, 2015

Amaretto Cherry Bread


For me, it is hard to turn down a culinary treat with Amaretto. The tasty Italian liqueur has found its way into many types of recipes from meat to ice cream. Even though Amaretto does have a bitter almond flavor, it is made from apricot pits- it does not contain any almonds or nuts.

This loaf has the same texture as most sweet bread. However, it is the Amaretto that makes it a standout from the rest. With the addition of cherries and nuts, the flavors compliment each other nicely. Also, this is a go to recipe when you are looking for something quick to bake.

The bread is a great item to give as a gift, it transports well and the flavors get better with time. You will also find that it is a welcome addition to a cup of tea or coffee. One slice can squelch the craving for something sweet, but not heavy.

The recipe makes 3 small loaves.

Amaretto Cherry Bread
adapted from Recipe Goldmine

Ingredients
1/2 cup Amaretto
3 eggs
1/2 cup butter
1 cup chopped almonds or chopped nuts
1 cup sugar
2 tsp baking powder
1 1/2 cups flour
powdered sugar (optional for dusting top of loaves)
1 1/2 cups fresh or frozen cherries

Preheat oven to 350 degrees.  Grease the interior of 3 loaf pans (5.5 X 3) and line bottom and 2 long sides with parchment paper.

Add the butter and sugar to the bowl of a stand mixer. Beat at medium speed for 1 minute then mix in one egg at a time, until all is blended and set aside. In another bowl, sift together the flour and baking powder.

Fold 1/3 of the sifted ingredients into the butter batter. Stir in 1/4 cup of Amaretto.  Repeat the process, ending with the flour after the last 1/4 cup of Amaretto.  Once batter is smooth, mix in the cherries and nuts until evenly distributed.

Spoon the mixture evenly into the loaf pans. Place in oven and bake until tester comes out clean. The bake time averages between 40-50 minutes. Loaves will have a golden hue on the surface when done.

Place pans on cooling rack and let bread cool completely in pans. If you prefer, the top can be dusted with powdered sugar right before slicing and serving.

Tips and Notes:
1. I used 2 standard loaf pans, but there was not much height to the loaves. The smaller loaf pans do allow for more height.

2. I used pecans, but you can use any type of chopped nuts, depending on personal preference.

3. Do not use any frozen fruit in syrup, buy the flash frozen type that has no syrup.  Make sure the cherries are thawed before putting into batter.
                                        **LAST YEAR:Coconut Chocolate Chip Cupcakes**

Sunday, November 22, 2015

Gothenburgers

When most people prepare for the holidays, they are concerned about making an impression as well as making the event memorable for years to come. These little pastries are sure to do both in a very good way.

With the beautiful golden piped edge and the marbled center, they are a stunner for the dessert table. Beware, however, that the inviting appearance will insure that your guests will be reaching for one of these to eat first.

One bite reveals a buttery base with a crunchy edge and smooth filling that coats the base. Each of these textures hold a rich almond flavor. Topping it off is a sweet raspberry/icing swirl and a touch of chocolate. All of those attributes makes them worthy of the holiday receipt vault. This is where are the special recipes lie that only come out once a year and are requested every year.

Make a delicious holiday memory this season by creating these stunning pastry-like cookies, named after the second largest city in Sweden, Gothenburg. This recipe makes about 24 pastries that are 3 1/2 inches in diameter.

Gothenburgers
adapted from Swedish Cakes and Cookies

Ingredients/Edged Base
1/2 an egg
1 egg white
7 oz almond paste
5 tbs butter
2 tbs sugar
3/4 cup flour

Ingredients/Filling and Garnish
1 egg (whisked)

3 tbs butter
4 oz almond paste
2-3 tsp water
raspberry jelly
3 oz semi sweet chocolate
1/3 cup powdered sugar

Prepare 2 baking sheets by lining with parchment paper.

To form the dough, cream together the butter and sugar in a medium size bowl. Beat in the 1/2 of egg. Add the flour and fold in, using a wooden spoon. Mixture should form a ball of dough. Flatten the dough into a thick disk and cover with plastic wrap. Place in refrigerator to chill for about 1/2 an hour. 

For the piped almond edge, fill a small bowl with the egg white. Take out a grater and grate the 7 oz of the almond paste into the egg white. Beat the two together until smooth, using a hand mixer on medium high speed. Set aside.

Preheat the oven to 400 degrees before you make the filling. Start on the filling by beating the butter in a bowl until smooth, set aside. Using another bowl, grate 4 oz of almond paste into the bowl. Add half of the grated almond paste to the butter and beat for 30 seconds.Then beat in the egg for another 30 seconds. Lastly, add the reset of the grated almond paste and beat until smooth.

Dust a flat surface lightly with flour and also dust a rolling pin. Prepare a piping bag with star tip. Place a cooling rack on the counter as well as a sheet of wax paper.

Remove the dough from the refrigerator and roll out onto the floured, flat surface. Cut dough into round circles, about 3 1/2 to 3 3/4 inch in diameter and place on baking sheet. Using a butter knife, smooth the filling evenly onto the circles, leaving a border of 1/4 of an inch.

Once all the filling has covered the circles, fill the piping bag with the almond paste/egg white blend and pipe around the edge of the pastry. Place pan in oven and bake for about 10-12 minutes or until edge turns a light golden hue.

Place baking sheet on rack and let cookies cool for about 2 minutes. Transfer from baking sheet to cooling rack. Once completely cool, spread about 1 1/2 teaspoons of raspberry preserves over the filling, keeping clear of the almond piped border. 

In a small bowl, sift the powdered sugar and add the water by teaspoons, mixing after each addition. The icing should be the consistency of cookie icing not cake frosting. Once blended, swirl the icing into the raspberry topping forming a marbling appearance. Again, avoid the piped border. Let the cookies set for about 5 minutes for the topping to solidify more. Take a sharp knife and cut each in half.

Set up a small double boiler and melt the chocolate. Coat the cut edge of each cookie in the melted chocolate and place on wax paper. Give time for the chocolate to set before serving or storing.

Tips and Notes:
1. I used seedless raspberry preserves and doubled the batch of icing.

2. I found that using a knife to coat the chocolate on the cookie edge made for a more even finish.It also helps when you get down the the last of the melted chocolate.

3. There are some strange measurements since this recipe originated from Sweden, such as the 1/2 egg and 7 oz of almond paste (my can was 8 oz). For the egg, whisk a whole egg and measure out 2 tablespoons for your ingredient for the dough base. The almond paste I weighed to eliminate the extra  1/oz.

4. For less leftover ingredients, double the whole recipe.


                                           **LAST YEAR: Aunt Bill's Brown Candy**

Sunday, November 15, 2015

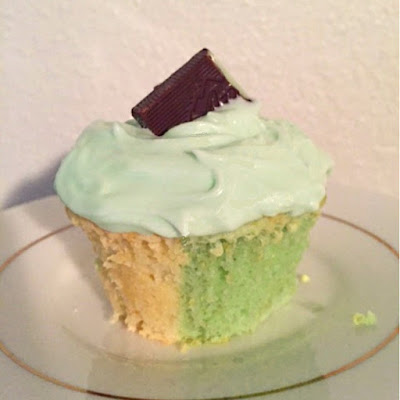
Grasshopper Cupcakes


When it comes to purchasing, everyone has their weakness for something that they have way too much of and want more. Some men have to have every type of fishing lure ever made and there are many women that can never get enough shoes. In addition to having them, they enjoy shopping for them as well.

My weakness is for baking utensils and cookbooks. I try to curb my weakness by being careful of which items are purchased. I ask myself how much use will I get out of it and is the usage worth the expense. Which brings me to the little cupcake separators that it took to make the two toned treat above. Tagged at under $9.00 for 6, I decided they were worth it. I have made several different combo cupcakes in the past and I like the idea of two flavors side by side, rather than top and bottom.

This is a cupcake take on the sweet, after-dinner drink called the Grasshopper. In case you are not familiar with the drink, it is made with creme de cacao and creme de mint. The drink originated back in the 1950's. The owner of a bar located in the French Quarter section of New Orleans, Louisiana came up with this tasty blend.

Chocolate and mint always make a good pairing and this moist cupcake is a perfect example. The frosting is a mix of mint, creme de cacao and cream cheese. Unlike buttercream, the frosting is thinner so no fancy piping was done. In review, I think buttercream would have masked the cake flavor, so I was pleased with the choice. Also, the creme de mint candies on top made them even better. This recipe makes about 1 1/2 dozen cupcakes.

Grasshopper Cupcakes
adapted from Spiked Desserts


Ingredients/Cupcakes
1 cup or 2 sticks of butter (room temp)
1 tsp clear vanilla extract
3/4 cup sour cream
4 oz white chocolate
4 eggs
3 tbs green creme de menthe
3 tbs clear creme de cacao
green food coloring (optional)
1/2 tsp mint extract
2 cups sugar
1/4 tsp baking soda
3 cups flour
1/2 tsp salt
1 tsp baking powder


Ingredients/Frosting
3 1/2 cups powdered sugar
8 oz cream cheese
1/4 tsp mint extract
2 tsp creme de cacao
2 tsp creme de mint

Grease the top edge of muffin cavities, then place paper liners in each cavity.  Preheat the oven to 350 degrees.

Place butter in bowl and beat until smooth with a stand mixer. Add the sugar and cream both together until smooth and light. Then add each egg, beating about 30 seconds between additions. Turn off mixer and leave bowl set in stand.

Place a double boiler over medium high heat. Once the water comes to a simmer, fill the top pot with the white chocolate and let melt. After all is melted, remove double boiler from heat and remove top pot.

Go back to the mixer and turn on low and start beating the butter/sugar batter again. As the mixer is running, slowly add the melted chocolate and then the vanilla extract. Be sure to stop and scrape down the sides occasionally. Once blended, turn mixer off. Remove bowl and set aside.

Take out 3 bowls. In one bowl sift together flour, salt, baking powder and baking soda. Using a wooden spoon or spatula, fold 1/3 of the sifted ingredients into the sugar/butter batter. Add 1/2 of the sour cream and blend. Complete this process again and then fold in the last of the sifted ingredients.
Divide batter equally into the remaining 2 bowls.

Mix 3 tbs of creme de menthe, mint extract and green food coloring (optional) into one batch of batter. For the remaining batter, blend in 3 tbs of creme de cacao.

Now comes the tricky part. If you have the separators for the batter it is helpful, just place in the center of each cavity and fill one side up 2/3 of the way with one batter. Then do the same with the other batter and remove separator. Without a separator, just spoon in best you can on each half of the cavity with each flavor of batter.

Once all the batter is in the muffin cavities, place pans in oven to bake. Bake until tester comes out clean. Bake time should be about 16-19 minutes. Remove and let cool in pan 1 minute and then transfer cupcakes to a cooling rack. Cool completely prior to frosting.

Start on the frosting by sifting the powdered sugar into a bowl of a stand mixer. Then cut the cream cheese into cubes and drop into the sugar. Add the creme de menthe, cream de cacao and mint extract. Start mixer and beat on low speed for about 2 minutes. Turn the speed up to medium and beat until creamy and completely blended. Top cupcakes with frosting, using a knife to swirl on top. Remove wrappers of candy. Grate, split or do both for the topping. Sprinkle on grating and/or stick 2 pieces of the split candy into the center of the cupcake top.

Tips and Notes:
1. I used Batter Babies brand of cupcake dividers. They do not fit tight into the muffin cavity, but the addition of one type of batter on a side does holds them up so you are free to add the batter to the other side.

2.The frosting is personal preference. It does not have to be a blend of both flavors, so add flavor how you want.

3. As with all cupcakes, frost as soon as cool to avoid having the top of cupcake drying out.
                                             **LAST YEAR: PBC Cookie Biscotti Sticks**

Sunday, November 1, 2015

Bacon Buttermilk Scones

Most of the items you will find on my blog are sweet rather than savory. Some men do like sweets, but if given a choice, they will choose savory over sweet. Even though my blog has sweet items, I have tried to make sure that the blog does not seem too "girly". By "girly" I mean recipes and photos of barbie doll cakes and hello kitty cookies. Nothing wrong with those type of things, but that is not the chosen image for this blog.

When it comes to savory, bacon and cheese does seems to draw the most attention. These scones definitely have that covered. To further escalate your craving, toss in some green onions sauteed in bacon drippings and some garlic powder. Then, seal the deal by adding some heat with red pepper flakes and make sure that the bacon is actually peppered bacon.

A plate of these tasty scones will give women easy access to the man cave during football season. Men, on the other hand, may consider bringing these scones out in an effort to help your friend decide who gets those 50 yard line tickets...

Bacon Buttermilk Scones
adapted from Better Homes and Gardens Fall Baking

Ingredients
1 1/2 cups shredded cheese
1/2 cup chopped green onion
6 slices peppered bacon
1/4 tsp garlic powder
1/4 tsp crushed red pepper
1 tbs baking powder
3 cups flour
1/2 cup cold butter (cubed)
1 egg
1 cup buttermilk

Prepare a baking sheet by lining with parchment paper. Preheat the oven to 425 degrees. Lightly dust a flat surface with flour.

Cook the bacon in a skillet over medium heat until crispy. Remove from pan and lay on paper towels to drain. Empty all but 2 tablespoons of bacon grease from pan. Chop or crumble bacon into pieces and set aside.

Place chopped green onions in the same pan in which the bacon cooked. Stir fry until tender. Empty pan over a sieve and let the grease drain, reserving the sauteed onions. Set aside.

Sift together the flour, garlic powder and baking powder into a medium size bowl. Then add the red pepper flakes.Toss in the butter chunks and use a pastry blender to form the mixture into coarse crumbs. Fold in the green onions, cheese and bacon, making sure all is evenly distributed. Form a well in the center of the mixture.

Using a medium bowl, whisk together the buttermilk and egg. Take out 2 tablespoons of the mixture for reserve. Empty the remaining egg/buttermilk batter into the well that was formed in the flour mix. Using a wooden spoon or large fork, stir all until combined into a dough.

Empty dough onto prepared surface and knead, about 10 to 12 turns. Roll dough into flat mass that is 1/2 an inch thick. Cut into squares or circles with a 2 inch biscuit cutter. After all is cut, you should have 24 to 26 scones. Place all on cookie sheet, fitting all 24 or 26 closely together but not touching.

Brush the tops with the reserved buttermilk mixture. Place scones in oven to bake for 13-15 minutes.  They will be lightly golden on top and bottom when done. After baking, transfer scones to rack to cool.

Tips and Notes:
1. The cheese is your preference, for really spicy scones use jalapeno cheese. The recipe does  recommend Guyere.
2. Sharply cut dough edges will insure proper rise to the scones.  Make sure your biscut cutter is sharp and do not twist when cutting into dough.
                        **2 YEARS AGO:Chocolate Sugar Cookies**