Foodbuzz

Sunday, December 22, 2019

Chocolate Chip Nut Loaf


I believe it was Latin America that first came up with the cinnamon chocolate flavor combination. Today, you can find cinnamon hot chocolate along with several recipes that make use of this wonderful flavor combination.

This particular recipe is one of those. It is a sweet loaf bread made with sour cream which guarantees that the bread is moist. Also, it has chocolate chips in the batter.  If that is not enough, there is a layer of cinnamon and walnuts which adds a tasty sweet crunch.

If you have never tried the chocolate cinnamon flavor combination, you have been missing out. If the flavor combination is new to you or an old favorite, this recipe is a good example of how delicious the combination can be.

Chocolate Chip Nut Loaf
adapted from Food Network 

Cinnamon Sugar blend
1/2 cup sugar
1 1/2 tsp ground cinnamon

Batter
2 eggs
2/3 cup sugar
1/2 tsp vanilla
1 1/2 cups flour
1 1/4 tsp baking powder
1 1/4 tsp baking soda
1 tsp salt
1/2 cup butter, melted
1 1/3 cup sour cream
3/4 cup chocolate chips
3/4 cup chopped walnuts

Preheat oven to 375 degrees. Spray a 9x5 inch loaf pan with non stick spray. Using a small bowl, whisk together the cinnamon and sugar and set aside.

Fill the bowl of a stand mixer with eggs and beat for 3 minutes until they are foamy. Add 2/3 cup of sugar and vanilla and blend until smooth. Then blend in melted butter and sour cream until incorporated into batter.

Using a large bowl, sift together flour, baking soda, salt and baking powder. Using a wooden spoon, mix the dry ingredients into the sour cream batter. Once no dry streaks remain, blend in chocolate chips until evenly distributed.

Divide the batter in half. Scoop one half of the batter into the prepared loaf pan. Sprinkle the cinnamon over the batter, reserving 3 tablespoons for the top of the loaf. Then carefully sprinkle the chopped walnuts over the cinnamon layer, making sure layer is even and covers the whole surface. Then scoop out the rest of the batter and smooth it over the walnut layer. Lastly, sprinkle with the reserved cinnamon sugar.

Place in oven and bake until tester comes out clean, about 50-55 minutes. Remove from oven and let rest in pan about 5 minutes then invert twice so the loaf is face up. Let cool completely before slicing and serving.

Tips and Notes:

1. The original recipe states use 2/3 of the cinnamon sugar blend in the center and the rest on top. The sugar on top remained dry so a lot fell off when inverted. I decided it was best to use more in the center layer than on top, so the recipe was changed.
                             **LAST YEAR:Peanut Butter Cut Out Cookies**

Sunday, December 8, 2019

Praline Bundt Cake

One thing about it, pecans are a favorite in our house. I always have to have a big bag kept on hand for baking. We have a place close to us that sells in bulk that has their own website, so it makes it convenient.

Having a cake with the flavor of pralines is a southern treat. This cake has cream cheese and sour cream in it which makes it quite moist.  Crushed candied pecans also makes a great crowning touch. Since I have yet to know anyone that hates pecans, I feel that this cake is at home on any dessert table.

The cake pan was sprayed with non stick cooking spray and it fell right out with no issues. It did rise above the center hole about an inch so it has a thick bottom, it would not sit flush with the cake plate. However, it did not detract from the general appearance or taste of the cake.

If you are looking for a southern dessert, you have landed on the right post.

Praline Bundt Cake
adapted from Southern Living

Ingredients/Cake
1 cup chopped pecans
2 1/2 cups flour
1 tsp baking powder
1/2 tsp baking soda
1/4 tsp salt
1 cup butter
8 oz cream cheese
16 oz dark brown sugar
8 oz sour cream
4 eggs
2 tsp vanilla

Ingredients/Icing
1 cup light brown sugar
1/2 cup butter
1/4 cup milk
1 cup powdered sugar
1 tsp vanilla extract
chopped sugared pecans

Preheat oven to 350 degrees. Toast pecans in a single layer in the oven for 5-7 minutes or until fragrant. Let cool for 15 minutes. Then reduce oven temperature to 325 degrees. Spray the interior of a 10 cup bundt pan with non stick cooking spray.

Fill the bowl of a stand mixer with butter and cream cheese. Beat at medium speed, scraping down sides of bowl when necessary.  Once mixture is smooth, add brown sugar in increments, beating after each addition until blended. After all the brown sugar is incorporated add one egg and beat for 30 seconds. Repeat process for additional eggs.

Using another bowl, sift together flour, salt, baking powder and baking soda. Add 1/3 of sifted ingredients to butter mixture and blend with a wooden spoon. Then add half of the sour cream, mixing until incorporated. Repeat process ending with dry ingredients. Stir in toasted pecans and vanilla extract until evenly distributed. Spoon batter into prepared cake pan and lightly tap on counter to get rid of any air pockets.

Place pan in oven and bake until tester comes out clean, approximately 1 hour and 15 minutes. Place cooling rack over wax or parchment paper. Remove cake and leave in pan for 20 minutes to cool. Then invert cake onto rack to finish cooling.

After cake has cooled, prepare icing. Fill a saucepan with brown sugar, butter and milk and place over medium heat. Stir as the butter melts down. Let the mixture come to a boil and then set your timer for one minute. Remove from heat and add powdered sugar. Whisk until all the sugar is dissolved then stir in vanilla extract. Then spoon over cake and let drip down sides. Sprinkle surface with candied pecans.


Sunday, November 24, 2019

Butterscotch Peanut Butter Bars


Having come across this recipe, I was curious about the flavor combination. Peanut butter and butterscotch together in one recipe is quite unique.

The flavors do compliment each other. The bar itself has a chewy texture that stems from the oats included in the mix. It is a peanut butter bar but the surface has the real combo of flavors with butterscotch chips on top along with a peanut butter glaze. The butterscotch chips heightens the sweetness. That surface combo is what makes them very rich.

Since most peanut butter has sugar in it there is not contrast, the butterscotch is just sweeter than the peanut butter. Had the recipe called for natural peanut butter, it would have been a salty/sweet bar. Perhaps not natural peanut butter but store bought peanut butter with no added sugar is a thought on attaining salty/sweet bars.

Butterscotch Peanut Butter Bars
adapted from Food network 

Ingredients/Bars
1/2 cup butter, room temperature
1/2 cup sugar
1/2 cup light brown sugar
1/2 cup creamy peanut butter
1 egg, room temperature
1 tsp vanilla
1 cup flour
1 tsp baking soda
1/4 tsp salt
1/2 cup quick oats
6 oz butterscotch chips

Ingredients/Glaze
1 cup confectioners sugar
1/4 cup creamy peanut butter
1/4 cup milk

Prepare a 9x13 inch pan by greasing the interior with butter. Also, preheat the oven to 350 degrees.

For the bars, start by sifting the flour, salt and baking soda together. Then whisk in oats and set aside. Fill the bowl of a stand mixer with butter, both types of sugars and 1/2 cup of peanut butter. Beat with the paddle attachment until light and fluffy. In a separate bowl, whisk together the vanilla and egg. Then incorporate the mixture into the peanut butter batter by mixing on medium speed.

Then, using a wooden spoon, fold the sifted ingredients into the batter until just combined and no dry streaks remain. Transfer the batter to the prepared pan and smooth out into the pan by using a spatula. Sprinkle butterscotch chips evenly over the surface of the batter. Place in oven and bake until edges are golden, about 20 to 25 minutes.

While the bars are baking, make the glaze by mixing all ingredients together until smooth. Pour over warm bars. Once completely cool, cut into squares.

Tips and Notes:

1. My bars took 25 minutes to bake.
2. I thought that the butterscotch chips would settle and melt more into the bars while baking, but they did not change much and remained on the surface.
3. These are not a thick bar, but are still quite satisfying as is.
                                   **LAST YEAR:Maple Date Loaf**

Saturday, November 16, 2019

Millionaires Candy


The last time I made candy it was some type of fudge. As you probably know, fudge has a lot of steps and a lot of beating time. Not the easiest thing to make. However, this recipe is quite the opposite. In fact, the process was so easy I almost made a second batch right after I finished with the first. This is a great time saving recipe for the holidays with tasty results.

The delicious combination of chewy carmel and crunchy pecans will have everyone reaching for seconds. These candies are stored in the freezer, but when you pull them out they take only a few minutes to reach the chewy stage. This recipe yields 64 pieces, depending on the size of the candy clusters.

Millionaires Candy
adapted from justapinch.com 

Ingredients
3 cups chopped pecans
14 oz caramels (about 50 pieces)
14 oz sweetened condensed milk
24 oz dipping chocolate or almond bark

Fill a saucepan with caramel pieces and sweetened milk. Place over medium low heat and let carmels melt, stirring occasionally. Do not let boil. Once caramels are melted stir in the pecans until evenly distributed throughout the caramel. Set aside from heat and let cool for 30 minutes to an hour.

Prepare 2 baking sheets by lining with foil and spraying with non stick spray. Once the candy has cooled, scoop into tablespoons and drop on prepared pans, leaving space between each. After all the candy has been formed into mounds, place baking sheets in the freezer. Let freeze for a minimum of 2 hours or maximum of overnight.

After the chilling time, melt the chocolate coating according to the manufacturer. Also, place 2 sheets of wax or parchment paper on a flat surface. Take one baking sheet out of the freezer at a time. Using a large fork, dip candy clusters in chocolate, making sure to cover all sides and place on paper to harden. After dipping all the clusters from that baking sheet, take out the next to dip and finish.

Store candy in freezer.

                                **LAST YEAR:Nutmeg Cake**

Sunday, November 3, 2019

Palm Beach Mint Brownies


With the holidays coming up, I have started to see recipes with peppermint. One of the traditional candies of the Christmas holiday is the peppermint candy cane. This candy first started out all white and strait. They were bent to use to decorate Christmas trees. The red color was added along with peppermint flavor. As years passed, they always reappear around the Christmas holiday, sometimes found on Christmas cards or handed out to children.

Since I do not favor the hard peppermint candy, that discounts quite a number of recipes. However, I love peppermint patties. Once I came across this recipe, I could not pass it up. Fudgey brownies filled with a peppermint patties makes for an extra special treat. Beware though, they are very rich so a little piece goes a long way.

If you love mint patties like I do and are looking for brownies with a little something extra then this is the recipe for you.

Palm Beach Mint Brownies
adapted from Maida Heatter via recipelink.com 

Ingredients
8 oz unsweetened chocolate
2 (11.5 oz) bags peppermint patties
5 eggs, room temp.
1 cup or 2 sticks butter
2 tsp vanilla extract
1/2 tsp almond extract
1 tbs plus 1 tsp espresso powder
3 3/4 cup sugar
1/4 tsp salt
1 2/3 cup flour
2 cups coarsely chopped walnuts

Set up a double boiler and fill top pot with chocolate and butter. Let water simmer in bottom pot and stir chocolate mixture occasionally until all is melted and blended together. Set aside.

Fill the bowl of a stand mixer with eggs, vanilla, almond extract, sugar, espresso powder and salt. Using the paddle attachment, beat the mixture on high speed for 10 minutes. During this time, the mixture will get pale and triple in volume.

As the mixer is running, preheat the oven to 400 degrees and prepare a 9 X 13 inch pan by lining with foil and greasing the interior with butter or non stick spray. Take out a bowl and unwrap mints, leaving about 15 still wrapped which you will not be using.

Once the 10 minute beating time has expired, remove bowl from mixer. Using a wooden spoon, stir in chocolate mixture (it may still be warm, but it is ok) until fully blended into batter. Then fold in flour, making sure no dry streaks remain. Lastly, fold in chopped walnuts.

Using a measuring cup, reserve out 3 1/2 cups of the batter. Take this reserved amount and fill the prepared pan, smoothing the surface. Then layer each of the mint patties on top, having the edges touch each other but not overlapping. Cover the whole surface. Then top with the remaining batter, smoothing it out evenly over the patties.

Place in oven and bake for 30 minutes. Cool completely in pan on wire rack. Remove foil and refrigerate overnight before cutting into bars.

Tips and Notes:
1. The original recipe did not state the size of the bags, but the smallest size I found was 11.5 oz.

2. I got a large bag of peppermint patties so I did not test the size and the noted leftovers in the recipe.

3. The original recipe states the chocolate and butter can be done in the microwave, but since there was no specifics on time I just went with the safer method of a double boiler.

4. There is mention that the edges may bake up to hard and that area may be trimmed off. I ate edges and all, but I did find it a little hard.

                          **LAST YEAR:Apple Spice Ice Cream**


Saturday, October 26, 2019

Rum Pineapple Upside-Down Cake


This recipe was a hit at our house. Not much left after the first day. I did make a few alterations, one being the pan size and preparation of the pineapple rings. The original recipe calls for 1 12" cast iron skillet. I used a 9X13 size pan. Also, I chose to eliminate the maraschino cherries, filling the center of the rings with the macadamia nuts. The recipe does not specify light or dark brown sugar, but I opted for light.

The one thing I liked is that the moist cake is only one inch to and inch and a half thick. I feel that it makes a better balance than a thicker cake. I was worried that the rum would be too strong, but there is only a hint of rum taste which comes from the rings, which is just enough.

If your looking for something tropical and easy to make, this is the recipe for you. Just plan ahead because the rings soak in rum overnight.

Rum Pineapple Upside-Down Cake
Food.com

Ingredients
1/2 cup chopped macadamia nuts
1 cup light brown sugar, packed
1/4 cup butter
1/2 cup spiced rum
1-20 oz can of pineapple rings (reserving  2 tbs of juice)
3 eggs, separated, room temperature
1 cup granulated sugar
1 cup flour
1/4 tsp salt
1 tsp baking powder


Empty juice from can of pineapple rings and set aside a few tablespoons. Also, place pineapple rings in a medium size bowl. Pour spiced rum over rings. Cover and refrigerate overnight.

The next day, preheat oven to 350 degrees. Place a skillet over medium heat and melt butter and brown sugar together. Don't overcook the brown sugar butter mixture, it will turn hard. Just as soon as melted, add pineapple rings (reserving rum) and leave on low heat while you finish preparing the cake.

Using a wooden spoon, blend the egg yolks with the granulated sugar. Add 2 tbs of reserved rum and 2 tbs of pineapple juice and stir. Discard the rest of the juice and rum.

In another bowl, sift together flour, salt and baking powder. Set aside. Fill the bowl of a stand mixer with egg whites. Beat with wire whisk attachment until stiff peaks form.

Combine the sugar/egg mixture with the sifted ingredients, blending with a wooden spoon. Then fold in egg whites.

Take a 9X13 pan and place warm pineapple rings in the bottom. Then pour sauce that is left in the pan over top, tilting pan making sure all the rings are covered.  Sprinkle macadamia nuts inside the pineapple rings. Spoon the batter over the rings, making sure that rings and nuts are completely covered.

Place in oven and bake until tester comes out clean, about 20-25 minutes. Remove and let cool for 20 minutes, then invert onto a cookie sheet or large pan. Serve warm or at room temperature

                                 **LAST YEAR:Macadamia Cherry Cookies**


Saturday, August 31, 2019

White Mountain Mudslide Cookies


This recipe is a spin off from the boozy mudslide drink. The drink recipe is one of coffee liqueur, irish cream and vodka. The cookie recipe has espresso chips, irish cream and whiskey. It does require some specialty ingredients, however, one bite of these delicious gems does make it worth it. Instead of the liqueur cooking out, they have irish cream extract in them which insures that they retain that flavor long after they have been baked.

Also, the original recipe stated cappuccino chips. Guittard actually made these at one time but they have been discontinued. Instead, Hershey has come out with espresso chips which are a coffee/cocoa combination, so this is what I used. Since they have cocoa in them I opted out of drizzling them with bittersweet chocolate. The Guittard cappuccino chips may not have had cocoa or chocolate in them.

They do have another drizzle on top which is simply a mixture of irish cream and confectioners sugar. They bake up soft and cakey with a rich irish cream flavor and an chock full of coffee chocolate chips. With that being said they are hard to resist. A great adult cookie for a special occasion or for when you want a cookie with a boozy kick. This recipe makes 3-3 1/2 dozen and the irish cream drizzle just enough for 3 dozen.

White Mountain Mudslide Cookies
adapted from Bed and Breakfast Inns 

Ingredients/Cookies
2 eggs
1 tbs whiskey
1 tsp irish cream flavoring
1/2 tsp vanilla extract
2 cups espresso or cappuccino chips
2 1/2 cups flour
1/2 tsp baking soda
1/4 tsp salt
1 cup butter
1/2 cup white sugar
1 cup light brown sugar

Ingredients/Topping
3/4 cup confectioners sugar
2-3 tbs irish cream
1/4 cup bittersweet chocolate chips, melted (optional)

Preheat the oven to 350. Line 2 baking sheets with parchment paper and set aside. Fill a stand mixer bowl with butter and both types of sugars, Beat until creamy. Then beat in irish cream flavoring, vanilla extract, whiskey and eggs. Mixture should be light and fluffy.

In another bowl, sift together flour, baking soda and salt. Fold into butter/sugar mixture until just combined. Then mix in chips until evenly distributed. Using a tablespoon sized scoop, drop mounds of dough onto prepared baking sheets, spacing about 1-1 1/2 inches apart.

Bake until golden brown on the edges, 14-16 minutes. Let rest on baking sheet a few minutes, then transfer to rack to cool completely. Once cooled, prepare topping by sifting confectioner's sugar in a bowl, then whisk in enough irish cream (I used only 2 tbs) for drizzling consistency. Drizzle over top of cookies using a squirt bottle or a fork. Let icing set.  If you opt for the chocolate drizzle, drizzle the opposite direction over the cookies after the irish cream icing has set. Then let chocolate set before serving.
                                  **LAST YEAR:Limoncello Bundt Cake**

Sunday, August 18, 2019

Apple Pie Bars


Things are in a change mode. Sometimes we welcome change, especially if it is our idea. Other times (usually someone else's idea) we find ourselves a bit resistant. All changes have their challenges which take us out of our comfort zone.  In time, however, we do make the adjustment and hopefully realize some of the good aspects about the change. Then there is the further step of it being inducted into our comfort zone.

Since I am not there yet, I decided to make something a little bit comforting. Most of us consider a slice of mother's or grandma's apple pie is something that falls into that category. These bars are easier to make than an apple pie, but you still get all the same flavor of a pie.

Apple Pie Bars
adapted from New York Times

Ingredients/Crust
3 cups flour
1 cup sugar
3/4 cup chopped walnuts
1 tsp salt
1 1/2 cups butter, cubed
1/2 tsp cinnamon
1/2 tsp cardamon

Ingredients/Filling
1 1/2 lbs granny smith apples, peeled cored and sliced into 1/8"
1 1/2 lbs one choice of gala, fuju or pink lady apples prepared same as granny smith
3 tbs lemon juice
1/4 cup butter
1 tsp cinnamon
1 tsp nutmeg
1/2 tsp cardamom
2/3 cup sugar

For the crust and topping, preheat oven to 350 degrees. Foil line a 9 x13 inch pan and leave an overhang on the longest sides. Butter the interior of the foil covered pan, bottom and sides. Using a food processor, pulse the flour, salt and sugar together. Then drop in butter cubes and process until it resembles a dough. Measure out 1 1/2 cups and place in bowl. Add walnuts, cinnamon and cardamom. Mix together until evenly distributed. Shape into a ball and cover. Place in refrigerator until ready to use.

Empty the remaining dough into the prepared pan and press evenly, covering bottom and 1/2 inch up the sides of the pan. Bake for 20-25 minutes, until golden. Cool on wire rack and turn off oven.

To make the filling, mix the apples with the lemon juice, making sure all slices are coated. Fill a saucepan with butter and place over medium high heat and let butter melt. Then sprinkle in the cardamon, nutmeg and cinnamon. Stir until blended with the butter and let sit for 15 seconds to meld. Add the sliced apples and stir as they soften, cooking for about 5 minutes. Then mix in sugar. Stir at intervals. Mixture will become soupy and then liquids will evaporate. This process should take about 10-20 minutes. The apples should be soft and coated with the mixture but running a spoon along the bottom of the pan should leave an empty space. It is dry but not so dry that the apples are sticking.

Remove from heat and set aside to cool to room temperature. As it cools, preheat the oven to 375. Once the apple slices are cool, empty into prepared pan. Spread evenly covering bottom and corners. Also, press down slightly to make more compact.

Remove walnut mixture from fridge. Using a fork, break the dough into clumps, about pebble-sized or smaller. Sprinkle evenly over the top of the apples. Bake until topping is golden, about 45-50 minutes. Cool completely in pan. Using foil overhang as handles, lift bars out of pan. Cut into squares and serve.
                                **LAST YEAR:Cherry Almond Eclairs**

Sunday, August 11, 2019

Carrot Cake Whoopie Pies


Whoopie pies originated from the Amish in Pennsylvania. The interesting thing is they were not a singular endeavor in baking. In fact, they were the result of leftover cake batter. They became such a favorite that today we mix up batter for the sole purpose of making these tasty cake-like sandwiches.

The standard is the chocolate, but since they are a spin off from cake, the flavors are endless. The flavor I chose here is carrot cake. These gems are wonderfully spiced and packed with shredded carrots. Along with carrots, there is a tasty complimentary cream cheese filling.

This recipe is from Moon River Bakey, but the website no longer exists. It is a good thing I got this recipe before it went away because it is a keeper in my book.  The recipe makes 12 whoopie pies and uses 2 whoopie pie pans.

Carrot Cake Whoopie Pies
adapted from Moon River Bakery

Ingredients/Cakes
2 cups flour
1 1/2 tsp baking soda
1 tsp baking powder
1 tsp cinnamon
1 tsp ginger
1/2 tsp nutmeg
1/2 tsp salt
1/2 cup butter (room temp)
1/2 cup packed light brown sugar
1/2 cup granulated sugar
2 eggs (room temp)
1 tsp vanilla extract
1 1/2 cups grated carrots

Ingredients/Filling
6 oz cream cheese (room temp)
2 cups confectioners sugar
1/2 tsp vanilla extract
1/2 cup butter (room temp)

If not using non-stick pans, spray two 12 cavity whoopie pie pans with non-stick spray. Preheat oven to 350 degrees. For the cakes, fill a stand mixer bowl with butter and both types of sugar. Beat on medium high speed until fluffy, scraping down the sides of the bowl when necessary. This should take about 3 minutes. Using another bowl, sift together the first 7 ingredients and set aside.

Beat one egg into the butter sugar mixture until blended. Repeat with the second egg. Blend in the vanilla extract. Take out a wooden spoon and mix the sifted ingredients into the batter until no dry streaks remain. Lastly, fold in the shredded carrots, distributing evenly throughout the batter.

Spoon heaping tablespoons of batter into the cavities, With dampened fingertips, press down the dough evenly in each cavity, so they are filled to the edges. Bake for about 12 minutes or until top springs back when lightly touched.

Let cool in pan for 5 minutes. Then transfer to rack to finish cooling. Let cool completely prior to making the filling.

For the filling combine the butter and cream cheese together, beating on medium high speed for 2 minutes, scraping down the sides of bowl at intervals. Sift in powdered sugar in 1/2 cup increments, beating after each addition. Once incorporated, beat in vanilla extract. Spread filling on bottom side of 12 cookies and then top each with an additional cookie. Refrigerate to store but let come to room temperature for serving.
                                **LAST YEAR: Grand Hotel Pecan Balls**

Saturday, July 27, 2019

Peach Bellini Cake

Today, I want to mention the importance of clearly written instructions in a recipe. The main reason is that writing out things (which may seem the long way) can really make a difference between a successful recipe and a failed one. For instance, you can write "beat in 4 eggs" or you can write "beat 4 eggs till pale in color about 5 minutes". Clearly, the second instruction is the better way to go.

Which brings me to this recipe. I followed the recipe exactly, but the texture of the cake was dry and dense. It was almost like it did not rise at all. My baking powder is in date, I am thinking that beating the eggs longer may have made for a less dense cake. This post is one of those recipes that have no comments and no indication that it has ever been tested. I was disappointed, but as I mentioned before, untested is a bit of a risk. The cake does need some tweaks when it comes to texture. Outside of the texture problem, the cake and the icing does have good flavor.

The cake gets its flavor from peach schnapps and champagne. The frosting is a buttercream with pureed peach.  If those flavors inspire you enough to make the cake and experiment on improving the texture, the recipe is below. The flavor still has my interest, but the due to the texture problem I would not make this recipe as originally stated again.

Peach Bellini Cake

Cake /Ingredients (adapted from Recipe Goldmine)
1/2 cup champagne
1/2 cup peach schnapps
1 cup vegetable oil
4 eggs, room temp
2 1/2 cups flour
2 1/4 tsp baking powder
1 tsp almond extract
1/2 tsp salt
2 cups sugar

Buttercream/Ingredients (adapted from Southern Living Magazine)
32 oz powdered sugar
1 large peach, peeled and chopped
3/4 cup butter

Preheat the oven to 350 degrees. Butter and flour two 9 inch round cake pans and line the bottom with parchment paper.  Start by beating together the eggs and sugar in a stand mixer (see note above concerning this step). Once blended, mix in the oil, peach schnapps, champagne and almond extract. Set aside.

Using another bowl, sift together flour, salt and baking powder. Then fold into the wet mixture until just blended. Transfer to prepared pans, dividing the batter equally between the two pans.  Place in oven and bake until tester comes out clean, about 35 to 40 minutes. Let cakes rest in pans for 10 minutes, then invert onto rack and remove parchment. Cool completely before frosting.

For the frosting, start by pureeing the peach in a blender. Set aside. Using a stand mixer cream butter until smooth, scraping down sides as needed. Sift in 16 ounces of powdered sugar and beat until blended. Then add the puree, mixing until incorporated. Lastly, sift in the remaining powdered sugar and beat until smooth. Add more powdered sugar to reach desired consistency.

Place one cake layer on cake plate and frost the top surface. Top with the other cake layer and frost sides and top. Refrigerate to help set the frosting.

                            **LAST YEAR:Cashew Butter Blondies**

Sunday, June 30, 2019

Dark Cherry Danish Tarts


Sometimes it is just simplicity that you crave in a dessert. Not alot of sweetness just fruit and pastry. Usually that means pie, but in this case it means a tart. The flavor of dark cherries against a biscuit type base was just the simplicity I was craving. Another bonus was that it did not take all the effort required for making a pie.

This recipe only has a few steps and has most of the rise time in the refrigerator. Chill it, cut the dough into rounds and stack them, that is about it. The only real concern that came about was finding frozen fruit in heavy syrup. I ended up buying canned fruit in heavy syrup and not the 10 oz of frozen strawberries recommended in the recipe. If you can find strawberries in heavy syrup to make this, I am sure it would be quite tasty.The recipe states the yield is for 24 danishes.

Dark Cherry Danish Tarts
adapted from Fleischmanns

Dough
1/2 tsp grated lemon peel
2 tbs cornstarch
1 envelope rapid rise yeast
1/3 cup sugar
5 3/4 cup flour
1 egg
1 cup butter
1/4 cup water
1 cup milk
1 tsp salt

Topping
1 15 oz can dark cherries in heavy syrup
1 tbs cornstarch
powdered sugar for garnish

 Fill a saucepan with milk, butter and water. Place over medium heat and let butter melt. Using a candy thermometer, monitor the temperature, Once it registers 120-130 degrees, remove from heat.

Fill the bowl of a stand mixer with cornstarch, lemon peel, salt, undissolved yeast, 2 cups of flour and sugar. Whisk together until blended evenly. Turn mixer to low speed and slowly stream in butter mixture, scraping sides of bowl as needed and beating until blended. Next, incorporate the egg and 1 additional cup of flour. After mixed together, add the rest of the flour and mix until dough forms. Shape into a ball and cover bowl with plastic wrap. Refrigerate for a minimum of 2 hours and a maximum of overnight.

Once the chilling time is complete, lightly dust a flat surface with flour and dust a rolling pin. Then line 2 baking sheets with parchment paper. Take the dough and divide into equal halves. Place one back in the refrigerator while you work with the other. Roll the dough into a 1/4 inch thick slab. Using a 3 inch round cutter, cut out 24 circles by cutting and then re-rolling scraps and cutting out more circles. Place each circle on the parchment paper, spacing so there is a total of 12 on each baking sheet. Then follow the same process of rolling and forming the other half of the dough, but this time stack the 24 circles of dough on top of the first 24.

Cover both baking sheets and sit in a warm, draft free area for about 45 minutes. As the dough is rising, preheat the oven to 375 degrees. Also, make the topping. Fill a saucepan with canned cherries and cornstarch, place over medium heat. Let the mixture cook and come to a boil, about 2-4 minutes. The end result is that the liquid would now be more like a thick jelly. Remove from heat and let cool.

Once the rise time is over, place one pan in the oven and let bake for 10 minutes. Remove and spoon fruit mixture on the top center of each round. Return to oven and let bake for an additional 5 minutes. Remove and transfer to rack to let cool completely. Repeat the baking process with the remaining 12 on the other baking sheet.

After completely cooled, dust with powdered sugar.

Tips and Notes:
1. I halved the recipe and ended up with 18 instead of 12.

2. The can of cherries was 15 oz and I had just enough to top all 18 danishes. Also, even though the strawberries were 10 oz and cherries were 15, I did not increase the cornstarch.

3. These should be golden brown on top when done.
                                     **LAST YEAR:Pumpkin Nutella Bars**

Sunday, June 16, 2019

Walnut Butter Cookies


Nut butters are so popular these days and they make for a great ingredient in baking. Today, I bring you cookies made with walnut butter and packed with nuts and chocolate chips.

These cookies have such great taste and amazing texture. They are not chewy or crunchy, but have a soft crumb that just melts in your mouth. Because of the nut butter, I was afraid that they would come out flat, but the baking soda did the trick. The cookies have a normal height to them, so I was well pleased with the size of the cookies. The walnut taste is prominent and the mini chocolate chips are a nice compliment to the overall flavor.

Walnuts do have their health benefits, so sneaking that into a delicious cookie is also a welcome addition. This recipe makes a little over 4 dz cookies. Also, when purchasing nut butter, make sure there are no additives, just pure ground nuts.


Walnut Butter Cookies
by flourtrader

2 1/2 cups flour
1 1/4 tsp baking soda
1 cup sugar
8 oz jar of walnut butter
1 egg
1 cup butter
1 1/4 cups mini semi sweet chocolate chips
1/3 cup chopped walnuts

Line 2 baking sheets with parchment paper and set aside. Preheat the oven to 350 degrees. Fill a stand mixer bowl with butter, walnut butter and sugar. Cream the mixture together on medium speed until well combined. Add egg and mix to blend for about 30 seconds.

In another bowl, sift together flour and baking soda. Using a wooden spoon, fold sifted ingredients into butter mixture. Once combined, fold in the chocolate chips and the nuts. After chips and nuts are evenly distributed throughout the batter, drop by tablespoons or a scoop onto prepared baking sheet, spacing about 2 inches apart.

Bake until edges are golden brown, about 14-16 minutes. Let cookies cool on baking sheet for about 3 minutes then transfer to rack to completely cool. Repeat forming and baking cookies with the remaining dough.
                                      **LAST YEAR:Black Bottom Pecan Cream Pie**

Saturday, June 1, 2019

Pistachio White Chocolate Gelato


I will admit that there is not a lot of green food when it comes to desserts. Also, the color green may not look very appealing...which is why it took me so long to try avocados or guacamole. Even though this may look like guacamole, it is ice cold gelato that has a rich flavor of pistachios that stems from pistachio paste. As an added indulgence, bits of white chocolate are included for crunch and flavor.

Outside of the crunch from the white chocolate curls, it has the smooth texture that is synonymous with frozen gelato. The recipe itself has the bonus of not requiring a lot of ingredients or a lot of effort. One component has to chill overnight and the freezing the next day takes time, so plan in advance.

So if you are ready for a smooth taste of pistachio and white chocolate, proceed below.

Pistachio White Chocolate Gelato
adapted from David Lebovitz

Ingredients
4 cups of milk
14 oz pistachio paste
4 tbs cornstarch
2/3 cup sugar
few drops of lemon juice
2/3 cup white chocolate curls

Fill a bowl with 1/2 cup of milk and the cornstarch. Stir so the cornstarch dissolves into the milk. Set aside. Pour the rest of the milk into a saucepan and add the sugar. Place over medium high heat and stir. Let the mixture heat up to a strong simmer. Prior to the boiling point, stir the cornstarch milk mixture again and pour into the saucepan with the sugar and milk. Let cook for 3 minutes, stirring all the while.

Remove from heat and pour into a heatproof bowl. Let cool for 15 minutes. Then cover and place in the refrigerator to chill overnight.

The next day, combine the chilled mixture with pistachio paste and a few drops of lemon juice. Once thoroughly mixed, add to the ice cream machine and follow instructions. Halfway through the process add the white chocolate curls and churn the mixture more to blend. After completing manufacturer's instructions, transfer gelato to a bowl and cover. Place in freezer and chill until desired consistency is achieved.
                                  **LAST YEAR:Port Cherry Coffeecake**

Sunday, May 26, 2019

Dutch Chocolate Donuts

I am back! I cannot believe it has been nearly one month since I have posted. As most bloggers realize, sometimes life can get hectic. Between vacationing and working in the bakery on the weekend, blog time was not available.

Also, my idea of cooking with my husband project has gone by the wayside as well. I have decided to do what I can when I can, no schedule. Besides, the spontaneity of when makes things more fun. As far as planning what to bake, I have a long list.

That brings me to the subject of the "untested" and "no picture" recipes that are posted on the web. I call it recipe gambling. The creation could be a flop or turn out pretty awesome but that is the risk you take. This blog does have both tried and true recipes as well as the unique and obscure. 

As a comeback, I bring you chocolate in a most delicious form-donuts. This one comes straight from a chocolate maker, so these gems are spot on when it comes to squelching that chocolate craving. Pair one with coffee in the morning and you will be good to go. This recipe makes about 9 standard sized donuts.

Dutch Chocolate Donuts
adapted from Ghirardelli

Ingredients/ Donut
1/2 tsp baking powder
1/2 tsp baking soda
1/3 cup dutch cocoa
1 1/4 cup flour
1/4 tsp salt
1/2 cup brown sugar
1/4 cup granulated sugar
1 egg
1/2 cup milk
1/2 cup melted butter
1 cup mini semi sweet chocolate

Ingredients/Choc Glaze
1 tbs light corn syrup
3 oz chopped chocolate bar (60% cacao)
3 tbs butter
1 tsp vanilla
3 cups powdered sugar
4-5 tbs hot water

Preheat the oven to 375 degrees. Prepare a donut pan by greasing the interior of the cavities. Also, place a piece of parchment or wax paper under a cooling rack set on a flat surface.

In a medium size bowl, mix the melted butter and milk. Then add the egg, using a fork to break up the yolks to blend. Once thoroughly mixed, set aside.

Using another bowl, sift together flour, salt, baking powder, baking soda and cocoa. Whisk in both types of sugars. Add the egg mixture and combine, using a wooden spoon to blend the ingredients together. Lastly, fold in the mini chocolate chips.

Snip off a corner of a sealing freezer bag. Make sure the hole is big enough to get the chocolate chips through. Fill the bag with the batter and seal. Pipe the batter into the prepared pan cavities, filling about 3/4 full.

Bake 10-12 minutes, rotating pan at the halfway baking point. Donuts are done when tester comes out clean. Let donuts cool in pan on rack for 3 minutes, then invert onto rack.

For the chocolate glaze, set up a double boiler. Fill with chopped chocolate and butter. Let the mixture melt, stirring occasionally. Once melted, remove from heat and mix in corn syrup and vanilla. Then sift in powdered sugar in one cup increments until all is blended. Stir in hot water, one tablespoon at a time, to bring to the correct consistency.

Spoon glaze over donuts, letting excess drip off. If desired, sprinkle with sea salt. Let glaze set before serving.
                             **LAST YEAR: Chocolate Dream Cake**


Saturday, April 27, 2019

Maui Scones


These scones take me back to thoughts of the tropics. The tropics...where things like pineapple and bananas seem to grow without any effort. Along with that, there is a vast array of big flowers you will find growing everywhere. Jamaica or Hawaii is the place for fruit and flowers. However, in a pinch, California and Florida are good seconds.

Well, there are no fruits growing here and the only flowers I see around are bluebonnets, so these tropical treats were welcome on the breakfast table. When I saw the recipe had pineapple and macadamia nuts in the ingredient list, I thought nothing much can go wrong with these two flavors and I was pleased with the results.

One bite reveals a cake like texture with the crunch of buttery macadamias. With a sweet pineapple drizzle on top and crushed pineapple baked inside, this is a great way to start the day or to have as an afternoon snack. Also, you will not be spending your whole day in the kitchen.

Maui Scones
adapted from Land O Lakes

Ingredients/Scones
1/2 cup chopped macadamia nuts
1/4 cup crushed pineapple (drained and juice reserved)
2 eggs
1/2 cup cold butter, cubed
1/2 cup sweet flaked coconut
1/2 cup light brown sugar
2 tsp baking powder
2 cups flour

Ingredients/Topping
2 tbs sweet flaked coconut
3/4 cup powdered sugar
reserved juice from above

Prepare 2 baking sheets by lining with parchment paper. Preheat oven to 400 degrees.

Sift together baking powder and flour in a large bowl. Whisk in brown sugar. Add 4 butter cubes and blend with a pastry cutter. Continue to add cubes and blend with pastry cutter until all is incorporated and is coarse crumbs with the largest chunk of butter being only pea sized. Stir in the coconut and chopped macadamia nuts.

Fill a medium size bowl with 1 tbs of juice, eggs and crushed pineapple. Whisk the ingredients together until well blended. Form a well in the brown sugar /flour mixture and pour the pineapple/egg blend into the well. Mix with a wooden spoon until the mixture comes together. Knead about 10 times. You may have to add more flour or more juice to get to dough consistency. Once the correct consistency is achieved, divide dough in half.

Place each ball of dough on the prepared baking sheets and form into a flat disc. Cut each disc into 6 wedges but do not separate wedges, leave disc intact. Sprinkle each disc with 1 tablespoon of coconut.

Bake 13-15 minutes or until scones are lightly browned on top. Cut through scones to fully separate but do not pull from disc.

Once the scones are completely cooled, prepare pineapple drizzle. Start with 3/4 cup of sifted powdered sugar and add 1 tsp of pineapple juice. Continue to blend pineapple juice and powdered sugar until correct drizzling consistency is met. Drizzle on to cooled scones and wait one hour until set. Then separate and serve.
                                      **LAST YEAR: Homemade Pop Tarts**

Sunday, April 14, 2019

Monkey Tail Banana Cake

I am glad to have the weekend to recoup from bread baking, but here I am baking on my own time. Sometimes blogging and baking of my choice is a great diversion or way to unwind. Through work and my personal life, I have come to realize that people's perceptions are just as diverse as people themselves. A misperception can be major or minor, depending on the person and we cannot control another person's perception. Someone once told me perception is everything. If so, things can easily get quite confusing.

Just like my perception of the name of this cake. When I came across this recipe, I thought the name was just a whimsical choice. I soon came to realize it actually defined the cake flavor. I had never heard of an edible monkey tail. If you a unfamiliar with this as I was, it is something they serve at festivals or carnivals. A monkey tail is actually a frozen banana that is dipped in chocolate and covered in peanuts.

This particular banana cake has pecans instead of peanuts and the filling is hazelnut spread. I liked a slice slightly warmed which makes the filling and the chocolate chips slightly melted. This has a whipped cream and cream cheese blend frosting, so it has to be refrigerated. However, since the cake contains 6 bananas it is very dense, so it is best served at room temperature or warmer.

Monkey Tail Banana Cake
adapted from The Cooking Channel

Ingredients/Cake
3 eggs, room temp.
6 mashed, ripe bananas
16 oz sour cream
2 tsp vanilla extract
3/4 cup unsalted butter, room temp.
1 cup chopped pecans, plus extra for garnish
1 cup mini chocolate chips, plus extra for garnish
1 1/2 cups granulated sugar
1 1/2 cups packed light brown sugar
4 1/2 cups flour
1/2 tsp salt
1 tbs baking soda

Ingredients/Frosting and Filling
2 cups heavy whipping cream
1 tsp vanilla extract
1 tbs whipped cream stabilizer (optional)
1-8 oz cream cheese, room temp.
1/2 cup powdered sugar
13 oz hazelnut spread (I used nutella brand)

For the cake, grease the interior of three 9 inch round cake pans. Preheat the oven to 350 degrees.

Sift together the flour, baking soda and salt. Set aside. Fill the bowl of a stand mixer with the butter and both types of sugars. Beat on medium speed until light and fluffy. Add the eggs, sour cream and vanilla extract. Mix on medium speed until blended. Fold in mashed bananas.

Combine 1/3 of the dry ingredients with the banana batter, folding until no dry streaks remain. Repeat adding the sifted ingredients in two more additions. Once blended, add nuts and chocolate chips and stir until evenly dispersed into batter. Divide batter evenly into thirds, about 3 cups each, filling each prepared pan. Bake until tester comes out clean, about 45-60 minutes, rotating at the halfway point.

Let cakes cool in pan 10-15 minutes and then invert layers onto rack to completely cool. Once cooled, proceed with frosting.

Start on the frosting by filling the bowl of a stand mixer with cream cheese, sugar and vanilla. Beat on medium speed until no lumps remain, stopping on ocassion to scrape down sides of bowl. On medium high speed, continue to beat and stream in the heavy cream. If you opt to use the stabilizer, add it with the heavy cream. Beat the mixture until you have a whipped cream consistency.

To assemble the cake, place one layer on a serving place or cake board. Cover the top of the layer with half of the hazelnut spread. Add the next layer and cover it with the rest of the spread. Then top with the third cake layer. Frost cake on top and sides. Sprinkle top of the cake with nuts and mini chocolate chips. Lightly press to adhere.

Store in refrigerator until ready to serve. Serve at room temperature or slightly warmed for best texture.

                                     **LAST YEAR:St Patricks Mocktail Cheesecake**


Sunday, March 31, 2019

Butter Pecan Cookies

Overcast and gloomy today, but it is getting warmer. Here I am in the middle of this baking project and the electricity went out. Since the dough in these cookies have to chill for four hours due to the butter content, the lack of electricity was a little irritating. However, it was fixed in a few hours. 

When you think of pecan cookies, pecan sandies and mexican wedding cookies come to mind. There is not much out there in a pecan variety of cookie. However, this recipe offers something distinctly different in the pecan cookie category. Instead of a soft shortbread type of cookie, these are thick, chewy and packed with pecans. Also, since the dough is scooped out into 1/3 cup size, they are big and shareable. This recipe makes 16 large cookies

Butter Pecan Cookies
adapted from Baker By Nature 

Ingredients/Butter Pecans
1 1/2 cups finely chopped pecans
1 tbs plus 1 1/2 tsp unsalted butter

Ingredients/Cookies
1 cup or 2 sticks butter
1 cup dark brown sugar
1/2 cup granulated sugar
2 tsp vanilla extract
2 eggs (room temp)
2 1/2 cups flour
2 tbs plus 1 1/2 tsp cornstarch
1 tsp salt
1 tsp cinnamon
1 tsp baking soda
16 pecan halves for topping

For the butter pecans, fill a skillet with the butter and pecans and place over medium heat. The butter will start to melt. Once completely melted, stir occasionally, mixing butter with pecans so they are completely coated. Pecans with start to toast and become fragrant. Let toast for 3-4 minutes then remove from heat and set aside.

For the cookies, sift the dry ingredients together (the 6th thru 10th items on ingredient list) and set aside.

Fill a saucepan with the butter and place over medium high heat. After melting, the butter will start to cook and change colors. Cook and stir at intervals until butter turns a golden brown color. This should take about 4-5 minutes. Butter will boil during this time, but watch the color. Remove from heat and let cool 15 minutes.

Transfer butter to the bowl of a stand mixer. Add granulated sugar and dark brown sugar and mix on medium speed until blended. Then add one egg and vanilla. Beat for 30 seconds until mixed. Repeat with the second egg.

Using a wooden spoon, mix in dry, sifted ingredients into batter until no dry streaks remain. Then mix in butter pecans until evenly distributed. Cover and chill dough for a minimum of 4 hours.

About 30 minutes prior to the end of the chilling time, preheat the oven to 375 degrees. Line 2 baking sheets with parchment paper. Scoop dough out measuring 1/3 of a cup. Place each scoop of parchment paper and space about 2 inches apart. Press 1 pecan into center of mound.

Bake in oven about 9-11 minutes or until edges are set. Center will still be soft. Once removed from oven, let cool on baking sheet. Place on rack to cool for 15 minutes, then transfer to rack to completely cool.
                          **LAST YEAR: Raspberry Almond Ice Cream Sandwiches**


Sunday, March 17, 2019

Cranberry Hand Pies


Sometimes contrast does come in delicious formats when it comes to food. One of the contrasts is sweet and tart. Outside of citrus fruits, cranberry offers quite a bit of the tart. Teamed with orange and some sugar, these little deliver the perfect contrast, just when you crave a little bit of fruit pie.

Due to the level of tartness, I feel that cranberries in a whole 1-1 1/2 inch deep pie would be a little too overwhelming. Making the smaller form of hand pies with cranberries lend themselves to a more balance of flavor. They are tasty on their own, but serving them warm with a scoop of ice cream makes them even better.

My posting and baking is waning down to just a few times a month. This change has made way for me to dabble in dinner entrees. It seems as if dinner has become repetitive types of meals, so it is time to start changing it up and trying new things. My cooking partner (husband) is looking forward to it.

The blogging posts may be slowing down but there are still so many things I have yet to bake. Trying new techniques and new flavor combinations is what makes baking fun, so my passion still remains. This recipe makes 15-16 hand pies.

Cranberry Hand Pies
adapted from Bon Appetit

Ingredients/Dough
3 2/3 cups flour
1 1/2 or 3 sticks unsalted butter plus 3 tbs
1 cup sugar
1 1/2 tsp kosher salt

Ingredients/Filling and topping
1 tsp orange zest
2 tbs fresh orange juice
1/2 tsp instant tapioca
1/2 vanilla bean, split lengthwise
1 lb (fresh or thawed frozen) cranberries
1 1/2 cups sugar
1 beaten egg
raw or sparkling sugar for sprinkling on top

For the pastry dough, start by cutting the butter into 1/2 inch cubes. Then place in freezer for about 10 minutes. While the butter is chilling, fill the bowl of a stand mixer with flour, sugar and salt. Using the whisk attachment, mix together on medium speed. Once the butter is ready, change the mixer attachment to the blade. Run the mixer on medium speed and start dropping in butter cubes, a little at a time. After all the butter is in the flour mixture, continue to beat until the consistency is more coarse, like sand. Keep mixing until the large lumps of butter are gone and just pea size and smaller remains.

Continue to mix and slowly stream in 1/2 cup of ice water. As you mix, the batter will form a lump a dough. At the dough stage, divide into 2 even pieces. Flatten each piece in a disc and completely cover with plastic. Place dough in refrigerator to chill for a minimum of 2 hours.

During the two hours, create the filling. Fill a saucepan with sugar, orange zest, orange juice and tapioca. Scrape the seeds from the vanilla bean and add to the saucepan. Mix together with a wooden spoon until all is evenly dispersed. Then add the cranberries into the mixture, tossing to cover. Let sit for about 10 minutes so juices can build up. Then place over medium heat and let come to a simmer. The mixture will thicken as it simmers. The correct consistency should be achieved by simmering 5-7 minutes. Remove from heat and let cool completely.

Dust a flat surface with flour. Prepare 2 baking sheets by lining with parchment paper and preheat the oven to 425 degrees.

Once the chilling time is complete, take out one disc of dough. Unwrap and place on floured surface and roll out to a thickness of 1/16". Cut dough with biscuit or cookie cutter, making 16 circles.Then coat the outer edge of 8 of the circles with the beaten egg. Place 1 tablespoon of filling in the center of each circle. Top the circles with the remaining rounds of dough. Take the tines of a fork and press down along the edge about 1/4 of an inch deep to seal the pies. To make a clean edge, use the cutter again to cut off any of the dough that is uneven.

Place pies on baking sheets, about 1 inch apart. Brush the surface with beaten egg and then sprinkle sugar on top. Vent top of pies with a line or with an "x".  Take filled baking sheets and put in refrigerator to chill for 45 minutes. After chilling, place pan in oven and bake for 15-20 minutes, until golden on the edges and filling is bubbling. Remove from oven and let rest on pan for 5 minutes then transfer to rack to completely cool. Repeat the rolling, forming, chilling and baking process for the pies with the 2nd disc of dough.

Tips and Notes:
1. The widest width of the pies I made were 4 inches and I ended up with 15 pies. The pies had 2 tablespoons of filling and I had a lot of dough left over. The filling ran out.

2. Even though the recipe states roll dough to 1/16 of an inch, I made mine a little thicker. The extra thin dough was too fragile and made it more difficult to form the pies.

3. The recipe can be made ahead in stages. The dough can be made 2 days ahead and chilled. Let it soften at room temperature for 15 minutes prior to rolling out. The cranberry filling can be made 5 days ahead, just cover and chill. Lastly, pies can be formed and chilled 2 hours ahead of baking.
                                            ***LAST YEAR:Baked Apple Donuts**


Sunday, March 3, 2019

Black and White Toffee Bars


Sometimes you just have a craving for a rich dessert without a lot of fuss. These bars are exactly that. They are packed with white chocolate chips, semi-sweet chocolate chips and chunks of toffee (ie Almond Roca). Just to give you an idea, I was wondering how all those add-ins would mix into the small amount of batter the recipe makes.

They are sinfully sweet, so a small piece with a glass of milk goes a long way. If I were to make these again, I would probably double the batter recipe and not double the add ins. That way they would have a little bit more cake to the bars.

They are good to put in your kid's lunchbox and great for an afternoon snack. The recipe also has the advantage of being quick and easy to make, so less time in the kitchen.

Black and White Toffee Bars
adapted from GourmetSleuth.com 

Ingredients
6 oz semi-sweet chocolate chips
6 oz white chocolate chips
1/2 cup chopped toffee (almond roca)
1/2 cup or 1 stick butter
1 egg
1 tsp vanilla
1/2 tsp baking soda
2 cups plus 2 tbs flour
1/2 tsp salt
3/4 cup brown sugar

Preheat the oven to 375. Grease the interior of a 9" square pan.

Start by filling the bowl of a stand mixer with the brown sugar and butter. Cream the two together until light and smooth. Using another bowl, place a sieve over the top. Then sift the flour, baking soda and salt together. Set aside.

Add egg and vanilla to butter/sugar batter and beat until blended. Using a wooden spoon, mix in the sifted ingredients until no dry streaks remain. Then fold in both types of chocolate chips and the chopped toffee. Once all is evenly distributed, add to prepared pan and smooth surface until even.

Bake 20-23 minutes. Set pan  on wire rack to cool completely. After cooling, refrigerate for 1 hour. Then cut and serve.
                              **LAST YEAR:Pecan Wedding Cake**


Sunday, February 17, 2019

Brown Sugar Ginger Caramel Swirl Ice Cream


I have a slight fear of the use of ginger in recipes. It stems from the past in which I made some cookies that were good the first day. The next day the flavor developed more and the ginger took over. The cookies had too strong of a flavor, the ginger even over powered the chocolate in the cookie.There should have been a disclaimer stating serve or eat the same day.

Flavor balancing is a difficult subject because a lot is based on personal preference. Some people want a strong flavor while others want an even balance. For the strong flavor, I recommend making something that has a singular flavor. A singular flavor does not have to balance with another and you will get the pure taste.

This post is a particularly great example of balance of flavor. The caramel, ginger and brown sugar all comes through, which makes this ice cream a real keeper. This recipe requires one special ingredient, ginger spread. The recipe does not require much and I ordered it from Amazon under the "ginger people" brand.

Should you decide not to add the ginger spread, the end result will be a pretty tasty caramel swirl ice cream. 

After I tasted the ice cream, I wished the recipe made more. Delicious and unique, I am sure I will be making this again soon!

Brown Sugar Ginger Caramel Swirl Ice Cream
adapted from Sweet Cream and Sugar Cones

Ingredients/Ice Cream
1 3/4 cup heavy cream
3/4 cup of 2% milk
5 large egg yolks
1/4 tsp salt
1/2 cup dark brown sugar
2 tsp vodka

Ingredients/Swirl
1/8 tsp salt
1 cup sugar
3/4 cup heavy cream
1 tsp of ginger spread

Complete any preparation work required on your ice cream maker prior to creating this ice cream. Fill the bowl of a stand mixer with the egg yolks and whisk together. Once blended, add in 1/4 cup of brown sugar and mix on medium speed until sugar is thoroughly blended into egg yolks. Set aside.

Add 1/4 cup brown sugar, cream, milk and salt to saucepan and place over medium high heat. Once it reaches a simmer, remove. Turn stand mixer back on to medium and stream in 1/2 cup of the hot cream mixture. After this is blended, repeat with an additional 1/2 cup of the cream. Take the saucepan and place over medium heat and pour cream/egg mix back into remainder of hot cream.

Stir constantly as the mixture heats up. It should cook to a thickened state and coat the back of a wooden spoon. If you swipe your finger through it, the path will remain. This indicates that it is done cooking.

Place a sieve over a large heat proof bowl and pour the mixture into the sieve. This will insure that the custard is smooth. Fill a sink with ice and water. Place the bowl into the ice water. There should be enough ice and water to come level with the top edge of the custard inside the bowl. Whisk in vodka.

Stir the mixture at intervals while it chills. Once 15 minutes has passed, mix in the vodka and cover bowl. Place in refrigerator for a minimum of 2 hours or overnight.

As the ice cream is chilling, the swirl can be made. Place a saucepan over medium high heat and add 2 tablespoons of sugar. As it cooks, the edge of the sugar pile will melt and then start to change colors. Once completely melted, repeat the process with another 2 tablespoons of sugar. The rest of the remaining sugar should be added and melted in the same manner. Remove from heat when all the sugar is melted and it has a mahogany hue.

Slowly pour in the cream, mixing it into the sugar. The cream will cause the caramel to seize up. In that instance, drop the temperature to low and continue to stir the mixture until all the caramel is melted and blended with the cream. This could take 15-30 minutes, depending on how much turned into a lump. Add ginger paste and salt to mixture and blend.

After the chilling time is complete, remove ice cream from refrigerator and fill ice cream machine. Follow manufacturer's instructions. Then place caramel in a squirt bottle. When transferring ice cream from machine to storage bowl, squirt caramel into bowl after transferring a few scoops. Repeat process until 6 tablespoons of caramel is in the ice cream. Take a knife and make a few swirls in ice cream to disperse caramel in streaks throughout ice cream base.  

Cover and freeze until ice cream reaches the preferred firmness for serving.

Tips and Notes:
1. The vodka is for the purpose of keeping the ice cream from turning rock hard in the freezer. It does not impart any flavor to the ice cream.

2. There will be extra caramel sauce for another use. the recipe states that smaller measurements of the ingredients somehow do not work. There is more than enough for double the ice cream base.

3. For a short cut without the ginger, use store bought Dulce de Leche.
                                **THREE YEARS AGO:Raspberry White Chocolate Cookies**

Sunday, February 10, 2019

Chocolate Raspberry Tassies


With Valentine's day right around the corner, it is time for a little dessert that is rich in chocolate. These little gems are perfect for the occasion. They have a bold dark chocolate flavor with a fudgey filling on the inside and a cookie crunch on the outside. In addition they have a dollup of cocoa buttercream for more texture and more chocolate flavor.

Now, concerning the raspberry. They are made with raspberry liqueur, but there is no remaining flavor after baked. As is, the recipe only tastes of chocolate. In order to add more raspberry flavoring, I would suggest an extract, about 1 - 1 1/2 teaspoons.

The recipe suggests plain cocoa, however ,for an even deeper dark chocolate flavor, I used dutch chocolate. Even with plain cocoa, I still believe the raspberry flavor of the liqueur would not come through after baked.

These are so rich in chocolate, I doubt if they would be refused due to their lack of raspberry flavor. Nothing like the taste of dark chocolate to bring a smile to someone's face. So if you are looking for a special treat this Valentine's-- add this to your day, you along with someone else will be happy to enjoy these little gems. The recipe makes 24 tassies.

Chocolate Raspberry Tassies
adapted from Better Homes and Gardens

Ingredients/Chocolate Pastry
1/2 cup or 1 stick of butter (room temp)
1/3 cup sugar
1/4 cup cocoa powder
1/4 tsp salt
1 1/4 cup flour
1 egg yolk (room temp)
2 tbs cold water

Ingredients/Filling
1/3 cup sugar
1 tbs raspberry liqueur
2 tbs butter
1 lightly beaten egg (room temp)
2 tsp vanilla
6 oz semi sweet chocolate chips

Ingredients/Buttercream
1/4 cup butter
2 cups confectioner's sugar
2 tbs milk
3 tbs cocoa powder

The first step is to make the chocolate pastry. Sift together flour, salt and cocoa in the bowl of a stand mixer. Then whisk in sugar. Cut the butter into cubes and drop into the sifted ingredients. Beat until mixture is crumbly. Preheat the oven to 375 degrees.

Take out a small bowl and whisk together the egg yolk and the water. Pour into the chocolate mixture and beat until a soft dough is formed. Test the dough for stickiness and the ability to hold its shape. It can be refrigerated and you can use floured fingers for shaping. Once you are ready to shape, divide the dough into 24 equal balls. Place the balls into the cavities of 2-12 count mini muffin pans. Then shape each ball into a cup, covering the bottom and interior sides. After this process is completed, set aside.

Next is to create the filling. Melt butter in a saucepan over medium heat. Then add chocolate chips and stir until mixture becomes smooth and all is melted. Remove from heat. Add the raspberry liqueur, sugar and vanilla extract. Mix until blended. Then whisk in the egg. Using a tablespoon scoop out some of the filling and fill a cavity of dough. Repeat this process until all cavities are filled with the chocolate blend.

Place in oven and bake until center is set, about 12-15 minutes. Remove from oven and let cool in pans for about 10 minutes. Then carefully scrape the outside of the cookie shell and pry the tassies loose from the pan and place on cooling rack to completely cool.

Once cooled, buttercream icing can be prepared. Beat the butter in a stand mixer until smooth, then scrape down sides. Sift in 1/2 cup of confectioner's sugar and mix until no dry streaks remain. Repeat the process until all the sugar is incorporated into the butter. Then add the cocoa and milk and beat. The end result is a thick glossy icing. Fill a piping bag with a large star tip and pipe a dollup of icing on top. Let the icing set for 1 hour before serving.

Tips and Notes:
1. The egg may cause the filling to glop up in sections but it is okay, it does not hurt the final outcome.

2. After baked, some of the filling may sink. However, the icing will cover this so the sinking is acceptable.

3. Be sure that the cups made by the dough are even. Any that are too thin will cause them to collapse when removing from the pan.

4. A tablespoon of filling is too much to use in each. It will result in a shortage. In order for all the cups to be filled, use 2/3 of a tablespoon or make some extra.
                                           **LAST YEAR:Nusstaler Cookies**

Sunday, February 3, 2019

Tecate Bundt Cake


There is a thought by some people that beer is the perfect pairing to every type of food imaginable. I believe this becomes more evident during football season. Today's post does support that theory, for this bundt cake is made with Tecate beer. It is not just in the cake, but there is a Tecate syrup that is drizzled on top.

It resembles a pound cake in texture and taste. After tasting the sweet vanilla flavor there is a subtle flavor chaser of malt that stems from the beer. Delicious with a drizzle of Tecate syrup and whipped cream, after one serving your taste-buds will crave a second piece. The recipe is for a 10 cup bundt pan and I have included a buttercream icing for those that like icing. Also, this recipe lists the brand as Tecate, but I am sure it would work for other beers, but I would not recommend a light beer.

Bring this cake out at Superbowl time, I am sure everyone will be impressed with how you have made use of the beer!

Tecate Bundt Cake
adapted from LA Times

Ingredients/Syrup
3 cups Tecate brand beer
3/4 cup sugar

Ingredients/Cake
1 1/4 tsp vanilla
1/2 cup Tecate brand beer
3/4 cup milk
3 eggs (room temp)
2 1/2 cups flour
2 1/2 tsp baking powder
1/2 tsp salt
3/4 cup or 1 1/2 sticks of butter (room temp)
1 3/4 cup sugar

Ingredients/Tecate Buttercream
1-2 tbs milk
3 tbs Tecate syrup
4 cups powdered sugar
1 cup or 2 sticks of butter (room temp)

The syrup, since it has to be room temperature when used will be made first. Fill a saucepan with the beer and the sugar. Place over medium high heat. Stir constantly and when mixture comes to a boil, set the timer to 15 minutes. Continue to stir as the mixture boils. Once the time goes off, check the amount in the pan, it should be about 3/4 cup. If still too much, continue to boil until reduced to 3/4 cup. Remove from heat and set aside.

For the cake, preheat the oven to 350 degrees. Generously grease the interior of a 10 cup Bundt pan. Dust with flour and tap out excess.

Fill the bowl of a stand mixer with the butter. Beat until smooth and silky, stopping at intervals to scrape down the sides of the bowl. Then add the sugar in 1/4 cup increments, beating to blend after each addition. Once the sugar is incorporated, add one egg and mix for 30 seconds, until combined into batter. Repeat the process with each egg until all 3 have been mixed in.

Pour milk, beer and vanilla into a bowl and stir. Take out another bowl and sift together the flour, salt and baking powder. Add 1/3 of the sifted ingredients to the batter and fold until incorporated. Then pour half the milk mixture into the batter and mix. Repeat the process, ending with the dry ingredients, until everything is blended together.

Lastly, whisk in 5 tbs of the beer syrup. Pour batter into prepared Bundt pan and smooth the top. The pan will be 3/4 full. Place cake in oven and bake for 25 minutes and then rotate. Bake until a tester comes out clean, 20-25 minutes. Let cool in pan 20 minutes, then invert onto baking rack.

If covering in syrup and frosting, drizzle all but 3 tbs of syrup onto cake while still warm. It will drip down sides. If you are not frosting the cake, you can use all of the syrup.

For the frosting, fill a stand mixer with butter and beat until smooth and light. Sift in one cup of powdered sugar and beat on low and then increase the speed to medium. Mix until blended, stopping at intervals to scrape down the sides of the bowl. Repeat until all the powdered sugar is mixed into the butter. Add 3 tbs of syrup and mix into frosting. Then beat in 1 tbs of milk and check for consistency. If too thick, beat in an additional tablespoon. Frost completely cooled cake as desired.

Tips and Notes:
1. If you have had trouble in the past with the release of bundt cakes from the pan, try using breadcrumbs to dust the interior of the pan instead of flour.

2. Do not use butter to grease the pan, it promotes sticking. Use shortening.

3. You can leave the cake as is and save the syrup for serving.

4. The milk may curdle when mixed with the beer, but that is normal.

5. When making the syrup, the beer will foam up as you stir, so be careful it does not foam over the pan.
                                   **LAST YEAR: Blue Corn Zucchini Bread**


Sunday, January 27, 2019

Penuche Coffee Cake


Outside of chocolate fudge, I believe the next favorite flavor of fudge is Penuche. Penuche is basically a brown sugar fudge. There are sometimes add ins like coconut and pecans, which makes this fudge even more irresistible.

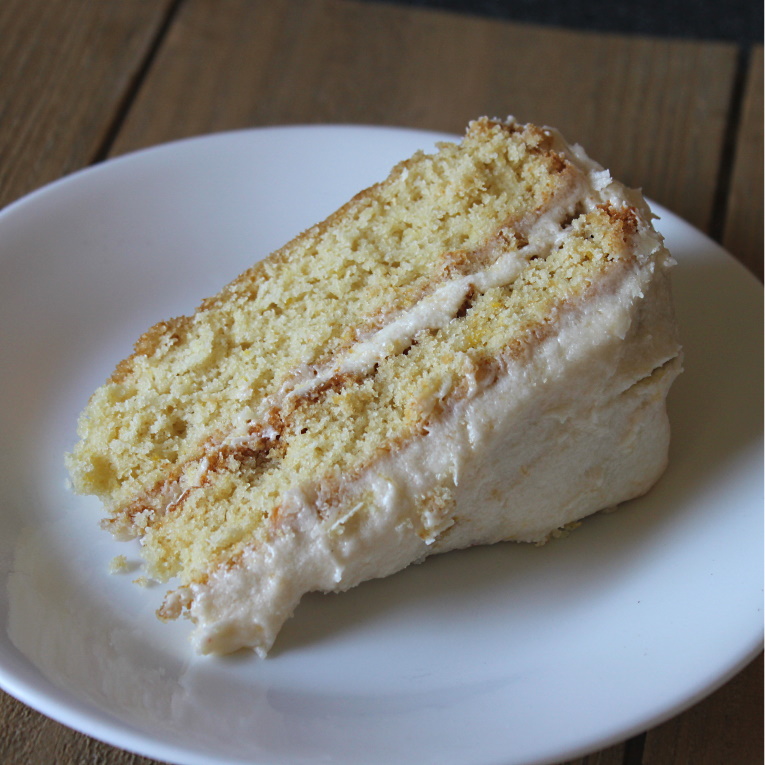
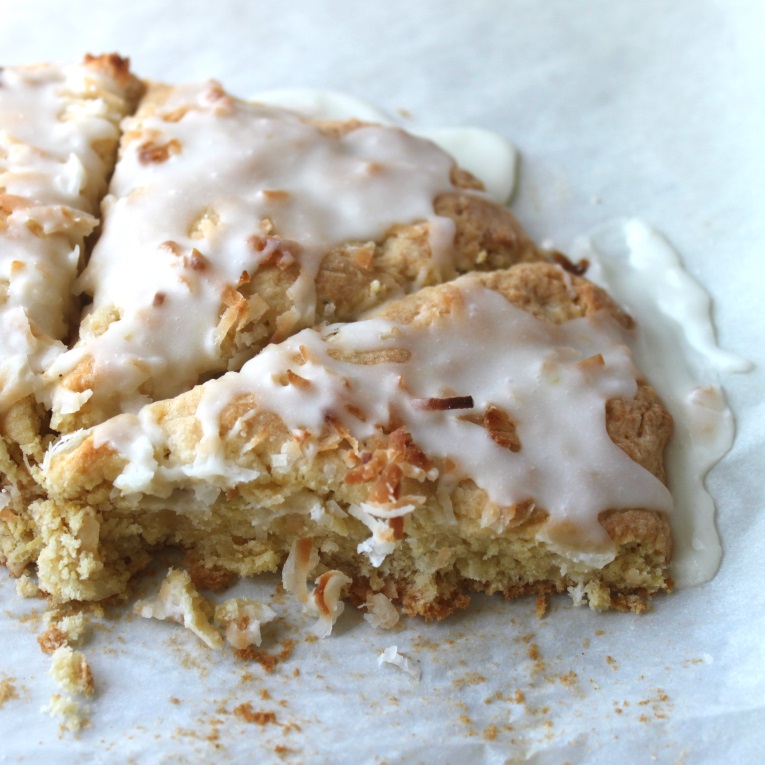
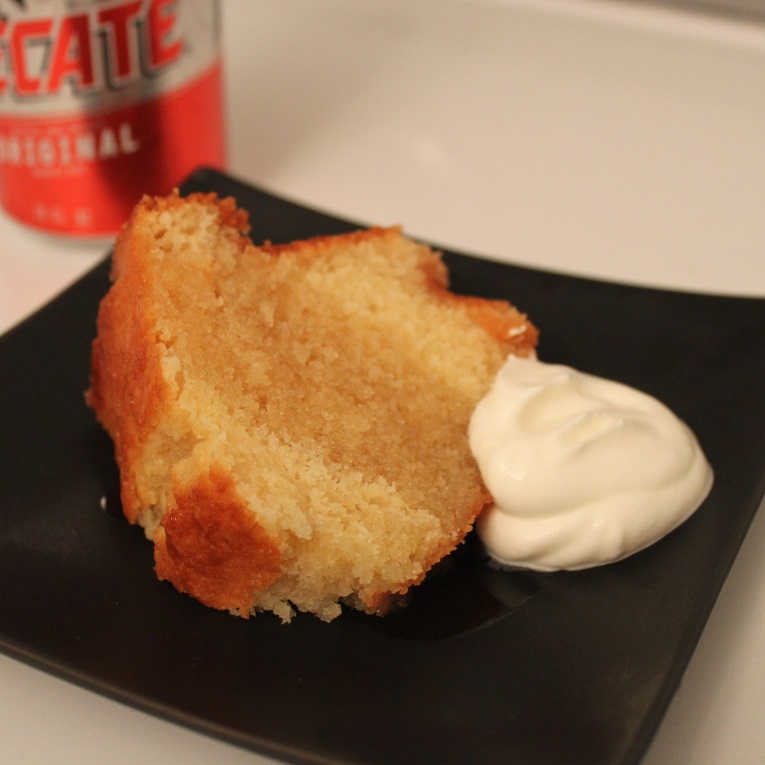
This particular recipe for coffee cake incorporates the flavor of penuche as a filling. It also has the particular add in as mentioned above. The filling in the cake is not as thick as fudge, it more resembles the texture of the typical icing you find on a German chocolate cake. The base of the cake is a fluffy yeast bread that just takes a few hours to rise. Outside of this delicious combination, the crowning touches are lots of streusel and a white icing drizzle.

The amount of filling in this cake is more than the norm, which I consider a plus. This insures that you get some crunchy pecans and moist coconut in every bite. That factor is what makes this recipe extra special. The original information is below and there are tips and notes at the end to help your bake be successful.

Penuche Coffee Cake
adapted from this old hen website

Pastry Ingredients:
3/4 cup warm milk
1/4 cup warm water
1 egg (room temp)
2 1/2 tsp yeast
1/3 cup instant mashed potatoes (mixed with 1/3 cup warm water)
1/2 cup sugar
1/4 cup shortening, cut in small cubes
1 tsp salt
3 1/2 cups flour

Penuche Filling Ingredients:
3/4 cup pecans, chopped and toasted
7 oz sweetened coconut
1/2 cup butter
1/4 cup sugar
1 egg (room temp)
1/2 cup heavy whipping cream
1/2 cup light brown sugar
1 tsp vanilla
1 tsp salt

Streusel Ingredients:
2/3 cup powdered sugar, sifted
1 1/2 cups flour
1/2 cup butter
1 egg
pinch of salt

Icing Drizzle Ingredients
2 tbs water
2 cups powdered sugar (sifted)

The bread base is the first component. Start by sprinkling the yeast over the surface of the warm water. Then stir a few times. The mixture will develop a foam on the surface after 10 minutes. At this stage, add mashed potato mixture, egg, shortening, milk, salt and sugar. Whisk together with a fork and use it to mash the shortening on the inside of the bowl so it is the size of peas.

Prepare a 9x13 inch rectangle pan or a 12 inch round pan by buttering the interior. If you have a 12 inch springform pan, that will work also. Set pan aside.

Using a wooden spoon, fold in 1 cup of the flour. When that is thoroughly blended, fold in the second cup and blend, then do the same with the last cup. Dust a flat surface with flour. Remove the ball of dough and knead for 5 minutes, kneading in the remaining 1/2 cup of the flour. Shape into a ball and cover dough lightly and let rise in a warm place until doubled in size. This should take about one hour.

During the rise time, prepare the filling. Place a saucepan over low heat and fill with the butter. Continue to cook until butter is completely melted. In a small bowl, whisk together the cream and the egg. Pour in with the butter. Then add both types of sugar, vanilla and salt. Stir together and switch heat to medium high. Mixture will thicken as it cooks. For the right consistency, cook for about 12-15 minutes, watching and stirring ocassionally. Lastly, stir in pecans and coconut, making sure coconut clumps are broken up. Transfer mixture to a heat proof bowl and place in refrigerator until needed.

After the dough has doubled, dust the flat surface again with flour. Remove dough from bowl and punch down. Roll out to about 1 inch more than the interior of your prepared pan. Then lightly press it into the pan covering the bottom and the sides up to the top edge.

Cover lightly with a towel and let the dough rise in the pan for one hour or until doubled in size.

As it rises, prepare the streusel. Fill a food processor with all the ingredients and pulse until all is combined and mixture is crumbly. Set aside.

Preheat the oven to 350 degrees.After the pan rise time is completed, press down dough in bottom and sides of pan. Empty bowl of filling into the pan. Using a spatula, smooth the filling out evenly,
covering the entire interior bottom and reaching to all corners of the dough. Then evenly sprinkle on the streusel clumps. Place cake pan on a baking sheet and put in preheated oven. Bake until edges of dough are golden, about 35-45 minutes.

Remove pans and place cake pan on a rack to cool completely. Once cool, prepare the icing by whisking together the water and sifted powdered sugar. If the cake was baked in round form, invert onto serving platter by inverting twice. The streusel should be face up. If baked in the 9X13 inch pan, cake can be served from pan. Drizzle or use a squirt bottle to ice the cake. Wait 30 minutes for icing to set.  

Tips and Notes:
1. I used parchment on the 9x13 inch pan so I could pull the cake out of the pan. It got too wet and tore, so it is best to leave it in the pan to serve.

2. The streusel was more dough than crumble, so I added 2/3 cup more flour to get it the right consistency.

3.The cake did not bubble over when baking, so the pan on the bottom was just a precaution.

4.The original recipe listed a egg for the filling ingredients yet instructed to add egg yolks but nowhere did it say to add egg. I used just an egg and it turned out fine.
                            **LAST YEAR: Chocolate Tequila Sundae**