Foodbuzz

Saturday, December 26, 2015

Cherry Pie Bites


Slicing and serving a big fruit pie can get a bit messy.  Not only messy, but it seems as if equality in the slice is never achieved. One person gets more crust or streusel and another gets more filling.  To curb all of those issues, I found a recipe for the cherry pie bite.

This is a tassie with a pie filling. When I started this project, it was based on me having cream cheese in the refrigerator. I soon found out I had none. However, I still had some goat cheese from the last baking session,so I decided to substitute it for the cream cheese. It worked out quite well for the dough.

I do not make pies all that often, but I was surprised that the only spice in these little treats is nutmeg. Streusel usually has cinnamon, which I like, but the nutmeg/cherry flavor combo is a now also a hit in my book. This recipe made about 2 dozen, but be sure to anticipate that each person will eat at least 2.

Cherry Pie Bites
adapted from BH&G 100 Best Cookies

Ingredients/Crust
3 oz cream cheese or soft goat cheese
1 cup flour
1/2 cup butter, cubed

Ingredients/Streusel
2 tbs chopped, toasted walnuts or pecans
1/8 tsp of nutmeg
2 tbs flour
2 tbs brown sugar
1 1/2 tbs butter

Ingredients/Filling
2 tsp cornstarch
1/3 cup sugar
2 cups fresh (pitted) or frozen (unsweetened,pitted, thawed) cherries

For the crust, beat the cream cheese (or goat cheese) for about 1 minute. Continue to beat, dropping in the cubes of butter. Once all the cubes are in, beat for an additional minute. Then fold in the flour with a spatula, forming a smooth dough. Divide the dough into 24 equal pieces and shape into balls. Place each ball into the cavity of an ungreased mini muffin pan (1 3/4 inch cavity size). Press each ball in the cavity to form a shell, covering the base and up the sides. Preheat the oven to 325 degrees.

In a small bowl, mix together the flour, nutmeg, nuts and brown sugar. Using the tines of a fork, cut in the butter until the dry ingredients can be clumped together like sand. Set this streusel mixture aside.

The last component of this dessert is the filling. Start by placing the cherries and sugar in a saucepan.  Then sift in the cornstarch. Place the pan over medium heat. Stir the ingredients together and let cook. The mixture should cook until it becomes the thickness of honey. You should be able to scrape the back of the spoon onto the edge of the pan and have it leave a streak. Remove from heat.

Fill each cup with a heaping teaspoon of the filling until all crusts look like fruit pies and no filling remains. Then sprinkle the streusel evenly on top of the little pies.

Place in oven and bake for 25-30 minutes. Pans should be rotated halfway through the baking time. Bites are done when crust is crispy and streusel turns a golden brown. Let pie bites cool in pan on rack for 5 minutes. Then transfer to rack to finish cooling.

Tips and Notes:
1. I grated my nuts for the streusel, so the nuts would be evenly distributed in the topping.
2. I used non-stick mini muffin pans, so I cannot comment on the recommended ungreased pans.
3. Be prepared for the filling to run a little bit over the cavities, but it will not run over the pan into the bottom of the oven.
                         **LAST YEAR:Graham Chocolate Chip Muffins**


Sunday, December 20, 2015

Dark Chocolate Fingers


I do like to dunk cookies and donuts into coffee. However, one is not to take the whole "dunking" thing too lightly when it comes to cookies.There is special consideration to be taken before you undergo this task. The first choice you have to make is the beverage...an ice cold glass of milk or tea versus hot tea or coffee. Then choose a cookie that will withstand the dunk. It will need to have some snap and crunchiness to it. No one enjoys soggy cookies crumbs floating in their drink.

With these crispy cookies, you will have the best of both ends.They have is a plain end for dunking and the another end for enjoying double the chocolate. The chocolate coated end is a not only delicious but the texture clash of creamy vs crunchy is hard to resist.

This recipe makes about 26 cookies. Now let's move on to the recipe so you will have that chocolate fix....

Dark Chocolate Fingers
adapted from The Perfect Afternoon Tea Recipe Book

Ingredients
4 tbs corn syrup
1/4 cup butter/cubed
5 oz dark chocolate (bar or chips)
chocolate sprinkles
1/4 cup sugar
1 cup flour
pinch of baking powder
2 tbs dutch cocoa powder

Whisk together the cocoa powder, baking powder, flour and sugar in a medium size bowl. Pour in the corn syrup and add the butter cubes. Combine using a pastry cutter or wooden spoon. Mixture should form a chocolate dough. If it is too dry, add 1 tsp of corn syrup and blend until dough consistency is achieved.

Preheat the oven to 325 degrees. Then cover the bottom interior of 2 baking sheets using parchment paper. Also, roll out 20 inches in length of parchment paper and cut. Fold over and place on a flat surface.

Place the dough between the folded parchment paper. Roll dough until it forms an even 7 x 9 inch rectangle. Unfold parchment and trim edges of dough so it is a perfect rectangle. Take the scraps and place on top of rectangle and roll lightly to smooth out top. This will keep you from wasting dough.

Next, cut the dough in half by running a sharp knife across the center, parallel to the longest side. The cut each half into 13 slices. Each slice will be a little under 3/4" wide and 3 1/2 inches long. Place 13 slices on each baking sheet, spacing evenly apart.

Place each sheet in oven to bake until crisp, which is about 15 minutes. Rotate pans halfway through baking. At the end of the baking time, transfer cookies from sheet to cooling rack.

Set up a double boiler to melt the chocolate. Once the water starts to simmer, fill the top pot with the chocolate. Also lay a sheet of wax paper on a flat surface. After the chocolate is melted and the cookies have cooled, dip one end of the cookies into the chocolate. Then lay on the flat surface to dry and put some chocolate sprinkles on top, you are ready to dunk and enjoy some chocolate!
                                              **LAST YEAR: Eggnog Chiffon Pie**

Sunday, December 13, 2015

Red Velvet Twinks


Individually packaged baked goods...we have all had them at one time or another, for they were usually stuffed inside our school lunch bag or purchased upon impulse at the convenience store. They are also found on shelves in the grocery store. Here in Texas, the Little Debbie brand is the most popular and has the most variety. However, I think the start up of these type of things began with the Hostess company back in 1919.

Twinkies were one of the little cakes that were created by Hostess in 1930. The creation of a sponge cake filled with cream became a sweet success. Yet, this recipe tops that original idea. It is actually a red velvet cake filled with cream. Not just any cream, but a blend of goat cheese and cream cheese which add a great dimension of tangy flavor to the cake.

You could make these into cupcakes as well and double the recipe for the filling and put it on top of the cupcake. Either way, your taste buds will thank you for taking the time to bake these little cakes. There are several methods to combine the filling with the cakes. The original instructions are below and at the bottom are my tips and notes. This recipe makes 16 "twink" cakes.

Red Velvet Twinks
adapted from Baking Out Loud

Ingredients/Cake
2 tsp white vinegar
1 1/2 cups canola oil
1 cup buttermilk
2 eggs
2 tsp vanilla bean paste or extract
1 1/2 tsp baking soda
2 1/2 cups cake flour
1 1/2 cups sugar
2 tbs Dutch processed cocoa powder
1 tsp salt
2 tsp red food coloring

Ingredients/Filling
1 1/2 cups confectioners sugar
1 tsp vanilla extract
4 oz goat cheese (room temp)
4 oz cream cheese (room temp)
6 tbs unsalted butter
1/2 tsp salt
1 cups chopped toasted pecans or shredded coconut (optional)

Prepare canoe baking pans by greasing the interior cavities and top edges of 2 pans with 8 cavities. Preheat the oven to 350 degrees.

For the cakes, start by pouring the sugar and oil into a medium size bowl and blend using a hand mixer. Add food coloring, one egg and vanilla extract. Beat for about 30 seconds. Add the other egg and beat again for 30 seconds. Set aside.

Using a separate bowl, sift together the cocoa, flour and salt. Add 1/3 of this dry blend into the bowl of red batter and fold mixture together using a spatula. Then stir in 1/2 cup of buttermilk. Repeat the process starting with 1/2 of the sifted dry ingredients. After the remaining buttermilk is mixed in, fold in the last of the dry ingredients.

Fill a small bowl with the vinegar and mix in the baking soda. Stir this mixture into the red batter until evenly distributed.

Spoon or pour the batter evenly into the prepared pan cavities.  Place pans in oven and bake for 8-9 minutes and rotate pans. Bake for an additional 8-9 minutes or until tester comes out clean. Cakes will have a slightly firm top center when done. Remove from the oven and place pan on rack to cool. Cool completely before removing cakes from cavities.

For the filling, cream together the goat cheese, cream cheese and butter using a hand mixer. Your batter should be void of lumps. Add then vanilla extract and beat again for 30 seconds. Take out another bowl and sift together the confectioners sugar and salt. Measure out 1/2 cup of the dry ingredients and beat into batter. Repeat the process with the sifted ingredients until all has been blended into the batter. If you choose to decorate the cakes, reserve 1/4 of the filling in a separate bowl. Prepare a piping bag with 1/4 inch tip. The remaining 3/4 of the filling will be used with the piping bag.

Remove the cakes from the pan.  Both sides will be rounded, so the side that was face up in the pan should be flattened so the cake will sit properly on a plate. Trim that side with a serrated knife.

The filling will be piped into the cake via the flat trimmed side. Pipe the filling into the bottom of the cake by making separate, even 3 holes with the tip. Make sure that there is sufficient space from each end of the cake. Each hole should be filled with about 1 tablespoon of filling. As an additional option, frost the flat side of the twink with a thin layer of the remaining filling. Pour the coconut or pecans evenly onto a flat plate and dip the frosted bottoms of the cake into the plate, coating the bottom.

Tips and Notes:

1. The perfect shape is hard to achieve. I had some cakes came cleanly out of the pan and some that did not. If your cake shrinks from the sides of the cavity when cooling, that is a good indicator that they will keep their shape. For no worries on this issue, cupcakes are the answer.

2. For filling, I preferred to use a skewer to make the holes at each end and piped from the sides and one hole in the bottom. The picture of the dessert did not show that there was a cake bottom, just a filling bottom sitting on the plate. This lead to my interpretation...cutting the sealed surface of the cake would expose the lighter crumb of the interior, making it victim to oozing filling.  I did not cut the cakes to have a flat surface.

3. Spreading the filling onto the cakes and dipping them makes for a better presentation and adds an additional flavor layer.  I kept mine basic to the original idea of a Twinkie and found it to be a good ratio of cake to filling.

4. Not ready for a big Twinks project? Try cupcakes instead for the same flavor, just without the cute shape.
                                       **LAST YEAR: Spiced Honey Pecan Fingers**

Sunday, December 6, 2015

Holiday Cheesecake Swirl Bars


I was watching Food Network the other day, where cooks compete for a grand prize. One of the judges advised a contestant that while her food was tasty, they were really looking for something more creative and a stand out. I guess if you stay with the tried and true, you are playing it too safe. I have always believed that it is the risk takers that are usually the most successful. If in the end you lose, would you rather have taken the risk or played it safe?

This particular recipe can be classified as a successful risk. It is very different from the image and flavors we think of when the subject of a cheesecake dessert comes up. I think of the NY slice with strawberries on it or the caramel turtle cheesecake. This recipe is definitely not those.

Firstly, it is a bar recipe instead of the round cheesecake made in a springform pan. The are several other factors which deem this recipe unique. The bottom is actually a blend vanilla wafers (sometimes called "Nilla" as stated on the package) and pecans. As you taste the creamy layer, there is that unmistakable tang of cream cheese. Then you experience some seasonal flavors such as eggnog and rum. Lastly is the top layer, of sweet swirled white and dark chocolate, which pulls it all together.

I am sure you agree that the title of this recipe does not reveal all the great flavors in these bars. Now let's get to baking...

Holiday Cheesecake Swirl Bars
adapted from My Recipes

Ingredients
1/4 cup of eggnog
6 tbs melted butter
1 1/2 tsp of rum extract
2 eggs
1/2 cup sugar
crushed vanilla wafer cookies (about 55)
1/2 finely chopped toasted pecans
16 oz softened cream cheese
1/2 cup or 4 oz white chocolate
1/2 cup or 4 oz semi-sweet chocolate


Grease the interior of an 8 or 9 inch square pan.  Line the bottom and up 2 sides of of the pan, leaving some overhang. Preheat the oven to 350 degrees.

To make the crust, mix together the pecans and cookie crumbs in a small bowl. Pour in the butter and stir, making sure everything is dampened. All of it should be able to clump together. Empty mixture into the prepared pan and press evenly into the bottom of the pan. Place pan in oven and bake for about 8 minutes. Remove and set aside on rack to cool.

Fill another bowl with the cream cheese, rum extract and sugar and combine, using a mixer. Beat batter for about 1 minute. The resulting batter will be thick and smooth. Add one egg and mix just until blended. Repeat the process with the second egg.

Separate out 1 1/2 cups of batter. Pour it on top of the prepared crust in the pan. For the remaining batter, mix in the eggnog. After blending, measure batter and divide in half.  Set each bowl of batter aside.

Set up a double boiler and once the bottom pot of water starts to simmer, fill the top pot with the white chocolate. Let the chocolate melt, stirring a few times. After it is completely melted, empty chocolate into one bowl with the eggnog batter and stir. Drop by spoonfuls on top of the cream cheese layer in the pan, leaving space between each.

Repeat the above process with the semi-sweet chocolate and spoon into the spaces left between the white chocolate blend. Marble the two together using a knife or skewer to make swirls.

Place pan in the oven and bake for about 30-35 minutes.When done, the surface will no longer be shiny. After baking, place pan on cooling rack. Once completely cool, cover and chill for a minimum of 1 hour. Using the parchment overhang, lift dessert out of pan and cut into bars and serve.
                                 **LAST YEAR: Pineapple Upside Down Gingerbread*

Sunday, November 29, 2015

Amaretto Cherry Bread


For me, it is hard to turn down a culinary treat with Amaretto. The tasty Italian liqueur has found its way into many types of recipes from meat to ice cream. Even though Amaretto does have a bitter almond flavor, it is made from apricot pits- it does not contain any almonds or nuts.

This loaf has the same texture as most sweet bread. However, it is the Amaretto that makes it a standout from the rest. With the addition of cherries and nuts, the flavors compliment each other nicely. Also, this is a go to recipe when you are looking for something quick to bake.

The bread is a great item to give as a gift, it transports well and the flavors get better with time. You will also find that it is a welcome addition to a cup of tea or coffee. One slice can squelch the craving for something sweet, but not heavy.

The recipe makes 3 small loaves.

Amaretto Cherry Bread
adapted from Recipe Goldmine

Ingredients
1/2 cup Amaretto
3 eggs
1/2 cup butter
1 cup chopped almonds or chopped nuts
1 cup sugar
2 tsp baking powder
1 1/2 cups flour
powdered sugar (optional for dusting top of loaves)
1 1/2 cups fresh or frozen cherries

Preheat oven to 350 degrees.  Grease the interior of 3 loaf pans (5.5 X 3) and line bottom and 2 long sides with parchment paper.

Add the butter and sugar to the bowl of a stand mixer. Beat at medium speed for 1 minute then mix in one egg at a time, until all is blended and set aside. In another bowl, sift together the flour and baking powder.

Fold 1/3 of the sifted ingredients into the butter batter. Stir in 1/4 cup of Amaretto.  Repeat the process, ending with the flour after the last 1/4 cup of Amaretto.  Once batter is smooth, mix in the cherries and nuts until evenly distributed.

Spoon the mixture evenly into the loaf pans. Place in oven and bake until tester comes out clean. The bake time averages between 40-50 minutes. Loaves will have a golden hue on the surface when done.

Place pans on cooling rack and let bread cool completely in pans. If you prefer, the top can be dusted with powdered sugar right before slicing and serving.

Tips and Notes:
1. I used 2 standard loaf pans, but there was not much height to the loaves. The smaller loaf pans do allow for more height.

2. I used pecans, but you can use any type of chopped nuts, depending on personal preference.

3. Do not use any frozen fruit in syrup, buy the flash frozen type that has no syrup.  Make sure the cherries are thawed before putting into batter.
                                        **LAST YEAR:Coconut Chocolate Chip Cupcakes**

Sunday, November 22, 2015

Gothenburgers

When most people prepare for the holidays, they are concerned about making an impression as well as making the event memorable for years to come. These little pastries are sure to do both in a very good way.

With the beautiful golden piped edge and the marbled center, they are a stunner for the dessert table. Beware, however, that the inviting appearance will insure that your guests will be reaching for one of these to eat first.

One bite reveals a buttery base with a crunchy edge and smooth filling that coats the base. Each of these textures hold a rich almond flavor. Topping it off is a sweet raspberry/icing swirl and a touch of chocolate. All of those attributes makes them worthy of the holiday receipt vault. This is where are the special recipes lie that only come out once a year and are requested every year.

Make a delicious holiday memory this season by creating these stunning pastry-like cookies, named after the second largest city in Sweden, Gothenburg. This recipe makes about 24 pastries that are 3 1/2 inches in diameter.

Gothenburgers
adapted from Swedish Cakes and Cookies

Ingredients/Edged Base
1/2 an egg
1 egg white
7 oz almond paste
5 tbs butter
2 tbs sugar
3/4 cup flour

Ingredients/Filling and Garnish
1 egg (whisked)

3 tbs butter
4 oz almond paste
2-3 tsp water
raspberry jelly
3 oz semi sweet chocolate
1/3 cup powdered sugar

Prepare 2 baking sheets by lining with parchment paper.

To form the dough, cream together the butter and sugar in a medium size bowl. Beat in the 1/2 of egg. Add the flour and fold in, using a wooden spoon. Mixture should form a ball of dough. Flatten the dough into a thick disk and cover with plastic wrap. Place in refrigerator to chill for about 1/2 an hour. 

For the piped almond edge, fill a small bowl with the egg white. Take out a grater and grate the 7 oz of the almond paste into the egg white. Beat the two together until smooth, using a hand mixer on medium high speed. Set aside.

Preheat the oven to 400 degrees before you make the filling. Start on the filling by beating the butter in a bowl until smooth, set aside. Using another bowl, grate 4 oz of almond paste into the bowl. Add half of the grated almond paste to the butter and beat for 30 seconds.Then beat in the egg for another 30 seconds. Lastly, add the reset of the grated almond paste and beat until smooth.

Dust a flat surface lightly with flour and also dust a rolling pin. Prepare a piping bag with star tip. Place a cooling rack on the counter as well as a sheet of wax paper.

Remove the dough from the refrigerator and roll out onto the floured, flat surface. Cut dough into round circles, about 3 1/2 to 3 3/4 inch in diameter and place on baking sheet. Using a butter knife, smooth the filling evenly onto the circles, leaving a border of 1/4 of an inch.

Once all the filling has covered the circles, fill the piping bag with the almond paste/egg white blend and pipe around the edge of the pastry. Place pan in oven and bake for about 10-12 minutes or until edge turns a light golden hue.

Place baking sheet on rack and let cookies cool for about 2 minutes. Transfer from baking sheet to cooling rack. Once completely cool, spread about 1 1/2 teaspoons of raspberry preserves over the filling, keeping clear of the almond piped border. 

In a small bowl, sift the powdered sugar and add the water by teaspoons, mixing after each addition. The icing should be the consistency of cookie icing not cake frosting. Once blended, swirl the icing into the raspberry topping forming a marbling appearance. Again, avoid the piped border. Let the cookies set for about 5 minutes for the topping to solidify more. Take a sharp knife and cut each in half.

Set up a small double boiler and melt the chocolate. Coat the cut edge of each cookie in the melted chocolate and place on wax paper. Give time for the chocolate to set before serving or storing.

Tips and Notes:
1. I used seedless raspberry preserves and doubled the batch of icing.

2. I found that using a knife to coat the chocolate on the cookie edge made for a more even finish.It also helps when you get down the the last of the melted chocolate.

3. There are some strange measurements since this recipe originated from Sweden, such as the 1/2 egg and 7 oz of almond paste (my can was 8 oz). For the egg, whisk a whole egg and measure out 2 tablespoons for your ingredient for the dough base. The almond paste I weighed to eliminate the extra  1/oz.

4. For less leftover ingredients, double the whole recipe.


                                           **LAST YEAR: Aunt Bill's Brown Candy**

Sunday, November 15, 2015

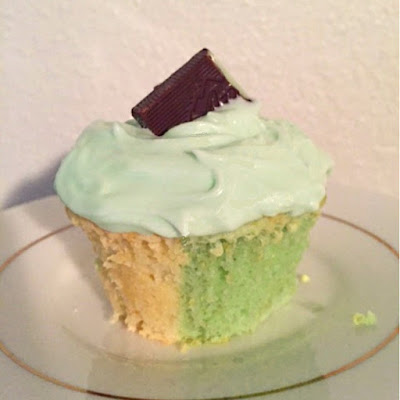
Grasshopper Cupcakes


When it comes to purchasing, everyone has their weakness for something that they have way too much of and want more. Some men have to have every type of fishing lure ever made and there are many women that can never get enough shoes. In addition to having them, they enjoy shopping for them as well.

My weakness is for baking utensils and cookbooks. I try to curb my weakness by being careful of which items are purchased. I ask myself how much use will I get out of it and is the usage worth the expense. Which brings me to the little cupcake separators that it took to make the two toned treat above. Tagged at under $9.00 for 6, I decided they were worth it. I have made several different combo cupcakes in the past and I like the idea of two flavors side by side, rather than top and bottom.

This is a cupcake take on the sweet, after-dinner drink called the Grasshopper. In case you are not familiar with the drink, it is made with creme de cacao and creme de mint. The drink originated back in the 1950's. The owner of a bar located in the French Quarter section of New Orleans, Louisiana came up with this tasty blend.

Chocolate and mint always make a good pairing and this moist cupcake is a perfect example. The frosting is a mix of mint, creme de cacao and cream cheese. Unlike buttercream, the frosting is thinner so no fancy piping was done. In review, I think buttercream would have masked the cake flavor, so I was pleased with the choice. Also, the creme de mint candies on top made them even better. This recipe makes about 1 1/2 dozen cupcakes.

Grasshopper Cupcakes
adapted from Spiked Desserts


Ingredients/Cupcakes
1 cup or 2 sticks of butter (room temp)
1 tsp clear vanilla extract
3/4 cup sour cream
4 oz white chocolate
4 eggs
3 tbs green creme de menthe
3 tbs clear creme de cacao
green food coloring (optional)
1/2 tsp mint extract
2 cups sugar
1/4 tsp baking soda
3 cups flour
1/2 tsp salt
1 tsp baking powder


Ingredients/Frosting
3 1/2 cups powdered sugar
8 oz cream cheese
1/4 tsp mint extract
2 tsp creme de cacao
2 tsp creme de mint

Grease the top edge of muffin cavities, then place paper liners in each cavity.  Preheat the oven to 350 degrees.

Place butter in bowl and beat until smooth with a stand mixer. Add the sugar and cream both together until smooth and light. Then add each egg, beating about 30 seconds between additions. Turn off mixer and leave bowl set in stand.

Place a double boiler over medium high heat. Once the water comes to a simmer, fill the top pot with the white chocolate and let melt. After all is melted, remove double boiler from heat and remove top pot.

Go back to the mixer and turn on low and start beating the butter/sugar batter again. As the mixer is running, slowly add the melted chocolate and then the vanilla extract. Be sure to stop and scrape down the sides occasionally. Once blended, turn mixer off. Remove bowl and set aside.

Take out 3 bowls. In one bowl sift together flour, salt, baking powder and baking soda. Using a wooden spoon or spatula, fold 1/3 of the sifted ingredients into the sugar/butter batter. Add 1/2 of the sour cream and blend. Complete this process again and then fold in the last of the sifted ingredients.
Divide batter equally into the remaining 2 bowls.

Mix 3 tbs of creme de menthe, mint extract and green food coloring (optional) into one batch of batter. For the remaining batter, blend in 3 tbs of creme de cacao.

Now comes the tricky part. If you have the separators for the batter it is helpful, just place in the center of each cavity and fill one side up 2/3 of the way with one batter. Then do the same with the other batter and remove separator. Without a separator, just spoon in best you can on each half of the cavity with each flavor of batter.

Once all the batter is in the muffin cavities, place pans in oven to bake. Bake until tester comes out clean. Bake time should be about 16-19 minutes. Remove and let cool in pan 1 minute and then transfer cupcakes to a cooling rack. Cool completely prior to frosting.

Start on the frosting by sifting the powdered sugar into a bowl of a stand mixer. Then cut the cream cheese into cubes and drop into the sugar. Add the creme de menthe, cream de cacao and mint extract. Start mixer and beat on low speed for about 2 minutes. Turn the speed up to medium and beat until creamy and completely blended. Top cupcakes with frosting, using a knife to swirl on top. Remove wrappers of candy. Grate, split or do both for the topping. Sprinkle on grating and/or stick 2 pieces of the split candy into the center of the cupcake top.

Tips and Notes:
1. I used Batter Babies brand of cupcake dividers. They do not fit tight into the muffin cavity, but the addition of one type of batter on a side does holds them up so you are free to add the batter to the other side.

2.The frosting is personal preference. It does not have to be a blend of both flavors, so add flavor how you want.

3. As with all cupcakes, frost as soon as cool to avoid having the top of cupcake drying out.
                                             **LAST YEAR: PBC Cookie Biscotti Sticks**

Sunday, November 1, 2015

Bacon Buttermilk Scones

Most of the items you will find on my blog are sweet rather than savory. Some men do like sweets, but if given a choice, they will choose savory over sweet. Even though my blog has sweet items, I have tried to make sure that the blog does not seem too "girly". By "girly" I mean recipes and photos of barbie doll cakes and hello kitty cookies. Nothing wrong with those type of things, but that is not the chosen image for this blog.

When it comes to savory, bacon and cheese does seems to draw the most attention. These scones definitely have that covered. To further escalate your craving, toss in some green onions sauteed in bacon drippings and some garlic powder. Then, seal the deal by adding some heat with red pepper flakes and make sure that the bacon is actually peppered bacon.

A plate of these tasty scones will give women easy access to the man cave during football season. Men, on the other hand, may consider bringing these scones out in an effort to help your friend decide who gets those 50 yard line tickets...

Bacon Buttermilk Scones
adapted from Better Homes and Gardens Fall Baking

Ingredients
1 1/2 cups shredded cheese
1/2 cup chopped green onion
6 slices peppered bacon
1/4 tsp garlic powder
1/4 tsp crushed red pepper
1 tbs baking powder
3 cups flour
1/2 cup cold butter (cubed)
1 egg
1 cup buttermilk

Prepare a baking sheet by lining with parchment paper. Preheat the oven to 425 degrees. Lightly dust a flat surface with flour.

Cook the bacon in a skillet over medium heat until crispy. Remove from pan and lay on paper towels to drain. Empty all but 2 tablespoons of bacon grease from pan. Chop or crumble bacon into pieces and set aside.

Place chopped green onions in the same pan in which the bacon cooked. Stir fry until tender. Empty pan over a sieve and let the grease drain, reserving the sauteed onions. Set aside.

Sift together the flour, garlic powder and baking powder into a medium size bowl. Then add the red pepper flakes.Toss in the butter chunks and use a pastry blender to form the mixture into coarse crumbs. Fold in the green onions, cheese and bacon, making sure all is evenly distributed. Form a well in the center of the mixture.

Using a medium bowl, whisk together the buttermilk and egg. Take out 2 tablespoons of the mixture for reserve. Empty the remaining egg/buttermilk batter into the well that was formed in the flour mix. Using a wooden spoon or large fork, stir all until combined into a dough.

Empty dough onto prepared surface and knead, about 10 to 12 turns. Roll dough into flat mass that is 1/2 an inch thick. Cut into squares or circles with a 2 inch biscuit cutter. After all is cut, you should have 24 to 26 scones. Place all on cookie sheet, fitting all 24 or 26 closely together but not touching.

Brush the tops with the reserved buttermilk mixture. Place scones in oven to bake for 13-15 minutes.  They will be lightly golden on top and bottom when done. After baking, transfer scones to rack to cool.

Tips and Notes:
1. The cheese is your preference, for really spicy scones use jalapeno cheese. The recipe does  recommend Guyere.
2. Sharply cut dough edges will insure proper rise to the scones.  Make sure your biscut cutter is sharp and do not twist when cutting into dough.
                        **2 YEARS AGO:Chocolate Sugar Cookies**

Sunday, October 25, 2015

Buttermilk Fig Cake

Figs are in season at the end of the summer. Since they do so well teamed with spices, I really think of them as a winter item. We all know that figs have good nutritional value. I am not sure why there are not more desserts made with them. The only thing that most of us can recall with this item as an ingredient is fig newtons.

After trying this recipe, I consider this cake as a wonderful alternative to the fig cookies. Rich, moist and spicy, it easily finds a place beside a cup of tea. The other good point about this cake is that it is a converted recipe that is low in fat, having only 3 grams per slice. The recipe comes from a spa and resort in Austin. We all know that even the idea of something fatty and sugary at a spa resort is not welcome.

It is a light dessert but really delivers on flavor and the texture. One bite reveals a myriad of rich spices with chewy figs and the crunch of nuts.The glaze is soaked up by the cake top and edges which give it a nice burst of sweetness.

Now for those that are unfamiliar with figs, they do have seeds. So every once in a while you will come across a fig seed in this cake.  If you do not mind the seeds of strawberries or blackberries, then you will be fine.  However, since there are some that abstain from the small seeded fruits-I have to give fair warning.

Buttermilk Fig Cake
adapted from Lake Austin Spa Resort

Ingredients/Cake
2 tsp baking powder
1 tsp baking soda
1 tsp ground nutmeg
1 tsp ground allspice
1 tsp cinnamon
1 tsp salt
2 cups flour
1 tbs canola oil
2 eggs
2 egg whites
1 1/2 cups sugar
2/3 cup buttermilk
1 tsp vanilla
7.5 oz baby food prunes (about 3 jars)
1 1/2 cups chopped preserved figs
1/3 cup chopped pecans

Ingredients/Glaze

1/4 cup buttermilk
1 tbs light butter
1 1/2 tsp cornstarch
1/2 cup sugar
1/4 tsp baking soda
1 1/2 tsp vanilla extract

Prepare a springform pan by greasing the interior. Preheat the oven to 350 degrees. Sift together the first 7 ingredients and set aside. Fill another bowl with the eggs and egg whites.Whisk until blended and a little foamy on top. Then mix the oil, sugar, prunes and vanilla into the eggs.

Take 1/3 of the sifted ingredients and fold into the wet batter. Stir in 1/3 cup of the buttermilk. Repeat the process, ending by blending the last addition of the flour. Lastly, fold in the nuts and chopped figs.

Empty the batter into the prepared pan and bake until tester comes out clean.  Bake time is approximately 55 minutes. After baking, place on rack to cool for 15 minutes, then unmold ring.  Glaze cake when completely cool.

The glaze can be made while the cake is cooling. Place a small saucepan over medium heat. Add buttermilk and sugar. Stir and let cook until sugar is dissolved. Sift in the cornstarch and baking soda, stirring quickly so no lumps form. Add the butter and mix until butter is completely melted and blended. Remove from heat and whisk in vanilla extract.  Let cool completely.

Once each component (cake and glaze) is at room temperature, give the glaze a stir and then drizzle over cake. Let sit until glaze is slightly soaked into cake, then slice and serve.

Tips and Notes:
1. If you cannot find preserved figs, then used dried figs. Let them simmer in a mix of water and pure maple syrup for about 45 minutes, then remove from heat and cover. Let sit for about 2 hours and then drain and dice.
2. Glaze is supposed to be really thin and sticky, not like the standard sweet glaze that dries hard.
                                            **LAST YEAR:Banana Nutella Bars**

Sunday, October 18, 2015

Maple Pecan Pinwheel Cookies


I have a hard time trying to remember when someone actually said that a cookie tasted awful. Most cookies have a flavor appreciation, so the next factor when evaluating them is the texture. Hard cookies for dunking in milk, soft cookies for those that like a cookie on the light side and chewy for those people leaning towards the more candy-like cookies. The candy-like cookies are the typical slice and bake dough found at the grocers for you to bake or already baked up in the small display bins in fast food restaurant chains.

This particular cookie has some chewiness that comes from the filling.  However, the rest of the cookie mimics the buttery flakiness that you will find in pastries. If I had to name these, I would call them mini tart swirl pastries - not cookies.

That covers the texture evaluation. The flavor of the filling reminds me of those cinnamon praline pecans that are an addiction of mine. Also,the filing and the glaze have maple syrup as an ingredient. Sadly, maple syrup could be used in a number of ways yet most people never reach for it unless waffles or pancakes are around. Overall, the taste and texture of these gems does make them pretty amazing.

The preparation of the cookies incorporates the slice and bake method, which makes it easy to prepare in advance and bake some up on short notice. That is always a plus in my book! The recipe makes about 7 dozen cookies.

Maple Pecan Pinwheel Cookies
adapted from the Journal Sentinel

Ingredients/Dough
4 cups flour
6 tbs sugar
2 cups or 4 sticks of butter (room temp)
2-8oz packages of cream cheese (room temp)

Ingredients/Filling
1 1/2 cups or 3 sticks of cold butter (cubed)
3 tbs maple syrup
3/4 tsp maple flavoring
2 1/4 cups flour
2 1/4 cup packed brown sugar
1 tbs cinnamon
1 1/2 tsp kosher salt
12 oz or 3 cups chopped pecans

Ingredients/Glaze
pinch of ground cinnamon
3/4 cup powdered sugar
1/2 tsp vanilla extract
1/4 cup maple syrup


For the dough, fill a large bowl of a stand mixer with the butter and cream cheese. Beat for about 3 minutes on medium speed, stopping occasionally to scrape down sides of bowl. Sprinkle in sugar and beat for another minute.  Remove bowl from stand mixer and fold flour into batter in 1/2 cup increments. Form dough into a rectangle and cover with plastic wrap. Chill dough for 2 hours.

Start on the filling by beating together the butter cubes and brown sugar. Stir in the maple extract and maple syrup. Using another bowl, sift flour, salt and cinnamon together. Add the sifted ingredients to the sugar batter and mix until there are no more dry streaks. Lastly, stir in the pecan pieces until evenly distributed.

Remove dough from refrigerator and cut into 3 equal but smaller rectangles. Let all rectangles sit for 20 minutes. Dust a flat surface lightly with flour and do the same with a rolling pin. Take 1 rectangle and roll out, forming a rectangle measuring 12x18.

Take 1/3 of the filling mixture and scoop out spoonfuls and drop onto dough. Fill a small bowl with hot water. Take a knife, dip in the hot water and use to smooth the filling evenly over the dough. Filling will be thick, but be gentle as the dough is very thin.

After the filling is smoothed over the dough, start rolling dough up from one of the longest edges. This is much like a jelly roll, only smaller. After the last part is rolled up, pinch end and press down to seal bottom seam also cut of any ends that are uneven.

Take the roll and cover in plastic wrap and refrigerate. Repeat the same process on the other two pieces of dough, dividing filling in half. The cut ends can be used to patch or to seal hole in the dough. Do not cut the ends of the last roll, just push in to flatten, so the edges are not jagged.

After all rolls have been in the refrigerator at least 30 minutes, preheat the oven to 350 degrees. Also line 2 baking sheets with parchment paper. Remove 1 roll and cut into about 28 slices. Lay each slice onto prepared baking sheets, filling each sheet with about 1 dz cookies. Cover the 2 slices and place in refrigerator. Put cookies on baking sheets in oven and bake until golden on edges. Cookies will take about 22 minutes to bake and pans will need to be rotated at the halfway point.

Place a sheet of wax paper under cooling rack. Remove cookies and let set for 2 minutes then transfer to cooling rack. Glaze cookies once completely cool.

For glaze, sift powdered sugar into a bowl. Add the rest of the ingredients and stir until smooth. Drizzle over cooled cookies.  Let glaze set before storing or serving.

Tips and Notes:
1. Be gentle with the dough but make sure it is tightly rolled and seam sealed. Filling expands as it cooks.
2. As an option, you can sprinkle more pecan pieces on top.
3. The smaller the pecans are in the filling, the easier it will be to smooth out over the dough.
4. Dough is not real sticky, so it does not need much dusting of flour.
5.There were places in my roll that were thin and some nuts were poking through but it did not cause a problem. 
                                    **LAST YEAR: Pineapple Cottage Cheese Pufflets**

Sunday, October 11, 2015

Caramel Apple Nut Pie


The standard thought when it comes to apple pie is apples baked in a crust with cinnamon thrown in.  If you are really craving the pure taste of apples in a pie, then the traditional apple pie is the one for you. For those looking for a additional layers of flavor in their pie, read on.

With Halloween coming up and the state fair, the caramel apple will be popping up in places. The thought of tasting a tart, green apple and smooth caramel can easily turn into a craving. Hold off on reaching for one..or you will miss out on satisfying your craving on a much more a tastier level. Let's take all that delicious flavor and texture from a caramel apple and enclose it into a flaky crust.  Caramel Apple Nut pie...need I say more?? Lets head into the kitchen!

Caramel Apple Nut Pie
adapted from Mrs Rowe's Little Book of Southern Pies

Ingredients/Vinegar Pie Crust
1 egg
1 cup plus 1 tbs vegetable shortening
1 1/2 tsp white distilled vinegar
2 cups flour
1/2 tsp salt
4-6 tbs ice water

Ingredients/Filling
6 cups peeled and sliced apples (4-5 McIntosh or Granny Smith)
1/4 cup heavy cream
3 tbs cold unsalted butter cut into bits
1 cup chopped walnuts or pecans
3/4 cup packed brown sugar
pinch of salt
3 tbs flour
1 tbs milk or cream
Sugar for sprinkling (brown, raw or granulated)

For the crust, start by blending the salt with the flour. Then add the shortening in chunks and use a pastry blender to cut the shortening into the dry mixture. Continue to use the pastry blender until all the powdery flour is slightly clumping with the shortening. There should not be any clumps bigger than peas. In a small bowl, whisk together the egg, vinegar and 1 tbs of the water. Pour the blend into the shortening/flour mixture. Using a spatula, mix all together. If the texture is too dry for dough, continue to add in the ice water and mix until the right consistency is met.

Divide the dough into two pieces. Flatten each piece to form a disk and cover with plastic wrap. Place in refrigerator to chill for a minimum of 30 minutes up to a maximum of 2 weeks.

Once you are ready to make the pie, dust a flat surface lightly with flour and do the same with a the rolling pin.Take out one disk of dough and roll in the floured surface, forming a circle 1/8 of an inch thick. Gently roll the dough loosely around the rolling pin. Hold the rolling pin 2 inches above the edge of the pie pan and slowly unroll the dough into the pan. Center the dough and then lightly press into the pan. Gather the dough edges into a border on the top edge of the pie pan and just fold the overhang of the dough over the top edge of the pie. Flatten slightly and make sure it is distributed evenly around the circumference of the pie pan. Place the dough lined pie pan in the refrigerator while you make the filling. At this time, preheat the oven to 400 degrees. 

Fill a large bowl with the apple slices. Then fill a second, smaller, bowl with the brown sugar, salt, flour and cream. Blend the ingredients in the smaller bowl with a wooden spoon. Toss in the nuts and fold until all is evenly distributed. Empty the blend from the smaller bowl into the apples. Mix until all the apples have some coating and the big clumps of the sugar/nut mixture are minimized.

Remove the lined pie pan from the refrigerator. Empty the filling into the pie pan and smooth the top, so all is even. Drop the butter bits over the top, making sure there is an even distribution. Take a pastry brush and dip in water. Brush the top edge of the dough with the water and set filled pie aside.

Take out the other dough disc from the refrigerator. Roll this piece out, in the same manner as the first. Also, use the same method of rolling the dough around the rolling pin. This time you will unroll it over the filled pie. Cut off any overhang of dough. Seal and shape the pie dough edges or use the tines of a fork. Cut a few steam vents in the center top of the pie with a sharp knife. Dip a pastry brush in the milk and gently brush over the top. Lastly, sprinkle a bit of sugar over the surface of the pie.

Place pie on a baking sheet then put in preheated oven. Pie is done when apples are tender and crust is golden. Bake time is about 40-45 minutes. Remove and place on a cooling rack to stand at least 2 hours prior to slicing and serving.

Tips and Notes:
1. It is important that apples are sliced thin, diced or chunks of apples will require longer baking time in order to get tender.
2. A vinegar pie crust is patchable and easier to work with but you can use whatever pie dough recipe you want.
3. The amount of water for your dough will vary, depending on the weather. Humidity or a dry day will make the difference.
4. If you choose to refrigerate the pie for enjoying at another time, let sit out 1 hour before serving.
5. Check the pie at the halfway point in baking, you may need a pie shield to insure that the crust edges do not get too brown.
6. You can use the dough scraps cut from the top dough layer.  Cut into leaves or desired shapes and place on the pie top after cutting vents and prior to brushing milk over the top.
7. The filling will be very thick, so when blending with the apples you may want to use clean hands.  
8. There is no need to shape edges of the bottom dough, the shaping is done with both the top and bottom dough is sealed together.
                              **LAST YEAR:After Eight Cupcakes**
 

Sunday, October 4, 2015

Gingerbread Latte Fudge


Fudge in all its glory, can be very fickle when attempting to make it at home.  Some recipes can be easy successes resulting in a luscious thick creamy concoction. Others can have a pitfall. The pitfall being that the timing was off.  Beat the mixture too long and it will be grainy and not cooking it to the right temperature and it will not set up.

This recipe yields a very smooth and creamy texture on the palate. However, the taste of the coffee was very dominant and the ginger did not come through in the fudge flavor. The addition of the toasted ginger cake did not do much. Even though the cake was toasted and chopped, it disappeared in the warmth of the fudge when stirred in. Other than that, I found it to be very sweet. In researching other fudge recipes, the sugar content is a little high for the amount of fudge that the recipe makes.

If you make candy on a regular basis, then this particular recipe should not be a problem. The special flavor combination is quite unique for fudge. More tweaks will need to be made in order to create a balance between the coffee and ginger.

Since this recipe is from the UK, it was given in oz or milliliters and grams. The oz and gram conversion to cups results in fractions, so I am submitting it with the original measurements. You can either weigh the ingredients or use a conversion chart to cups and round up or down.

Gingerbread Latte Fudge
adapted from BBC Food

Ingredients
500 grams or 1 lb 2oz sugar
75 grams or 2 and 1/2 oz sliced ginger cake
150 ml or 5 oz heavy cream
50 grams or 1 3/4 oz butter
135 ml or 4 1/2 fluid oz whole milk
1 tsp ground ginger
2 tsp ground espresso coffee
50 ml or 2 oz water

Set your oven to broil. Then prepare a 7 inch square cake pan by greasing the interior and lining with parchment paper.

Place the cake slices on a baking sheet and place under the broil to toast. Keep a close eye, so they do not get too brown. Then turn slices over and toast the other side. Remove pan and let the cake cool. Chop into small pieces. Your pieces do not have to be exactly the same size, but remember that each piece of fudge is only 1x1 inches.

Pour water into a large, deep saucepan and place over high heat. Once it comes to a boil, remove from heat. Turn heat down to low and wait about 10 minutes. Fill the saucepan with the cream, milk, butter and sugar. Put saucepan back over heat and stir. It will take about 15 minutes for the butter to melt and the sugar to dissolve. Take out a small heat proof bowl.

Clip a candy thermometer onto the side of the pan. Turn the temperature up to medium high. When the mixture reaches a simmering point, it should be bubbling. Hold at this point by making adjustments to the heat. The mixture will need to reach a perfect temperature of 241 degrees Fahrenheit or 116 centigrade. Once idea temperature is achieved, remove from heat and pour 1/4 of the mixture into the heat proof bowl. Set the heat proof bowl aside.

The mixture in your saucepan is the main fudge and the bowl will be the "latte" topping. Add the ginger spice and coffee into the main fudge batch and beat for 1 minute. Once blended, mix in the ginger cake pieces. Beat again for a few minutes. It will thicken and pull away from the sides of the pan-it has reached the correct consistency. Pour into prepared tin.

Take the heat proof bowl of candy and beat a few times. Drop spoonfuls over top of main fudge and marble with a skewer or toothpick. Refrigerate for 30 minutes or cool at room temperature for a few hours prior to cutting and serving.

Tips and Notes:

1. Chopped gingersnap cookies may do better in this recipe than cake.
2. My topping was not like a foamy latte, so it may require more cooking time than suggested.
3. Beat time after you add the ginger cake pieces may vary, mine took longer than 2 minutes to thicken.
4. The chunks of cake/cookie in a cut piece of fudge were not visible and did not change the texture. For something more visible and crunchy-increase the measurement.
5. To insure success, you will need a candy thermometer.
                            **LAST YEAR: Pistachio Schoolboy Cookies**

Sunday, September 27, 2015

Cranberry Black Walnut Coffee Cake

Because black walnuts have such a strong flavor, there are not a lot of recipes that use this ingredient. Using this type of nut in a recipe does require the proper balance of flavor, which involves a lot of trial and error. The other consideration is the development of flavor over time. Cookies, for instance, are usually in the cookie jar for a few days before they all disappear.

When I saw this recipe, I was deliberating about using English walnuts instead of the black, but I am glad I chose the black. The black walnuts provided a perfect amount of subtle flavor that was well matched with the cranberry and cinnamon. The moist cake, warm cranberries and crunchy streusel really hit the spot.

I would say that eating things that remind us of the fall makes us happy. The flavors conjure up thoughts of the holiday seasons with family get togethers, sitting in front of the fire and cool crisp days outside. Sometimes we all need an attitude adjustment and a slice of this coffee cake may just be the key-especially on a Monday morning.

Cranberry Black Walnut Coffee Cake
adapted from Better Homes and Gardens Fall Baking

Ingredients/Cake
3 cups flour
2 tsp baking powder
1 tsp cinnamon
1/4 tsp salt
1 cup packed brown sugar
1/2 cup granulated sugar
4 eggs
1 tsp vanilla
1 cup butter, melted
1 cup milk
2 inches stick cinnamon
1 cup apple juice or apple cider
2 cups dried cranberries
1 cup walnuts (black or English), toasted and ground

Ingredients/Streusel
1/2 cup packed brown sugar
2/3 cup flour
3/4 tsp ground cinnamon
1/2 cup chopped walnuts (black or English)
1/3 cup of cold butter, cut into small cubes

Start by making the cranberry topping.  Fill a saucepan with 1/2 cup of the brown sugar, cranberries, stick cinnamon and apple juice (or cider).  Place over medium high heat and stir constantly, letting the mixture come to a boil.  When the sugar has dissolved, lower the heat and let simmer.  As it simmers, the liquid will reduce. It will take about 15 minutes of cooking for the cranberry topping to reach the correct consistency. Remove from heat and discard cinnamon stick. Set the mixture aside and let cool completely before using, this is your first bowl.

Grease the interior of a 10 inch springform pan and preheat the oven to 325 degrees. For the second bowl, sift the cinnamon, flour, salt and baking powder in to this bowl. Add the ground nuts,granulated sugar and remaining 1/2 cup of brown sugar. Stir so all is evenly distributed. Also, set this bowl aside.

Proceed to making the streusel topping by combining the cinnamon, flour and brown sugar together in a small bowl, the third bowl. Add the cubes of butter and use a pastry blender to cut the butter into the sugar mixture. Once no dry streaks remain and mixture can easily clump together, stir in the walnuts.

Get your second bowl and make a well in the center of the dry mixture. Take out a 4th bowl. Crack eggs into this bowl and beat with a fork for about 1 minute. Mix in the melted butter, milk and vanilla. Pour this egg mixture into the well of dry ingredients in the second bowl. Stir until blended and mixture becomes a batter.

For assembly, pour the egg batter into the prepared pan and smooth the top so it is even. Spoon the cranberry mixture (from the first bowl) over the top of the batter, leaving a 1 inch border. Lastly, sprinkle with the walnut streusel topping.

Place pan in oven and let bake until edges are golden brown. Cake will start to pull away from edge of pan when done. Bake time is approximately 1 hour and 15 minutes. Let cool in pan for about 15 minutes before removing the outside ring of pan. Slice and serve warm.
                                    **LAST YEAR:Chocolate Liqueur Suicide Cheesecake**

Sunday, September 20, 2015

Marbled Pumpkin Chocolate Bundt Cake

People that bake occasionally really do not have much concept of how a recipe can actually end up being a visual work of art. A carefully placed series of strawberries on a cheesecake all the way to a contrasting marbled cake can be as visually pleasing to the eye as well as pleasing to the palate.

The "visual aspect" does play an important part when it comes to choosing food, especially at a younger age. It took me quite some time to actually try guacamole, simply because I was turned off by the look. Now, as a food blogger, I am more open to try things before making a decision regarding food and yes, I do think guacamole is pretty tasty!

This particular recipe blends spicy, pumpkin flavor with rich chocolate in a cake. The end result is a tasty, as well as stunning, dessert. This bundt cake has great texture. The use of oil instead of butter always yields a more moist cake. The chocolate part of the cake is extra rich, using dutch process cocoa while the spicy pumpkin swirl offers a tasty accent of flavor to every slice.

Marbled Pumpkin Chocolate Bundt Cake
adapted from Kiss My Bundt

Ingredients/Pumpkin Batter
7 1/2 to 8 oz pumpkin puree (1/2 15 oz can)
2 eggs
1/2 cup brown sugar, packed
1/2 granulated white sugar
1/2 cup vegetable oil
1 1/2 tsp pumpkin pie spice
1 1/2 tsp baking soda
1 1/2 tsp baking powder
1/2 tsp salt
1 1/2 cups flour

Ingredients/Chocolate Batter
1 egg
1/2 cup whole milk
1/4 cup vegetable oil
1 tsp vanilla extract
1/2 cup boiling water
1/2 tsp baking soda
1/2 tsp baking powder
1/2 cup dutch process cocoa powder
1 cup flour
1/2 tsp salt
3/4 cup plus 3 tbs sugar

Start by preheating the oven to 350 degrees. Then generously grease and coat the interior of a 12 cup bundt pan with flour.

For the pumpkin batter, crack the eggs into a bowl of a stand mixer and beat on medium speed about 3 minutes. Eggs will have a frothy consistency. Turn the mixer down to low speed and slowly stream in the white sugar. Then toss in scoops of the brown sugar. Continue to beat until batter becomes thick. Add the pumpkin puree and the oil. Combine with the mixer on medium speed until completely blended. Set aside.

Using a separate bowl, sift together the remaining dry ingredients for the pumpkin cake. Also, set this bowl aside.

For the chocolate batter, fill the bowl of a stand mixer with the egg, milk and oil. Beat for about one minute. Set aside.

Sift the baking soda, baking powder, cocoa powder, flour and salt into a medium size bowl. Stir in sugar until mixed evenly. Empty 1/3 of the batter into the egg/oil mixture and fold together. Continue
with this process until all the sifted ingredients has been blended into the batter. Lastly, mix in the
 boiling water.

Go back to the pumpkin batter and fold in the sifted pumpkin spice ingredients. Add and stir in increments, just like the instructions for the chocolate batter.

Now that you have created 2 batters, you will start the layering process. Using 1/3 of the pumpkin batter first, spoon it into the bundt pan, making sure batter makes a complete circle inside the pan.  Then pour on 1/3 of the chocolate batter. Repeat this process until you have filled the cavity of the pan with 6 layers of alternating batter. The batter layers in the pan start with pumpkin and end with chocolate.

Bake until tester comes out clean.  Cake should take about 45 minutes to bake.  Remove cake and let rest on a cooling rack about 20 minutes. Then invert onto rack to finish cooling. When cool, transfer to serving plate.

Tips and Notes:
1. The chocolate batter will be very runny, that is why the pumpkin batter goes first into the pan.
2. The chocolate is very rich, so much so that the prumpkin flavor to chocolate is not 50-50.  Should you want  a 50-50 ratio of flavors, you will need to experiment more with the recipe. However, this cake disappeared very quickly, perhaps waiting a day before serving may have allowed the pumpkin flavor to develop more.
3. Glazing or topping the cake is optional, but I would have chosen a cinnamon glaze since it pairs well with either chocolate or pumpkin, if I was going to glaze or frost the cake.
                                   **LAST YEAR:Chocolate Pecan Snails** 

Sunday, September 13, 2015

Frosted Pineapple Cookies

All the summer tourists are now back home. If you have ever lived in a tourist area, you will find that the residing population always have nicknames for the tourists. In Florida, we always called them "snowbirds". That is due to a lot of people visiting from the northern states who have very little exposure to the sun. The north has their days where they use nicknames as well. You will often hear the term of "leaf peepers."

With that being stated, just like the "snowbirds", the summer recipes will be gone until next year. This marks the last one. Even though it is still hot in Texas, I will comply with the calendar seasons. For this year, the "official" first day of fall is September 23rd. Goodbye to citrus and berries and hello ginger and spice.

To close out the summer, I chose a cookie recipe that has a buttery base with chunks of pineapple. It uses crushed pineapple instead of dried pineapple. Also, the frosting on top incorporates pineapple juice and lemon zest for an extra pop of fruity flavor. This recipe makes about 2 1/2 dozen cookies. As a reminder, the recipe has not been altered but there are important tips and notes at the end to help you succeed when creating these. Now let's get to it....

Frosted Pineapple Cookies
adapted from Copycat Recipe website

Ingredients/ Cookies
1 egg
1 8oz can of crushed pineapple
1 tsp vanilla extract
1/2 cup of butter
1/4 tsp baking soda
1 1/2 tsp baking powder
2 cups flour
1/2 tsp salt
1 cup packed brown sugar

Ingredients/Frosting
3 tbs reserved juice from canned pineapple
1 1/2 cups confectioners sugar
1/4-1/2 tsp lemon zest

Line 2 baking sheets with parchment paper. The preheat the oven to 325 degrees.

Using a stand mixer, fill the bowl with sugar and butter. Beat on medium speed for about 2 minutes, stopping periodically to scrape down the interior sides of the bowl. You now have a cookie batter.

Take out a small bowl and a sieve. Open the canned pineapple and pour into the sieve, letting the juices drain out into the bowl. Reserve 3 tbs of the juice for use in the the frosting. Empty the contents of the sieve into the cookie batter. Then add the vanilla extract and egg. Beat the mixture until all is blended smoothly.

Remove the bowl from the stand mixer and set aside. In another bowl, sift together the baking powder, baking soda, flour and salt.  Using 1/3 of the sifted ingredients, fold into the batter.  Continue with the process in two more increments, until all the dry ingredients are mixed into the batter.

Using a scoop, drop batter onto prepared cookie sheet. Since the cookies do spread, space the batter lumps about 2 inches apart. Place cookie sheet in oven and bake until golden on bottom and around edges. This should take about 17-20 minutes. Transfer baked cookies to cooling rack.

Once the cookies have completely cooled, it is time to make the frosting.  Mix together the zest and 2 tbs of juice in a medium size bowl. Sift the powdered sugar into the same bowl and then mix with a  spatula. Blend in more juice to make a spreadable frosting. Frost cookies by drizzling on top. Let frosting set up before storing or stacking cookies.

Tips and Notes:
1. The spreading of the cookie when baking is a result of the amount of juice that remains after the pineapple is drained. I wanted thicker cookies, so after draining, I pressed out a lot of the juice. Also, I saw one complaint on the original recipe stating that the cookies ran all over the pan-too much liquid.

2. Reserve all the juice from the canned pineapple. This way you can have the opportunity to make more frosting if you prefer. The original recipe shows just a drizzle on the cookies instead of being frosted like the picture above. I definitely made more frosting.
                           **LAST YEAR:Pastry Project:Croissant Dough**

Sunday, September 6, 2015

Peach Pecan Cheesecake


Using fresh fruit in a recipe that requires baking does have its challenges. First of all, you have the juice issue which may add too much liquid to the recipe. The other challenge is the acid in the fruit. In review, I would say that the citrus fruits are the most acidic and the other end of the spectrum would be bananas. The mid range would be peaches, apples and melons.

While most cheesecake recipes have a fruit sauce that you ladle on top, this one actually has diced peaches baked in. That texture, along with the crunch of chopped pecans and a cookie crust, is an excellent contrast to the creamy cheesecake. The cream cheese batter bakes up with a nice depth of flavor, incorporating a blend of dark brown sugar and peach schnapps. The chopped additions of diced peaches and toasted pecans offer an occasional zing of flavor.

My co-workers really liked this dessert and it disappeared quite quickly, so I this particular recipe is marked as a keeper. The instructions are for 1 nine inch cheesecake.

Peach Pecan Cheesecake
adapted from Cheesecake Extraordinaire

Ingredients/Crust
3 tbs chopped toasted pecans
3 tbs melted butter
11 vanilla sandwich cream cookies

Ingredients/Peach Pecan Filling
1/4 cup chopped toasted pecans
1 1/4 cup peeled and diced fresh peaches
5 tsp cornstarch
3/4 cup dark brown sugar
24 oz cream cheese
1 egg yolk
4 eggs
1 tsp vanilla extract
3 tbs heavy whipping cream
1/3 cup peach schnapps

Preheat the oven to 350 degrees. Grease the bottom of a 9 inch springform pan.

Using a food processor or blender, grind the cookies into a fine powder. Empty contents into a small bowl and stir in the pecan pieces. Pour in the melted butter and mix until all crumbs are damp and can clump together. Transfer mixture to springform pan and press into the bottom, forming a flat, even layer on the bottom of the pan. Set aside.

Fill the bowl of a stand mixer with brown sugar and cream cheese. Beat until smooth. Sift in the cornstarch and beat for 30 seconds, so it is evenly distributed into the batter. Add egg yolk and beat on low speed for 15 seconds. Repeat this process for each egg. Once all the eggs are blended, add vanilla extract, peach schnapps and whipping cream. Beat again on low speed for about 1 minute.

Remove bowl from stand mixer and fold in pecans and diced peaches. Pour the batter over the crust in the springform pan. The baking process will be in intervals. Bake the cheesecake for the first session at 350 degrees for 15 minutes. Then lower the oven temperature to 225 degrees and bake for about 1 hour and 15 minutes. The cheesecake will be done once the center no longer looks wet or shiny.

Take the cheesecake out of the oven and run a knife around the inside, between the pan ring and the cheesecake. Also, turn the oven off. Put the cheescake back in the oven for another hour.  After the hour has expired, place in refrigerator to chill overnight.

Tips and Notes:
1. Use only fresh fruit, canned and frozen will have too much liquid for this recipe.

2. None of the recipes in this book use a water bath in order to keep the cheesecakes from cracking. The book does offer other pointers in order to minimize cracks, but none are guaranteed to prevent all cracks. The eggs should not be over beaten into the batter, which is why the instructions state using low speed when blending. Also, running a knife around the interior edge right after baking helps because the cheesecake will contract upon cooling. Other tips include: making sure your oven is at the correct temperature and not overbaking the cheesecake.

3. So you did everything right and you still have a cracked cheesecake? The author suggests using a wet knife to smooth it out on top when the cheesecake is still hot. However, due to discoloration, a dry knife is recommended with chocolate cheesecakes. This will not fix "Grand Canyon" cracks. Those are the big cracks that result when the cheesecake is overbaked.

4. Do not cover your cheesecake when you place it in the refrigerator to chill. Covering will cause moisture to form on top.

5. For best flavor, cheesecakes should be made 1 day in advance of serving.

6. If you are making a cheesecake with topping, slicing prior to the topping is easier. Slicing should be done with a thin, hot and sharp knife.
                                            **LAST YEAR:Carrot Cake with Cream Cheese**   

Sunday, August 30, 2015

Boo Boo Pie


Sorry, but there is no back story here as to how this recipe got its name. We can only speculate that it was a mistake or "boo boo" that actually turned out to be a delicious error. Errors can prove to be a good thing in certain cases. After all, chocolate chip cookies stem from the act of someone trying to compensate for a missing ingredient in a recipe.

If you love Mounds candy bars, then you have come to the right place. This recipe is basically a sweet combo of a rich chocolate brownie and chewy coconut. Not only will it squelch your craving for something sweet, you will not be spending very much time in the kitchen to create this. Another plus is that the ingredient list is very basic. Now let's get into the details....

Boo Boo Pie
adapted from Recipe Goldmine

Ingredients
3 eggs
1 tbs vanilla extract
1/2 cup butter
3/4 cup sugar
3 oz unsweetened chocolate
2 2/3 cup sweetened coconut or 1 7 oz bag
1/2 cup flour
1 14.5 oz can sweetened condensed milk

Grease the interior of a 9 inch pie pan.

Empty the bag of coconut into a bowl. Using a fork or clean hands, separate the coconut so there are no clumps. Once all the clumps are loosened, pour in the sweetened condensed milk. Mix together and then let sit for at least 1 hr so the coconut can soak up some of the milk.

While the coconut is soaking, start on the brownie part of the recipe. Set up the bottom part of your double boiler by filling 2/3 full of water and placing over medium high heat. Once water comes to a simmer, place top pot on top and fill with butter and chocolate. Let ingredients melt together, stirring occasionally until smooth and blended. Remove from heat. Preheat the oven to 325 degrees.

Take out a medium size bowl and fill with eggs, sugar and vanilla extract. Stir with a wooden spoon until evenly mixed. Then mix in flour. Lastly, pour in the melted butter and chocolate blend. Mix together to form a smooth chocolate batter.

Empty the chocolate batter into the prepared pan. Smooth the top and make sure the batter is even in the pan. Go back to the bowl of coconut and sweetened condensed milk and stir.  Then spoon the coconut mixture on top, but leave a 1/2 inch border around the edge so the brownie batter can form a crust.

Place pan in oven and bake for about 25 minutes. Let cool completely before slicing.

Tips and Notes:
1. The thickness of the coconut mixture is personal preference. The center of the pie, with the recipe as is, produces a sticky but soft texture. For something more solid, cut back on the sweetened condensed milk.

2. Bear in mind that the center sets up when cooling, but it should be somewhat solid coming out of the oven, not too jiggly.

3. Due to the liquidity of the chocolate batter, smoothing out the coconut filling evenly can be difficult. To insure that the coconut layer is even, spoon it onto a sheet of wax paper and smooth it into an even 8 1/2 inch round. Then place it in the freezer until it becomes a solid mass. Remove and peel off wax paper and center on brownie batter and lightly press down. Since the coconut mixture is frozen, you will need to increase the baking time. 
                             **TWO YEARS AGO: Creme Fraiche Coffee Cake**

Sunday, August 23, 2015

Honey Glazed Berry Scones

When it comes to combining fresh blueberries or blackberries to dough, it is hard for the end result not to look like a bruised lump or have tinges of purple. That is why most bread recipes use dried fruit. There is nothing wrong with dried fruit, but you cannot deny the "gummy bear" type of texture when biting into a chunk of dried fruit. Some recipes remedy this by including a "plumping" or soaking interval for the dried fruit prior to mixing it into the dough, which is a beneficial process.

In light of this information, I decided that frozen fruit is the best choice when you are making a sweet bread type of recipe. The frozen aspect keeps the fruit from tie dying your dough into a purple lump. Also, baked in frozen fruit rates higher on the texture scale than dried fruit.

Dark colored berries, if you did not already know, are the healthiest to eat. I do try to eat fruit for breakfast. However, adding them to cereal, smoothies or yogurt all the time can get boring after awhile. It was time to have something a little different and these scones were the choice. Chock full of a double helping of berries and honey sweetened crust, there was no denying the fact that this chosen difference made my breakfast a little bit more special. Not only did the bread/berry combo turn out to be irresistible, but the honey glaze does double duty with adding sweetness and also keeping the scones from drying out. This recipe makes about 8-12 scones, depending on the cutter size.

Honey Glazed Berry Scones
adapted from A Passion For Baking

Ingredients/Scones
2 tsp of vanilla extract
1 egg
1tbs of lemon juice
1 cup whipping cream
3/4 cup or 1 1/2 sticks of butter (cut into cubes)
1/2 cup of sugar
4 tsp baking powder
1/2 tsp baking soda
1/2 tsp salt
3 1/2 cups of flour
1/2-3/4 cup frozen blackberries
1/2-3/4 cup frozen blueberries

Ingredients/Topping
1/4 cup of milk or melted butter (for brushing prior to baking)
1/3 cup honey
1/4 cup unsalted butter

Start the process by stacking 2 baking sheets together and lining the bottom of the top sheet with parchment paper. Preheat the oven to 425 degrees.

Using a liquid measuring cup, fill with the tablespoon of lemon juice and then the whipping cream. Stir and set aside.

Sift together the flour, baking soda, salt and baking powder in a medium size bowl. Stir in the sugar. Pour the blend into a food processor and drop in the chunks of butter. Pulse until no more dry streaks remain. This should result in a coarse, sand like mixture. 

Transfer dough back into medium size bowl and make a well in the center. Fill the well with the egg, lemon/cream mixture and vanilla. Blend with a wooden spoon until no dry streaks remain. The dough should be able to hold its shape but also be soft. Then fold in the berries.

Prepare a flat surface by dusting lightly with flour. Take dough out of bowl and knead. This process may require more flour to insure that the dough does not expand after cutting. Flatten and shape dough so it is only 1 inch thick. Cut into desired shape (rounds, squares or triangles) and place on parchment lined baking sheet about 1 inch apart.  Brush the top of each scone with the melted butter or milk.

Bake for about 16-19 minutes. Scones are done when they are golden brown on top. While the scones are baking, prepare the glaze.  Fill a liquid measuring cup with honey and butter. Place cup in microwave and heat on high for 45 seconds. Stir mixture and then return to microwave and heat for an additional 45 seconds.

Remove scones from oven when done and place baking sheet on a cooling rack. Then brush lightly with the glaze. Let the scones sit for about 15 minutes and then coat the surface generously again with the rest of the glaze.

Tips and Notes:
1.The purpose of stacking 2 pans together insures that the bottom of the scones do not brown too fast.

2.The frozen fruit should be in separate pieces but not thawed out.

3. Because of the size of the blackberries and the fact they are frozen, the best way to cut the dough is with a sharp blade. It insures a sharp cut into the fruit and also makes for a good height on the scones when baked. 

4. Due to the glaze, the scones will stay moist and flavorful for up to 4 days.

5. Using a food processor is recommended, but you can blend with a mixer and have the same results.
                                   **LAST YEAR:Banana Walnut Tart**   

Sunday, August 16, 2015

Raspberry Lager Cupcakes


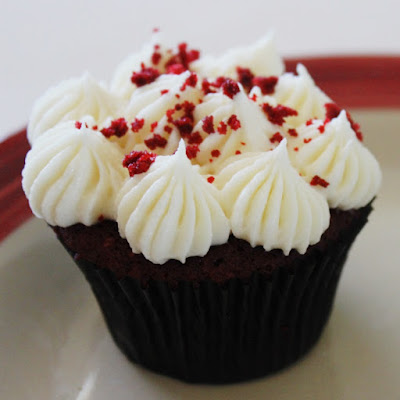
Red velvet cupcakes are always ranked as one of the favorites when it comes to baking contests.  Something about the color and that touch of cocoa really appeals to the majority of cake and cupcake lovers. With that appeal, you run across numerous recipes that have been modified from the original.  One thing I have seen is the color change; blue velvet, green velvet...etc.

However, this is one twist that does not involve a change of color. This recipe is actually a red velvet recipe with a fruity, boozy twist. It incorporates raspberry beer. Even though raspberry and chocolate is a delicious combination, my first concern was about the raspberry flavor. I did not want it to taste "artificial", so I took some time to find a naturally flavored beer. I came across a Belgium beer, Lindeman's Frambois Lambic. Other than being naturally flavored, the size of the bottle (25 oz) was a benefit since the recipe calls for more than 12 oz of beer.

This recipe scored very high in flavor and texture. As you can see by the bottom picture, the cake was nice and moist. The brush of raspberry syrup on top gave them an extra pop of delicious fruit flavor. Also the obvious, but perfect, choice of topping is the cream cheese frosting.This recipe makes about 2 dozen cupcakes, but you may try 1 1/2 times the recipe if you are bringing this to a potluck or family get together. You definitely want to make sure no one is left out when it comes to eating one of these special cupcakes.....

Raspberry Lager Cupcakes
adapted from Just a Pinch website

Ingredients/Cupcakes
1 tsp vanilla
1 oz red food coloring
2 eggs
1 tbs apple cider vinegar
1/2 cup vegetable oil
1 cup raspberry beer
1 3/4 cup sugar
1/2 cup or 1 stick butter (room temp)
3/4 cup of regular flour
2 cups cake flour
3 tbs cocoa powder
1 tsp baking soda
1 tsp salt

Ingredients/Topping
3-4 cups powdered sugar
8 oz cream cheese (room temp)
8 oz butter (room temp)
1 tsp vanilla
24-30 fresh raspberries for garnish (optional)
1 crumbled cupcake for sprinkling

Ingredients/Soaking Syrup
1 1/2 cups raspberry beer
8-10 fresh raspberries, mashed

Start by making the soaking syrup.  Fill a saucepan with the beer and mashed raspberries.  Bring the mixture to a slow boil and stir. Let it cook down to about 1/2 of the original amount. This should take about 7-10 minutes.  Place strainer over a heat proof bowl and strain liquid. Use the back side of a spoon to separate the fruit from the seeds, scraping the inside of the strainer. Once strainer holds nothing more than seeds, set bowl of strained liquid aside to cool and discard seeds.

To make the cupcakes, begin by greasing the top edge of your cupcake cavities and insert paper liners for approximately 2 dozen cupcakes. Preheat the oven to 350 degrees.

In a small bowl, mix together raspberry beer and food coloring. Set aside. Then fill the bowl of a standard mixer with the oil, butter and sugar. Beat on medium speed, occasionally scraping down the sides, for about 3 minutes or until mixture is light and fluffy. Drop in one egg and beat for 30 seconds. Add the other egg and beat again. Pour in cider vinegar and vanilla extract and blend liquids into batter until incorporated.

Using a third bowl, sift together 2 types of flour, cocoa powder, salt and baking soda. Fold 1/3 of this mixture into the batter. Pour in 1/2 of the raspberry beer/food coloring liquid. Stir until thoroughly blended. Repeat this process, using 1/2 of the remaining dry ingredients and all of the liquid. Lastly, fold in the last bit of the dry ingredients.

Using a scoop, fill each lined cupcake cavity with batter. Fill to approx. 2/3 full. Place both pans in oven and bake for 10 minutes and rotate pans. Bake for an additional 7-10 minutes or until tester comes out clean. Let cupcakes cool in pans about 5-7 minutes and then carefully transfer to cooling rack. Wait another 5 minutes and then brush lightly with soaking syrup. The brushing step will be in two sessions, about 3 minutes apart. This will give it time to soak in prior to the second session.

Cupcakes can be frosted once completely cooled.

For the frosting, add the cream cheese and butter to the bowl of a stand mixer. Then beat until no lumps remain and both ingredients are completely blended and creamy. Add the vanilla extract and beat again for about 1 minute, scraping down sides of bowl. Remove bowl from stand mixer and sift in 1 cup of powdered sugar. Place bowl back in stand mixer and beat until no dry ingredients remain. Continue with the process, adding the powdered sugar until frosting reaches the desired consistency.

Take one of the cooled cupcakes (preferably the ugliest, misshapen one) and place in mixer or food processor and process until you have fine crumbs.

Pipe frosting onto top of cupcakes and then sprinkle cupcake crumbs on top.  If desired, place 2 raspberries on center of top, just prior to serving.

Tips and Notes:
1. You will have some leftover soaking liquid.  Be sure not to "oversoak" your cupcakes, this will make them very fragile to handle and insure that they will fall apart when someone trys to eat them later.

2. How much food coloring or if you use any is personal preference.

3. The soaking liquid idea can be beneficial in instances where the flavor has baked right out of the cupcake for some reason. The recipe will need to be tweaked more, but you have a way to save these particular cupcakes from the error bin. Making a syrup with the flavoring and brushing on top will add back what was baked out.
                                       **Last Year: Citrus Syrup Tea Cakes***

Sunday, August 9, 2015

Citrus Snap Cookies

There are some treats that never really appear unless it is the holidays. Cut out cookies usually are reserved for the Christmas holidays. The shapes made are usually those of the occasion: bells, Christmas trees, gingerbread men...etc. I guess because of the time involved, it is only the holidays that motivates some people to make these type of cookies.

Well, just to be clear....these particular cut out cookies are not for the Christmas holidays. Made with a myriad of fruit zest and juices, they are most appropriate around spring or summer. That is when citrus fruit is the most plentiful and perfectly ripe.

No holiday to motivate you? Consider it a holiday when the kids go off to school! Or better yet, make the kids first day a little bit nicer by tucking a few of these away in their lunch bag.

The fun part about cut out cookies is the opportunity to make them unique. Choose whatever shape and decorate however you want. The cookies pictured above are in the shape of a butterfly, have just white glaze with sprinkles. With all the different colors of sugars, gel pens and different miniature decorations ( I even saw little "minions") the style possibilities are limitless. This recipe makes about 2 - 2 1/2 dozen.

Citrus Snap Cookies
adapted from Orlando Edible Feast 
 
Ingredients/Cookies
3 tbs fresh lemon juice
3 tbs fresh orange juice
3 tbs fresh lime juice
2 tsp lemon zest
2 tsp orange zest
2 tsp lime zest
1 cup or 2 sticks softened butter
1 cup confectioners sugar
2 cups flour
1/2 tsp salt

Ingredients/ Glaze & Topping
1 lb confectioners sugar
1 tsp lemon zest
1 1/2 tbs lemon juice
1/2 cup plus 2 tbs pasteurized egg whites

For the cookies, line 2 baking sheets with parchment paper. Pull out 2 small bowls. Mix the three kinds of zest together in one bowl. In the other bowl, combine all juices.

Fill the bowl of a stand mixer with the sugar and butter. Cream together, beating on medium high for about 3 minutes. Then add the juices, zest and salt. Beat until evenly distributed.

Remove bowl from mixer stand and fold in one cup of flour. Once blended, fold in the additional cup. Place a long sheet of plastic wrap on a flat surface. Gather dough into a ball and place in the middle of the plastic sheet. Flatten into a disc, about 1/2 an inch thick. Fold plastic over the dough, making sure all is covered. Then place in refrigerator to chill for about an hour for the dough to firm up.

While dough is chilling, preheat the oven to 325 degrees. Place a piece of parchment paper on a flat surface and dust with flour, this will be your rolling area. Also, place parchment paper underneath a cooling rack.

Once dough is firm, take out of refrigerator and divide in half. Keep one to work with and put the other, covered, back in the refrigerator. Roll dough out onto prepared surface, ending with an 1/8 inch thickness of dough. Cut into desired shapes and transfer to parchment lined baking sheets, spacing about 1/2 inch apart. Then place filled baking sheet in refrigerator. Dough will need to chill again for about 10 minutes.

After the chilling time is complete, place sheet in oven and let cookies bake for about 10-15 minutes, or until cookies are a light golden color on the edges and the bottom. Remove cookie sheet and place on cooling rack. After about 2 minutes, transfer cookies to rack. Let cool completely before frosting or decorating.

Repeat the process of forming and baking with the dough scraps and the remaining dough in the refrigerator.

For the glaze, mix all ingredients together and spoon glaze onto tops of cookies. After about 3 minutes, put topping of your choice onto glaze (sprinkles, sugar, dragees, etc.). Give the glaze time to completely harden prior to storage.

Tips and Notes:
1. The standard way to form these type of cookies, is to cut them out and then transfer to baking sheet. Instead of this method, you can roll out dough on parchment paper that fits the interior of the baking sheet. After rolling, parchment is then transferred to cookie sheet and shapes are cut out. Place pan in freezer for 10 minutes. Pull out pan and remove cold dough from around the cut shapes. Then place in oven to bake. By eliminating the transfer step from the standard process, you eliminate any possibility of losing the shape of the cookie.

2. The glaze can be as thin or thick as you want. The thicker it is, the less it will run off and drip on the parchment below the rack.
**LAST YEAR:JD's Birthday Cake**                    **2 YEARS AGO: Grand Marnier Cake**