Foodbuzz

Sunday, March 26, 2017

Frozen Maraschino Cream


Spring has finally arrived. This means longer days and more time enjoying the outdoors. The flip side to this is making sure outside is a nice and comfortable place to be. Time to clean the back patio and get the leaves off the lawn chairs. Also, mowing that back yard. Well, with all of that said, I decided to make some very "adult" ice cream as a motivator.

After all, that bright big bottle of pink Creme de Noyaux was not going to go away by itself. There never has been a time when the cabinet was opened without that item being noticed. However when it comes to creating desserts, that vibrant color is an asset to have. Another almond liqueur, Amaretto, has the same flavor but will always guarantee a golden ivory hue to any dessert.

Now that I decided on Creme de Noyaux as the primary flavor element to the ice cream, there needed to be some add-ins. Since I had some chores to do, this ice cream needed to be more than just typical to get me motivated. Then the light bulb went off...maraschino cherries (I chose Luxardo brand) and chunks of dark chocolate!

There I had it. The perfect motivator..now I could clean off the patio. After the freezing of the ice cream and the chores, it was time to indulge. I sat down on the lawn chair and ate a scoop of ice cream. As I gazed across the yard with the warm sun on my face, I thought to myself that simple things are sometimes the perfect elements for generating the best moments.

Frozen Maraschino Cream
by flourtrader

Ingredients
1 1/4 cup milk
1/2 cup sugar
3 egg yolks
1 tsp vanilla bean paste or 1 vanilla bean
1 cup and 1 tbs heavy whipping cream
1/3 cup almond liqueur
1/4 cup chopped dark chocolate
1/2 cup maraschino cherries (rinsed and drained)

Fill a saucepan with 1/4 cup of sugar, milk and vanilla bean paste or bean. If using a vanilla bean, split and scrape the interior and place scrapings and whole bean in saucepan. Place over medium high heat and let come to a simmer. Right before the boiling point, remove from heat and set aside.

Next, place a whisk attachment on a stand mixer and fill the bowl with the remaining sugar and egg yolks. Beat the mixture on high for about 3 minutes, stopping occasionally to scrape down the sides of the bowl. The mixture has reached the right consistency when it is a pale yellow color.

Go back to the saucepan and heat the milk mixture up again until simmering. Remove vanilla bean, if used. Turn mixer on medium low and stream in the hot milk into the egg mixture while continuing to whisk. Be careful that you do not create a lot of bubbles in the mixture by beating on too high of a speed. Once all the milk has been incorporated into the mixture, set up a double boiler and let water come to a simmer. Strain milk/egg blend into top pot of double boiler.

Let mixture cook while stirring constantly. As it cooks, it will thicken into a pudding or custard consistency. A few ways to test this is by temperature (it must reach 85 degrees) and it must coat the back of a spoon and hold its shape if you run your finger through it. Once it reaches the correct consistency, transfer to heat proof bowl. Cover and place in freezer for about 15 minutes. Then remove and stir. Test the temperature, room temperature or slightly cooler is acceptable.

Whisk the liqueur and milk together in a large bowl. Then add the cooled custard and blend together. Pour in ice cream maker and follow the instructions. Add the cherries and chocolate chunks when the ice cream has thickened. Once the churn process is complete per the instructions, transfer ice cream to a bowl and cover with a tight lid and place in freezer. How long it has to freeze before serving is your preference, either soft serve type or hard frozen type.

Tips and Notes:
1. Remember that the liqueur is not cooked down at all, so the taste is prominent.
2. This makes about 3-4 servings of ice cream
3. This recipe is a good base for any ice cream using alcohol, so feel free to experiment.
                                    **LAST YEAR: Meyer Lemonade Cake**


Sunday, March 19, 2017

Amaretto Latte Bars


One of the pitfalls of baking at home is that those family members that do not bake turn you into their baking volunteer.  If you like to bake that really isn't a big deal, however, the non-baker has no concept of recipe time requirements. This equates to 6 dozen cookies needed for Tonya's party which starts in only a few hours.

So sometime in history a person was facing this particular problem and came up with the bar cookie. They are the perfect solution to providing all the great taste of a cookie without all the time devotion.

This recipe is a spin off of sugar cookies with an adult twist of almond liqueur. There are two cookie layers with an espresso filling. The cookie part has a chewy texture with the crunch of almonds. The filling, when baked evolves into a coffee dulce de leche. Lastly, the crowning touch of sweetened whipped cream ties everything together in one tasty bite.

Amaretto Latte Bars
by flourtrader

Ingredients
2 1/2 cups flour
1/2 plus 1/8 tsp baking soda
1/2 plus 1/8 tsp cream of tartar
1/2 tsp salt
3/4 cup or 1 1/2 sticks of butter
1 cup of sugar
1 egg
3/4 cup chopped or slivered almonds
1/4 cup almond liqueur
2 tbs espresso powder
1 cup whipping cream
3 tbs sugar
1/2 tsp almond extract
1/2 tsp vanilla

Preheat the oven to 350 degrees. Prepare an 8 inch square cake pan by greasing the interior, either with oil or shortening.

In a medium size bowl, sift together the cream of tartar, salt, baking soda and flour. Set aside. In another bowl, cream together the butter and sugar by beating on medium speed for about 2 or 3 minutes. In a small bowl, whisk the egg and the almond extract together. Add this mixture to the butter/sugar blend and beat until blended. Fold in the sifted ingredients and then mix in the almonds.

Divide dough in half. Then prepare a flat surface by dusting with flour. Take each half of the dough and roll out into a 8 inch square. Cover 1 square of dough with plastic wrap and set aside.

Using a spatula, transfer one dough square to the prepared pan. Press the dough lightly so it is even and covers all the bottom surface and meets the edges and corners of the pan. Place pan in oven and let bake until edges turn a golden hue. This should take about 15-18 minutes.

While the dough is baking, prepare the filling. Place 2 tbs of almond liqueur in a small bowl and add the espresso powder. Place in microwave and heat for 15 seconds. Remove bowl and stir. Pour espresso mixture into a larger bowl and add the sweetened condensed milk.

Once the first layer is baked, remove from oven and place pan on rack. Pour the espresso/condensed milk mixture over the baked cookie layer. Then remove the plastic from the second square of dough and cut into 4 smaller squares. Place each square over the espresso filling, covering most of the filling. Do not worry about gaps, the layer will expand while baking.

Place pan in oven and let bake for 25-30 minutes. It will be toasty on the edges. Rest pan on rack and after 5 minutes, brush the remaining 2 tbs of almond liqueur over the surface.

Once the dessert has cooled for a total of 30 minutes, place in oven for 1 hour to cool completely.

When you are ready to serve, remove the bars from the fridge and let set for 10 minutes. Then prepare the whipped cream topping by placing the whipping cream and sugar in a small bowl. Then add both extracts and beat until it reaches the thickness you need in order to decoratively pipe on top.
Feel free to sprinkle ground almonds or place a chocolate covered coffee bean on top of the whipped cream.
                                 **LAST YEAR: Chocoberry Cupcakes**

Sunday, March 12, 2017

Palm Harvest Cake


The inspiration for this recipe came about when listening to Cake by the Ocean by DNCE. My take on this song is that we should not take things too seriously. Also, being spontaneous and unpredictable may turn out to be the best time ever.

Now, if I was to choose a cake to eat while watching the ocean waves rolling in from the sand, it would have to be something with tropical flavors. My pick for this cake was coconut, banana and pineapple. The recipe does make use of a few forms of coconut  (cream and oil). Also, the sweet coconut layers are slathered with fruity as well as creamy fillings. The banana pastry cream and pineapple filling have different textures but create a nice balance. I topped it with the standard cream cheese frosting, which is a basic recipe you can find on the net.

However, please note that this cake does take some time and the layers are baked in 10 inch springform pans. If you do not have 3 pans, plan on dividing the recipe for each. The springform pans were chosen due to the nature of the batter and the need for toasty edges. Since cake pans were not used, so I am unable to advise if they yield the same results.

So if you find yourself by the ocean, be sure to have fun and be spontaneous, but don't forget the cake!

Palm Harvest Cake
by flourtrader

Ingredients/Cake
3 tsp vanilla extract
1 cup plus 2 tbs whole milk yogurt
1 1/2 cups of cream of coconut
3/4 cup or 1 1/2 sticks of butter
3/4 cup of coconut oil
3 egg yolks
5 eggs
4 1/2 cups flour
1 1/2 tsp baking soda
3 cups sugar
1 tsp salt

Ingredients/Banana Filling
1/2 cup milk
1 egg
1 egg yolk
1/2 vanilla bean
1 tbs butter
1 1/2 tsp cornstarch
1/4 cup sugar

1 banana
2 tbs brown sugar
1/4 cup whipped cream

Ingredients/Pineapple Filling
10 oz crushed pineapple
1/3 cup sugar
1 tbs cornstarch


For the cake, start by greasing the interior of 3 springform pans generously with coconut oil. Use 2 tablespoons for each pan. Preheat the oven to 325 degrees.

Place the sugar, remaining coconut oil and butter in the bowl of a stand mixer and beat on medium speed for about 3 minutes. Stop occasionally to scrape down the side of the bowl. Then add each egg and each yolk, one at a time and beat for 30 seconds to blend. Once all is blended, beat at medium speed for another 3 minutes. Pour in the yogurt, cream of coconut and vanilla. Beat again for about 2 minutes. Set aside.

Take out a small bowl and sift together the flour, baking soda and salt. Using a spatula or wooden spoon, fold 1/3 of the sifted ingredients into the egg batter. Then fold in half of the remaining dry ingredients and fold in the last of it.

Measure the batter and divide it evenly into 3 batches. Pour each batch into a springform pan and smooth out evenly. Place in oven and bake for about 30-35 minutes or until tester comes out clean.

Once baked, remove and let set in pan for about 10 minutes. Run a knife around the interior edge and remove springform ring. Let sit another 20 minutes and use a thin knife or spatula to unstick from springform bottom plate and transfer to rack to finish cooling.

The next step is to make the banana pastry cream. Start by cutting up the banana. Then place the pieces in a small pan and add the brown sugar. Stir together and let set for about 10 minutes. The sugar on the banana slices will dissolve and turn glossy. Then place the pan over medium heat and let the bananas cook while stirring constantly. The cook time should take about 15 minutes. As it cooks, the gloss will disappear and the mixture will start to lump together and become pasty. Once it reaches that point, remove pan from heat and transfer filling to a small, heatproof bowl. Cover and place in refrigerator.

For the cream, fill a saucepan with milk and the scrapings from 1/2 of the vanilla bean and the outside half of the split bean. Take out another bowl and whisk together the egg and yolk with the cornstarch and sugar, set aside.

Place the filled saucepan over medium heat and let the milk heat up until you see small bubbles form on the edge of the surface. This is the point right before boil. Remove pan from heat and then stream in a little of the hot milk into the egg mixture and whisk together. Do this in small increments until a total of 2 tablespoons have been incorporated into the eggs.

Pour the egg mixture into the milk and whisk together. Place the pan over the heat again, this time on medium high heat, and stir constantly using a heat proof spatula. Once the mixture starts to boil, it is time to remove from the heat. Filling should be the consistency of pudding at this point. Cut the tablespoon of butter into 4 pieces and mix into filling. Take a sieve and place it over a bowl and pour the mixture into the sieve. Stir with a spoon, pressing the sides to make the mixture go through. Once the mixture has been pressed through, scrape off the bottom of the sieve into the bowl. Discard the vanilla bean.

Take the banana mixture out of the fridge and put in the bowl of a stand mixer and beat until smooth. Then beat in the pastry cream. Empty contents onto a plate and smooth out. Place plastic wrap over the cream and put in refrigerator to cool.

For the pineapple filling, place all ingredients in a saucepan and let cook over medium heat, stirring constantly. Let cook until it becomes the consistency of applesauce. Transfer to a heat proof bowl and place in fridge to cool.

Once both fillings have cooled, place one layer of the cake on a round cake board. Mix 1 tbs of cream of coconut with 1/4 cup of water and brush over top of layer. Let sit for 5 minutes. As this sits, you will finish the banana cream filling. Beat the whipped cream until soft peaks form. Then take out the cooled banana mixture and fold it into the whipped cream. Smooth this on top of the layer on the cake board. Place another layer of cake on top and brush on the cream of coconut/water mixture. Smooth the chilled pineapple filling over the layer. Then top with the third cake layer and frost as desired with cream cheese frosting.

Tips and Notes:
1. Feel free to add some lime zest or rum to the frosting.
2. The cake is more dense than most.
3. I found that Coco Lopez brand cream of coconut is the best to use, it is easier to blend than others and less watery.
4. Be careful not to overcook the cake, because it will lose moisture.
5. The best part of this cake was the banana pastry cream, I will use this component again.
6. Do not use pineapple in heavy syrup for the filling.
                                    **LAST YEAR:Bajan Sweet Bread**

Sunday, March 5, 2017

Cake of Leaves


It is natural of us to try to minimize things down to a "yes"  or a "no" because we want things to be simple. Remember the notes generated in elementary that were passed around? One of the typical ones was the "do you like me?" and it had two boxes to choose from. At that time, we could check yes or no, but now as we are older we would probably check one and list reasons or contingencies for the one we check, such as yes, only if you quit smoking or no because you still live with mom..

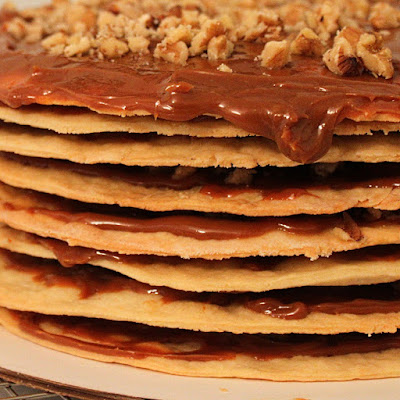
This dessert is much the same way. Is it a cake? Yes, only if you consider that it has filled layers like a cake or no because the layers are made up of a dough not batter.

This recipe originates from Chile and in their language is called "Torta de Hojas", which translates to the title of this post. When looking at the picture above, most get the impression that it is basically stacked cookie layers with caramel and walnuts. That would be only partly correct. The layers are made up of a buttery dough with no sugar. The no sugar idea is right on point. Slathered with Dulce de Leche and toasted walnuts, each layer gets transformed. One bite of this tower of deliciousness gives your palate a sensation of flaky, crunchy and slightly sticky textures with a trifecta of satisfying flavors.

This is a 9 layer dessert and the layers are the most time consuming. Here in Texas, Dulce de Leche is easily found at the grocers, so I did not opt for using cooked sweetened condensed milk. There are various methods for cooking the milk to make the caramelized filling and this process available on the internet. Use two 14 ounce cans of the milk for this recipe and let cool 10-15 minutes after cooking before coating the dough layers.

Cake of Leaves
adapted from All Recipes

Ingredients/Pastry Layers
3 egg yolks
1 cup milk
7/8 cup of butter or 1 3/4 stick of butter
4 cups of flour
2 tsp baking powder

Ingredients/Filling
2-14 oz cans cooked sweetened condensed milk or
   2-13 oz cans Dulce De Leche
1 cup chopped toasted walnuts
1/4 cup brandy
1/4 cup water

For baking, the oven temperature should be preheated to 350 degrees and you will be using plain cookie sheets, not parchment lined and not greased/floured. The cooked layers will slide off the pan easily when baked.

Cut the butter into cubes and place in bowl of stand mixer. Beat until smooth and silky, stopping occasionally to scrape down the sides of the bowl. Add one egg yolk and beat into butter, running mixer on medium for about 30 seconds. Continue with this method for each egg yolk.

Using another bowl, sift together the flour and the baking powder. Fold 1/3 of the mixture into the butter using a wooden spoon. Then blend in 1/2 cup of milk, then half of the sifted ingredients and repeat, ending with the last amount of dry ingredients. Once a dough is formed, separate into 9 equal balls of dough. Roll out one ball into a flat mass a little over 9 inches. Using a 9 inch plate as a guide, trim the edges to a smooth circle. Transfer disc to a cookie sheet and prick the surface in several places with the tines of a fork.

Place in oven and bake for 10-12 minutes or until the edge is slightly golden. Let rest on sheet for 3 minutes then carefully transfer to rack to completely cool. Repeat the forming and baking process for the rest of the dough balls.

Once all the dough is baked and cooled, place the first pasty layer on a cake board. In a small bowl, mix together the water and brandy. Brush this mixture on top of the pastry layer. Then measure out about 1/4 cup of dulce de leche and place in a microwave bowl. Heat in microwave until pourable, about 20 seconds. Mix and then pour on top of the first layer, smooth out evenly and leave a 1/4 inch border. Repeat the same process, stacking each layer and filling.

Let the finished cake rest for 8 hours or overnight. The rest time helps the layers from shattering once the dessert is cut, the pastry becomes more pliable.

Tips and Notes:
1. I had to use more chopped nuts than stated.
2. You can cover the sides with the filling and nuts, just make sure to get extra ingredients for this.
3. The brandy does not add flavor due to the strong flavor of the filling, so it is more of a factor to help the texture rather than flavor.
                                     **LAST YEAR:Peanut Butter Oatmeal Cookies**