Foodbuzz

Sunday, June 30, 2013

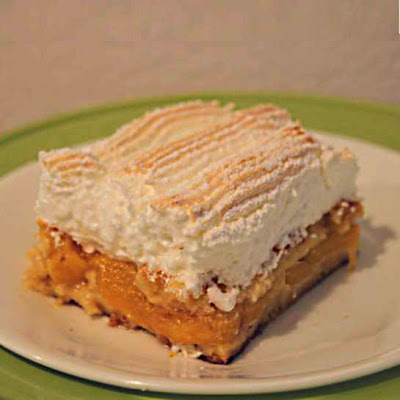
Peach Amaretto Bread Pudding


This recipe stems from Austria and it has a long Austrian name, but I decided it would be easier for all if I labeled it with an American name.  The original is more of a winter type of dessert consisting of apples and raisins, but I gave it a summer touch by using peaches.

The meringue topping really did make all the difference in the dessert.  I have made bread pudding before, but never had used this type of topping. Also, the peach and amaretto flavors have always been a favorite, so I was pleased with the final tasting of this desssert.

The change in the fruit to the original recipe as well as the type of bread only impacted the height of the dessert.  If I was to make it again I would probably use the more dense brioche than the Hawaiian bread.  While Hawaiian bread does taste sweeter, it just does not hold up to the soak as well as brioche.  At the time, I could not find any brioche and did not have the time to actually make any from scratch.

The original recipe is listed below, with notes of the changes that were made to create something for the summer season. 

Fruit Bread Pudding
adapted from Austrian Desserts and Pastries

Ingredients/Bread Pudding Base
3 eggs (whites separated from yolks)
1 1/2 cup milk
3 1/2 tbs clarified butter
pinch of salt
3 1/2 tbs butter (for pan coating)
1/2 cup bread crumbs
12 oz of brioche ( or Hawaiian Bread)
zest from 1/2 of a lemon ( not used in peach flavor)
1/3 cup of granulated sugar
1 tsp vanilla sugar ( or regular granulated sugar)
1/2 cup bread crumbs (for coating pan)

Ingredients/ Fruit Filling
3 tbs granulated sugar
1/2 cinnamon stick ( not used with peaches)
1/2 cup raisins (optional- not used with peaches)
1 lb peeled cored apples (or 6 peeled peaches)
1/2 cup white wine ( or 1/2 cup amaretto for peach dessesrt)

Ingredients /Meringue
3/4 cup granulated sugar
3 egg whites
powdered sugar for dusting

Cut the fruit into thin slices and set aside.  Place a saucepan over low heat.  For the original apple dessert, pour the white wine into the saucepan and add the apples, cinnamon and sugar.  For the peach, pour the amaretto into the saucepan,  stir in the sugar and then add the peach slices.  Let poach in alcohol for about 5 minutes and then remove fruit and and drain well.  If using raisins, wash in hot water and place on paper towel to dry.

Take out the bread loaf and remove all of the crust.  Then slice very thin, about 1/5 of an inch.  Place in a bowl and set aside.  Pull out another bowl and mix together egg yolks, lemon zest, milk, salt and 1 tsp vanilla sugar until blended. Pour mixture over the the cut up bread.

Take out another bowl and fill with the egg whites and 3 tbs of sugar.  Beat until the consistency becomes very stiff. Preheat the oven to 325 degrees.  Add the remaining sugar and beat for 1 minute. Fold this mixture into the bread pudding.

Once completed, grease a 9 X13 inch pan and dust with the bread crumbs. Then spread half of the bread pudding batter into the bottom of the pan.  Place the fruit slices evenly on top of the batter and sprinkle raisins on top (optional).  Smooth the additional batter over the top of the peaches, making sure it is even. Sprinkle the batter wth the melted butter. Place in oven and let bake for 1 hour.

While this is baking, place egg whites and sugar in top of a double boiler on low.  Beat until the temperature reaches 113 degrees.  Then pour egg whites into a regular medium size bowl and beat with mixer until they have a stiff consistency. 

Remove the pan from the oven once bread pudding is done.  Let cool and raise the temperature of the oven to 500 degrees.  Spread 1/3 of the meringue over the bread pudding.  Using the rest of the meringue, pipe long strips over the top.  Lastly, dust with powdered sugar.  Bake in the oven until lightly browned.  Keep a close eye on it, it browns quickly, about 2-3 minutes to reach the desired color.

Then take pan out of the pan and let cool for 5 minutes and slice and serve.
                                     **LAST YEAR: Lemongrass Bars**

Sunday, June 23, 2013

Chocolate Irish Cream Cheesecake


With the heat and humidity, I found myself in a mood to make something that would be served cold but would not be fast melting like ice cream.  Naturally I went to the next best thing...cheesecake.

Since the cheesecake was not going to sit around the house, but be devoured at work- I had my co-workers take a vote on the flavor and this one was chosen.  This particular cheesecake is good to make and serve, but even better after the flavors meld with another day.

I have made many desserts with the combined flavors of chocolate and coffee.  They all seem to go over with great reviews and requests for more of the same. This dessert was no different.  The recipe makes one 9 inch cheesecake.

Chocolate Irish Cream Cheesecake
adapted from Cheesecake Extraordinaire

Ingredients/Crust
3 tbs butter
11 milk chocolate sandwich cookies

Ingredients/Filling
1 1/2 tsp instant coffee
2 tsp hot water
3/4 cup irish cream liqueur
1 1/4 tsp vanilla extract
2/3 cup whipping cream
5 eggs
12 oz milk chocolate chips
18 oz cream cheese
2/3 cup sugar

Optional topping:
1/2 cup sweetened whipped cream
1/4 milk chocolate chips
powdered sugar

To make the bottom crust, pulverize cookies in a blender or food processor until it turns into fine crumbs.  In a small bowl, melt the butter in the microwave.  Pour the crumb mixture into the butter and stir until smooth.

Grease the interior of a 9 inch springform pan.  Then press the crumb mixture evenly into the bottom of the pan. For the filling, start by dissolving the instant coffee in a small bowl with the water. Also, melt the chocolate in a double boiler until smooth.  Remove the melted chocolate from over the water pan. Also set aside the springform pan and instant coffee mixture. Preheat the oven to 350 degrees.

 Using a stand mixer or handheld mixer,  beat  the cream cheese and sugar together in a large bowl, running the mixer at medium speed.  Once all the lumps are gone, add one egg and beat for 30 seconds.  Repeat the process with each additional egg.  Scrape down the sides of the bowl and add the vanilla extract, whipping cream and irish cream.  Beat for another 30 seconds.  Lastly, use a wooden spoon and stir in the melted chocolate.

Pour the filling over the crust in the springform pan.  Place pan in the oven and bake for 15 minutes. For the second baking interval, reduce the oven temperature to 200 degrees and bake for about 1 hour and 10 minutes.  The cheesecake is done when the filling is no longer glossy or shiny on top.

Remove the cheesecake from the oven and run a knife along the outside edge between the cheesecake and the pan. Put the cheesecake back in the oven and turn the oven off.  Let it continue to bake for about 2 hours.  After the baking time, cover the cheesecake with plastic wrap and place in refrigerator to chill overnight.

The next day, top the cheesecake as desired.  Whipping cream rosettes can be piped around the edge and each topped with a milk chocolate chip or you can use a stencil and dust with powdered sugar.  Then you are ready to slice and serve.

Tips and Notes:
1. Dark springform pans require less baking time, the rule of thumb on cakes is about 10 minutes.
2.Iif you cannot find milk chocolate sandwich cookies, Oreos will do fine.
3. Wrap the bottom half of the springform pan in heavy duty foil, otherwise butter will melt out and run all over the oven.
4. Make sure the eggs and cream cheese are at room temperature.  If it is too cold, the melted chocolate will seize.  Then you will have a cheesecake with flakes of chocolate in the filling.
5. How thick you want the crust is a personal preference, so you can alter by adding more crumbs and butter.  Increments of about 4 cookies to 1 tbs + 1 tsp of butter.
6. Do not delay on running the knife around the outer edge of the cheesecake after it is removed from the oven.  Delay will cause the cheesecake to crack when the filling contracts in the cooling process.
                          **LAST YEAR: Key Lime Parfaits**


Sunday, June 16, 2013

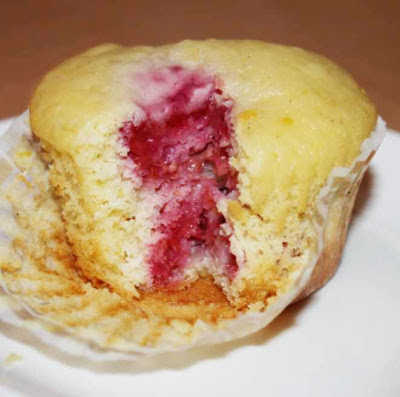
Raspberry Lemon Muffins

Well since the heat of the summer has hit, I have been on a berry kick lately.  Blackberries and raspberries have been populating the fridge for the last few months.  Luckily I had not eaten too many this time, so I did have some to bake with. 

I like the fact that muffins are so versatile.  I made them without a topping but a slather of cream cheese or honey butter would be good for those who want more to their muffin.  Also, being plain makes them appealing for those that are only craving a little sweetness to have with their morning coffee.  Eaten slightly warm or at room temperature, getting a big bite of a raspberry surrounded by lemony sweet cake hits the spot.

I have included the recipe for the limoncello glaze. The addition of that would make for a stronger lemony taste as well as add more sweetness.  Without it, the lemon flavor is very subtle in the muffins.  This recipe makes  about 1 1/2 dz.

Raspberry Lemon Muffins
adapted from Moufllet

Ingredients/Muffins
1 cup fresh raspberries
1 tbs lemon zest
1 cup buttermilk
1/4 cup melted butter
2 tbs oil ( vegetable or canola
1 tsp vanilla extract
2 eggs
1/4 cup sugar
1/2 tsp salt
1 tsp baking powder
2 cups flour
1/2 tsp baking soda

Ingredients/Limoncello Glaze
1/2 tsp melted butter
3 tbs limoncello
1/2 tsp vanilla
1 drop yellow food coloring (optional)
2 cups powdered sugar

For the muffins, prepare the pans by greasing the top edges of 18 cavities and line with paper liners.  Preheat the oven to 350 degrees.

In a small bowl, whisk together the eggs until frothy. Stir in the melted butter, buttermilk, zest, oil and vanilla extract.  Set aside.  In another bowl, sift together the salt, baking powder, baking soda and flour.  Then mix in the sugar.

Make a well in the dry ingredients and pour in the egg batter.  With a wooden spoon, mix the dry with the wet but only 10 strokes.  Over mixing will ruin the texture of these.  Fold the raspberries in with only 3 strokes.

Evenly fill the cavities of the pans with the batter.  Place in oven and bake for about 15 minutes and check with a tester to see if it comes out clean of any batter. Make sure it is not inserted into a raspberry when testing. Tops should spring back when muffins are done.  Note that the 15 minutes is a starting place and that the muffins can take up to 20 minutes.  The difference is due to the type of pan ( dark non stick, silicone and shiny metal).  

Let the muffins cool in pans for 3 minutes and then transfer to a rack to completely cool.  Glaze when completely cool.

For the glaze, start with mixing the melted butter with 1 tbs of limoncello.  Then sift in 1/4 cup of powdered sugar and mix until no dry streaks remain.  Continue with the process of sifting and stirring in the powdered sugar until all is mixed in.  Add more limoncello in small increments until the glaze has a syrupy consistency. Lastly, stir in the food coloring (optional) and the vanilla extract. 

Then dip the top of the cooled muffins into the glaze, being careful to immerse so that there is still 1/2 to 1/4 inch top edge border.  Let the extra drip off and set upright on the rack.  Glaze will need about 1 hour to set before serving.  The glaze can be stored up to 1 day prior to use.
                                      **LAST YEAR:Persephone's Winter Cake**

Sunday, June 9, 2013

Graham Cracker Madeleines


After the rich indulgence I posted last week, I was determined this week to make something lighter.  These cookies were a nice alternative.  Something a little sweet to have with tea or coffee.

Someone at work said that these were a pain to make, however, I beg to differ.  You can make the batter on one day and bake the next, so each process is easier to squeeze into the day. I actually made three different kinds, but this recipe turned out to be the favorite. 

Graham cracker flavored anything is hard to come by in baked goods, except for cheesecake crust and playing the part in a s'more type of treat. I did like the stand alone flavor of these, which is why they have no glaze on them.  You can take it up a notch and dip them in chocolate if you crave something a little sweeter.  As is, the cake-like, moist texture makes them perfect for dunking. The recipe makes about 2 dozen cookies.

Graham Cracker Madeleines
adapted from We Love Madeleines

Ingredients
1/2 cup or 1 stick melted butter
2 eggs (room temp)
3/4 cup flour
1/2 cup graham cracker crumbs
2/3 cup of sugar
 
Place the eggs and sugar in a bowl and beat on medium high speed for about 5 minutes.  The mixture should convert to a pale yellow, shiny batter and the sugar be totally dissolved. Using a wooden spoon, fold in the graham crumbs and the flour until all is blended.  Then stir in the butter until it is completely incorporated into the batter.

Pour batter into a shallow bowl and cover the surface with plastic wrap.  Refrigerate batter for at least one hour or the maximum, which is overnight.  After the chill time, preheat the oven to 375 degrees. Also, prepare your pans by greasing the cavities with melted butter and then dusting with flour.

Spoon or pipe the batter into the pan cavities evenly.  They should be about 2/3 full.  Place pans in oven, putting one pan on a rack to the right and the other pan on the rack below it to the left.  They should be staggered to bake evenly.  Bake for about 10-12 minutes, rotating pans at the halfway mark.  Madeleines are done when tester inserted into the thickest part comes out clean.

After the pans are removed from the oven, invert cookies onto wire rack for cooling.  These can be served warm or at room temperature.

Tips and Notes:
1. Regardless of pan type (shiny, silicone or non stick) the pans need to be greased and floured for every batch baked.
2. If using a non-stick pan, take note that it is darker so the cookies will brown faster.  In the non-stick pans, mine took about 7-8 minutes.
3. if you only have 1 pan, refrigerate the batter between batches.
                                 **LAST YEAR: German Carmelite Sister Cookies**         

Sunday, June 2, 2013

Cherry Ripe Cake


This is a recipe I have had tucked away for awhile.  I do like chocolate covered cherries and this is about as close as you can get to finding all that flavor in the form of a cake.

Between the big flavor and the wonderful texture, this is one is not easily forgotten about.  The great texture can be attributed to the coconut milk and vegetable oil. There is no butter in the cake.  Even a small slice can satisfy, with a hefty amount of cocoa laced with with cherry brandy, chunks of glace cherries and sweet coconut.  These same flavors are part of the assembly as well. Chocolate ganache covers the top and sides of cake while the other flavors make up a buttercream filling that sandwich the two layers together.

There are a lot of people employed where I work and it is good that there was more than enough cake for our department.  There were some intent stares from not in the department when this cake was being sliced so I could not help to offer them a piece!

Cherry Ripe Cake
adapted from Ledelicieux 

Ingredients/Cake
1 3/4 cup coconut milk
1/2 cup vegetable oil
1 tsp vanilla extract
1/4 cup cherry brandy
2 eggs
2 cups sugar
3/4 cup cocoa powder
1 tsp baking powder
2 tsp baking soda
1 tsp salt
1 3/4 cup flour
1 cup shredded sweetened coconut
200 grams or about 1 cup chopped glace cherries

Ingredients/Buttercream Filling
125 grams or about 1/2 cup butter
2 tsp cherry brandy
1 cup powdered sugar
1/4 cup shredded sweetened coconut
200 grams or about 1 cup chopped glace cherries
red food coloring (optional)

Ingredients /Chocolate Ganache
1 tbs cherry brandy
300 grams or about 1 3/4 cups chopped chocolate
1 cup heavy cream

Additional topping (optional)
1 cherry ripe chocolate bar, chopped
fresh cherries

Preheat the oven to 350 degrees.  Prepare two 8" round cake pans by buttering the interior and lining the bottom with parchment paper and buttering the face up side of the parchment..

For the cake, place the eggs in a small bowl and whisk until whites are completely blended with yolks. Then stir in the cherry brandy, oil, vanilla extract and coconut milk. Set mixture aside.

In the bowl of a stand mixer, sift together flour, cocoa powder, baking powder, baking soda and salt. Then mix in the sugar.  Turn the mixer on low speed and let run while slowly adding the wet mixture in 1/4 cup increments, scraping down the sides of bowl between each addition.  Lastly, add the coconut and the glace cherries, all while continuing to let the mixer run on low speed. 

Once all is evenly distributed into the batter, pour batter evenly into prepared cake pans.   Place in oven and bake until tester comes out clean.  Baking time should range between 35 to 40 minutes. The cakes should cool in the pans for 30 minutes and then transferred to a rack to finish cooling.

Start making the filling by beating the butter until light and smooth.  Then sift the powdered sugar into the same bowl and beat until mixture is fluffy and light.  If using the food coloring, add it and beat until icing has an even color with no streaks.  Lastly, stir in the cherry brandy and fold in the glace cherries and coconut. 

Remove the parchment from the cake. Place one cake layer on a cake stand. Place parchment or wax paper all around the split between the cake and the plate.  Then smooth the filling over the the top of one of the cake layers and stack the other cake layer on top. 

Place the chocolate and cream into a small saucepan over low heat.  Once it is all melted and smooth, stir in the cherry brandy.   Let ganache cool for about 5 minutes  Pour ganache over the center of the cake, letting it fan outward and drip down sides of the cake.  Use a spatula to even out the ganache on the top and sides of the cake.  Once the ganache is set, remove the wax paper from between the cake plate and cake.

To decorate further, recipe suggests to use fresh cherries on top or chopped cherry ripe chocolate bars.
                                   **LAST YEAR: Ginny Bee Bkfst Cake**