Foodbuzz
Showing posts with label lemon. Show all posts

Sunday, June 16, 2013

Raspberry Lemon Muffins

Well since the heat of the summer has hit, I have been on a berry kick lately.  Blackberries and raspberries have been populating the fridge for the last few months.  Luckily I had not eaten too many this time, so I did have some to bake with. 

I like the fact that muffins are so versatile.  I made them without a topping but a slather of cream cheese or honey butter would be good for those who want more to their muffin.  Also, being plain makes them appealing for those that are only craving a little sweetness to have with their morning coffee.  Eaten slightly warm or at room temperature, getting a big bite of a raspberry surrounded by lemony sweet cake hits the spot.

I have included the recipe for the limoncello glaze. The addition of that would make for a stronger lemony taste as well as add more sweetness.  Without it, the lemon flavor is very subtle in the muffins.  This recipe makes  about 1 1/2 dz.

Raspberry Lemon Muffins
adapted from Moufllet

Ingredients/Muffins
1 cup fresh raspberries
1 tbs lemon zest
1 cup buttermilk
1/4 cup melted butter
2 tbs oil ( vegetable or canola
1 tsp vanilla extract
2 eggs
1/4 cup sugar
1/2 tsp salt
1 tsp baking powder
2 cups flour
1/2 tsp baking soda

Ingredients/Limoncello Glaze
1/2 tsp melted butter
3 tbs limoncello
1/2 tsp vanilla
1 drop yellow food coloring (optional)
2 cups powdered sugar

For the muffins, prepare the pans by greasing the top edges of 18 cavities and line with paper liners.  Preheat the oven to 350 degrees.

In a small bowl, whisk together the eggs until frothy. Stir in the melted butter, buttermilk, zest, oil and vanilla extract.  Set aside.  In another bowl, sift together the salt, baking powder, baking soda and flour.  Then mix in the sugar.

Make a well in the dry ingredients and pour in the egg batter.  With a wooden spoon, mix the dry with the wet but only 10 strokes.  Over mixing will ruin the texture of these.  Fold the raspberries in with only 3 strokes.

Evenly fill the cavities of the pans with the batter.  Place in oven and bake for about 15 minutes and check with a tester to see if it comes out clean of any batter. Make sure it is not inserted into a raspberry when testing. Tops should spring back when muffins are done.  Note that the 15 minutes is a starting place and that the muffins can take up to 20 minutes.  The difference is due to the type of pan ( dark non stick, silicone and shiny metal).  

Let the muffins cool in pans for 3 minutes and then transfer to a rack to completely cool.  Glaze when completely cool.

For the glaze, start with mixing the melted butter with 1 tbs of limoncello.  Then sift in 1/4 cup of powdered sugar and mix until no dry streaks remain.  Continue with the process of sifting and stirring in the powdered sugar until all is mixed in.  Add more limoncello in small increments until the glaze has a syrupy consistency. Lastly, stir in the food coloring (optional) and the vanilla extract. 

Then dip the top of the cooled muffins into the glaze, being careful to immerse so that there is still 1/2 to 1/4 inch top edge border.  Let the extra drip off and set upright on the rack.  Glaze will need about 1 hour to set before serving.  The glaze can be stored up to 1 day prior to use.
                                      **LAST YEAR:Persephone's Winter Cake**

Monday, September 17, 2012

Peach Tarte Tatin & Lemon Ice Cream

Recently I was struck by the fact that I have nearly missed out on peach season.  They are almost gone at the market and I have not made a thing with them.  That is until now.

Thumbing through some magazines I landed on a recipe for Peach Tarte Tatins.  What really got my interest was the fact that the recipe was so easy to put together and that they were made in individual servings.

These little desserts are a great alternative to a big pie.  The layers all come together for something tasty and unique.  The base is puff pastry, then it has a caramelized peach sitting atop of it. To create t those layers, the assembly is the opposite in a ramekin because the dessert is inverted onto a plate.

While they are satisfying enough by themselves, a dollop of ice cream makes them even better.  Vanilla a la mode may be tradition, but the dessert really pops with a homemade lemon ice cream topping.  The complimentary flavor blend really does make you question the traditional.

The equipment needed to make the complete dessert  is 8 ramekins that hold 3/4 cup and an ice cream maker. It is best to prepare the ice cream the day before, the recipe makes about 6 cups.

Lemon Ice Cream
adapted from Bon Appetit

Ingredients
8 egg yolks
5 tbs fresh lemon juice
1 tbs lemon zest (packed)
1 cup whole milk
1 1/4 cup sugar (divided)
3 cups heavy whipping cream

Fill a large saucepan with 1 cup sugar, whipping cream, lemon zest and milk.  Place over medium heat and stir.  The mixture should come to a simmer and the sugar dissolve. One it reaches that point, remove from heat.

In a medium heatproof bowl add egg yolks, remaining 1/4 cup of sugar and lemon juice.  Whisk until blended.  Take the saucepan of warm cream mixture and pour a slow stream into the egg yolks and stir together.

Pour custard back into saucepan and place over medium heat.  Let mixture cook, while stirring constantly.  The custard should become thicker and reach a temperature of about 170 to 175 degrees. This process should take about 5 minutes.  Take caution to make sure the mixture does not boil.

Pour custard into a heat proof bowl and cover with plastic wrap.  Chill in refrigerator for 3 hours. Then pour into a ice cream maker and follow manufacturers instructions.  Place ice cream in a bowl and cover and freeze until firm.

Peach Tarte Tatins
adapted from Bon Appetit
Ingredients
1 17.3  oz package of puff pastry (thawed)
1 cup sugar, plus 2 tbs
4 ripe peaches, peeled, halved and pitted
1/4 cup water
1 egg yolk beaten with 1 tsp water for glaze
6 tbs butter

Put sugar and water in a saucepan and place over medium heat.  Stir mixture until all the sugar has dissolved.  Prepare a cup of water along with a pastry brush to occasionally wash down the sides of the mixture from the pan while it cooks.  Increase the heat and let mixture boil without stirring.  In about 7-10 minutes, it will turn a deep amber color.  Remove from heat and add the butter. Wait a few minutes for the butter to melt.

Place pan back on low heat and stir, making sure all the caramel chunks dissolve.  Once the correct consistency, pour caramel in equal increments into each of the 8 ramekins.  The place 1 peach half on top of the caramel, with cut side facing up. Complete the process until all peach halves are in the ramekins.  Set ramekins aside.

Preheat the oven to 400 degrees.  Then take out puff pastry and cut into 8 rounds that are the same diameter as the ramekins.  Put one round on top of each of the peach halves and tuck in the edges.

Brush the dough tops with egg glaze and sprinkle some sugar on top.  Place ramekins on a rimmed baking sheet, spacing evenly.  Put in oven and bake about 25 minutes.  Pastry should have a golden color when done. 

Remove pan from oven when done. Using oven mitts, invert each ramekin onto a dessert plate.  Let cool for about 10 minutes.  Then top with a scoop of ice cream and serve.
                         **LAST YEAR: Cranberry Invasion Cake**

Monday, July 2, 2012

Lemongrass Bars

I still had some lemongrass left over from my last creation, so I decided to make these lemongrass bars.  The good thing about lemongrass is that it does last for about 10 days in the fridge.

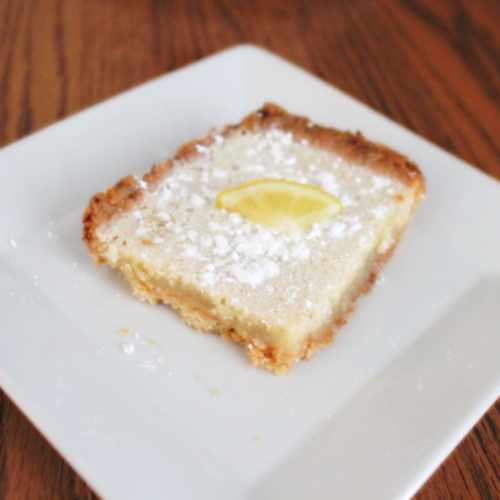
This particular bar has a coconut shortbread base and a lemony topping.  The filling texture does resemble more like a key lime pie than a baked bar.  The usage of lemongrass does make these bars quite different from the standard.  It reduces the tartness of the lemon and adds hints of mint and ginger.

While I do like lemon bars, I am pretty picky.  I do not like them to be dry, nor do I like them to be too strong.  Some I have tasted have been pretty bitter.  These bars do not have those issues.  Also, the extra flavors do bump them up to more of a gourmet quality dessert.

Lemongrass Bars
adapted from Bon Appetit

Ingredients/Crust
1 cups sweetened coconut
1/2 cup plus 3 tbs butter (room temp)
1/2 cup powdered sugar
1 1/2 cups flour
1/2 tsp salt

Ingredients/Filling
1/4 cup flour
1 1/4 cup sugar
3 finely chopped lemongrass stalks (outer layer removed, bottom 4 inches only)
3 eggs
5 tbs lemon juice
powdered sugar (for dusting)
pinch of salt

Preheat the oven to 350 degrees.  Prepare 9x13 inch pan by buttering the interior.

To create the crust, mix together powdered sugar, coconut, salt and flour.  With an electric mixer on medium, beat in the butter until the mixture clumps.  Pour into your prepared pan.  Place waxed paper over the dough and flatten it evenly into the bottom of the pan as well as about 1/2 an inch up the sides.  Bake for about 25 minutes.  Crust will be golden brown with darker edges.  Remove pan from the oven and place on cooling rack.

Reduce the oven temperature to 325 degrees.  Using a food processor, pulse together the lemongrass and the sugar.  The lemongrass should be finely ground with the sugar, which should take about about  a minute.  Add the lemon juice and process again for 30 seconds.  Put the eggs into the mixture and run the processor for about 10 seconds.  Lastly, pour in the flour and salt and pulse until smooth.

Pour the filling over the hot baked crust and place in oven.  Bake for about 22-23 minutes.  Remove and place on rack to cool completely.  Cut into pieces and dust with powdered sugar.
                                    **LAST YEAR: Austrian Apple Twists** 


Monday, May 14, 2012

Florida Cottontails

When I think of cottontails, I usually think of a more central or northern rabbit.  However, there is a rabbit which inhabits some areas of Florida.  They are called marsh rabbits.  They look like most cottontails that you see in other areas, except they are a little more reddish instead of brown.

Since Florida is a large producer of lemons and these cakes do look like a big fluffy cottontail, that is how I came up for a name for these cakes.

The flavor idea came to me when I saw those pink Hostess cakes called "snowballs".  For those that are unfamiliar with the "snowballs" they are chocolate cakes shaped like a dome that are filled and coated with marshmallow fluff and then sprinkled with pink coconut. 

Instead of that combination, I thought that lemon,coconut and meringue would go well together.   These lemony cakes are filled, as well as topped, with meringue then have a final coating of sweet coconut.  Outside of their great taste, they have a bright lemon yellow color which conjures up the lazy days of summer and outdoor picnics.  However, be aware that these yellow gems do entice little kids into grabbing and eating them with their hands-so be sure to have plenty of napkins around when serving!

This recipe makes 8 cakes and requires 2 domed cupcake pans with 1/2 cup cavities that are 3.5 inches in diameter and 1.5 inches deep.

Florida Cottontails
by flourtrader

Ingredients/Cake
1 cup sugar
2 eggs
1 tbs lemon zest
2/3 cup of lemonade (I used Simply Lemonade brand)
1 tbs lemon juice
1/2 cup butter (room temperature)
1 tsp vegetable oil
2 cups flour
2 tsp baking powder
1/2 tsp salt

Ingredients/Filling and Frosting
3 egg whites, room temp
3/4 cup sugar
1/4 cup water
1/4 tsp vanilla extract
pinch salt
2 cups sweetened coconut
6 drops liquid or 1/4 tsp powdered yellow food coloring

Preheat the oven to 350 degrees and grease the top edges and interior of 8 cavities of your dome pans.  Then dust with flour.

Sift together the flour, salt and baking powder.  Then sprinkle in the zest and stir, distributing evenly.  Set aside.

In a large bowl, beat together the butter and sugar.  Once it becomes light and fluffy, add one egg and beat for 30 seconds.  Then add the additional egg and vegetable oil, beating again to blend.  Using a wooden spoon, fold in 1/3 of the sifted ingredients.  Then mix in 1/3 cup of lemonade and lemon juice.  Repeat this process and then add the final amount of the dry ingredients.

Using an ice cream scoop or a spoon, fill each cavity 2/3 full with cake batter.  Place in oven and bake 15-25 minutes or until tester comes out clean. Rotate baking pans halfway into the baking time.  Mine took a total of 18 minutes to fully bake.  Remove pans and let rest for 3-5 minutes, then invert cakes onto rack to finish cooling.  Flip cakes so dome is facing up.

Once cool, take a serrated edge knife and cut off 1/3 of the top of the dome on each cake.  Then scoop out 1 1/2 tbs of cake from the center of the bottom piece.

To create filling and frosting, fill a sauce pan with the water and sugar and place over medium heat.  Let come to a boil and cover.  Set timer for 3 minutes. During this time, prewarm your thermometer in a glass of warm water.  Once the timer goes off, uncover and place thermometer in syrup and let mixture heat up until it registers between 235-240 degrees.  Once it reaches that stage, remove pan from heat and place thermometer back in the glass of warm water.

With a large stand mixer,  beat the egg whites until foamy.  Sprinkle in the pinch of salt and beat for 30 seconds.  Continue to beat until soft peaks form.  While still running the mixer at high speed, pour in the syrup in a thin stream, letting it glide down the inside edge of the bowl.  Continue to beat the mixture for 10 minutes longer to let cool down.  Then beat in the vanilla extract.  Take 1 cup of the meringue out and place in another bowl, setting aside.  Add 3 drops or 1/8 tsp of the food coloring to the larger amount of the meringue in the stand mixer bowl and beat until it becomes an even color of yellow.  You can add additional food coloring should you want a deeper color.

Then fill a small food processor bowl with the coconut and the remaining food coloring and blend until coconut has turned a lemony yellow.  Set aside.

Take the white meringue and fill the hole in the bottom of the cakes.  Then put the top back on the cakes.  Then thickly cover each cake with the colored meringue.  Generously sprinkle the cakes with the coconut, covering all areas.  Press gently to maintain dome like shape and to get the coconut to adhere. Then they are ready to serve!

Tips and notes:
1. you can change up the extract flavoring in the meringue according to your tastes.
2. I used powdered food coloring.  My liquid food coloring may have been too old, but it gave the meringue an orange tinge, instead of yellow.
3. The meringue gets foamy if it sits, but you can beat it back into its silky consistency.  The silkier, the better you can work with it.
                         **LAST YEAR: Armenian Dinner Rolls**


Monday, May 7, 2012

Lemon Butter Fudge

I have been wanting to make some fudge for awhile but I have always thought it to be a difficult task.  Remembering my childhood days of having to assist in the hand beating of the batter was not something I relished.  Then my thermometer was nowhere to be found (perhaps a subconscious means of fudge aversion).  However, I finally broke down and bought a new digital thermometer with the intention of making fudge.

When thumbing through a recipe book, there was a section on "exotics fudges", which did catch my interest.  Most of the recipes were not unique flavors, but had a unique ingredient-goat's milk.   Then I found the lemon butter fudge recipe, unique in flavor but no goat's milk.

Since I liked lemon cream filled candy, I thought this would be an unusual treat that would be enjoyed by many people. Also the recipe had a option of including nuts which made it even better.

Now with technology and good equipment like a food processor, that wretched task of beating by hand was out of the picture!  For my first time making fudge, I was pleasantly surprised at the results. My biggest fear was graininess or that it would not set up.  However, in the end my hesitation was just delaying something that was actually a fun project with delicious results. I am a fan of lemon and citrusy things so the tart flavor and creamy texture definitely scored in my book.  Also, I included pecans which added another tasty layer of flavor and crunch. This recipe makes 1 pound of fudge.

Needless to say I am gifting these up for a few special people. Giving gifts for no special reason is always fun!

Lemon Butter Fudge
adapted from Oh Fudge by Lee Benning

Ingredients
4 tbs butter (do not use margarine)
2 cups granulated sugar
1 tbs 1 1/2 tsp lemon juice
1 inch by 2 inch piece lemon zest
1/4 tsp salt
1/2 cup evaporated milk

Optional Ingredients
1/2 to 1 tsp lemon extract
1/2 cup chopped nuts
4 drops yellow food coloring

Prepare your thermometer by placing it in a glass of hot water so it will be pre-warmed.  Take a 2 quart sauce pan and butter the upper 2/3 of the sides of the inside of the pan.  Fill a glass with water and ice.  Also, fill the sink full of cold water to a depth of 1 1/2 inches.

Grease the inside of a 5X10 inch pan and line with parchment paper in bottom and two opposite sides with overhang.  Place the butter in the freezer.

Place all ingredients in the saucepan with the exception of butter and the list of optional ingredients. Put saucepan over low heat and stir constantly with a wooden spoon until the sugar is dissolved.  The spoon should glide smoothly over the inside bottom of pan with no grittiness.

Increase the heat and let mixture come to a boil.  Use a pastry brush dipping in hot water to wash down the sugar crystals on the inside edges that precede the batter.  Place pre-warmed thermometer in candy and reduce heat but maintain boil.  Once thermometer registers between 236 to 244 degrees Fahrenheit, test by placing a drop in ice water.  It should hold shape until the heat from your fingers start to flatten it and it has a slightly chewy texture.

Once it is at the correct consistency, take saucepan and place in the sink of cold water.  Then drop in frozen butter. Do not stir.  Leave thermometer in candy and wait until it cools down to a temperature of 110 degrees and develops a skin on top.

Pour mixture into food processor, take out zest and add two optional ingredients-the food coloring and lemon extract.  Place the cover over the food processor and leave the feed tube uncovered so steam can escape.   Turn on food processor and run for 3 minutes and let rest for 1 minute.  Repeat this process until the fudge thickens and loses it sheen.  It will become lighter in shade and then stiffen.  For me the true indicator was when the batter did not flow back to the center when the machine was shut off.  It left about a 3/4 inch gap.  This process took about 12 minutes.

Once the right consistency is achieved, mix in the nuts.  Then pour into the prepared pan and let cool.  Once cool, pull on parchment paper to take out of pan and cut into desired shapes.  Then it is ready to serve.  Cover tightly and refrigerate to store.

Tips and Notes:

1. This does give your food processor a work out, it did get very warm.
2. My mom used to serve 1 inch by 1 inch pieces of fudge, these pieces are between 1/2 to 3/4 an inch thick
3. You can use a towel dampened with cold water to place around the outside of the processor bowl to speed up the thickening process of the candy.
4.  I did not take out the zest and let the food processor grind it up to blend into the fudge
5.  Taste batter before opting for the lemon extract, for strength of flavor is a personal preference
6.   I monitored the progression of the candy changes in the consistency by periodically stopping and watching the movement of the batter when machine was of as well as tasting and getting a "mouthfeel" of the texture.
7. Once batter is in pan, it sets up fast, so do not delay in spreading it out.
8. Statement from recipe says"not easily doubled but can be frozen"
                      LAST YEAR:Jalapeno Cheese Squares**


Friday, April 20, 2012

Crunchy Rooftop Cupcakes

This particular recipe is a creation of a craving I had for a certain combo of flavors.  I wanted something that had the rich taste of graham and cinnamon with a pop of tart lemon.

The graham/cinnamon combo was easily found in the biscoff spread and the cookies.  To add the lemon, I poked holes in the cakes and soaked them with a lemon syrup.  Then the topping is made even better when it is dipped in the sugary cinnamon.  Lastly a touch of whipped cream holds half of a Biscoff cookie on top

As you bite into one of these, you will have the crunch of the cinnamon topping, the tartness of the lemon and then the deep graham flavor of the cake. The syrup is an exact mimic of the flavor your get in a lemon drop. Needless to say, this recipe hit the mark in what I wanted in flavor as well as texture.

Also, I had to quickly pack them away so I would have enough for the pot luck.  It seems that I am building a reputation at the monthly event , for upon arrival it is "what did you bring this time?".  There is a lot of curiosity around the creations I bring, mainly due to the fact the attendees are people that stick with making the tried and true classic recipes.  A small country town does not have that much exposure to the big variety that exists beyond the classics.

Crunchy Rooftop Cupcakes (makes 16-18 standard cupcakes)
by flourtrader

Ingredients/Cakes
1/4 cup butter, room temperature
1/4 cup Biscoff spread
1 tsp vanilla extract
2 eggs
2/3 cup of sour cream
1/2 cup ground Biscoff cookies (do not pack)
1 1/2 cups flour
2 tsp baking powder
1 tsp baking soda
3/4 cup brown sugar
1 tsp cinnamon

Ingredients/Topping & Syrup
juice from 2 lemons
zest from 1 lemon
1/2 cup sugar (for syrup)
1 tbs cinnamon
1/2 cup sugar
whipped cream
8-9 cookies broken in half

Preheat the oven to 350 degrees.  Grease the top edge of muffin cavities and line with cupcake papers

Sift together the flour, baking powder, baking soda and cinnamon.  Then stir in the ground Biscoff cookies. Set aside.

 In a mixing bowl, cream together sugar, butter and Biscoff spread. Then beat in one egg and vanilla extract for 30 seconds.  Add the additional egg and beat for another 30 seconds.  Take a wooden spoon and fold in 1/3 of the sifted ingredients.  Take 1/3 cup of the sour cream and fold into batter.  Continue with the process of adding and mixing, ending with the last 1/3 of the sifted ingredients.

Using an ice cream scoop or a spoon, fill cupcake liners 2/3 full with batter.  Place in oven and bake for 12-15 minutes or until tester indicates cupcakes are done.

While the cupcakes are baking, make the simple syrup.  Place the lemon, lemon zest and 1/2 of sugar in a sauce pan and place over medium high heat.  Let the mixture come to a boil.  Turn down heat and stir until mixture turns to a syrup type consistency.  Remove from heat.

Remove cupcakes from the oven and let rest for 2 minutes then transfer to a rack.  Let cool for about 5 minutes.  Using a wooden skewer, poke holes in the top of the cupcake about 1 1/2 inches in depth.  Then take a pastry brush and brush syrup on cupcakes.  Brush twice and then let set for another 5 minutes.  During this time the syrup will get thicker.  Then brush the tops again. All cupcake tops should be coated.

In a small bowl mix together the cinnamon and 1/2 cup of sugar.  Take each cupcake and dip the top in the mixture, making sure it is well coated.  Place cupcake back on cooling rack.  Continue until all cupcakes are topped with cinnamon.

Then take 1/2 cup of whipped cream and pipe or drop a dollop on the center of each cupcake.  Stick 1/2 a cookie upright into the whipped cream.

Tips:
Cupcakes do need a day for flavors to meld, so do the whipped cream and cookie the following day prior to serving.
Keep a careful eye on the syrup while cooking as well as cooling, the consistency can become too thick very quickly.
The baking powder and baking soda do react quickly, so it is wise to only prepare what you can bake at one time.
I was not pleased at the taste of these warm from the oven, so reserve your taste testing for the next day when all the flavors have melded.

Enjoy!                    

Wednesday, March 21, 2012

Oatey Naptime Muffins

This particular muffins contain lemon verbena leaves and oats.  For those that do not know much about them, the leaves are known to be a sedative.  While they did not knock me out when I ate a few, I was feeling a little tired.  I really had no idea about this until I had already created this recipe! I learned something when I looked into the origin of this tea.

I have been wanting to infuse tea in a baked good for sometime now.  The muffin is not real sweet by itself, so the lemon glaze is a perfect topper.  However, you may opt to add fruit to the batter, which would also be very complimentary.  Since it is already lemony, adding blueberries or blackberries is a great choice. Also, these could be served with fruit coulis. Since the muffin is made of oats, that ingredient does impact the texture of the muffin.  They are fluffy with a chewiness from the oats.

If you like lemons and enjoy lemon verbena tea, than I think you will like these. Also, they may help someone who has trouble sleeping.  A word of caution, do not make big plans for the few hours after eating, except maybe plan on a nap!

Oatey Naptime Muffins
by flourtrader

Ingredients/ Muffin
1 tbs plus 2 tsp lemon verbena tea leaves
1/3 cup butter
3/4 cup milk
1 egg
1/2 tsp vanilla extract
1 tsp vegetable oil
2 tbs lemon zest
2 1/2 tsp baking powder
1/2 tsp baking soda
1/4 tsp salt
1 cup of oats
1 cup of flour
1/2 cup sugar

Ingredients/Glaze (optional)
juice of 2 lemons
1/2 to 3/4 cup of powdered sugar

Preheat oven to 350 degrees.  Grease top of 12 muffin cavities and line with cupcake papers or butter and flour the inside of the cavities.

Sift together the baking powder, soda, salt and flour.  Then stir in the oats and 2 tsp of the tea leaves.  Set bowl aside. Beat together butter and sugar until creamy.  Add the egg, mixing until completely blended.Then beat the zest, vanilla extract and vegetable oil into the batter.

Pour the milk into the saucepan and place over medium high heat.  Add 1 tablespoon of tea leaves.  Let come to a simmer and cook for 3 minutes, stirring constantly.  Remove from heat and let cool until it comes to room temperature.  Then pour milk through a sieve, straining out all the tea leaves.

After this process, stir in 1/3 of the sifted dry ingredients into the batter.  Mix in half of the milk tea.  Continue with this process, ending with the final 1/3 of the sifted ingredients.

Using a spoon or an ice cream scoop, fill 12 muffin cavities evenly with the batter.  Place in oven and bake 18-23 minutes or until tester comes out clean.  After 2 minutes of cooling, transfer muffins to a rack.  Let cool completely.

To make glaze, fill bowl with the juice from one lemon only and then sift in the powdered sugar.  Stir until no dry streaks remain and all is blended.  Take a skewer and poke a 1/2 inch deep hole in the tops of the muffins.  Divide the glaze into two bowls.  Stir in the juice of the second lemon to one of the bowls of glaze.

With the thinner glaze (one with juice from 2nd lemon), brush over the tops of all the muffins.  Let soak into the muffins for about 30 minutes.  Then drizzle the thicker glaze over the top and let set for another 30 minutes.  Then they are ready to enjoy!

Monday, February 20, 2012

Citrus Tri Stars

Well I definitely broke the rules on this one.  I recently got a cookie press and the directions said "not recommended for refrigerated dough".   I sat there wondering why.  Now, I can understand that if you took too long with refrigerated dough, it would become difficult to work with.  However, most of the time when I use this type of dough, I form the dough on one cookie sheet and then place the bowl back in the fridge while the one pan was cooking. So after deliberating on that, I disregarded the warning and forged ahead.

My main thoughts about making the dough is that it had to be stiffer than drop cookie dough and had to bake up with some height, unlike cut out dough. In addition, the dough could not spread like leavened cookies, they had to maintain their shape when baked.  Add ins in the dough is possible, but the particles must be small enough to go through the press.  That narrowed it down to three things, cocoa nibs, poppy seeds and milk crumbs.

I tried some of the batter with cocoa nibs and some with poppy seeds. The poppy seeds were smaller so they distributed better in the dough than the cocoa nibs.  Taste wise, I liked both of them. As far as the milk crumbs (see recipe here), it was an after thought. These cookies taste better the next day, for the lemon flavor develops more with time. This recipe makes about 5 dozen.

Citrus Tri Stars
by flourtrader

Ingredients
1 tbs lemon zest
1 tsp lemon juice*
2 cups of flour
1/4 tsp salt
1/3 cup shortening
1 cup sugar
2 eggs
2 tbs poppy seeds


Sift together the flour and the salt and set aside.  In a separate bowl, beat together shortening, sugar, eggs, lemon zest and lemon juice.   The fold in sifted ingredients  Lastly, fold in poppy seeds until evenly distributed.  Cover dough and refrigerate for 8 hours or overnight.

After chilling the dough, preheat the oven to 350 degrees and grease two baking sheets.  Remove dough and fill cookie press according to instructions.  Cover remaining dough and place back in fridge.  Press cookie dough out onto greased cookie sheets according to manufacturers instructions.

Place cookie sheet in oven and bake for 9-12 minutes or until lightly golden on bottom and edges.  Remove and let cool for 1 minute and then transfer cookies to cooling rack.  Repeat process, greasing cookie sheets after baking each batch.

*02/26/12  a taste tester has stated that there is not enough zip of lemon flavor in this cookie, so feel free to add lemon extract in place of the juice for a stronger lemon flavor.


                                 **LAST YEAR:Brandy Alexander Pie**


Friday, February 10, 2012

Great Basin Muffins


I was up in the attic the other day and I saw a bag of scented pine cones that I had bought for Christmas.  They still smelled faintly of cinnamon.  Then I began to wonder about how much pine cones are used as decorations at Christmas instead of being harvested for the nuts.

I started looking into information on pine nuts and found out that they are very difficult to harvest.  In fact, the nuts are bad by the time the pine cone has fallen.  Like the pecans, this nut was also a staple in the diet of Native American Indians hundreds of years ago.  The tribes that harvested these were located between the Rockies and the Sierra Nevada, originally referred to as the Great Basin.

Apparently, the Indians were on to something.  The pine nut has 20 amino acids.  In the list of the acids, eight are essential building blocks of protein.

The cake part of these muffins are flavored with lemon and honey.  Also, included inside are honey roasted pine nuts.  The topping is a honey lemon sauce sprinkled with pine nuts.  The topping should  be used only at the time of serving.  Due to its honey content, it is sticky so if you are going to store the muffins, you definitely do not want to use the sauce.  This recipe makes 1 dozen muffins.

Great Basin Muffins
by flourtrader

Ingredients/Honey Roasted Nuts
3/4 cup pine nuts
2 tbs honey
1 1/2 tsp vanilla extract
2 1/4 tsp butter
pinch of salt

Preheat the oven to 325 degrees.  Line the bottom of a baking sheet with foil and spray with non stick spray.

Then place all ingredients, except for pine nuts, in a microwave bowl.  Microwave for 20 seconds.  Then stir and microwave for another 20 seconds.  By this time, the butter should be completely melted.  Stir until all ingredients are blended and liquid is smooth.  Then fold in the pine nuts, making sure they are completely coated.

Pour mixture onto foil and spread out so the nuts form an even layer.  Then place in oven to bake for about 5 minutes.  Remove pan and then stir the nuts.  Repeat this process 3 more times and remove from oven to let cool.  Once the nuts have cooled to room temperature, break them up so you have single separated nuts instead of clumps.  If you are having sticking issues, that is ok.  Once the nuts are broken up, cover and  place in freezer until ready to use.  This will keep them from clumping.

Ingredients/Muffins

3/4 cup of honey roasted pine nuts
1 cup of honey yogurt
2 eggs
1/3 cup butter, melted at room temperature
1 tbs lemon zest
1/4 cup plus 2 tbs lemon juice
1/2 cup sugar
3 tbs honey
2 cups flour
1/4 tsp salt
2 1/2 tsp baking powder

Preheat the oven to 400 degrees.  Prepare your muffin tin by using non stick spray on a paper towel and then coating the top edge of the cavities.  You can either line with paper baking cups or spray the inside of the cavities with the non stick spray.

Beat together the eggs and the yogurt. Then stir in add the zest, juice and honey.  Lastly, mix in the butter until all is smooth.

In another bowl, sift together the flour, baking powder and salt.  Mix in the sugar until evenly combined.  Form a well in the center and pour in the egg mixture.  Stir until no more dry streaks remain.  Then fold in the honey roasted pine nuts until they are evenly distributed throughout the batter.

Using an ice cream scoop or spoon, scoop batter into muffin cavities, filling 3/4 full. Place pan in oven and bake until tester comes out clean, about 12-15 minutes.  Remove and transfer muffins to rack to cool.

These are ready to serve as is or store for eating at a later time.  Should you opt to have the warm honey lemon sauce on top, the recipe is below.

Ingredients/Honey Lemon Sauce
1/4 cup honey
2 tbs lemon juice
1/4 tsp corn starch
3/4 cup plus 2 tbs powdered sugar
1/4 cup pine nuts (for sprinkling)

In a saucepan placed over medium high heat, add the honey and the lemon juice.  Let come to a boil and then turn down heat. Let simmer for about 3 minutes, stirring constantly.   Remove from heat and then stir in cornstarch.  Sift 1/4 of the powdered sugar into the mixture and stir until smooth.  Continue adding the sugar in increments and stirring until it is all mixed in. Place a spoonful of the sauce on top of the muffins and sprinkle a few pine nuts over the sauce.  Another option is to serve the sauce on the side for dipping pieces of the muffin into.  You can back off the powdered sugar content if you prefer a stronger honey/lemon flavor.
                **LAST YEAR: Ricotta Pancakes**

Friday, January 6, 2012

Baked Lemon Cake Puddings

I had bookmarked these several months ago, but the book somehow got put back on the shelf with the bookmark still in it.  I just came across it recently.  Now I am wondering,what else has a bookmark.  At least I came across it now, so I was happy to make these.

This recipe is a concoction which allows the cake part to float to the top and the custard part to float to the bottom.  While there was not a big distinction between the cake and pudding layer, I did find these to be tasty.  They were a nice change from the chocolatey cake I made earlier this week.

I love all things citrus-my favorite fruit drink is lemonade.  You will not see me drinking tea or soda if lemonade is around, regardless of the weather.  When I took of spoonful of this cross between a cake and a pudding, I was quite taken.  Fluffy in some areas and silky smooth in others, the texture was pleasing to the palate.  Also, the tart lemony flavor was pretty addicting, so it was very difficult not to eat the whole thing.  It had just the right amount of tartness, not mouth puckering but enough for you to notice the zing. 

I filled two 16 ounce ramekins to make mine.  The recipe below is for six 6 ounce custard cups or ramekins.  Also, you can use a 1 quart casserole dish.  The cooking time should be about 55-65 minutes for the casserole dish.

Baked Lemon Cake Puddings
adapted from Good Housekeeping Book of Desserts

Ingredients
3 tbs flour
3/4 cup sugar
1/4 tsp salt
1 cup milk
3 tbs melted butter
2 eggs, whites and yolks separated
2 medium sized lemons

Grease all the inside of the ramekins or custard cups.  Set aside.

Zest the lemons to make 1 tablespoon.  Then squeeze out 1/3 cup of lemon juice.

Fill a small bowl with the egg whites and salt.  Beat until soft peaks form and continue to beat, slowly adding 1/2 cup of sugar.  Beat at high speed until the mixture reaches the stiff peak stage.

Take out another bowl and beat egg yolks with the remaining 1/4 cup of sugar.  Then add all the other ingredients and beat until well blended.  Fold the egg white mixture into the batter with a whisk or spatula, folding until no white streaks remain.

Then boil about 6 or 7 cups of water in a saucepan.  While this is coming to a boil, preheat the oven to 350 degrees.

Evenly fill the custard cups with the batter and place in a 9X13 inch pan and place on oven rack.  Fill the pan with the boiling water so it comes halfway up the sides of the custard cups.  Slide rack with pan back into oven and bake until tops are golden and firm.  This should take about 40-45 minutes.  Remove and let custard cups cool on wire rack before serving.

Wednesday, July 20, 2011

Sunshine Grove Cookies

My thought of the groves brings me back to California when I was much younger.  We lived right across the street from a big fruit grove and behind it was a sloping hill.  One day, my mom told me a story about a woman that went out to get her mail. When she arrived at her mailbox, she heard a noise from the groves.  Surprised, she looked around.  Suddenly, a man came forth from the trees.

No strange thing, right?  Except this man was wearing only a sheet!  Startled, the woman quickly got her mail out of the box and ran back to her house, locking the door behind her.

Later that week, I was horseback riding along the space between the grove and the hill.  Remembering my mothers story, I gazed into the thick bunch of trees.  It was very shady and dark, except for a few feet of sunshine that covered the ground.

As my horse continued to walk, I spied a pair of army boots.  I instantly clicked for my horse to pick up speed and we fled the scene.  To this day, I am not sure if it was just boots someone had left there or a person was actually standing there.

Also, I often wonder if there was a gang of homeless people living in the groves.  After all, they have plenty of shade and fresh fruit to eat.  That story is how I came about giving these cookies their name.

Now for the recipe.  It is a recipe for lemon cookies. The texture is are crispy on the outside and chewy on the inside.  The chewiness is because they have a pocket of lemon curd in the center.  The flavor of the lemon is well balanced, not too tangy or sweet.  Also, I liked the appearance of this cookie. Some of the ones I have made have been very flat, but these have a good size to them. This recipe makes about 20 cookies.

Sunshine Grove Cookies
by flourtrader

Ingredients/ lemon filling
2 eggs
3 tbs lemon juice
1 tbs lemon zest
1/8 tsp lemon extract
2 tbs sugar
pinch of salt
2 tbs sweetened condensed milk

Ingredients/lemon cookies
1 egg
1/4 cup butter flavored shortening (room temp)
1/4 cup butter
1 1/2 tsp lemon extract
1/2 cup brown sugar
1/4 cup white sugar
1 1/4 cup plus 2 tbs flour
1 tsp baking powder
1/2 tsp salt

For the filling, line a baking sheet with wax paper and set aside.

Place the eggs in a saucepan and beat for 30 seconds. Add lemon juice, lemon extract, salt, zest and sugar.  Place pan over medium heat and cook mixture for about 4 minutes, stirring constantly.  The filling is done cooking when it reaches the consistency of pudding.

Remove pan from heat and pour mixture into a mesh strainer or sieve placed over a heat proof bowl. Stir and push mixture through the strainer. Scrape off any remaining filling on the bottom side of the mesh into the bowl. Discard the lemon zest, which should be the only thing left in the strainer.

Stir the sweetened condensed milk into the filling until smooth.  Cover and place bowl in fridge for about 1 hour to cool.  After an hour, remove filling from fridge.  Then scoop out 1/2 a teaspoon of filling and place on prepared baking sheet.  Continue this process, until no more filling remains.  You should have at least 20 or 24 lumps on the sheet.  Place the sheet in the freezer.

Then, you can start making the cookie batter. Melt the 1/4 cup of butter in a saucepan or microwave.  Pour it in a small bowl and add the shortening.  Stir the mixture until both ingredients are blended.  It should be the consistency of a paste.  If some tiny lumps remain in the batter, it is ok.

In a separate bowl, whisk together both sugars, lemon extract and salt.  Add the butter mixture and beat until smooth.  Then beat in the egg and set aside.

Sift together the baking powder and flour in another bowl.  Fold 1/3 of the flour mixture into the batter until no flour streaks remain.  Continue with this process until all the flour is blended into the batter.

Then cover the bowl with plastic wrap and place cookie dough in the fridge to cool for about 1 1/2 hours.

In the last 15 minutes of the chilling time, preheat the oven to 375 degrees and line 2 baking sheets with parchment paper.

Using a scoop or tablespoon, drop mounds of dough about 1 1/2 inch apart onto baking sheet.  After sheet is filled with mounds, cover remaining dough and place back in fridge.  Then remove the frozen pan of filling from the freezer.

Take a mound of cookie dough and push a piece of frozen filling into the center. Then roll it in your hands to form a ball, covering the filling as best you can.  Place back on baking sheet.  Continue with this process until all mounds are filled.  Put frozen sheet of remaining filling back into freezer.

Bake cookies for about 10-12 minutes.  Cookies are done when the bottoms are a golden brown and the tops of the cookies do not get brown, so check cookies after 10 minutes.  Remove cookies and let cool on sheet for 5 minutes, then transfer to rack to finish cooling.

Repeat the process of forming and baking the cookies to use up the rest of the batter and filling.

Due to the filling, these cookies are best stored in the fridge.

Friday, June 24, 2011

Sweet Lemon Nut Bread

Well I have finally cleaned up the floor after the tape and bedding was done in our storage building.  To be honest, I would have rather had my fingernails pulled out.  Cleaning the floor is no big deal, but having to use a putty knife to scrape all that chalky mess off the floor is tedious.  I know that my arms will be sore tommorrow.

Anyhow, now that the worst part of the cleaning is over, I decided to treat myself with this sweet bread.  This recipe uses frozen lemonade to give it the bread that extra lemony flavor. The bread itself is studded with chopped walnuts.  In addition, the top has a glaze with fresh lemon juice.

Sweet Lemon Nut Bread
by flourtrader

Ingredients
2 tbs plus 2 tsp sour cream
1/4 cup plus 2 tbs corn or vegetable oil
1/4 cup frozen lemonade
1 cup flour
2 eggs
3/4 tsp baking powder
1/4 tsp salt
1 cup sugar
1/4 plus 2 tbs chopped walnuts
4 1/2 tsp lemon zest
1/4 cup lemon juice (for glaze)
2 tbs sugar (for glaze)

Preheat the oven to 350 degrees.  Prepare a 8X4X2 1/2 inch loaf pan by buttering all of the inside and dusting with flour.

In one bowl, add sugar, oil, eggs and lemon zest. Beat with an electric mixer about 2 minutes. Then add nuts and stir with wooden spoon. Set aside.  Take out another bowl and sift together flour, sugar, salt and baking powder.  Add 1/2 of the dry ingredients, 1 tbs and 1 tsp of sour cream and 2 tbs of the frozen lemonade.  Mix with a wooden spoon until blended then add the rest of the dry ingredients,sour cream and frozen lemonade.  Stir batter until all is evenly distributed.

Pour batter into pan and place in oven.  Baking until tester comes out clean, which should be about 50-60 minutes.  My pan is dark, so if yours is light it may take longer.

During the baking time, prepare the glaze by stirring juice and sugar together.  Glaze is ready when the sugar is dissolved.

One done, remove bread from the oven and run a knife along the edges.  Then brush glaze all over bread.  Some of the glaze will drip down between the cake and pan.  Cool bread in pan completely and then turn out on wire rack.  Cut into slices and serve.