Foodbuzz
Showing posts with label raspberry. Show all posts

Sunday, June 16, 2013

Raspberry Lemon Muffins

Well since the heat of the summer has hit, I have been on a berry kick lately.  Blackberries and raspberries have been populating the fridge for the last few months.  Luckily I had not eaten too many this time, so I did have some to bake with. 

I like the fact that muffins are so versatile.  I made them without a topping but a slather of cream cheese or honey butter would be good for those who want more to their muffin.  Also, being plain makes them appealing for those that are only craving a little sweetness to have with their morning coffee.  Eaten slightly warm or at room temperature, getting a big bite of a raspberry surrounded by lemony sweet cake hits the spot.

I have included the recipe for the limoncello glaze. The addition of that would make for a stronger lemony taste as well as add more sweetness.  Without it, the lemon flavor is very subtle in the muffins.  This recipe makes  about 1 1/2 dz.

Raspberry Lemon Muffins
adapted from Moufllet

Ingredients/Muffins
1 cup fresh raspberries
1 tbs lemon zest
1 cup buttermilk
1/4 cup melted butter
2 tbs oil ( vegetable or canola
1 tsp vanilla extract
2 eggs
1/4 cup sugar
1/2 tsp salt
1 tsp baking powder
2 cups flour
1/2 tsp baking soda

Ingredients/Limoncello Glaze
1/2 tsp melted butter
3 tbs limoncello
1/2 tsp vanilla
1 drop yellow food coloring (optional)
2 cups powdered sugar

For the muffins, prepare the pans by greasing the top edges of 18 cavities and line with paper liners.  Preheat the oven to 350 degrees.

In a small bowl, whisk together the eggs until frothy. Stir in the melted butter, buttermilk, zest, oil and vanilla extract.  Set aside.  In another bowl, sift together the salt, baking powder, baking soda and flour.  Then mix in the sugar.

Make a well in the dry ingredients and pour in the egg batter.  With a wooden spoon, mix the dry with the wet but only 10 strokes.  Over mixing will ruin the texture of these.  Fold the raspberries in with only 3 strokes.

Evenly fill the cavities of the pans with the batter.  Place in oven and bake for about 15 minutes and check with a tester to see if it comes out clean of any batter. Make sure it is not inserted into a raspberry when testing. Tops should spring back when muffins are done.  Note that the 15 minutes is a starting place and that the muffins can take up to 20 minutes.  The difference is due to the type of pan ( dark non stick, silicone and shiny metal).  

Let the muffins cool in pans for 3 minutes and then transfer to a rack to completely cool.  Glaze when completely cool.

For the glaze, start with mixing the melted butter with 1 tbs of limoncello.  Then sift in 1/4 cup of powdered sugar and mix until no dry streaks remain.  Continue with the process of sifting and stirring in the powdered sugar until all is mixed in.  Add more limoncello in small increments until the glaze has a syrupy consistency. Lastly, stir in the food coloring (optional) and the vanilla extract. 

Then dip the top of the cooled muffins into the glaze, being careful to immerse so that there is still 1/2 to 1/4 inch top edge border.  Let the extra drip off and set upright on the rack.  Glaze will need about 1 hour to set before serving.  The glaze can be stored up to 1 day prior to use.
                                      **LAST YEAR:Persephone's Winter Cake**

Tuesday, January 1, 2013

Swedish Raspberry Almond Bars


With all the heavy food of the holidays gone, I am more in the mood for something lighter as well as a hot beverage.  Kind of ready for some tea time with a light snack.  I mainly wanted a bar recipe but something more of a shortbread fruit type of thing rather than a thick brownie.
I came across this easy recipe that was just perfect for my craving.  Shortbread is topped with raspberry jam.  Then a fluffy meringue batter that holds almonds and coconut goes on top with a final sprinkling of almond slices.

Swedish Raspberry Almond Bars
adapted from Taste of Home Best Loved Recipes
Ingredients
1 cup sliced almonds (divided into 1/2 cups)
1/2 cup sweetened coconut
3/4 cup seedless jam
3 egg whites
6 tbs of sugar
3/4 cup confectioners sugar
3/4 cup butter/room temperature
1 1/2 cups flour

Preheat the oven to 350 degrees and grease the interior of a 9X13 size baking pan.

Beat together the butter and the confectioners sugar for about one minute on medium speed, scraping down the bowl at the halfway point.  The mixture should become very light and fluffy. Fold in the flour until the mixture is crumbly and all the flour is blended.

Pour it into the prepared pan and press evenly into a layer on the bottom of the pan.  Bake crust for about 18-20 minutes.  The crust should be a golden brown when done. Remove and place on rack.

Using a small offset spatula, smooth the jam evenly over the warm crust.  Set aside.

While the crust is cooling, place the egg whites into the bowl of a stand mixer and beat until soft peaks form.  Continue to beat and increase the speed of the mixer to high.  Gradually add one tablespoon of regular sugar and beat for 1 minute.  Follow this for each tablespoon addition until all 6 tablespoons are incorporated.  The beating process should end when the whites can hold stiff peaks.

Sprinkle the coconut into the batter, making sure there are no big lumps, and stir.  Then blend in 1/2 cup of the sliced almonds.  Empty bowl of mixture onto the jam layer of the bars.  Spread evenly, covering all sides and corners of jam. Then sprinkle the last 1/2 cup of almonds on top.

Place in oven and bake until the meringue layer becomes a golden brown, which is about 18-22 minutes.  Let cool on a rack completely before cutting and serving.

Tips and Notes:
1. I used canned raspberry pastry filling which I had to de-seed and warm up to spread.  I am sure the seedless jam would have been easier.
2. Parchment is not required, for I found that these bars came out of the pan easily with just greasing.
3. Make sure that you are not too heavy handed when smoothing the meringue layer, you want distinct layers, not a mixture of the meringue and raspberry.
4. None of the components are strong in this recipe.  I got good reviews even from one person that did not like coconut and another that had a dislike for meringue.
                           **LAST YEAR: Nut Drenched Chocolate Cake***

Friday, May 18, 2012

Raspberry Tea and Chambord Brownies

Well today would have been one of my own creations but I have had to hold off until next week.  Apparently the arrival my ordered ingredients is coming via horseback, but I am told also that it has to be made first!  Anyhow, since I have things planned out for several weeks, it did not really put me in a bind.

These particular brownies are really rich.  One small piece does go a long way.  The brownies, since they have no baking soda or powder are very dense, but the texture is not chewy. The decadent dark chocolate is paired up with Chambord (raspberry liqueur) and raspberry tea.  The recipe states you can use whatever fruit tea and matching liqueur flavor you want, but I chose this one. I particularly favor raspberry and dark chocolate, however I am sure there are lots more of delicious combinations that can be done.

These brownies will be packed up for donation and quickly transported in a cooler. I have deemed these to be something for a special occasions due to their richness. Valentine's does come to mind due to the flavor combo. The recipe states that these are to be cut into 36 squares, so that means 1X1 inch.  Even though small, the rich depth of flavor does linger.

 Raspberry Tea and Chambord Brownies
adapted from Glorious Liqueurs

Ingredients
4 oz of bittersweet chocolate (finely chopped)
2 oz of unsweetened chocolate
1/2 cup or 1 stick of butter
1/2 cup heavy cream
2 eggs
3/4 cup of water
3 tbs raspberry liquor (Chambord)
1/4 cup raspberry preserves
3/4 sugar
1/2 cup flour
1/4 tsp salt
4 tsp raspberry tea leaves

Prepare a 8 inch square baking pan by buttering the inside and lining the bottom with parchment paper and also buttering the face up side of the parchment.  Set aside.  Preheat the oven to 350 degrees.

Take the 3/4 cup of water and put in a heat proof mug.  Cover and place in microwave and heat until boiling.  Mine took about 2 minutes. Then stir in 2 tsp of the tea leaves and let steep for 5 minutes.  Place a fine mesh strainer or coffee filter over the top of another heat proof mug. Pour the tea into the strainer or filter.  After the liquid has gone through, discard filter or rinse out and clean strainer.

Place a small saucepan over low heat and fill with unsweetened chocolate and butter.  Stir occasionally until all is melted and blended.  Remove from heat and let cool for 10 minutes.

While this is cooling, sift together the flour and the salt.  Set aside.  Then fill a medium size mixing bowl with the eggs and beat until frothy.  Add the sugar and beat again until mixture thickens slightly, about 2 minutes.

Add to the egg mixture the cooled chocolate, 2 tbs of the strained tea and 1 tbs of the raspberry liqueur.  Beat until all is blended, about 1 minute.  Then, using a wooden spoon, fold in the sifted ingredients until no dry streaks remain.  Pour mixture into cake pan.

Bake for 25-30 minutes or until done.  Brownies will be done when they pull slightly from the edge of the pan and batter is firm. Remove pan and place on rack to cool for 10 minutes. After 10 minutes invert brownies and remove from pan.  Peel off parchment and then carefully turn back over and let rest on rack.

During the cooling time, mix together one tablespoon of the strained tea and 2 tablespoons of the raspberry liqueur.   After the 10 minutes cooling time of the brownies has passed, brush this mixture  over the top until all has been completely used up.

Place a small saucepan over medium heat and fill with the preserves.  Stir and cook until it has melted into a liquid.  Place a mesh strainer over a heat proof bowl and pour the melted preserves into the strainer.  After straining, brush melted preserves over top of the brownie.

Clean both the sauce pan and the strainer, for you need them again for the chocolate topping.  Fill the saucepan with heavy cream and let come to a boil.  Remove from and mix in the remaining 2 tsp of raspberry tea leaves.  Let sit 5 minutes.  Then pour into a strainer placed over the bowl of chopped chocolate.  Let sit one minute.  Stir until all the chocolate is melted and smooth.

Spread the chocolate ganache over the brownies.  Then place in fridge for about 20 minutes partially and then mark or score your cutting lines with a knife. Then refrigerate another 10 minutes and then remove  Let come to room temperature, cut and serve.  To store, lightly cover with plastic wrap and refrigerate.

Tips and notes:
1. The tea I used worked out to being 1 tsp of leaves per bag.
2. The ganache will crack if you cut when cold, so it is best to wait for room temperature when cutting.
3. The paper coffee filter only worked with me on the water/tea leaves, the cream/tea leaves and preserves were too heavy to strain through paper.
2. Act fast on brushing the melted preserves, mine sat up back to a thick state in no time.
                        **LAST YEAR: Coconut Banana Coffeecake** 

Monday, April 9, 2012

Berry Meringue Slices


Well I hope everyone enjoyed their weekend.  At our place it was great weather and my husband decided to take some time to plant some herbs and vegetables.  We have an issue with a lot of winds here, so I am not sure how his poly house will withstand it-but at least he has given it a go.

This particular dessert is a part of Austrian cuisine.  This is actually one of many desserts that falls under the name of a Schnitten.  It is basically a cake layered with berries and meringue.  There are  a lot of variations and this particular recipe hails from a Cafe in Vienna.

The original recipe is with blueberries but there was a variation with raspberries listed, so I decided to go with the raspberries.

As far as the taste, I really did like the combo.  The cake part is almost like the same cake as a traditional pineapple upside down cake, except it had a subtle lemon flavor.  Then you have the burst of fruit from the fresh whole berries all topped with a fluffy, sweet meringue.  This dessert was a hit and it is definitely worth making more than once.  Below is the recipe with some helpful tips at the end.

Berry Meringue Slices
adapted from Kaffeehaus Cookbook

Ingredients/Cake
1 3/4 sticks or 14 tbs of butter
1 cup sugar
4 eggs
1 tsp vanilla extract
grated zest of  1/2 lemon
2 tbs fresh lemon juice
1 1/2 cups of flour
1 1/2 tsp baking powder
pinch of salt

Ingredients/Topping
2 pints of fresh blueberries or 4 cups of raspberries or blackberries or currants (I used 3 pints)
confectioners sugar: 3 tbs if using blueberries
                                 1/4 cup if using blackberries or raspberries
                                 1/2 cup if using currants
1 cup plus 2 tbs granulated sugar
6 large egg whites, room temperature

Prepare a 9X13 cake pan by greasing the interior and lightly dusting with flour.  This dessert will be plated straight from the pieces cut from the pan. Preheat the oven to 350 degrees.

In a medium size bowl sift together the baking powder, flour and salt.  Then take a separate bowl and fill with butter and sugar.  Cream butter and sugar together until fluffy, which should take about 3 minutes.  Beat in one egg until the batter is smooth, about 30 seconds each.  Continue with the same process until all the eggs are beaten into the batter.  Then add the vanilla extract and beat again until blended.

Beat 1/2 the sifted ingredients into the batter.  Once all is mixed in, beat in the remaining sifted ingredients.  Then stir in the zest and juice, making sure it is distributed through out the batter.

Spoon the batter into the pan and smooth the top.  Then place in the oven and bake for about 25 minutes.  Cake will be done when the center is touched and lightly springs back. Remove pan and place on cooling rack.

Increase the oven temperature to 450 degrees for the topping.  Beat the egg whites at high speed until it reaches a soft peak consistency.  Then continue to beat and gradually add the granulated sugar.  Once all the sugar is blended, continue to beat the egg whites until they become very stiff.  You want the meringue to be shiny in appearance as well.

Then toss the fruit with the confectioners sugar. Pour or place the fruit on top of the cake.  Place scoops of meringue over the berries and smooth it evenly to cover all of the cake and berries.

Place cake in oven again and let cook 3-5 minutes.  You want the meringue to have some golden cooked streaks on the top.  Remove and place pan on a wire rack to cool completely.

To serve, cut the cake using a hot water dipped knife and then lift serving out with cake server or spatula. You can prepare this cake a day ahead, refrigerating it.  However, let it come to room temperature before serving.

Helpful hints and tips:

-line the bottom of the pan with parchment, buttering the surface and then dusting with flour, it will make for a cleaner release when plating.
-if using small berries, spoon over top.  For larger, place by hand in rows.
-fold in the flour instead of beating for lighter texture. Beating batter or dough after adding flour can toughen the texture of the cake
- you can use a knife or the back of the spoon to get a textured look on the top of the meringue.  When cooking, the uppermost portions will brown first, leaving the ones below white.
-Due to the varying size of blackberries and raspberries, place the smaller berries to the outside edge and the larger towards the inside  The smaller ones will hold easier than the larger ones..
                                **LAST YEAR: Brioche Bread Loaves***

Thursday, February 16, 2012

Almond Slices

I have been waiting on the arrival of a rectangle tart pan in order to make this.  Luckily it did arrive in time for this post, otherwise I would have gone to plan B.  Now plan B is for another time.

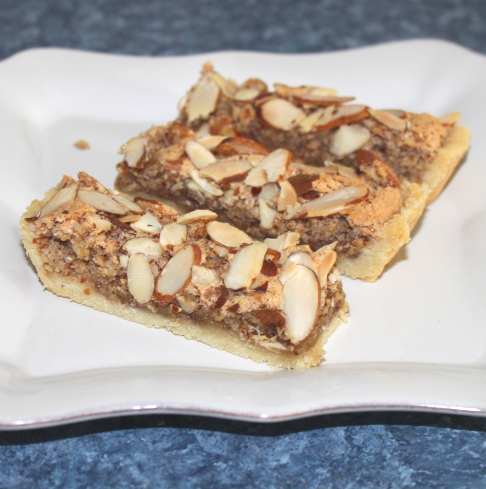
This tart has a buttery pastry base that is spread with raspberry jam and then filled with a almond egg white mixture and topped with sliced almonds.  The picture in the book looks quite different and I think it is because they used skinned almonds.  Skinned almonds does give the filling more of a honey color and there is distinction between the almond and the jam in appearance.  However, I just had regular almonds on hand, but I will be making the change next go around on this recipe.

Once you get the pastry dough in place, the rest of the recipe comes together quite quickly.  I do like the flavor of the almonds and this was an unusual treat.  The touch of raspberry amidst all that almondy goodness is a perfect match.  The almond filling, which the author calls cake, does not have the texture of cake, considering the ingredients but it is hard to explain.  However unexplainable the texture is, there is no issue explaining that I think it tastes delicious!

If you have a weakness for almonds, then I am sure you will enjoy this recipe.

Tomorrow I am out of town for some appointments and shopping at the specialty grocers to find some inspiration-so wish me luck!

Almond Slices
adapted from Perfect Afternoon Tea Recipe Book

Ingredients
8 oz of sweet shortcrust pastry
4 egg whites
a few drops of almond extract, I used 1/8 tsp
1 1/2 cups ground almonds
1 cup sugar
flour for dusting
powdered sugar for dusting (optional)
1/4 cup sliced almonds
1/4 cup raspberry jam

Grease an 11 X 7 inch shallow or tart pan.  Preheat the oven to 350 degrees.

Lightly dust a flat surface with flour and roll out the pastry into a rectangle, about 14 x 10.  Lower the pastry into the pan.  Then press into the sides and bottom of the pan.  Cut off the excess pastry hanging over the top of the pan so all sides are even. 

Spread the jam over the bottom of the pastry.  I warmed the jam in the microwave for about 15 seconds to make it easier to spread.

In a small bowl, beat the egg whites until they reach a stiff peak stage.  Then fold in the almond extract, ground almonds and sugar.  Pour mixture into pan and smooth the top, making sure that filling is even.  Then sprinkle with the flaked almonds.

Place pan in oven and bake until top is firm and crisp and pastry is golden.  This should take about 30-35 minutes.  Let cool completely in pan.  Once cool, prior to slicing, you can dust with powdered sugar.
                      **LAST YEAR: PBC Doodle Cookies**

Monday, October 3, 2011

Dirty Flamingo Freeze

This does look like ice cream.  However, since it has such a zing of tart raspberries in its flavor and does not have a lot of dairy or egg, I hesitated to call it ice cream or custard.  Now, I have never tasted ice cream made with a berry puree, so maybe the tartness is acceptable and still labeled ice cream. To me this it is more like a frozen smoothie since the fruit stands out so much in the flavor.  It does have the texture of ice cream and is not icy.

The raspberry flavor is amped up with Chambord (black raspberry liqueur). When tasting this you get the smooth texture of the raspberry and the crunch of deep dark chocolate bits.  The flavors of tart and bitter sweet go very well together. This recipe makes 1 quart.

Fresh raspberries are recommended as well as a quality dark chocolate (72% or more cocoa). 

Dirty Flamingo Freeze 
by flourtrader

Ingredients
1 lb raspberries
1/2 cup Chambord or raspberry liqueur
1 cup sugar
1 cup heavy cream
1/2 cup sour cream
1/8 tsp lemon juice
1/4 tsp vanilla extract
3.5 - 4 oz chopped bitter sweet chocolate

In a medium sauce pan add raspberries and liqueur.  Cook over medium heat, stirring occasionally, for about 10 minutes.  Berries should be very soft at this point.  Remove from heat and stir in sugar. Set aside to cool to room temperature.

Once the mixture has cooled, add the heavy cream and puree in a food processor.  Then push mixture through a sieve to get all the seeds out.  This is a long process, but well worth it.

Pour the smooth raspberry mixture back into a clean food processor bowl. Add the sour cream, vanilla extract and the lemon juice.  Blend ingredients in processor for about 15-20 seconds. our mixture into a bowl and place in refrigerator for 6 hours.

After 6 hours, place in ice cream machine and follow manufacturers instructions. 5 minutes prior to the end of the churning time mix in the chocolate pieces.  Once the machine is done, you can serve at that time or freeze for additional hours until the preferred consistency is achieved.
                             **LAST YEAR: NY Cowgirl Cookies**