Foodbuzz

Sunday, September 23, 2018

Carrot Cupcakes


After creating these cupcakes, I realized the importance of finishing touches on a baked good. These special touches can be just to enhance appearance of items, like using sprinkles. However, in addition to the visual enhancement, a finishing touch should also add more flavor to the dessert.

These cupcakes have walnuts on top of the icing. You may think it is no big deal, but let me clue you in further. The walnuts are chopped and roasted in the oven. Then, while still warm, they are coated in melted butter with a light sprinkling of salt. This creates a wonderful contrast to the fluffy, sweet cream cheese icing. I would not even think of omitting the nuts on top.

Now that I have your taste buds awake concerning the icing and nut topping, let's get into the cake component. The cake contains oil instead of butter, which guarantees they will be moist in texture. Also, the myriad of spices in the batter with the grated carrots equates to the delicious standard that we all crave when it comes to carrot cake. This recipe makes about 2 dozen cupcakes and about 4 cups or more of icing (feel free to cut back on this).

Carrot Cupcakes
adapted from Robicelli's

Ingredients/Cake
1 1/4 cups canola or grapeseed oil
1 tsp vanilla extract
4 eggs, lightly beaten
1/2 tsp ginger
1/2 tsp nutmeg
3/4 tsp cinnamon
1 tsp salt
1 tsp baking powder
1 tsp baking soda
2 1/4 cups flour
1 cup granulated sugar
1 cup packed light brown sugar
2 cups packed shredded/grated carrots
1/2 cup chopped, roasted walnuts
1/2 cup raisins (optional)

Ingredients/Cream Cheese Buttercream
1 batch French buttercream (recipe below) or 1 batch American buttercream but without marscapone cheese ingredient (see this link)
1 tsp vanilla extract
8 oz package cream cheese (cut into cubes)
1/4 tsp guar gum (optional)

Ingredients/French Buttercream
5 egg yolks
1 whole egg
1 lb to 1 1/2 lbs of butter
1 cup water
2 tbs corn syrup
1/8 tsp xanthan gum

Ingredients/Roasted Walnuts
1 1/2 tsp salt
1 cup coarsely chopped walnuts
1 tbs butter

Start by setting up a stand mixer with a paddle attachment. Grease the top edge of each cavity of a cupcake pan. There should be 2 pans prepared with 12 cavities each. Line the cavities with paper liners. Preheat the oven to 350 degrees.

Place a sieve over a large bowl. Fill with flour, nutmeg, salt, cinnamon, ginger, baking soda and baking powder. Sift the ingredients together and set aside.

Fill the bowl of the stand mixer with both sugars and the grated/shredded carrots. Mix on medium low for about 30 seconds and scrape down the sides of the bowl. Then mix for an additional 30 seconds. Continue to run the mixer on the same speed and pour in the vanilla extract and oil. Once combined, remove the bowl from the stand and use a spatula and scrape down the sides and mix, making sure all is blended.

Add the sifted ingredients to the sugar/carrot batter and mix, using a wooden spoon until everything is fully incorporated. Add the eggs and mix again until blended. Lastly, fold in the walnuts and raisins (if using).

Using a scoop, fill each of the paper lined cavities with the batter. They should only be 3/4 of the way full. Place each pan in the oven (on the same or different racks-making sure they are spaced so each pan is to the left or right so they get enough heat). Bake for 10 minutes and then rotate the pans from front to back and left to right. Let bake an additional 10 minutes and check with a tester. When done, the tester will be clean and cupcakes should spring back when lightly touched.

Remove from oven and let rest in pans about 2-3 minutes. Keep the oven on. Then transfer to a rack to completely cool.

To roast the walnuts, line a pan with foil and add the 1 cup of chopped nuts. Spread out evenly onto the pan and place in oven. Roast for about 7-10 minutes. Walnuts will release an aroma once done. Once roasted, make a foil pouch with the foil that you lined the pan with, enclosing all of the nuts. Open up a small hole on top and add the salt. Close up and shake. Open the top again and pour in the melted butter. Close and shake again then set aside.

If you are making the French buttercream, place a saucepan on the stove. Fill with the water, corn syrup, sugar and cream of tartar- you do not need to mix together. Turn the heat up to high and let cook. Once it becomes a liquid, place a candy thermometer in the pan. The mixture will cook up to a boil, but do not stir. It will be ready to use once it reaches a temperature of 235 degrees.

As the liquid cooks, fill the bowl of a stand mixer (fitted with a whisk attachment) with the egg and egg yolks. Turn the mixer to high. This process will change the eggs to a light yellow batter that falls of the whisk in silky ribbons.

While the sugar is cooking and the eggs are being beaten, slice the butter into thin slivers. Take a few moments to still monitor the sugar mixture for correct temperature. Once the sugar reaches the desired temperature, remove the saucepan from the stove. Turn the mixer to medium speed and sprinkle the xanthan gum into the silky egg mixture. Continue to run the mixer and lift the hot saucepan and place the lip or top edge against the edge of the bowl of the stand mixer. Slowly stream in the hot sugar mixture. Keep a steady stream going until the saucepan is completely empty.

Switch the speed of the mixer to high and beat until the outside of mixing bowl is cool to the touch. Once correct temperature is achieved, turn the mixer off and take off whisk and fit with beater blade. Switch on the mixer again and set at high speed. Steadily add butter slices to the batter as the mixer is running. After all the butter is blended, reduce speed to medium high and beat for an additional 20 seconds.

Now you will use this batch (or the American Buttercream) to create the cream cheese frosting. Add the vanilla extract and the cubes of cream cheese to the buttercream. Beat until cream cheese is fully incorporated into batter. Pipe frosting onto batter and sprinkle with walnut pieces.

Tips and notes:
1. Buttercream requires refrigeration and cupcakes are best not refrigerated, so I frosted the cupcakes right before serving.

2. If you have chosen the French buttercream, be aware that it is the most unstable of the 2 types of frosting. This is why the recipe contains stabilizers such as guar gum and xanthan gum.

3. The amount of butter in the French buttercream frosting is a personal preference. I only used 1 lb and it still came out delicious with the correct consistency.

4. When making the French buttercream, there is a risk of the buttercream breaking when mixing with the cream cheese. In order to prevent this, make sure your cream cheese is ice cold and solid-not liquidy. Guar gum is the remedy if it breaks, but it is used in such a small quantity, some of us do not keep it on hand.

5. The xanthan gum is also a binding agent, it is more important than the guar gum. It helps bind eggs with water- which is essential to a good buttercream.

6. If the butter is all sliced before the egg mixture has cooled, refrigerate until ready to use.

7. If you want to buy shredded carrots instead of doing the shredding, be aware that the shredded carrots at the grocer have lost a lot of moisture. You can remedy this by soaking them overnight in a bowl of water. Drain before using.
                                   **LAST YEAR:Almond Frangipane Cookies** 

Sunday, September 16, 2018

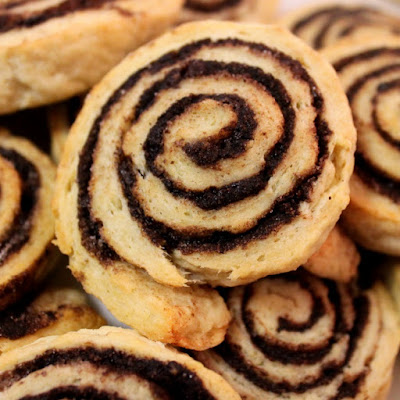
Cocoa Snails


The best independent coffeehouses can be found in Europe. Some of the more elite date back to the 1800's and the atmosphere is nothing short of amazing. Going out for a simple cup of coffee turns into an experience that reflects history and elegance. As you walk inside, you will behold red velvet, gold leaf and milk white marble. You can stay on that floor or go one floor up.

Your stay will not just include coffee. To heighten the whole experience, there are delicious pastries that reflect the unique skills of the famous pastry chefs of Paris or Hungary.

I have yet to get to Europe, but visiting some of these coffeehouses are on my bucket list. As you can tell, I have read up on the subject. With that in mind, I bring you this recipe that is a recognized favorite in Budapest, kakaos csiga (cocoa snails).

Do not let the picture fool you, these are nothing like cinnamon rolls. The pastries are a cross between yeast dough and puff pastry. The rolls have a crisp outer edge and a soft interior, unlike yeast rolls. These snails have a deep chocolate flavor and do not contain a lot of sugar-typical of most European recipes. Each round is small, ranging from 2 1/2 to 3 inches in diameter, making them look more like a cookie than a pastry. The dough is formed by using the laminated dough process of folding and rolling to create layers, making approximately 2 1/2 dozen snails.

Cocoa Snails
adapted from zserbo.com

Ingredients/Dough
2 tbs sugar
1 egg
1 cup milk
1 cup or 2 sticks butter (or more depending on roll out)
4 cups plus 2 tbs flour
1/4 tsp salt
2 1/2 tsp dry yeast

Ingredients/Filling
4 heaping tbs dutch processed cocoa
7 heaping tbs of sugar
1/4 cup butter

To make the dough, you should start with the butter. The butter, if in the form of sticks, should be sliced vertically and placed in a bowl. Add the 2 tbs of flour and use a pastry cutter to blend the butter with the flour until no more dry streaks remain. Place the lump of butter in between 2 pieces of parchment paper and roll out to a rectangle, approximately 16 x 10 inches. This rectangle is to cover 2/3 of the rolled dough surface. While you prepare the dough, place the butter pad in the refrigerator.

While the butter is chilling, prepare the dough. Heat the milk in the microwave on 15 second intervals, mixing and checking the temperature after each session. Once it registers between 105 to 115 degrees, sprinkle in a pinch of sugar and the yeast. Stir to blend and then set aside for the yeast to react. Once the surface of the mixture becomes foamy, it is ready to incorporate into the flour.

Fill a large bowl with the 4 cups of flour, egg, 2 tbs of sugar, salt and activated yeast. Combine by using a wooden spoon. Once a mass has formed, place on a flat surface dusted with flour. Knead until smooth and elastic. If the dough seems too dry, knead in more milk (one teaspoon at a time) until the proper dough consistency is achieved.

Form the dough into a rectangle, rolling out to approximately 21-24 inches in length by 16-18 inches in width. The longest part of the dough should face towards you, parallel with the length of the counter top. Remove the butter pad from the refrigerator and peel off one layer of the parchment paper. This butter pad is to cover 2/3 of the surface of the dough. Flip the butter rectangle on top of the right side of the dough, with the remaining parchment paper facing up and butter down. Slowly peel the parchment paper off of the butter pad. This should result in 1/3 of the left side of the dough without a buttery surface and the remaining should be covered in butter.

If you have thin places and some does not peel off, take another stick of butter and cut thin vertical slices. Use these slices to spread on dough so the 2/3 section on the right is completely covered. Then fold the left section of dough (the section with no butter) towards the center, covering 1/3 of the buttered section. Then fold the last 1/3 of the buttered section (on the right) over the top of the other, forming a 3 layer stack of dough. It should measure 7-8 inches wide (this side parallel with the counter top) and 16-18 inches in height.

Turn the dough mass 90 degrees. Roll out again to the original size (21-24 by 16-18 inches), placing it lengthwise, parallel with the counter top. Now each side is to be folded in to meet each other. This is called the book method. Then the dough is folded over again at the seam where the two sides meet. Cover in plastic wrap and place on baking sheet and refrigerate for 30 minutes.

After the 30 minutes of chill time, follow the instructions on the rolling and folding for the 1/3 sections and then refrigerate again for 30 minutes. Then take out and roll and fold, using the second, or book, method. Wrap and chill again. Repeat this rolling and folding process a second time for each method. Once the last fold is made, do not refrigerate. Instead let the dough rest for 30 minutes at room temperature.

During the rest period, preheat the oven to 390 degrees. Line 2 baking sheets with parchment paper and set aside.

For the filling, melt the butter in the microwave and take out a pastry brush. Fill a small bowl with the cocoa and sugar and whisk together. Set aside.

After the dough has rested, roll out to a rectangle (same size as originally stated). Dough should be about 1/4 of an inch thick and the length should be parallel to the counter edge. Brush the surface with the melted butter and then evenly sprinkle the cocoa/sugar blend on top. Roll up the dough tightly, forming a round log with swirls of filling, starting with the longest length. Slice the log into 1/2 inch rounds.

Place the rounds on the prepared baking sheets, about an inch apart. Bake in the oven until slightly golden, about 13-15 minutes. Remove and let rest on baking sheet for 3 minutes then transfer to rack to completely cool.

Tips and Notes:
1. Whenever you are making laminated dough, the temperature is crucial. The dough and the butter should have the same pliability. Too much heat in the kitchen will cause the butter to start to melt and if too cold, the butter will crack. During the process you may need to refrigerate or leave at room temperature if you experience any of these issues.

2. If you have butter seeping out through the dough when rolled, use a little flour to patch the area.

3. After the last fold of the dough, dust off the excess flour before rolling into a log.

4. Should you want an even fold of dough, cut the edges to form a straight, sharp edge.

5. Insuring that the butter pad is an even rectangle is the most difficult part. If it is not, some of your rolls will be drier than others and not puff as much. They will still taste good, but will not be a perfect example.
                                  **LAST YEAR:Apricot Sweet Rolls** 

Sunday, September 9, 2018

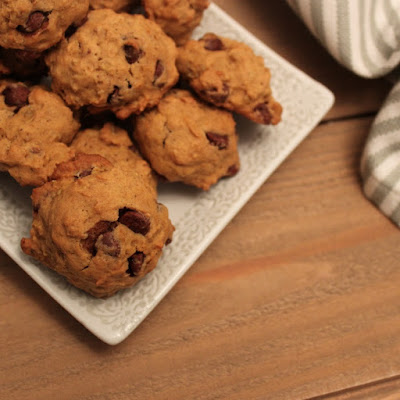
Pumpkin Chocolate Chip Cookies


To start the fall season, I have kicked it off with these pumpkin chocolate chip cookies. My first dilemma was that I knew the use of pumpkin would produce a cake-like cookie and that was not exactly the texture I was looking for. The cookies needed to have a little bit more substance than that.

This particular recipe amps up the structure of the cookies by using oats and chocolate chips. Even though the main texture is cake like, the oats support a little bit of chewiness. Also, since the chocolate chips remained unchanged in structure, they support a slight crunch.

Regarding the flavor, it reflects the typical essence of pumpkin and pumpkin spice with a touch of chocolate. These gems are a delicious reminder of all the wonderful flavors that fall represents. I am looking forward to this season.

Pumpkin Chocolate Chip Cookies
adapted from castlehomes.com 

Ingredients
2 eggs (room temp)
1 tsp vanilla extract
2 oz honey whiskey
15 oz pumpkin puree
1 cup butter (room temp)
1 cup sugar
1 cup brown sugar
2 tsp pumpkin pie spice
2 tsp baking soda
4 cups flour
2 cups oats
1 tsp salt (optional)
2 cups milk chocolate chips

Prepare 2 baking sheets by lining the interior with parchment paper. Preheat the oven to 350 degrees.

Place flour, pie spice, baking soda and salt (if using) in a sieve placed over a large bowl. Sift the dry ingredients together into the bowl. Then add the oats and stir until evenly distributed. Set aside.

Fill the bowl of a stand mixer with the butter. Beat on medium high speed, stopping at intervals until butter becomes slick like frosting. Then switch the speed to medium and add the brown sugar. Beat until fully blended into the butter. Add the regular sugar and beat again, the end result will be a light fluffy mixture.

Incorporate each egg, one at a time, into the batter by mixing on medium speed. Remove the bowl from the stand mixer. Using a wooden spoon, stir in the vanilla extract, honey whiskey and pumpkin puree. Once fully mixed, fold in 1/3 of the dry oat/flour blend. Then add half of the remaining blend, mix again and add the last of it, mixing until no dry streaks remain. Fold in the chocolate chips, making sure they are evenly distributed throughout the batter.

Using a small scoop or tablespoon, drop mounds of cookie dough onto the prepared baking sheets, spacing about 1 inch apart. Bake until golden brown on edges. This should take about 15-20 minutes.
Cookies should rest on baking sheet for 2 minutes and then transferred to a cooling rack.

Tips and Notes:
1. Feel free to experiment with the 2 oz liquour addition. Liquour that has fall flavors such as cinnamon, gingerbread and nutmeg would be good paired with the pumpkin.

2. The cookies do not spread much on the pan, so you can bake a lot on each pan.

3. This recipe makes about 8 dozen small cookies, so divide the ingredient quantities if you want to make less.

4. Consider adding 1 cup of chopped toasted pecans and reduce the milk chocolate chips to 1 cup.
                                  **LAST YEAR:Hibiscus Butter Cake** 

Sunday, September 2, 2018

Limoncello Bundt Cake


There are many cake recipes out there, but there is one type of cake that stands in a class all of its own - the bundt cake. These type of cakes are more dense and much more flavorful than any layer or sheet cake. Based on that, the bundt cake is prepared and served (quite often) without any icing or glaze.

Recently, our house was gifted with a bottle of a special lemon liqueur that hailed from Italy, Limoncello cream. As we know, all things lemon basically equate to summertime. Since the temperature is starting to wane down, I decided that this Limoncello bundt cake would be the perfect way to say goodbye to the season of long hot days. Summer was fun, but now it is time to bid it farewell until after another spring season.

This bundt cake has 1/4 cup of lemon zest, which gives it a nice clean taste. Also, the flavor of the Limoncello exists as a subtle undertone in every bite. The structure and texture reflects that of the classic standard-moist and with a tight, tender crumb. Now on to the recipe...you will need a 10 cup capacity bundt pan in order to make this cake.

Limoncello Bundt Cake
adapted from Nordicware 

Ingredients/Cake
1/4 cup limoncello
1 1/2 tsp vanilla extract
3/4 cup of buttermilk
4 eggs
2 egg yolks
4 oz melted white chocolate
1/4 cup lemon zest
1 cup butter
2 1/4 cups sugar
1/2 tsp salt
1/2 tsp baking powder
1/2 tsp baking soda
3 cups flour
1/4 cup bread crumbs (or more for dusting pan)
2 tbs vegetable shortening

Ingredients/Glaze
1/4 cup water
1/4 cup sugar
2 tbs Limoncello

Start by preparing the bundt pan for baking. Melt the 2 tablespoons of shortening in the microwave. Then, using a silicon brush, brush the interior of the pan. Make sure all the surfaces are well coated. Empty the bread crumbs into the pan and rotate to coat the interior with the crumbs. Once fully coated, set the pan aside.

Preheat the oven to 325 degrees. Also, prepare a cooling rack by placing over a parchment lined baking sheet.

Fill the bowl of a stand mixer with the 2 1/4 cups of sugar and the butter. Cream together on medium speed, stopping at intervals to scrape down the sides of the bowl. Continue to beat the mixture until the consistency reaches a fluffy stage-which should take about 5 minutes. Add the vanilla extract and combine. After that, each egg and egg yolk is to be blended into the mixture, one at a time. Once all the eggs are incorporated, blend in the lemon zest and white chocolate. Set aside.

Using a small bowl, whisk together the Limoncello and the buttermilk. Take out another bowl (medium size) and place a sieve over the top. Fill the sieve with the flour, baking soda, baking powder and salt. Sift the ingredients together, filling the medium size bowl.

Fold 1/3 of the sifted ingredients into the butter/sugar batter. Then, mix in 1/2 of the buttermilk/Limoncello blend. Repeat the process-beginning and ending with the sifted ingredients. Empty the batter into the prepared pan and smooth the top.

Place filled pan in the oven and bake until tester comes out clean, about 1 hour to 1 hour and 15 minutes. Remove from the oven and set on the prepared cooling rack. Let the cake cool in the pan for about 20 minutes. Then invert the cake pan onto the rack, releasing the cake. The cake should cool for about 15 minutes before drizzling the glaze on top.

For the icing glaze, fill a saucepan with the water and sugar. Place over medium high heat. Stir the mixture until the sugar has dissolved into the water. Remove from heat and whisk in the Limoncello. Drizzle the syrup over the warm cake.

Tips and notes:
1. Make sure your refrigerated ingredients have warmed up to room temperature (yes, this does include the buttermilk)

2. The bread crumb coating creates a nice toasty surface to the cake and insures that it falls out of the pan with no sticking issues. Also, if you are making any type of bundt cake with chocolate, dusting with cocoa is another option. Should you not want a toasty surface for the cake, generously spray the pan with a non stick spray that includes flour.

3. This cake is good sliced and served with cream and fresh fruit.

4. I used a white chocolate bar for the chocolate, but you are welcome to use chips. If using the chips, the melted chocolate can cool some prior to adding to the batter. The bar chocolate, due to its tendency to seize up quickly, should be mixed into the batter as soon as it is melted. 
                                          **2 YEARS AGO: Bali Hai Pie**