Foodbuzz
Showing posts with label recipe. Show all posts

Monday, November 28, 2011

Citrus Sri Lanka Cookies

  The above cookie is made with simmered spices and orange extract. Since Sri Lanka is the major source for cinnamon, I have named the cookies accordingly.

In preparing these, I tried different sources for flavoring. Dried orange zest, orange juice, Grand Marnier as well as orange extract.  However, nothing held the orange flavor as well as the extract.  The only other thing I have considered is orange oil, which may give it a fresher flavor.

The cookies have a cinnamon/clove spice taste with a tart orange flavor.  The spices are picked up in the simmering process along with the coating after they are baked.  This cookie would be perfect for an afternoon tea.  This recipe makes about 2 1/2 to 3 dozen cookies.

Citrus Sri Lanka Cookies

Ingredients/ Cookies
2 1/4 cups flour
1/4 tsp salt
2 tsp baking powder
1 tsp whole cloves
2 sticks cinnamon
1 1/2 cup of water
1/2 cup sugar
1/3 cup butter flavored shortening
1/3 cup butter
1 1/2 tsp orange extract

Ingredients/Topping
2 tbs ground cinnamon
1/2 tsp ground cloves
4 tbs sugar

Sift together flour, salt and baking powder.  Set aside.  Fill a small saucepan with water, whole cloves and cinnamon sticks.  Place over medium high heat and bring to a boil.  Reduce heat and let simmer for 10 minutes.  Remove from heat and let cool.

In a medium size bowl, cream together sugar, butter and shortening.  Then add orange extract and beat for 1 minute at medium speed. Add 1/4 cup of the spice water and beat for an additional minute. Discard the remaining boiled cloves and cinnamon sticks, but keep the spice water in reserve.

Using a wooden spoon, fold the sifted ingredients into the batter, forming a dough that holds together.  If it is too dry, add a teaspoon of the boiled spice water and mix until it reaches the correct consistency.  I had to add two teaspoons to mine.  After that, you can discard the remaining spice water.

Shape the dough into a ball inside the bowl, cover with plastic wrap and place in fridge 20-30 minutes or until dough can hold its shape and be easily formed.

While the dough is chilling, preheat the oven to 375 degrees.  Also, mix the topping ingredients together in a small bowl.

Once the chilling time is complete, take dough out of fridge and shape into several 1 inch round balls and place on an ungreased baking sheet about 1 inch apart.  Bake for 15-20 minutes or until the bottom edges start to brown.

Remove pan from oven and take each cookie and roll gently in the cinnamon sugar mixture and place on rack to finish cooling.
                                 **LAST YEAR: Banh Mi Sandwiches**
Please note that this is the last of my vacation and I will be back blogging as normal tomorrow afternoon and the comment option will be available on new posts after today.  While vacationing with the family is enjoyable, I know I will probably be missing all my foodie friends by now and be anxious to get back into the swing of blogging.             

Friday, November 25, 2011

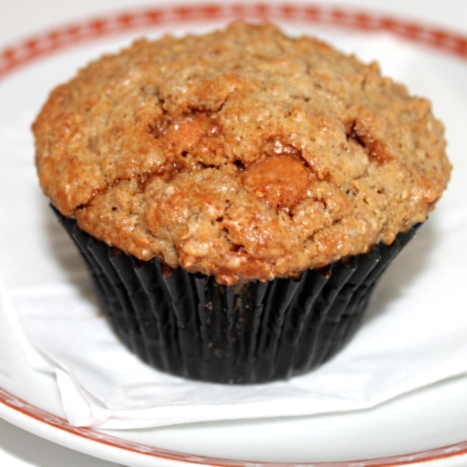
Oatmeal Butterscotch Muffins

The yearly physical is always a nice reminder that you are not what you used to be back in your younger days. As you get older, the hereditary health issues start revealing themselves. You leave with comments floating around in you head like, "you need to work on your cholesterol level" or "you need to eat more nuts and grains".
I know about all the benefits of oatmeal but I prefer to have a little bit more variety for breakfast. This put me in a mode to find something appealing for breakfast with oatmeal in it instead of just a plain bowl of oatmeal.  Also, I did not want to be eating oatmeal cookies for breakfast. So below is what I came across.  Not sure if it is better or worse than eating cookies, but one of these muffins was very filling.
You can definitely taste the oats, especially in the top toasty part.  Even though the oats are prevalent, you get an occasional bump of sweetness from the butterscotch chips.  I get my sweet fix and I am getting my grains.  Makes me happy as well as my doctor. This recipe makes about 3 dozen muffins, but it can be easily halved should you not want as many.

Oatmeal Butterscotch Muffins
adapted from Recipes from American Inns and Bed & Breakfasts

Ingredients
3 cups of flour
1 tbs plus 1 1/2 tsp of baking soda
1 tsp salt
4 tbs baking powder
1 18 oz box of oatmeal or 7 cups (instant or regular)
2 1/4 cups light brown sugar
6 eggs
1 1/2 cups or 3 sticks of butter
1 quart of low fat buttermilk
1 1/2 cups of butterscotch chips tossed with 2 tbs of flour

You will need to start with four bowls of ingredients.  In the first bowl, mix together the oatmeal and buttermilk.  Then stir in the brown sugar.  This will need to set for at least and hour for the liquid and sugar to be absorbed.  Place the 6 eggs in the second bowl and beat with a fork until lightly frothed.  In the third bowl, sift together the salt, baking soda, baking powder and flour.  Lastly, melt the butter in the fourth bowl and allow to cool.
Preheat the oven to 375 degrees.  Grease the top edges of the cavities of the muffin pan and place cupcake liners inside.

After your oven is preheated, butter has cooled and oat mixture has sat for an hour, you are ready to make the batter.  Mix the butter into the oats until liquid is absorbed.  Then blend the eggs into the batter.  Fold the dry ingredients into the batter until no dry streaks remain.  Lastly, fold in the butterscotch chips that have been mixed in the flour.

Using an ice cream scoop, fill the cavities with the batter.  They should be about 3/4 full.  Bake for 18 minutes or until a tester comes out clean.   Let cool in pan for about 2 minutes then transfer to a rack to finish cooling.
                            **LAST YEAR: Pecan Brown Butter Bread**
Please note that comments are not open due to my being on vacation for the Thanksgiving Holiday, since I will be unable to reciprocate or answer any questions.

Monday, October 10, 2011

Curry Crackers

After all those sweets last week, I decided I would start with one that is a shout out to all my savory foodie friends.  Believe it or not, I do eat something other than sweets.  We all need some square meals and that is why I peruse around looking at savory stuff.  I have made a lot of great dinners thanks to their posts and my husband is happy that I am expanding his range of food, he grew up on steak and potatoes.  Not that those things are bad, there is just so much more out there.

I keep my spices in a closet in tins along magnetic strips.  Apparently, those tins are not air tight because you get a lot of spicy aroma when you open that door.  After smelling that aroma a few days, I decided it was time to make use of them. This cracker recipe was perfect for that.

These crackers have a lot of great flavor when you bite into them.  After you swallow your first bite...wait for it...then comes the heat in the back of your throat.  Now, do not get me wrong-these are not so hot that you sweat when you eat them, but they have a pleasant amount of heat.  I am not a big habanero fan, but I did like these.

This recipe states that it makes 90 crackers 2 inch in diameter.  When I made them, I ended up with about 65 crackers, 2 1/4 inch in diameter.  The most important thing with this recipe is to make sure the crackers are cooked thoroughly, the center should be crisp before you remove from the oven.  The small batch I cooked to test was about 6 crackers and they did not get done all the way through, but a little while in the microwave saved them.  The rest I cooked longer than the first batch and they turned out fine.  The recipe is below, I hope you enjoy this savory snack!

Curry Crackers
adapted from Fun and Easy Recipes for Delicious Crackers

Ingredients
1/2 tsp cayenne pepper
1 1/2 tsp tumeric
1 1/2 tsp ground cumin
1 1/2 tsp ground coriander
1 1/2 tbs onion,finely minced
1 tsp garlic, minced
3/4 tsp grated ginger
3 tbs butter or margarine
approximately 1/2 cup water
2 cups flour
1 tsp salt and more for sprinkling

Lightly grease 2 baking sheets and set aside.

Melt butter or margarine in a small frying pan over medium heat and then add onion, garlic and ginger. Stir and cook mixture for about 3 minutes or until onions are translucent. Then add the spices(cayenne, cumin, coriander and tumeric) and stir until evenly distributed for about 1 minute.  Remove pan from heat.  Using a spatula, scrape all the ingredients from the pan into a heat proof bowl.  Let mixture cool to room temperature.

Preheat oven to 325 degrees.  Sift together the flour and salt in a medium size bowl.  Mix in the cooled spice mixture.  Once mixed, flour should be a yellowish color.  Add 1/4 cup of the water and mix.  Then add a tablespoon at a time, stirring until mixture becomes a dough.

Divide dough into 2 equal pieces.  Roll out on a flat surface (flour is not required, dough is not sticky) until it is 1/16 of an inch in thickness.  Using a cutter, make 2 to 2 1/4 inch crackers and place them on the baking sheets.  Prick each with a fork to keep from bubbling up when baking. At this time, you can opt to brush with margarine or butter and sprinkle with salt.  I prepared half of mine with and half without.  The "with" is good for snacking by itself and the "without" is good if you are using with a dip or having with soup.

Bake for 20-25 minutes or until crisp and slightly toasted.  Remove from sheets and cool on wire rack.
                                   **LAST YEAR: Pretzel Bites**

Wednesday, October 5, 2011

Georgia Tunnel Cake

The one thing I really like about this cake is that it is versatile.You can make it without the filling and let peach schnapps soak into the cake while warm or you can prepare it with the tasty cinnamon nut filling.  Either way, it makes for a wonderful dessert.

My first trial resulted in too much filling and too much batter.  Second time around I used a 12 cup bundt and half the filling recipe.  It yielded much better results, even though I still had a little batter left, which you can use to make some cupcakes.  That way if you are bringing this cake to a party or giving it, you still will be able to have a taste without cutting into the cake.

The cake part is a moist crumb with chunks of peaches in it.  The filling part is a cinnamon walnut mixture which is much like a pie filling.  The flavors really compliment each other, so I will be making this again.

My sister says she is making a request list of things on my blog she would like to see on a dessert table for around the holidays, so we will see if this ends up on the list!

Georgia Tunnel Cake
by flourtrader

Ingredients/Filling
1/2 cup cinnamon chips
1/2 cup chopped walnuts
1/8 tsp salt
1/4 cup butter
1/2 tsp vanilla extract
1/2 cup sugar
1/2 cup light corn syrup
2 beaten eggs

To make the filling: Place butter in a small saucepan over medium heat.  Once melted, stir in sugar, salt and corn syrup.  Continue to stir as mixture cooks and sugar dissolves.  The sugar is completely dissolved when there is no gritty consistency at the bottom of the pan.  Remove pan from heat and place in fridge on a pot holder or trivet to cool.

In a large bowl whisk together vanilla, eggs and salt until combined.  Then preheat the oven to 350 degrees and line a baking sheet with parchment paper.

Continue to check the temperature of the sugar mixture periodically.  Remove the bowl once it reaches a lukewarm temperature.  Stir it a few times and then pour it into the vanilla/egg mixture.  Use a spatula to get all the sugar mixture out and mix the ingredients together until evenly distributed.  Then fold in the cinnamon chips and the nuts.

Pour the mixture onto prepared baking sheet and place in oven for 5-7 minutes.  The mixture will foam up a little while baking and you should make sure it does not become hard like candy. Remove and let the filling cool.  The filling should become thick and be able to be spooned up without any watery drips.

Ingredients/Cake
4 1/2 cups of flour
1 1/2 tsp baking powder
1 3/4 cup plus 2 tbs butter
7 eggs
1 1/2 tsp vanilla extract
3 3/4 cup sugar
1/2 cup milk
1/2 cup peach schnapps
3 cups chopped peaches

To make cake: preheat oven to 350 degrees and grease 12 cup bundt pan and then dust with bread crumbs.

In a large bowl, cream together butter and sugar until light and fluffy.  Beat in eggs one at a time, beating for 30 seconds after each addition.  Then beat in the vanilla extract and set aside.

Sift the flour and the baking powder together in another bowl.  Then take out a small bowl and whisk the peach schnapps with the milk.

Fold in 1/3 of the flour mixture to the butter/sugar batter until no dry streaks remain.  Stir in half of the peach schnapps slurry.  Repeat the process, ending with the flour mixture.  Lastly, fold in the peaches.

If you are using the filling, put half of the cake batter into the pan and even it out.  Then spoon filling mixture into the center of the batter, being careful not to let it touch the sides of the pan.  After the filling is all used, pour the rest of the batter on top and smooth it out.  If not using the filling,  just pour all of the batter into the pan and smooth the top.

Let bake for 45-55 minutes or until tester comes out clean and batter is pulling away from the sides of the pan.  Remove pan from oven and place pan on rack to cool.  If you have not filled the cake, you might opt to pour 1/4 cup of peach schnapps on the cake and cover so it will sink in and not evaporate.  Let cake cool in pan for 20 minutes, then invert onto a rack to finish cooling.  Below is a picture of a slice of this cake, but note that this was the recipe before I cut back on the amount of filling.

                             **LAST YEAR: Jumbo Harvest Squash Muffins**

Wednesday, September 28, 2011

Orange Poppy Seed Tea Cakes

There has always been a dilemma when it comes to what classifies as a cake, muffin, bread or scone.  Each one of these connotates a specific texture in each person's mind.  So before I lead you down the wrong path with the name of this post, I will be very specific regarding the texture of this baked good.

It is very dense, much like a scone.  The batter is very thick and has the same leavener ratio to flour as a lot of cookie recipes.  This is not a fluffy light cake by any stretch of the imagination.

The citrus flavors in the cake are very subtle which pairs nicely with the poppy seeds.  I found that with the light glaze, that there is enough flavor even though the recipe suggests  using butter or jam to spread on the split cakes.  

I used dariole molds to bake these in.  It gives the cakes a nice tall shape as you can see, however, it does take some time to prepare the molds prior to baking. This recipe makes 8 cakes.

Orange Poppy Seed Tea Cakes
adapted from Perfect Afternoon Tea Recipe Book

Ingredients
1 tsp lemon juice
grated rind of 1 lemon
2 tbs orange juice (cake)
grated rind of 1 1/2 oranges
1 1/2 tbs poppy seeds
1/4 cup plus 1 tbs vegetable oil
1/4 cup plus 2 tbs melted butter
2 1/2 cups flour
3/4 cup sugar
1 tbs baking powder
2 eggs
1/4 cup powdered sugar
1 tbs orange juice (icing)

Prepare muffin pans by lining with paper cases or greasing the cups with butter.  If using molds, butter all insides and then line the inside edge with parchment paper.

Measure out the flour in a small bowl.  Remove 1/4 cup and 2 tbs of flour and place in another small bowl and set aside to reserve for later.

In a larger bowl, sift together the large amount of the flour and the baking powder. Then stir in the sugar.  Make a well in the center of the ingredients.

For the wet ingredients, mix together butter, oil, poppy seeds, lemon rind, lemon juice, orange rind and 2 tbs of orange juice.  Beat in egg for 30 seconds, then add the other egg, beating 30 seconds after addition.

Pour the wet ingredients into the well of the flour mixture and stir until no dry streaks remain.  Let batter rest for 1 hour.  Then preheat the oven to 350 degrees.

After the batter rests, fold in reserved flour mixture.  Your batter will be quite lumpy.  Fill the muffin cups or molds 3/4 full, making sure batter is even. Place pan in oven and let bake for about 25 minutes.  Cakes are done when they have risen and are golden on the top.

Remove pan from oven and let cool in pan for a few minutes.  Then transfer to rack to finish cooling.

In the meantime, icing can be made.  Sift powdered sugar into a small bowl. Stir in orange juice and add a small quantity of water to get to the correct consistency.  Then drizzle over cooled cakes.

                            **LAST YEAR: Fried Peach Pies**

Monday, September 26, 2011

B52 Cookies

In case you are unfamiliar with the bar drink called a B52, I will explain.  It is a drink that is made up of layers of liqueur.  The sequence of the layering is based on the weight of the liquid as is layered in this order:  Baileys Irish Cream on the bottom, Kahlua or coffee liqueur in the middle and Grand Marnier or orange liqueur on top.  There is some bartender skill involved to make sure that the liquid does not mix and the layering stays intact as pictured below.
Anyhow, this recipe duplicates the layered flavors in a cookie form.  It has one basic dough that is separated into thirds and flavored.  Then the dough is stacked in layers and cut to form the cookies.

My cookies did not turn out with perfect edges, but I feel that maybe a sharper knife and freezing the dough longer would have helped.  However, these are homemade and not manufactured, so maybe the non-perfect edges are a good thing.

As far as taste, you can taste the liqueur flavors in each of these layers and the chocolate chips compliment each flavor layer.  The texture and ingredients in the cookie base very much resemble sable cookies. Now on to the recipe, it makes about 2 dozen cookies:

B52 Cookies
courtesy of Sophisticated Cookie Cookbook

Ingredients
2 tbs Baileys Irish Cream
2 tbs Kahlua
1 tsp instant espresso powder
2 tbs Grand Marnier
1 cup mini semi sweet chocolate chips
1 egg
1/2 cup unsalted butter (room temp)
1 cup sugar
1 tsp baking powder
2 1/4 cup flour

Sift together flour and baking powder in a medium size bowl.  Set aside.  In another bowl, cream together butter and sugar.  This should take about 2 minutes on medium high speed.  Then beat in egg until blended.

With a wooden spoon, fold flour mixture into butter/sugar batter until no dry streaks remain.  Then stir in the chocolate chips so they are evenly distributed throughout the dough.  Divide the dough into 3 pieces and place each in a separate bowl.

Take a small bowl and add the Kahlua and espresso and still until the espresso dissolves.  Set aside.

Line up your bowls of dough.   Going from left to right you will flavor the dough.  In the first bowl, mix the Baileys Irish Cream into the dough.  In the second bowl of dough, stir in the Kahlua/espresso mixture.  In the last bowl, stir in the Grand Marnier.

Each piece of dough will need to be checked for consistency before rolling out between pieces of waxed paper.  I found that my Kahlua dough was a not as stiff as the other dough, so I placed it in the freezer for 10 minutes.

Once the pieces are of rolling consistency, each will need to be placed between sheets of wax paper. You will need to keep track of the flavors, so it is best to roll them out and line them up in the same order as noted above. Roll each piece into a rectangle, about 1/2 inch thick, 3 inches wide and about 10 inches long.  Place each piece of dough on a separate baking sheet and place in freezer for 10 minutes.

Remove baking sheets and peel off the wax paper of the Baileys dough.  Place back on baking sheet.  Then peel the wax paper off of the Kahlua dough and stack on top of the Baileys dough, making sure that the edges are even as possible.  Lastly, remove the wax paper from the last layer (Grand Marnier) of the dough and stack it on top of the Kahlua dough.  Wrap the whole block in plastic wrap and freeze for at least 30 minutes or up to an hour.

During this time, preheat your oven to 350 degrees and lightly grease baking sheets.

Remove block from freezer once chilling time is complete.  With a sharp knife, square off all sides so that the rectangle has sharp straight edges.  Then cut the block in 2 separate pieces, measuring 1 1/2 inches wide by 10 inches long.  Place one piece of dough so the 10 inch length is running left to right on a flat surface. Then slice the dough vertically into 1/2 inch wide pieces.  Repeat the process with the other piece of dough.

Place each square of dough 1 inch apart on the baking sheet.  Bake for 10-12 minutes or until done.  When done, cookies will be firm and lightly browned on the bottom.  As you can see by the above picture, these cookies do not brown on the top or the edges.  Remove cookies from baking sheet and transfer to a rack to cool. Cheers!
                     **LAST YEAR: Espresso Chocolate Shortbread**

Friday, September 23, 2011

Apple Butter Crunch Coffeecake

This is an old recipe that I had in my archives.  I did not even have the title written down, but the ingredients reminded me of fall and I was looking for something that included apple butter.

This recipe does use a boxed cake mix, so if you are not into semi-homemade you need not go further.  Outside of the apple butter, it does have some interesting ingredients like yeast and wheat germ.

This recipe is a prize winner from a contest and I can understand why. One bite has a fluffy moist texture of the cake with spices and then the crunch of the crumbled ginger cookies and pecans on top.  This is perfect to wake up to with a cup of coffee.

Apple Butter Crunch Coffeecake
courtesy of Better Homes and Gardens/Year 2000

Ingredients
1-2 tbs apple juice
1/2 cup warm water
3/4 cup apple butter
2 tsp butter (for glaze)
1/3 cup butter (for streusel)
1 cup crushed gingersnap cookies (for homemade recipe click here)
1/4 cup wheat germ (regular or honey crunch)
1/3 cup toasted chopped walnuts
1 package spice cake mix
2 tbs brown sugar
1 package or 2 1/4 tsp of fast acting yeast
1/4 cup chopped white chocolate or chips
2/3 cup sifted powdered sugar

Prepare a 9X13 inch pan by greasing the inside with butter and dusting with flour.  Then preheat your oven to 350 degrees.

Whisk together cake mix and yeast in a large bowl and set aside.  Then, in a smaller bowl, mix wheat germ, gingersnaps and brown sugar.  Using a pastry cutter, cut in 1/3 cup of butter until the mixture becomes crumbly.  Fold in the walnuts.

To the dry mix of cake mix and yeast, add water, eggs and apple butter.  Using an electric mixer, beat on low speed for 2 minutes, then switch speed to high and beat for an additional two minutes.

Pour batter into prepared pan.  Smooth the batter so it is evenly spread in the pan.  Take the gingersnap mixture and sprinkle evenly on top of the batter.  Place pan in oven and bake until tester comes out clean, which should be about 30 minutes.  Let cake cool in pan while you prepare the glaze.

Place sifted powdered sugar in a medium sized bowl. In a smaller, microwave safe bowl, add white chocolate and 2 tsp of butter.  Cover, place in microwave and let cook for 15 seconds.  Take out and stir, then microwave again for 10 seconds.  Stir the mixture and check the consistency to make sure all is melted.  Be careful to watch during this process, microwave performance does vary.

Add chocolate mixture and apple juice to powdered sugar.  Stir until no dry spots remain.  Should you find it to be too thick, add a little apple juice and mix until you reach your desired drizzling consistency.  Then drizzle glaze over warm cake.  Cool at least 1 hour before cutting.  It is delicious served warm or at room temperature.
                      **LAST YEAR-Shortbread Caramel Cupcakes**

Friday, September 16, 2011

Nocello Walnut Muffins

We all like recipes in cookbooks and on the net to have pictures.  Somehow it is hard for me to use a recipe if it does not show a picture.  I guess it is just a comfort level having it there.

The funny thing about the recipe I found for these muffins is that I did not like the picture.  It just was too dark and the tops look burnt.  The tops were sprinkled with brown sugar and brown sugar is the type of sugar used in the batter also.  Because of the appearance, I chose to use granulated sugar in these.  I also substituted sparkling sugar for the brown sugar on top.

The strangest thing about the recipe is that you add the liqueur to the butter mixture.  The butter is melted first, but I am not sure if the butter solidified or curdled after the liqueur was added.  It did not seem to alter the final taste though.  It was just a little bit difficult to get it mixed in with the dry. I have made an adjustment because of that.

These muffins are a great item to have with coffee or tea in the morning.  They have a moist crumb and a crunch from the sugar topping and walnuts inside.  The Nocello and the spices add the right balance of flavor.  This recipe makes 1 dozen muffins.

Nocello Walnut Muffins
courtesy of The Perfect Afternoon Tea Recipe Book

Ingredients
3/4 cup milk
2 tbs Nocello or any walnut liqueur
2 beaten eggs
1/4 cup butter, melted and cooled to room temp
1/4 tsp cinnamon
1/8 tsp nutmeg
pinch of allspice
pinch of cardamon
4 tsp baking powder
1/2 cup light brown sugar or granulated sugar
2 cups flour
3/4 cup chopped toasted walnuts
sparkling sugar for topping (optional)

Preheat the oven to 400 degrees.  Prepare a muffin tin by greasing the top edge of the cavities and lining with paper cases.

Sift together the flour, cinnamon, allspice, nutmeg, cardamon and baking powder.  If using brown sugar-measure out (lightly packing) 1/2 cup and take out 1 tbs and reserve for topping.  Then stir in the light brown or granulated sugar.  Then mix in the walnuts.  Form a well in the center of the dry ingredients and set aside.

In another bowl, whisk together the eggs, butter and milk.  Then stir in the Nocello/walnut liqueur.  After all is blended, pour into the formed well of the dry mixture.  Carefully fold the ingredients together, taking care not to over mix.

Fill the 12 paper case lined cavities with the batter,  making sure all are evenly filled.  Sprinkle the light brown or sparkling sugar on top of each muffin.

Place pan in oven and bake for 15 minutes.  Muffins are done when the batter has risen and the tops have a toasty golden hue.  Let muffins cool for 5 minutes in pan and then transfer to rack to finish cooling.
                                                **LAST YEAR: Hazelnut Cookies**

Wednesday, September 14, 2011

Cranberry Invasion Cake

Well I still have that large bottle of creme de noyaux, so I decided to make a cake with it.  I thought that the almond flavor would go well with some cranberries.  My biggest peeve about swirled cakes, breads and coffee cakes is that there is so little of that swirl included, you can barely taste it.  I set about making a cake with a big flavorful swirl in it as you can see.

This picture is actually my the first draft of the recipe.  If you notice, there is a lot of crumbs on the plate.  That is actually almonds.  One of the changes I made is that the almonds go in with the cranberry mixture, that way they are in the cake and not apt to fall off, like in this picture.   There were some other trials and errors, but I will save you all that detail.

The cake is better served the next day.  With time, the flavor of the creme de noyeau develops more.  The burst of cranberry flavor with the almond cake is exactly what I was looking for in taste as well as texture.  Now on to the final recipe that I arrived at:

Cranberry Invasion Cake
by flourtrader

Ingredients/Cranberry Filling
1 1/2 cups cranberries
2/3 cup brown sugar
1/3 cup granulated sugar
1/4 tsp salt
1/2 cup finely chopped toasted almonds (optional)
3/4 cup water

Ingredients/Cake
1 tsp baking soda
1 tsp baking powder
1/2 tsp salt
2 cups flour
1 cup sugar
1/2 cup butter
2 eggs
1/4 cup creme de noyaux
1 cup sour cream
1 tbs vegetable oil
red food coloring

Prepare a 10 cup bundt pan by brushing all the inside with melted butter and then dusting with bread crumbs.  Set aside.

To make the filling, place all ingredients (except for the almonds) in a medium size sauce pan.  Put saucepan over medium high heat and stir.  Cook filling for 15 minutes or until thickened.  Filling mixture should reduce down to 1/3 of the original mixture.  This is basically a cranberry sauce, so it will thicken quite a bit when cooled.  Transfer mixture to a heat proof bowl and let cool completely before using. 

Now, you can start making the cake.  Sift together flour, baking powder, baking soda and salt in a small bowl and set aside. Preheat your oven to 350 degrees or if you are using a dark pan, 325 degrees.

Using an electric mixer, beat together the butter and sugar until smooth and creamy.  This should take about 2 minutes.  Add one egg and beat for 30 seconds.  Then beat in the additional egg.  Pour in the creme de noyaux and the vegetable oil.  Beat on low speed until evenly distributed.  At this time, put in 2 drops of food coloring and beat.  Continue with this process until desired color is met.

Fold 1/3 of the dry ingredients into the batter.  Then blend in 1/2 cup of sour cream. Repeat this task, ending with the dry ingredients, until completely mixed together.  Be careful not to over work the batter.

Spoon 1/2 of the cake batter into the pan and smooth it out even.  If using almonds, mix them into the cooled cranberry filling.  Carefully spoon the filling on top of the cake batter in the pan.  The trick is to get it even but not touch the edges of the pan.  If you touch the edge with the filling, that section will most likely stick and you will have difficulty getting your cake out of the pan.

After you have used up all the filling, spoon the rest of the batter on top and smooth it out. Place cake in oven and bake for about 50-55 minutes or until done.  Cake is done when tester comes out clean and it is golden brown on top.

Let cake cool in pan set on a wire rack for about 20 minutes.  Then invert on to rack to finish cooling.  If you have some difficulty, slide a butter knife around the edges and then try to invert cake.  Once cooled, you can dust with confectioners sugar or drizzle with glaze (click here for recipe).
                            **LAST YEAR: 18 hour Guinness Burgers***

Wednesday, September 7, 2011

Dynamic Duo Cupcakes

Do not let the above picture fool you.  You might say that this cupcake has a split personality. The left half is chocolate with ground chocolate chips and the right half is mint.  If that was not enough, I have topped this with dark chocolate ganache and mint butter cream icing.

I have wanted a way to have 2 distinct cakes in one cupcake for awhile, but the idea of cutting an layering was out of the question.  I wanted the cake parts to bake together, but still be as one solid cupcake.  To my surprise they have cupcake and cake dividers.  You just put them in middle of the cavity and pour your batter into each side.  Then remove the divider prior to baking.

Sounds pretty simple, but what I did not realize is all the other factors.  With two different batters, there may be different textures, each side may rise to a different height and they may bake at two different temperatures and times.  It was not going to be as easy as I thought. A boxed cake mix would have been perfect to use, but I did not give in.

I made two batters of similar ingredients.  However, the textures and thickness did turn out different.  One was like a brownie batter and the other batter was thin enough to be poured.  I still went on and surprisingly the cupcakes did turn out well.
 These cupcakes were for donation, so the recipe makes about 4 dozen.

Dynamic Duo Cupcakes
by flourtrader

Ingredients/ Chocolate Cake
3 eggs
1 3/4 cup milk
1 cup or 2 sticks of butter (room temperature)
1 3/4 cup sugar
1 tsp vanilla extract
1/2  tsp vegetable oil
1 cup ground semi sweet chocolate (I used food processor and chocolate chips)
1/4 cup cocoa
2 cups plus 2 tbs of flour
1/4 tsp salt
1 tbs baking powder

Ingredients/Mint Cake
3 eggs
1 3/4 cup milk
1 cup or two sticks of butter
1 3/4 cup sugar
1 tsp mint extract
2 1/4 cup flour
1 tbs baking powder
1/4 tsp salt

Ganache Topping
see filling recipe here 
or use a mix of 8 oz semi sweet chocolate melted in a double boiler with 1 tsp shortening.

Ingredients/Mint Buttercream Frosting
courtesy of Cupcake Bake Shop
1 1/2 cups or 3 sticks of butter
6-7 cups sifted powdered sugar
1/4 cup plus 2 tbs milk
1/8 tsp mint extract or more to taste
green food coloring

If you are making the ganache topping, this will need to be done first.  Click over to the link and prepare as stated.  Once it is in the fridge chilling, then you can start on making the cupcakes. 

For the chocolate batter, cream together the butter and sugar.  Then beat one egg into the batter for about 30 seconds.  Continue this process with the remaining eggs, one by one.  Then add the extract and vegetable oil and stir until blended.  Set aside.

Sift together the flour, cocoa powder, salt and baking powder.  Then fold 1/3 of the flour mixture into the butter/sugar batter.  Stir in 1 cup of the milk until all is evenly blended.  Mix in 1/3 of the flour and continue to mix, adding the rest of the milk.  Fold in the last part of the flour and stir until no dry streaks remain.  Lastly, fold in the ground chocolate.  Cover and place in fridge.

Preheat the oven to 350 degrees and grease top edge of cavities in muffin pan.  Then line with cupcake papers and place the plastic dividers in the center of the cavities.

To make the mint cake, follow the same process as stated for the chocolate, except for the ingredient changes.  Leave out the vegetable oil, cocoa and ground chocolate.  You will replace the vanilla extract with mint.  Also note that this cake does call for a little bit more flour than the chocolate.

Take out the chocolate batter and fill one side of each muffin cavity to the top.  Continue until each cavity has chocolate batter on one side of the divider.  Then fill the other side of each divider in the cavity to the top with the mint batter.  Carefully pull out the batter dividers.

Bake cupcakes for 23-30 minutes or when tester comes out clean.  If you chose to do a chocolate drizzle on top of the cupcakes, now is the time to melt the ingredients in a double boiler. Once melted, remove pan from heat and pour into a heat proof bowl to cool.  Let cool at least 20 minutes prior to putting on cupcakes.

Once cakes are done baking, let cool in pan for 2 minutes then transfer to rack to cool.

After cooling, you can drizzle the melted chocolate or spread a thin layer of cold ganache on top.  Let topping set for about 1 hour.

To prepare the frosting, cream the butter until smooth.  Then add the rest of the ingredients and beat until all is evenly distributed. Taste to see if you want to add more mint extract.  After making the extract adjustment, add 3 drops of food coloring and beat again.  Continue to add the food coloring and beat until you reach the color you want. Frost cupcakes as desired.

                                           **LAST YEAR: Walnut Pillow Cookies**

Friday, September 2, 2011

Harvest Spice Bites

I have been working at making donuts for awhile and I finally decided just to drop the dough in the oil instead of trying to make picture perfect donuts.  I am glad I did because these are now more of a bite size item than a big donut.

This particular recipe has some ingredients that you probably will not find in your kitchen.  The first is pureed butternut squash.  I found a bin of this in my freezer.  As we get further into the season you should be able to make your own fresh puree or purchase it canned.  Note that the puree used is a simple blend of cooled, cooked squash and a little water.  Do not use the puree that most people consider a side dish, it is a recipe that has additional ingredients such as butter. The other specialty ingredient is liquid pie spice extract.  That is a combination of nutmeg, cinnamon, allspice and ginger flavors.  You can use traditional powdered spices, which are a blend of 1 tsp cinnamon, 1/2 tsp ginger, 1/4 allspice and 1/4 nutmeg.

These donut bites turned out much like a cake donut, fluffy on the inside with a crispy outside.  Without the sugar coating, they do have the slightly sweet taste of the squash with light undertone of the spice flavors.   These are a special treat with morning coffee or tea. This recipe makes about 2 1/2 dozen donut bites.

Harvest Spice Bites
by flourtrader

1 1/2 cups pureed butternut squash
3 tbs melted butter
3/4 cup milk
3 eggs, room temp
1 tsp vanilla extract 
2 tsp pie spice extract (or mix of powdered spices noted above)
4 tsp baking powder
1/2 tsp baking soda
1 tsp salt
3 1/2 cups flour
1 cup sugar
Canola oil for frying

Sift together baking powder, salt, baking soda, flour and spice blend (if using powdered spices).  Set aside.

In another bowl, beat together eggs, sugar and butter until smooth.  Add vanilla extract, milk, butternut squash puree and pie spice extract (if using).  Beat for 30 seconds on medium speed or until evenly blended.

Fold the flour mixture into the bater with a wooden spoon and mix until no dry streaks remain.  Cover and place in the fridge.

Prepare a pan by filling with 1 1/2 inches of canola oil.   Layer 3 sheets of paper towels on top of 2 baking sheets for the donuts to drain on. Place a deep fry thermometer in the oil and heat the oil to 365-370 degrees Fahrenheit.

At this time, you will need to decide on a topping for the doughnuts.  Joy the baker has compiled several options from Bon Appetit, which you can find here.   I just opted to roll them in white sugar.  Prepare your topping and place in a bowl beside the baking sheets.  If you are using a glaze, place a cooling rack over a flat surface covered with wax paper.

Once the oil reaches the correct temperature, drop batter by round spoonfuls into the oil.  A soup spoon is a great size to use.   Only drop four at a time to cook at once.  Let cook for about 2 minutes on each side and then remove and place on paper towels to cool.  Let cool for 3 minutes and roll in sugar mixture or dip in glaze.  After coating the sugar ones, you can place on a plate.  If you dip them in glaze, place the donuts on a cooling rack to set.  Repeat process with the remaining batter.

Wednesday, August 31, 2011

Showstopper Cookies

I still had a lot of white chocolate left after making those Lucid Dream Bars.  Since I am scheduled to make a cookie donation, I decided I would need to find a good cookie recipe using the white chocolate.

I found a recipe that I had kept from last year.  It is one in which the chef/blogger coerced the recipe from a local catering company.  After reading that information and looking at the list of ingredients, I knew that this was a winning recipe.

In addition to the white chocolate, these cookies are packed with toasted walnuts and toffee. The add ins to the cookie dough makes them extra special. The sweet "crispy on the outside and chewy on the inside" texture was just right.

I know you are thinking, last years recipe and now I am just getting around to making them.  What can I say but too many recipes and not enough time!  Most of you food bloggers can relate.  I would love to say that I am am now making the last recipe I have in my collection so I will need more, but not the case.  Anyhow-- on to the recipe, which makes about 4 dozen cookies.

Showstopper Cookies
courtesy of Oui Chef Network

2 eggs, lightly beaten
1 tbs vanilla extract
1 cup or 2 sticks of softened butter
1 cup granulated sugar
1 cup packed dark brown sugar
12 oz of toffee bits
12 oz white chocolate, chopped
3 cups chopped, toasted walnuts
1 tbs kosher salt
1 tsp baking powder
2 1/2 cups flour
1 tsp baking soda

Preheat the oven to 350 degrees.  Line 2 baking sheets with parchment paper.

In a large bowl, cream the butter and both sugars together until light and fluffy.  Then beat in the eggs, this should take about 30 seconds.  On low speed, mix in the vanilla extract until all is blended into the batter.

Then sift the baking powder, baking soda and salt into the batter.  Beat for 30 seconds on medium speed.  Lower the speed and add 1 cup of the flour and run mixer until no more dry streaks remain.  Repeat the process with the the remaining 1 1/2 cups of flour.

Using a large wooden spoon or clean hands, fold the toffee bits, chopped chocolate and walnuts into the batter, making sure it is evenly distributed.  Divide the dough into 4 equal parts and place 1 part in a small bowl and put the rest in the refrigerator.

Divide the 1/4 section of the batter into 12 pieces and drop onto baking sheet about 1 1/2-2  inches apart (I only could fit 9 on a sheet at one time).  Lightly flatten the top of the cookies. Place cookies in oven to bake for about 10-12 minutes.  Cookies are done when they turn a golden brown on the edges.

When you remove the cookies, they will be very puffy and will flatten out upon cooling.

Remove pan from oven and place on rack to cool for about 5 minutes.  Then transfer cookies to rack to finish cooling.  Repeat process with the remaining cookie dough.

Monday, August 29, 2011

In Remembrance: Princess Diana's Cake

It is really hard to believe that it has been nearly 14 years since the death of Princess Diana.  Her life of royalty started out as a fairy tale wedding when she was 21.  Thereafter, she was constantly in the spotlight of the press and was having difficulties with Britain's Royal Family.    As time went on, her relationship with Prince Charles started deteriorating due to infidelity.  However, she accomplished great works of charity and was dubbed the "people's princess" and the "queen of hearts".
I think of how young she was to have the burden of the press in her life as well as death on August 31, 1997.  Had she lived longer, I am sure she would have went on to do many more great things.  When I heard about the press putting something out there called "Diane at age 50", I assumed that was what was going to be the focus.  However, I was shocked to find out that it was mostly related to pictures that aged her appearance.

There is a recipe that claims to be Princes Diane's Wedding Cake.  After doing some research, I have found it to be similar, but not exact.  The actual wedding cake had fruit soaked in brandy and had a different type of icing.  I am not sure how this version came about, so that is why I did not title it as her wedding cake.  Also, it does not have the elegance of a wedding cake.  However, perhaps the simple, homemade appearance of the cake is more fitting for Diana.  I feel that she was more down to earth, rather than the type of person that put on airs due her relationship with Prince Charles.

The recipe is very similar to Hummingbird Cake, but it has the extra ingredients of coconut and apples. If you like the Hummingbird cake, you will enjoy this.

Princess Diana's Cake
courtesy of recipelink.com

Ingredients
3/4 cup chopped nuts
3/4 cup coconut
1 cup chopped apples
1 1/2 cups chopped bananas
8 oz crushed pineapple with juice
1 1/2 cups oil
3 eggs (beaten with mixer)
1 3/4 cups of sugar
2 tsp vanilla
2 1/4 cups flour
1 1/2 tsp cinnamon
1 tsp baking soda
3 cups powdered sugar
8 oz package of cream cheese

Preheat the oven to 350 degrees.  Grease the insides of a 9X13 pan and line the bottom with parchment paper.  Grease the top side of the parchment paper.  The parchment is only if you want to cut & frost the cake outside of the pan. Should you want to leave it in the pan, eliminate the parchment paper. Dust the inside of the pan with flour.

In a small bowl, sift together the cinnamon, baking soda and flour.  Set aside.

Add the beaten eggs, 1 tsp vanilla and 1 1/4 cup of oil to a large bowl and mix with a wooden spoon until all is blended.  Fold in the flour mixture until no dry streaks remain.  Then stir in the coconut, crushed pineapple, bananas, apples and nuts.

Pour batter into pan and bake at 350 degrees for about 48 minutes or until tester comes out clean. 

Cool completely in pan prior to serving. If you used parchment paper, cool in pan 20 minutes and then invert onto rack.  Invert again and let cool completely.

To make the frosting, mix the remaining 1/4 cup of oil with the remaining 1 tsp of vanilla extract.  then beat in the softened cream cheese.  Once blended, add 1/2 cup of powdered sugar and beat for 30 seconds.  Continue to add the powdered sugar in increments, beating after each addition.  After all has been mixed in, frost cooled cake as desired.


Time is too slow for those who wait       
  to swift for those who fear
To long for those who grieve
  to short for those who rejoice
But for those who love, time is eternity
          -------read by Lady Jane Fellows at the funeral of Diana

Friday, August 26, 2011

Lucid Dream Bars

Have you ever had a dream and in the dream you realize it is a dream?  Experts on the subject will tell you that if this happens very often you can start to control exactly what happens in your dream.  I am not aware that I have had a lucid dream, but sometimes my thoughts prior to going to sleep may have had some influence.

The other night I was toying around with the idea of creating a recipe that had strawberry in it that had a strong enough flavor to work well with white chocolate. I did not want to use extract. As you know, white chocolate is quite sweet.   Anyhow, after falling asleep, waking up and then falling asleep again it came to me-canned strawberries in light syrup.

That is how this recipe came about.  It is very rich, having both white chocolate and cream cheese layers in it. Then to make it even better, it is filled with crushed canned strawberries and nuts.  Without the strawberries and nuts, the texture can best be described as a cross between white chocolate blondies and cheesecake.  The filling just adds another dimension of flavor.

You know some people say that dreamers are just people that can't face reality. To make sure you are not labeled as such, I have provided the recipe below so you can make these bars a reality in your own kitchen! :)

Lucid Dream Bars
by flourtrader

Ingredients
1 15 oz can of strawberries in light syrup
1 cup roasted chopped pecans
1 8 oz package of cream cheese (softened)
1/2 cup or 1 stick of butter
5 eggs
3 tsp vanilla extract
12 oz chopped white chocolate
2 cups sugar
1/2 tsp baking powder
1/2 tsp salt
1 1/3 cups flour

First, drain the can of strawberries and reserve 2 tbs of juice in a small bowl.  Using a fork or your fingers, crush the strawberries into smaller pieces and place pieces in a measuring cup of 1 cup capacity.  All you will need is one cup, if there is any strawberries left in the can, use them up as an ice cream topping. Cover both the strawberries and juice.  Place in fridge until needed.

Preheat the oven to 350 degrees.  Prepare a 9X13 cake pan by greasing the bottom. Then line with parchment paper, covering the bottom and leaving some to overhang on the long sides.  Grease the face up side of the parchment on the bottom of the pan.

Set up a double boiler and melt white chocolate chips together with the butter.  Once all is melted, pour into a large heat proof bowl. Beat in the additional ingredients of 1 1/2 cups sugar, 4 eggs, 1 tsp vanilla extract. 

In a smaller bowl, sift together baking powder, salt and flour.  Then fold into chocolate mixture and set aside.

Place the softened cream cheese, remaining 2 tsp of vanilla, remaining egg and remaining 1/2 cup of sugar in another bowl.  Beat until smooth.

To make the layers, pour half of the chocolate batter into the prepared pan.  Then sprinkle half of the pecans over the layer and drop 1/2 cup of  strawberry chunks evenly over layer.  Then drop the cream cheese on top by spoonfuls and use a knife to smooth it out evenly as best you can.  The cream cheese should cover the strawberries.

For the last layer, mix the nuts, strawberries and reserved 2 tbs of juice into the chocolate batter and pour it over the top.

Bake in oven for 35-40 minutes or until done. When done, you will see the toasted edges are starting to pull away from the pan and the whole surface should have a light crust.  Remove pan and place on rack to cool.  Once completely cool, lift out of pan and cut into squares.    

Wednesday, August 24, 2011

Chocolate Parthenons

Well, I decided that I would try something different, using phyllo pastry sheets.  I was nervous, so I purchased double the amount required for this recipe.  I am glad I did, because I was halfway through making these little pouches when I finally felt at ease.  The sheets are not ideal for the heavy handed or the impatient, but I did get through it and still had some left over.  There were some sheets torn in the process, but less that I expected.

Dealing with the phyllo is probably the most difficult thing in this recipe.  The rest came together really quickly.  This is a perfect recipe for first timers, since I did not have any problem except for the few sheets that were torn.  I also needed more butter than recommended when I got to the stage where the outside is brushed after the phyllo package is formed.  Now that I have dealt with phyllo sheets, I am hooked. The smell of the baked buttery sheets is so intoxicating.   

By now you are wondering what is in this phyllo package?! Simply put- it is pure, sinful indulgence.  If you can imagine, think about crunching into these buttery flakes of phyllo and reaching a brownie-like chunk of cake packed with chocolate chips and walnuts. There you have it.  For those without a vivid imagination.....


Now on to the recipe...

Chocolate Parthenons
courtesy of Bon Appetit (prior to 2005)

Ingredients
20 phyllo pastry sheets (this will make 10 pouches)
1-12oz package of semi-sweet chocolate chips
2 cups chopped and toasted walnuts
4 eggs
1 cup and 2 tbs melted butter (2 1/4 sticks)
1 1/2 cups sugar
1 tbs brandy
1 tbs vanilla extract
1 cup flour
1/4 tsp salt
1/2 tsp ground cinnamon

Optional toppings:
Powdered sugar
Chocolate syrup

Prepare 10 tartlet pans (4x1 inch) by buttering all the insides.  Pans with removable bottoms are recommended but if you have the solid ones, place a parchment round in the bottom and butter it as well.

In a large bowl, whisk the eggs.  Then stir in the sugar until evenly dispersed.  Add the brandy, vanilla extract and 2 tbs of butter and mix together.  Set aside.

Sift together flour, salt and cinnamon.  Stir this dry mixture into the wet egg mixture.  Fold in the chocolate chips and walnuts.  Set the filling aside while you prepare the phyllo packages.

Place 2 phyllo sheets (one on top of another)on a work surface.  Cover the rest with a damp towel or plastic wrap so it will not dry out.  Brush the surface of the top phyllo sheet with butter.  Cut sheets in half, so you have two rectangles measuring 9X13.  The cut each half again to form 3 sections, measuring 9X4 1/2.  You should have a total of six sections.

Take one section and place the end inside one of the tart pans leaving the rest of the section to go up  over the edge of the pan and lay flat on the surface outside..  This will be like the first spoke of a wheel.  Continue the same process with the 5 strips, overlapping slightly and going around the outer edge of the pan like spokes.

Place 1/2 cup of the filling inside the pan on top of the phyllo.  Then gather all of the strips towards the center.  Carefully twist the phyllo  strips (1/4 turn) and squeeze slightly to form a top knot. Then brush with melted butter.

Preheat the oven to 350 degress. Then repeat the cutting and forming of the purses on the additional 9 tartlet pans.  Place tartlet pans on baking sheets and bake until the phyllo turns a golden color, which is about 40 minutes.  Once baked, remove from oven and cool slightly.  Carefully lift off or out of tartlet pans by holding the packages on each side, right above the pan edge.  You do not want to touch the top knot.  Place on dessert plate and if you want, dust with confectioners sugar and pour on chocolate syrup.

These purses can be prepared one day in advance and refrigerated.  Also, they are tasty both at room temperature or warmed.

Friday, August 19, 2011

Tequila Sunrise Bars

Even though this is a popular bar drink, I cannot help but think of the Mel Gibson movie by the same name where he played Mac McKussic.  That was back in 1988 when Mel was such a hot commodity. 

Surprisingly, with all the bad publicity concerning his personal life, he is still writing screenplays and starring in them.  The most recent one is called "How I Spent my Summer Vacation".   He portrays a criminal in a Mexican prison.  There is no release date for the US yet, but it is going to be showing in Finland and Sweden later this month.

Anyhow, enough of Mel, lets get back to food!  These bars are two layers, the first and major layer being orange tequila and the second little layer is flavored with grenadine.  To make it look more colorful, I have sprinkled pink powdered sugar on top.  I am delighted with the flavor and the appearance of these bars and will definitely make them again.

I made a few changes that will help.  On the grenadine layer, the recipe calls for orange zest for sprinkling.  Since fresh orange zest is usually damp and clumpy, I used zest from the spice aisle at the grocery.  Also, the instructions are to color the dough after you put the flour in, but it is easier to color the batter before adding the flour.  It also makes for a more even tinting.

Tequila Sunrise Bars
courtesy of The Sophisticated Cookie Cookbook

Ingredients/Base Layer
3 tbs Tequila
food coloring (orange, or mix of red/yellow to make orange)
2 tbs fresh orange juice
2 tbs grated orange zest
1/2 cup powdered sugar
1 tsp baking powder
1 1/2 cups flour
3/4 cup butter (room temp) 

Ingredients/Grenadine Layer
2 tbs grated orange zest (for sprinkling)
1/2 tsp baking powder
3 tbs flour
1/2 cup sugar
2 eggs
2 tbs grenadine

To make the first layer, grease bottom and sides of an 8 inch square pan.  Then line bottom and two sides (leaving an overhang on the sides) with parchment paper.  Grease face up side of parchment lining the bottom of the pan.  Preheat oven to 350 degrees.

Cream together butter and powdered sugar in a medium size bowl.  Once it has a smooth consistency, add orange juice, zest and tequila.  Beat until evenly dispersed.  Add food coloring a few drops at a time and beat.  Continue with this process of adding the coloring and mixing until you are satisfied with the color.  Set aside.

In another bowl, sift flour and baking powder together.  Then fold into wet batter until no more dry streaks remain.  Empty dough into baking pan and, using damp hands, spread the dough evenly inside the pan.  Place pan in oven and bake for 12 minutes.

As the layer is baking, you will need to prepare the batter for the grenadine layer. In a small bowl, sift together flour and baking powder. Set aside.

Crack eggs into medium bowl and beat for about 10 seconds.  Then add sugar and beat at medium high speed for 3 minutes.  Add the grenadine and beat for an additional minute.  Stir the flour mixture into the batter.

Once the base layer has baked, remove from oven and pour the grenadine batter over the top, making sure it is even . Then sprinkle with the orange zest. Place back in oven for 17-20 minutes.  The top and edges should be brown when done.

Remove from oven and dust heavily with powdered sugar.  Let cool on a wire rack for a few hours or until top is set.  Then slide a knife around the edges and lift out with parchment handles.  Then it is ready to cut and serve.  Store at room temperature in an airtight container. Cheers!

Wednesday, August 17, 2011

Peach Heart Muffins

Well, I recently got some new equipment for baking.  It is a muffin pan with spikes in it.  I had to try it out.  The one thing I did realize is that in order for the spikes to suspend whatever you stick on them, they would have to be somewhat solid.  In this particular recipe, I cooked the peaches first, so they were a little too soft to be suspended.   I will be doing more experimenting to see what tasty things I can suspend in muffins or cupcakes.

This recipe does not require the special pan, you can place the peach piece on top of the batter before baking. I have only tested this recipe with the spike method, so I am not sure how much the fruit will or will not sink when baking if you place it it on top of the batter .

Peaches have not been the best this year and I have patiently waiting for some good ones. Most of them are the size of plums. However,  I recently found a good selection at a roadside stand. Now I  wish I had bought more.

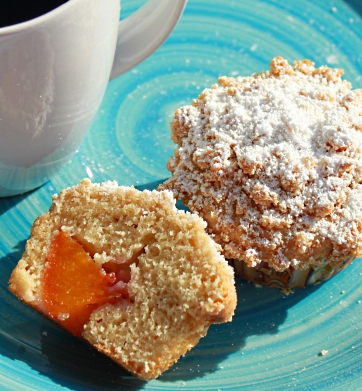
This muffin recipe yields a moist cake that envelopes a juicy peach chunk that was cooked in peach schnapps (or peach nectar for the non alcoholic).  Each is covered with a crumb topping and sprinkled with powdered sugar.  The recipe yields one dozen standard size muffins.

Peach Heart Muffins
by flourtrader

Ingredients/muffins
12 chunks of peeled peaches
1/4 cup of peach schnapps (or nectar)
2 eggs
2 egg yolks
1/2 cup or 8 tbs of butter (room temp)
3/4 cup sugar
1/4 tsp salt
1 tsp baking powder
2 tbs vegetable oil
1 tsp vanilla extract
1 3/4 plus 2 tbs flour

Ingredients/topping
2 tbs peach schnapps (or nectar)
1 cup flour
4 tbs melted butter
1/3 cup light brown sugar
1 tsp cinnamon

To make the muffins, grease the top edges of the 12 indentations in the pan.  Then line with cupcake liners or slide over the spikes (special pan) making a small hole in the liner.

Take a small saucepan and fill with peach schnapps (or nectar) and peach pieces.  Place over medium high heat and stir a little.  Then let mixture come to a boil.  Turn heat to low and let simmer for 6 minutes or until all pieces are cooked through. Remove and let cool.

While this is cooling, preheat the oven to 350 degrees.  Sift together the salt, baking powder and flour.  Set aside.

In a large bowl, beat butter and sugar for 3-5 minutes or until light and fluffy.  Add each whole egg, one at a time, beating for 30 seconds after each addition.  Do the same with the yolks and then beat in the vanilla extract and the vegetable oil.

After cooling the cooked peaches, separate them from the sauce.  Then stir the sauce into the batter.

Mix the dry ingredients into the batter in 1/3 increments until no more dry streaks remain.  If using a regular pan, pour the batter into the cupcake liners and smooth the top.  Then place 1 peach chunk on top.  If using a spike pan, slide one peach piece onto the the top of the spike.  Piece should be pierced all the way through, but the spike should not show sticking out the top. Spoon batter over the piece, filling each cavity.

Then make the crumb topping.  Whisk together all the dry ingredients until evenly distributed.  Pour in the schnapps (or nectar) and the melted butter. Stir with a fork until it becomes coarse crumbs.  Sprinkle topping evenly over muffins.

Place pan in oven and bake for 18-23 minutes or until top is a golden color.  A tester can also be used, but be sure that it is stuck into the cake part to test and not the peach piece.

Remove pan and let muffins cool for 1 minute and transfer to wire rack.  Dust with powdered sugar.

Tip: the easiest way to peel a peach is by putting it in boiling water for 2 minutes.  Then remove and let cool a little and wipe with a paper towel.  The towel will pull the skin right off.  This beats peeling with a knife and there is less of the peach wasted.

Monday, August 15, 2011

Eggnog Cookies


My trials and tribulations in the kitchen did not turn out for my intended recipe, so I had to go to my back up plan.
 
It is another "out of season" recipe.  It may be out of season, but you can get your hands on eggnog via Amazon.com.  For some reason I have been thinking about making something with eggnog for a few months.  Maybe it is because I am ready for the cold winter weather and am looking forward to the winter holidays.  The aroma and the taste of these cookies did get me into a holiday spirit.  They are just the thing to get you motivated about planning your Christmas this year.

Some people think it is funny, but I buy Christmas presents all year long. I am always asking my family what they want or make notes when they are discussing something they want or need.  Based on that, you will not find me in the crowd of last minute shoppers. Now more about this recipe...

The standard recipe for these cookies states to drop them on a baking sheet, but that method does not make for a pretty cookie.  I used a big tip and swirled onto the baking pan.  The batter flattened out when it baked and they came out pretty even sized.

This cookie is not puffy, but more flat and crispy.  The eggnog along with the spices does make for a good flavor to the cookie.  Also, the rum flavored icing really pairs well with the eggnog flavor.  This recipe makes about 3 dozen cookies.

Eggnog Cookies
courtesy of All Recipes

Ingredients/Cookies
3/4 cup brown sugar
1/2 cup white sugar
3/4 cup butter (room temp)
2 egg yolks
1/2 tsp ground nutmeg
1/2 tsp ground cinnamon
1/2 cup eggnog
1 tsp baking powder
2 1/4 cup flour
1 tsp vanilla extract

Ingredients/Icing
1 1/2 cups of powdered sugar
3 tbs butter (room temp)
3 tbs rum


To make the cookies, first line two baking sheets with parchment paper.  Preheat the oven to 300 degrees.  Also prepare a piping bag by using a coupler and a large piping tip or cut off 1/4 of the corner of a zip lock bag.

Sift together the cinnamon, baking powder, nutmeg and flour.  Set aside

In another bowl, cream together the butter and both types of sugar.  Once the consistency is light and fluffy, beat in the vanilla extract, egg yolks and eggnog.  Then fold the flour mixture into the batter until no more dry streaks remain.

Then fill pastry or zip lock bag with batter.  Using the bag, push dough out into circles on baking sheet spacing about 1 inch apart.  The circles should be the size of quarters and any tips of dough sticking up should be pushed down.  Place filled baking sheet in oven and bake cookies for about 20-23 minutes.  Cookies will be done when edges are a golden color.

Remove pan from oven and let cookies cool on pan for 3 minutes.  Then transfer to a rack to finish cooling.  Repeat forming and baking process until there is no more batter.

To create the icing, place butter and powdered sugar in a bowl and beat until smooth.  Then add the rum and beat for 2 minutes more.  Once cookies have cooled, use a knife and frost as desired.  Icing should set up after 2 hours.

For additional flavor, you might want to sprinkle some toasted pecans on top of the icing before it sets. Enjoy!

Friday, August 12, 2011

Blue Cheese Crisps

Yes, it has been some time since I posted an appetizer or savory recipe.  I do not crave salty things as much as I do sweet, but the craving eventually comes along.  I wanted something cheesy, yet I did not want it to be deep fried.

Firstly, I have a lot of different cheeses in my fridge.  On those rare occasions when I go to Central Market, I take my time in the bread and cheese area.  They have such a great variety there and my husband is usually trying to rush me.  He is one of those "list" people, which means that impulse buying is out.  Sometimes that is a good thing and sometimes not.

Anyhow, if you have a craving for blue cheese or are looking for a quick appetizer, this recipe may be just the one.  The outside is fluffy bread dusted with smoked paprika and a sprinkling of cheddar and Monterrey jack cheese.  The creamy inside is a mix of 2 cheeses, the first being the tangy cream cheese and the other, blue cheese.  This mix provides a wonderfully sharp and salty flavor in every bite.

Outside of the taste, it is a pretty quick fix.  These morsels can be prepared in advance and frozen.    Once taken out of the freezer-just top and bake, no defrosting required!  The recipe states you can top and freeze but I am not sure how well the paprika or cheese on top will do in the freezer, so my suggestion is to top them the day you bake them. This recipe yields 48 appetizers.

Blue Cheese Crisps
courtesy of My Great Recipe Cards/packet 33

Ingredients
3/4 cup cold vegetable shortening, cubed
1/3 to 1/2 cup ice water
1 egg
2 tbs butter
3 oz cream cheese
2 tsp instant minced onion or 1 tsp onion powder
4 oz crumbled blue cheese
2 cups flour
1 tsp salt
smoked or regular paprika (for topping)
grated cheddar cheese (optional)

Line 2 baking pans with parchment paper.  Also, let your cream cheese, egg and butter come to room temperature before using.

Sift together flour and salt and set aside.  Fill another bowl with cream cheese, egg, onion or onion powder, butter and blue cheese. Beat on medium speed for 2 minutes or until it reaches a creamy consistency. Cover and refrigerate.

Add the cubes of shortening to the flour mixture and blend with a pastry cutter until it becomes a mass of pea-sized clumps.  Sprinkle 1/3 a cup of the ice water over dough and mix with a fork.  If it seems to dry, add more water until the dough holds together in a large ball.    Split dough into 2 equal pieces.

Lay one piece out on a floured surface and roll into a rectangle.  The rectangle should be 8X12.  Take out the filling from the fridge and smear 1/2 of it evenly on the dough, covering a space of 4 inches wide and 12 inches long.  The filling should leave a small border on the three edges, so the dough can be sealed without the filling coming out.  Place the rest of filling back in fridge. 

Take a spatula and run it underneath the dough that is not covered with filling.  This is to make sure that there is no sticking.  Then fold the dough in half, making it into a 4X12 inch rectangle. Press down lightly making sure all the air bubbles are out and seal the edges of the dough.

Preheat your oven to 425 degrees. Cover dough and place in fridge for about 30 minutes.  This will insure that the filling is not runny when you cut the dough.

After cooling, the dough will need to be cut. You can use a knife, a regular or crinkle edged pastry cutter or a small biscuit cutter.  I used a biscuit cutter and they turned out uniform in size but there was some wasted scraps.  Cut dough into 1 inch squares or circles and place pieces on baking sheet. These do not rise much, if at all, so they can be spaced closely together as long as they are not touching.

Sprinkle dough pieces with paprika.  If you opted to top with cheese, sprinkle that over the paprika.
Place pan in oven and bake for 12-15 minutes or until lightly browned.  Remove and let cool on pan for 5 minutes and transfer to serving tray. These are best served warm. Repeat process with remaining dough and filling.

If you plan to freeze, complete all steps up to and including the cutting instructions. Freeze in a single layer and wrap well.  To prepare, do not defrost, just put paprika and cheese (if desired) on top and bake.  Enjoy!

Wednesday, August 10, 2011

Jazzy Jam Cupcakes

Well, if any of you make your own jam, this recipe has a use for that!  Most of the times when you hear about jam being used in a baked good, it usually is a filling between cake layers or a pastry filling. However, in this case, the jam is actually mixed and cooked into the batter.

The cake part reminds me of a hummingbird cake. The subtle flavor of the pineapple jam goes well with the cinnamon and ginger spices.  The icing on top tastes much like a praline, especially since the edges are rolled in ground pecans.

I am now thinking of all the other jams that could be used to flavor a cake or cupcakes and the different icing combinations you can come up with. The only concern on a variation is the type of jam. It would need to be seedless, so you may have to do some straining. This recipe makes 3 dz cupcakes.

Jazzy Jam Cupcakes
by flourtrader

Ingredients/cupcakes
1 cup chopped toasted pecans
3/4 cup buttermilk
1 cup of pineapple jam
6 eggs
2 cups light brown sugar
1 cup or 2 sticks of butter (room temp)
3 cups flour
1/2 tsp salt
1/2 tsp ginger
1 tsp ground cinnamon
1 tsp baking soda

Ingredients/Frosting
3/4 cup dark brown sugar
1/2 cup heavy cream
1/4 cup butter
1 cup powdered sugar
1 1/2  tsp rum
1/2 cup ground pecans

To make your cupcakes, preheat the oven to 325 degrees and grease the top edge of the cavities of a muffin tin.  Line the cavities with paper liners.  Set aside.

With an electric mixer, beat butter until it reaches a creamy consistency.  Slowly add the light brown sugar and beat for an additional 2 minutes.  Beat in the eggs one at a time for about 30 seconds each.
Fold the jam in the batter with a wooden spoon until evenly dispersed, then beat for 1 minute.  Set aside.

In a medium size bowl, sift the flour, baking soda, cinnamon, salt and ginger together.  Fold in 1/4 of the dry mixture to the wet batter, then add 1/4 cup of buttermilk.  Continue with this process of adding and mixing in the dry mixture and buttermilk-ending with the addition of the last bit of flour.
Then stir in the pecan pieces.

Fill each cavity of the pan with the batter. Batter should be nearly to the top edge of each cavity.   Place pan in oven and bake until done, or when tester comes out clean.  Mine took about 20-25 minutes.

Remove pan and let cupcakes cool for about 3 minutes then transfer to a cooling rack.

To make the frosting, place first three ingredients into a saucepan over medium high heat.  Stir the mixture until the butter is melted.  As you stir, let the mixture come to a boil and then
boil for 3 minutes. Remove from heat and stir in rum.  Let cool for 20 minutes.

Then add wet frosting mixture to powdered sugar, stirring to blend.  Place a sieve over a large bowl and strain frosting mixture into bowl, using a spatula to stir out any lumps from the powdered sugar.

Using a spoon, smooth the frosting over the top of the first cupcake, making sure that the edges are covered. You should let excess frosting drip down into a bowl.  Place the cupcakes on a cooling rack for about 3 minutes for the icing to start to set up.  After about 3 minutes, roll iced cupcake edges into the bowl of ground nuts, pressing lightly. If icing still drips off into pecan crumbs, stop and wait another 3 minutes and resume rolling in the crumbs. I was able to frost about 6 cupcakes at each interval before rolling in nuts. After all the cupcakes are frosted and decorated with nuts, allow the frosting to set up. This should take about an hour.

Then you are ready to serve.