
Foodbuzz
Showing posts with label filled cookies. Show all posts

Sunday, April 2, 2017

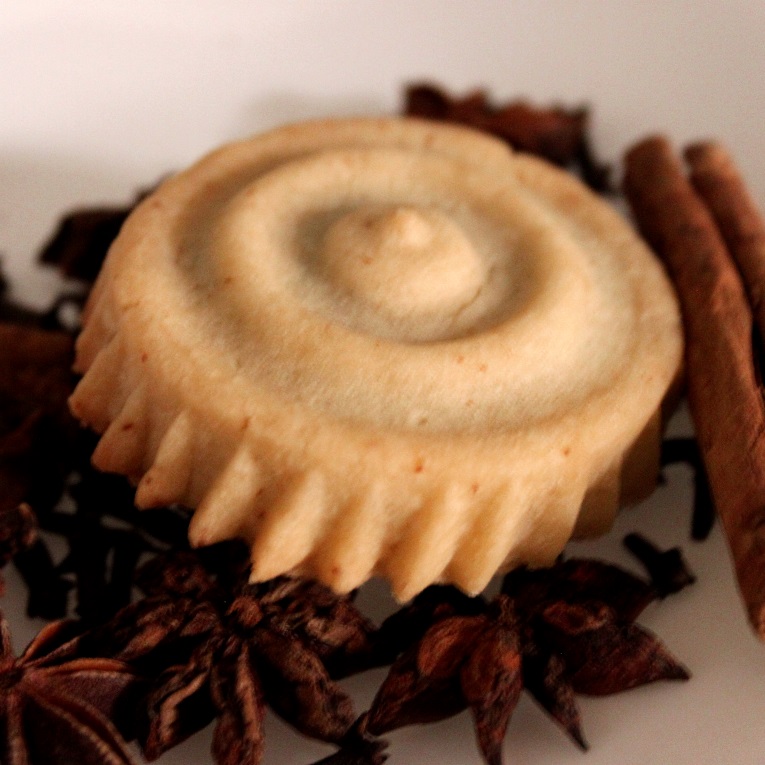
Spicy Date Filled Cookies


Sometimes baking in the kitchen can be like resolving a mystery. You see something that you have never made nor have you ever tasted. Then you review the recipe, noting that it has some challenges that take time. Like most bloggers, we step up to the plate, eager to create and push our skills further.

This particular recipe originates from the Middle East, so there are special ingredients as well as a special tool needed to create this traditional cookie called Ma'amoul. However, you can scale it back in a few ways. The mold is only for appearance, so the cookies can be formed by hand. Also, clarified butter can be made from real butter, if you have the time. The specialty spices can be found on line or at an Indian or Middle Eastern grocers. Also, the mold can be ordered on line.

These may be called cookies, but they are definitely more of a pastry type of item. The outer part contains yeast and the dough is used in a manner much like a crust rather than a cookie. The crust houses a blend of sweet dates, spices and walnuts. All in all, this recipe mystery unraveled into round pastries housing exotic flavor that were both pleasing in appearance and taste. The recipe is definitely a keeper, especially when you want to impress for special occasions. 

Now, without further delay, below is the recipe, which makes about 2 dozen cookies. Note that the spice mix yields more than required in this recipe, but the mix can be stored for later use.

Spicy Date Filled Cookies
adapted from an Edible Mosaic

Ingredients/Spice Blend
1 tsp ground allspice
1/4 tsp ground anise
1 1/2 tsp ground cinnamon
1/4 tsp ground cloves
1/4 tsp ground fennel seeds
1/4 tsp ground ginger
1/2 tsp ground mahlab (ground cherry pits)
1/2 tsp ground nutmeg

Ingredients/Filling
1/3 cup finely chopped walnuts
2 tbs canola oil
3/4 lb of date paste
1 1/2 tsp of spice blend (above)

Ingredients/Dough
1/4 cup oil
3/4 cup water
3/4 cup clarified butter (ghee)
4 cups flour
1/2 tsp instant yeast
1 cup sugar
1/4 cup powdered sugar (for dusting on top/optional)

Start by whisking all the spice ingredients together in a small bowl and set aside.

To create the filling, a food processor or stand mixer will need to be used. Prepare the blade and the interior of the bowl by coating with oil. Place the date paste in the bowl and then pour in the oil. Pulse the food processor or beat on medium speed with mixer until the oil is blended with the date paste. During this process you may need to stop occasionally and scrape down the sides of the bowl.

Oil the surface of a cutting board and empty the date mixture onto the board. Separate out 1 1/2 tsp of the spice blend and store the remaining in a small jar or time for later use. Oil your hands and sprinkle some of the spice mix on the date mixture. Knead the spice into the date filling and then add some more spice and knead again. Repeat the process until all the spice is blended into the filling. Then do the same with the chopped walnuts. Set the bowl aside.

For the dough, get out two saucepans. Fill one with sugar and water. Fill the other with the butter and oil. Place the saucepan with the sugar/water over medium high heat. Let the mixture heat up to boiling and swirl a few times to get the sugar swirled into the water. It should boil for 1 minute and then remove from heat and set aside. Put the saucepan filled with the butter and oil over the medium high heat and let cook until the butter is completely melted. This saucepan is also to be removed from heat and set aside.

Sift together the flour and yeast in a large bowl. Form a well in the center of the dry ingredients and pour in the butter/oil mixture. Using a wooden spoon, fold the liquid into the flour mixture. Once this comes together, blend in the sugar syrup in three increments until a dough is formed (it will be oily). Dust a flat surface with flour and knead the dough on the surface for 2 minutes. Form into a flat disc and cover with plastic wrap and place in freezer for about 7 minutes. Remove and knead again for 2 minutes.

Prepare 2 baking sheets by lining with parchment paper.

To form the cookies by using the mold: Take one tablespoon of dough and fill the mold and shape it much the same way as you do a tart pan, flattening and bringing up the sides. Once this is formed, take a knife to remove the excess dough, running the knife from the center top edge outward to the left then the right. Separate out a teaspoon of filling and flatten it into the center of the dough in the mold, being careful that it does not touch the sides. Then separate out a teaspoon of dough and flatten it into a disc, big enough to cover the filling. Place it on top of the filling and press down, so the edge is compressed with the edge of the first layer of dough. Make sure there are no cracks and the filling is completely covered. Lastly, tap the side rim of the mold on a flat surface and the cookie will fall out.

To form the cookies by hand: use the same measurements above, but use your palm as a mold and create the same coverage of the filling and make a slightly flattened circle. Use the tines of a fork to make a cross hatch on top.

After making 6 cookies and placing them on a cookie sheet one inch apart, preheat the oven to 350 degrees. Make 6 more, spacing the same on the cookie sheet. Place pan in oven and let cookies bake for about 10-12 minutes, then rotate and bake for another 10-12 minutes. Cookies are done when the bottom is toasty and golden.  Remove and transfer to rack to completely cool.

Once cooled and prior to serving, you can dust with powdered sugar.

Tips and Notes:
1. Do not worry about the filling bubbling up and bursting the cookie, it does not hold that much liquid, so fill these cookies with as much as they can hold. In the beginning, I was too sparing on the filling resulting in more cookie than filling. The cookie is only to be a crust.

2. The dough is oily, so if you find it becoming too slick while forming the cookies, put it the fridge for 3-5 minutes to firm up. I did spend a lot of time forming these, so I needed the re-chill in the process.

3. If you find the cookie release from the mold requires too much effort, use a light dusting of flour in the mold before forming another cookie.

4. As stated before, specialty items can be ordered on line or can be found at a Middle Eastern or Indian grocery store. Also, you can always grind whole spices (Anise, Fennel) if the "ground" version is not available.
                               **LAST YEAR: Sawdust Pie** 

Sunday, February 22, 2015

Taffy Treats


The title and the picture does have a way of leading you down the wrong path.  Let me clarify a few things: these are not candy, but caramel coated cookies and there is none of the traditional taffy in this recipe. The only link to taffy is that the filling and coating is stretchy, much like the taffy.  Sorry for the taffy fans, but if you love caramel and nuts, gladly read on. Clearly, the person that won the baking contest with this treat must be in your nutty caramel circle.

If I had to name these little goodies, I would call them nut caramel clusters. There is a walnut praline filling inside and then they are coated with caramel and walnuts.  The cookie itself tastes like a butter cookie. Surprisingly, these are made with both powdered sugar and brown sugar. The outside caramel is the soft, chewy kind with a deep, buttery flavor. The layer of caramel in a Milkyway bar is the same.

The filling, forming and coating is what requires the most time to create these.  You could make your own caramel, but this recipe only calls for softening store-bought caramels.  It is a time saver and I do not feel that it detracts any from the flavor.

Anyhow, these morsels are as delicious as they look.  For parties, dress them up with colored toothpicks and place them in 1 1/2" candy papers. However, feel confident that these will be eaten quickly, regardless of how fancy the presentation.

This recipe makes about 3 dozen cookies.  Be sure to read the helpful tips and notes at the end before you begin.

Taffy Treats
adapted from the Plymouth Star Tribune

Ingredients/ filling
1/3 cup ground walnuts
1/3 cup evaporated milk
1/3 cup sugar

Ingredients/cookies
1/2 cup or 1 stick butter (room temp)
1 egg
1 tsp vanilla extract
1/4 tsp salt
1/4 cup packed brown sugar
1/4 cup sifted powdered sugar
2 cups sifted flour

Ingredients/ coating
14 oz of caramels (approx 48-50 caramels)
1/3 cup evaporated milk
1 cup ground walnuts
Toothpicks for dipping and serving

The first step is to make the filling.  Place all filling ingredients in a saucepan.  Cook and stir constantly until thick, about 5 minutes.  You should be able to scrape the bottom of the interior of the pan and have the streak remain for at least 20 seconds before the filling flows back to cover it.  Remove from heat and set aside.  It will set up more upon cooling.

For the cookies, prepare 2 baking sheets by lining with parchment paper.  Preheat the oven to 350 degrees. Fill a mixing bowl with the butter, powdered sugar, brown sugar and salt.  Beat until smooth and creamy.  Then beat in egg and vanilla extract. Once blended, mix in the flour with a spatula or wooden spoon.

Take the dough and form into 1 inch balls.  Make a depression with your thumb and fill indentation with 1/4 tsp of walnut filling. Seal in filling and shape back into a ball.  Place each on baking sheet, spacing about 2 inches apart.  Bake until golden brown on bottom, about 15-18 minutes.  Remove cookies from the oven and gently insert toothpick into center and transfer to cooling rack. Let completely cool prior to coating.

Set up a double boiler for the caramel coating and place over medium heat. Then lay a sheet of wax paper and a bowl full of the ground walnuts aside. Once water starts to simmer in bottom pot, pour evaporated milk and add caramels to top pot.  Let mixture melt, stirring occasionally.  After all caramels are melted and blended with the milk, you are ready to dip the cookies by using the toothpick. Dip each cookie into the caramel and let the excess drip off. Then coat the bottom by placing in the ground walnuts.  Transfer to wax paper and allow to set.

Tips and notes:
1. The forming process is best done in dozen increments.  Forming several dozen indented rounds prior to filling will cause the dough to dry out and crack while it sits.

2. To fill and seal, I dampened my fingers to pull out the filling, to place in the indentation and to seal inside.

3. The recipe suggests using the microwave to melt the caramels or removing the double boiler from the heat.  I used a double boiler and left it on the heat to maintain the caramel consistency while dipping. The microwave method would not allow for this.

4. How much you cover your cookies with the caramel or walnuts is your option.  If you plan for full coverage, don't roll the cookies around in the nuts. Placing it in the nuts to cover the bottom and sprinkling the nuts on the top is the best way to keep all the caramel on the cookie instead of having it drip off into the nuts.

5. I used Kraft brand caramels (comes in an 11 oz bag) and the coating was soft and smooth.  If for any reason your coating is too thick, adjust by adding a tablespoon at a time of evaporated milk or water until desired consistency is met. Eenjoy!
                             **LAST YEAR: Peach Brandy Pound Cake**

Sunday, February 9, 2014

Dutch Love Letter Cookies


With Valentine's coming up, I decided to take on a project.  Turning a tasty cookie recipe that is very basic in appearance to something more pleasing to the eye.  Granted these were not the easiest things to form and did take some practice batches, but I am happy with the end result.  If you are short on time, you can always just do these in logs or the "s" shape as the recipe instructs.

The cookies have a flaky, crunchy exterior with an almond paste filling.  The exterior is somewhat made like pastry dough, using water. Instead I used chocolate liqueur in its place.  However, there was no trace of this flavor in the cookie after baked.  Perhaps with something stronger like rum or bourbon, the flavor may remain.  I still want to experiment some more on these.  With regard to the the shaping of the dough, the filling does not ooze out when baking so cracks in the cookie dough is not a disaster.

The original recipe states to form these in large "S" shapes, brush with an egg wash and sprinkle with sugar.  As you can see, I dipped these in chocolate instead.  The recipe in its original state is below, but I encourage you experiment and add your own spin.  In making the large "S" shapes as per the recipe, it yields 16 cookies and takes about 2 1/2 hours to complete the process.

Dutch Love Letter Cookies
adapted from 100 Great Cookie Recipes/Ladies Home Journal

Ingredients/Cookie Crust
1 cup or 2 sticks cold butter, cubed
1 egg yolk
6-7 tbs ice water
3 cups flour
1/4 tsp salt

Ingredients/Filling
1/4 tsp grated lemon peel
8 oz can almond paste or 7 oz tube
1/3 cup sugar
1 egg

Ingredients/ Topping
1 egg white
2 tbs sugar

Sift together the flour and salt.  Then cut in butter with pastry blender or 2 knives until mixture is crumbly.  In a separate small bowl, whisk together 1 egg yolk and 2 tbs water. Drizzle mixture into the sifted ingredients and toss together with a large fork.  Add one tbs of water and toss together.  Repeat with additional tbs of water until the mixture comes together like pastry dough.

Separate dough into 4 equal sizes.  Place a square on lightly dusted wax paper and form into a 4 inch square.  Repeat with the other lumps of dough.  Peel wax paper off of squares and completely enclose in plastic wrap.  Refrigerate for 1 hour or overnight.

During chilling time, prepare the filling by beating together all 4 ingredients listed above.  Once it is blended into a fluffy mixture, scrape out of bowl with a spatula and transfer into a plastic zip lock bag.  Seal and chill for one hour or overnight.

After the chilling time, preheat the oven to 375 degrees and line 2 baking sheets with parchment paper.

Lay a 20 inch piece of wax paper on a flat surface and lightly dust with flour.  Remove one pastry square from the refrigerator.  Test the dough by kneading to make sure it is can be rolled out without breaking.   Once it becomes pliable, roll into a 9 1/2 inch square about 1/8 inch thick. 

Trim the edges until you have a straight edged, 9 inch square.  Cut into 4 strips, each measuring 2 1/4 by 9 inches.  Brush each strip with water.  Take filling out of refrigerator and cut off a small section of the corner of the bag.  Then pipe 1/2 inch strip lengthwise down the center of the dough, starting 1/2 below small top of strip and ending 1/2 above bottom of strip.  Roll up pastry strips lengthwise and crimp seam and ends.  Place seam side down on baking sheet in the shape of an "S".

Brush top with egg white and sprinkle with sugar.  Continue with the forming of the 3 remaining strips for this pastry dough and sugarcoat as instructed.  Repeat the rolling, forming and topping instructions for the remaining 3 squares of pastry dough in the refrigerator.

Cookies should bake for about 20 minutes.  The finished letters should have a slightly golden hue on the edges. Let cookies cool on pans for 2 minutes then transfer to a rack to finish cooling.
                                     **LAST YEAR: Lemon Limoncello Cupcakes**


Sunday, December 22, 2013

Maraschino Snowball Cookies


They say it is all about quality ingredients.  When I think of all the different things I have bought and ordered for the sake of creating something in the kitchen, there is a lot of unique as well as imported ingredients I can recall.  There is probably a blogger in another country that has the same situation.  The grass is always greener so we find ourselves coveting ingredients from another country who regards that ingredient as commonplace.

This particular recipe requires maraschino cherries which are imported from Italy.  I have made cookies before with maraschino cherries, called Cherry Bon Bon Cookies.  Between the two, I prefer this recipe over that.  This recipe has the added flavor of almond but the vast difference in the maraschino cherries is what won me over. The cherries in the US are more of a neon color and are stored in a watery liquid.  The Luxardo ones are black and packed in a syrup. The cherries taste much sweeter and stronger, which melds nicely with almond flavor of the cookie. I am hooked, so there are no plans to go back the red neon maraschinos that are so easy to find in the states.

I am adding this one to my holiday cookie recipes. Below you will find the original recipe as well as the tips and notes.  This recipe makes 2-2 1/2 dozen.

Maraschino Snowballs
adapted from Elizabeth Morris via Saveur Magazine

Ingredients
1 egg 
1 cup or 2 sticks of butter
1 tsp vanilla extract
1 cup or about 30 pitted Luxardo cherries, drained
1/2 cup almond paste
1/4 cup powdered sugar
1 tsp baking powder
2 cups flour
1/4 tsp salt
2 cups white sparkling sugar

Preheat the oven to 350 degrees and line 2 baking sheets with parchment paper.

In the bowl of a stand mixer, cream together butter and powdered sugar.  Add the almond paste, vanilla extract and egg.  Beat until all is blended and batter is fluffy.  Set aside.

Sift together the flour, salt and baking powder in another bowl.  Add 1/3 of sifted ingredients to butter mixture and mix in with wooden spoon.  Repeat the process two more times until all the dry ingredients are mixed into the batter.  The end result is cookie dough that should easily clump together with your hand.

Separate the dough into 30 pieces.  Center one cherry inside each piece of dough and form into a ball. Roll each cookie in the sparkling sugar and place 1 inch apart on the baking sheet.  Bake for about 20 minutes.  Cookies will toast on the bottom and the edges will turn golden when done.

Remove and let cool on pan for 2 minutes and then transfer to a cooling rack to completely cool.

Notes and Tips:
1.  For less leftover ingredients, I doubled the recipe so my can of almond paste would be used as well as the complete jar of Luxardo cherries.
2. The amount of decorative sugar used application is based on preference and method.  In doubling the recipe and keeping about 3 tbs or less in a shallow bowl at any time for rolling only required 1 cup of sparkling sugar.  However, more of the sugar will increase the crunch and sparkle to your cookies.
3. These are a crumbly cookie so they should be bite sized.  They are best eaten by popping a whole one into your mouth.
4. For more color to your cookies, try colored sugar or drops of food coloring to the batter.
5. Amazon.com was the resource for the Luxardo Cherries
                                 **2 YEARS AGO: Hendrix Pie**   


Tuesday, December 18, 2012

Cinnamon Roll Cookies


I am a big fan of cinnamon and nuts, especially when it comes to pastry.  However, the idea of having a special pastry every time I crave the flavor combination would be excessive indulgence.  So what is a person to do?  Looking around for the solution, I landed on the perfect item- a cookie with all the flavor of a cinnamon roll.

This cookie is thick and packed with pecans, brown sugar and cinnamon.  Also, the creams cheese icing is a must when it comes to cinnamon rolls and it was not left out of this recipe. The good thing here is that the icing is put on right before serving.  However, and even more convenient idea is to serve the cookies on a plate with the icing in a bowl for dipping.

Please allow plenty of advance time to make these, the dough does require a lot of chilling time.  The first session is for 1 hour but the second states 1 hour or overnight, noting that overnight is preferred.  Also, leave your cookie sheet in the cabinet, these are actually baked in muffin pans. The recipe makes 2 dz cookies. 


Cinnamon Roll Cookies
adapted from The Cravory in San Diego via nymag.com

Ingredients/Cookie Dough
3 eggs
2 tsp vanilla extract
1 cup or 2 sticks butter
1/2 tsp salt
1/2 tsp baking soda
3 cups plus 1 tsp flour
1 tsp baking powder
1/4 cup cornstarch
1 tsp cinnamon
1/4 cup powdered sugar
1 cup brown sugar packed
1/2 cup granulated sugar

Ingredients/Filling
1 cup chopped toasted pecans
1 tbs cinnamon
1/4 cup or 1/2 stick of butter
1/4 cup light brown sugar

Ingredients/ Icing Drizzle
1 cup sifted powdered sugar
3 tbs milk
2 oz softened cream cheese
2 oz softened butter
1 vanilla bean (scraped)
Zest of 1/2 orange (optional)

To make the dough, cream together the butter and the three types of sugars in the bowl of a stand mixer.  Once smooth, add one egg and beat for about 30 seconds.  Continue with the process on the rest of the eggs, adding each one by one.  Then beat in the vanilla extract.  Set aside.

In a large bowl, sift together the cornstarch, flour, cinnamon, salt, baking powder and baking soda.

Add 1/3 of the sifted ingredients to the egg batter and mix on low speed until no streaks remain. Add the additional flour in two increments, blending after each addition.  Form dough into a ball and cover with plastic wrap and chill for 1 hour.

While that is chilling, you can prepare the filling.  Melt the butter in a small saucepan.  Remove from heat and stir in the brown sugar and cinnamon.  Lastly, mix in the pecans until evenly distributed.

After an hour, remove the dough from the fridge and roll it out on a lightly floured surface to form a 10X10 square. Spread the filling over the dough evenly.  Then roll it up and wrap with plastic wrap and chill again at least one hour or overnight, preferably overnight.

Once the chilling time has completed, preheat the oven to 350 degrees.  Grease the cavities of 2 one dozen muffin tins.  Remove the dough roll from the refrigerator and slice evenly into 24 pieces.  Place each piece into one of the muffin cavities.

Put pans in oven and bake until lightly golden, which should take about 15 minutes.  At the 7.5 minute mark, rotate pans for even baking. Remove the muffin tins and place on rack to cool. Cool cookies completely in pan before removing.

Once you are ready to serve these, prepare the icing by beating together the cream cheese and the butter until smooth.  Then beat in the powdered sugar in 3 increments, scraping down bowl after each time.  Then beat in the vanilla bean and the orange zest (optional).  Lastly whisk in the milk until the icing reaches a smooth consistency.  Drizzle the icing on top and enjoy.
                            **LAST YEAR: Coconut Apple Walnut Bread***  

Wednesday, May 30, 2012

Cherry Sachet Cookies

 Today sachets are known for just making things smell sweet. Basically like a bag of potpourri to place in your drawer. Now they are not only for that, but there are several different type of fillings as well.  The variety has most likely come about with potpourri being introduced into the market.

Early on, they were considered a love token.  Then with the medievil era, they were considered "plague bags" to ward off insect and disease.  In the 19th century, Prince Albert had some which were filled with hops and used them to help induce him to sleep.

These particular cookies are like a filled pouch,  much like a sachet. Also, the filling does have its own special aroma when cooking-however the alcohol fumes can be overwhelming!

The outside cookie is made with cream cheese and cooks up very crisp.  Inside is a chewy mixture of cherries and almonds.  The cherries are cooked in a blend of creme de cacao and creme de noyaux.  This is kind of like a fig newton with its own unique filling and a crisper cookie shell.

Before we get to the recipe I have a few bloggers to thank:

CJ at Food Stories: She was so nice to award me with not just one but three awards!  CJ started her blog in January and has really bounded onto the scene.  She has a great angle of creating something with the same ingredient as called for on that particular national food day.  Also, she created her own special award for bloggers.  A few of my food pics from her site are the deep dish chocolate chip cookies and cauliflower rice.

Ambreen at Simply Sweet and Savory:She passed the Versatile blogger award to me. Her blog does showcase her skill for both sides of the fence.  With stunning photos, you will be enticed by a number of her posts.  Not only can you find delicious recipes, but a lot of them you cannot find anywhere else.

Stop in and say hi, you will be glad you did.

Cherry Sachet Cookies  -makes about 2 dozen cookies
by flourtrader

Ingredients/Filling
3/4 cup creme de cacao
3/4 cup creme de noyaux or amaretto (almond liqueur)
2/3 cups of  chopped dried cherries
1/3 cup chopped almonds
1/4 cup sugar

Ingredients/Cookie
1/2 tsp vanilla extract
1/2 tsp almond extract
3 oz softened cream cheese
1/4 cup or 1/2 stick of butter
1 egg
1/4 cup sugar
1 1/2 cups flour
3/4 tsp baking powder
pinch of salt

To make the filling, pour liquid filing ingredients into saucepan and add sugar.  Place over medium high heat and stir until sugar has dissolved.  Then add the cherries.  Let simmer and come to a low boil, stirring occasionally.  Cook for 15-20 minutes.  You want that the mixture to become syrupy and most of the liquid to evaporate.  Remove from heat and stir in chopped almonds.  Let cool to room temperature.

The cookie batter can be made while the filling is cooling.  Beat together the cream cheese, butter  and flavor extracts until light and fluffy.  Add the sugar and the egg and mix until completely blended.  Set aside.

Sift together the flour, baking powder and salt.  Then fold into cream cheese batter until no dry streaks remain.  Refrigerate dough for 30 minutes.

Preheat oven to 350 degrees and butter the inside of one baking sheet.

Once the dough has chilled, roll it out on a floured surface  about 16 x 5 inches and 1/4 inch in height. Then cut in half, making 2 rectangles 8X5.  Then spoon filling down the length of the bottom half of each rectangle, leaving a 1/4 inch border on the right/left and bottom. Use a knife to smooth it out evenly.  Fold dough over and seal edges.  Then push bottom length and folded edge closer together so there are no air pockets and fold sealed edges under.

Place each on a baking sheet about 3-4 inches apart.  Then bake until the edges become crispy, about 25-30 minutes.  Remove and quickly slice into pieces and place on rack to finish cooling.

Tips and Notes:
1. When chopping, use your judgment on size of pieces.  The smaller the pieces are the more of a clean cut you will get.
2. You want to make sure that the filling is distributed evenly, so you do not have a big chunk of cookie without filling.
3. Feel free to use cherry juice or other liquids if you want this to be non-alcoholic.
                         **LAST YEAR:Passion Fruit Cupcakes**
 

Wednesday, November 9, 2011

Bon Bon Cookies

Well, I have been looking at a lot of Christmas cookie recipes trying to find something tasty as well as festive.  If you are familiar with my blog, you will know that I like cherries.  I have done quite a number of baked goods with that flavor/fruit.

This recipe has been around for some time.  In fact, it was one of the Betty Crocker's favorite cookie between 1955-1960.  This recipe comes from that red Betty Crocker cookbook that was published in 1963.  There are are lot of great recipes in this book, some old standards and some I have never seen made before.

These little bon bons are a great cookie that lends themselves to a variety of ways to make them.  The above type is the plain vanilla ones filled with a candied cherry.  The recipe has instructions to make chocolate and even penuche ones and suggests various fillings: nuts, dates, chocolate pieces.  However, with todays array of chips,candy pieces and sugared nuts, the options are many.  I am thinking that the chocolate ones could be filled with a peanut butter chip or andes mint chips. I do have plans to play with the variety a little more.

These basically taste the same as any of the butter/powder sugar cookie recipes.  They are not as rich and crumbly as Russian tea cakes, so the sweet filling inside adds just what the dough needs.

I did try the chocolate ones, but they do not come out very pretty.  Be aware that they are a light milky brown, not a rich brownie color.  However, the dark chocolate icing does dress them up a little.

These are easy to prepare and the recipe does not make that many, therefore you can easily make several varieties without having to burn the midnight oil. This recipe makes about 2 dozen cookies.


Bon Bon Cookies
adapted from Betty Crocker's Cookie Book

Ingredients/Cookie
1 1/2 cups of flour
1/8 tsp of salt
3/4 cup sifted powdered sugar
1/2 cup butter
1 tsp vanilla extract
12 pieces of your choice of filling (nits, chocolate, candied cherry, dates..etc)
food coloring (optional)

Ingredients/Icing
1 cup sifted powdered sugar
2 tbs and 1 1/2 tsp of heavy cream
1 tsp of vanilla
food coloring (optional)
decorative topping (sprinkles, colored sugar, nuts, etc)

Preheat oven to 350 degrees.  Sift together flour and salt, set aside.  In another bowl, cream together the butter, vanilla extract, powdered sugar and, if desired, 2 drops of food coloring or more depending on your preference.

With a wooden spoon, stir the flour mixture into the batter.  If dough is too dry add cream until desired consistency is achieved.   Then evenly divide dough into 24 pieces.  Take each piece and surround 1 piece of the chosen filling, rolling it into a ball.  Place on ungreased baking sheet, spacing about 1 inch apart.  Bake until set, but not brown.  This should take about 12-15 minutes.

Remove baking sheet and transfer to rack to cool.  While these are cooling, you can make the icing.  Place all icing ingredients in a small bowl and mix until smooth and all is evenly distributed.

Once cookies have cooled, dips tops in icing and sprinkle top with chosen decorations.

For cookie variations:
Chocolate-melt 1 oz of unsweetened chocolate in double boiler and follow the above directions, adding the chocolate after butter and sugar are creamed together.

Penuche-follow directions for regular cookies above, only replace the confectioners sugar with 1/2 cup packed brown sugar.

For chocolate icing variation:  follow instructions for icing above, but add 1 oz melted unsweetened chocolate and use a total of 3 tbs of cream instead of the amount originally stated.
                                   **LAST YEAR: Frangelico Ice Cream**

Wednesday, July 20, 2011

Sunshine Grove Cookies

My thought of the groves brings me back to California when I was much younger.  We lived right across the street from a big fruit grove and behind it was a sloping hill.  One day, my mom told me a story about a woman that went out to get her mail. When she arrived at her mailbox, she heard a noise from the groves.  Surprised, she looked around.  Suddenly, a man came forth from the trees.

No strange thing, right?  Except this man was wearing only a sheet!  Startled, the woman quickly got her mail out of the box and ran back to her house, locking the door behind her.

Later that week, I was horseback riding along the space between the grove and the hill.  Remembering my mothers story, I gazed into the thick bunch of trees.  It was very shady and dark, except for a few feet of sunshine that covered the ground.

As my horse continued to walk, I spied a pair of army boots.  I instantly clicked for my horse to pick up speed and we fled the scene.  To this day, I am not sure if it was just boots someone had left there or a person was actually standing there.

Also, I often wonder if there was a gang of homeless people living in the groves.  After all, they have plenty of shade and fresh fruit to eat.  That story is how I came about giving these cookies their name.

Now for the recipe.  It is a recipe for lemon cookies. The texture is are crispy on the outside and chewy on the inside.  The chewiness is because they have a pocket of lemon curd in the center.  The flavor of the lemon is well balanced, not too tangy or sweet.  Also, I liked the appearance of this cookie. Some of the ones I have made have been very flat, but these have a good size to them. This recipe makes about 20 cookies.

Sunshine Grove Cookies
by flourtrader

Ingredients/ lemon filling
2 eggs
3 tbs lemon juice
1 tbs lemon zest
1/8 tsp lemon extract
2 tbs sugar
pinch of salt
2 tbs sweetened condensed milk

Ingredients/lemon cookies
1 egg
1/4 cup butter flavored shortening (room temp)
1/4 cup butter
1 1/2 tsp lemon extract
1/2 cup brown sugar
1/4 cup white sugar
1 1/4 cup plus 2 tbs flour
1 tsp baking powder
1/2 tsp salt

For the filling, line a baking sheet with wax paper and set aside.

Place the eggs in a saucepan and beat for 30 seconds. Add lemon juice, lemon extract, salt, zest and sugar.  Place pan over medium heat and cook mixture for about 4 minutes, stirring constantly.  The filling is done cooking when it reaches the consistency of pudding.

Remove pan from heat and pour mixture into a mesh strainer or sieve placed over a heat proof bowl. Stir and push mixture through the strainer. Scrape off any remaining filling on the bottom side of the mesh into the bowl. Discard the lemon zest, which should be the only thing left in the strainer.

Stir the sweetened condensed milk into the filling until smooth.  Cover and place bowl in fridge for about 1 hour to cool.  After an hour, remove filling from fridge.  Then scoop out 1/2 a teaspoon of filling and place on prepared baking sheet.  Continue this process, until no more filling remains.  You should have at least 20 or 24 lumps on the sheet.  Place the sheet in the freezer.

Then, you can start making the cookie batter. Melt the 1/4 cup of butter in a saucepan or microwave.  Pour it in a small bowl and add the shortening.  Stir the mixture until both ingredients are blended.  It should be the consistency of a paste.  If some tiny lumps remain in the batter, it is ok.

In a separate bowl, whisk together both sugars, lemon extract and salt.  Add the butter mixture and beat until smooth.  Then beat in the egg and set aside.

Sift together the baking powder and flour in another bowl.  Fold 1/3 of the flour mixture into the batter until no flour streaks remain.  Continue with this process until all the flour is blended into the batter.

Then cover the bowl with plastic wrap and place cookie dough in the fridge to cool for about 1 1/2 hours.

In the last 15 minutes of the chilling time, preheat the oven to 375 degrees and line 2 baking sheets with parchment paper.

Using a scoop or tablespoon, drop mounds of dough about 1 1/2 inch apart onto baking sheet.  After sheet is filled with mounds, cover remaining dough and place back in fridge.  Then remove the frozen pan of filling from the freezer.

Take a mound of cookie dough and push a piece of frozen filling into the center. Then roll it in your hands to form a ball, covering the filling as best you can.  Place back on baking sheet.  Continue with this process until all mounds are filled.  Put frozen sheet of remaining filling back into freezer.

Bake cookies for about 10-12 minutes.  Cookies are done when the bottoms are a golden brown and the tops of the cookies do not get brown, so check cookies after 10 minutes.  Remove cookies and let cool on sheet for 5 minutes, then transfer to rack to finish cooling.

Repeat the process of forming and baking the cookies to use up the rest of the batter and filling.

Due to the filling, these cookies are best stored in the fridge.