
Foodbuzz
Showing posts with label sandwich cookies. Show all posts

Sunday, August 20, 2017

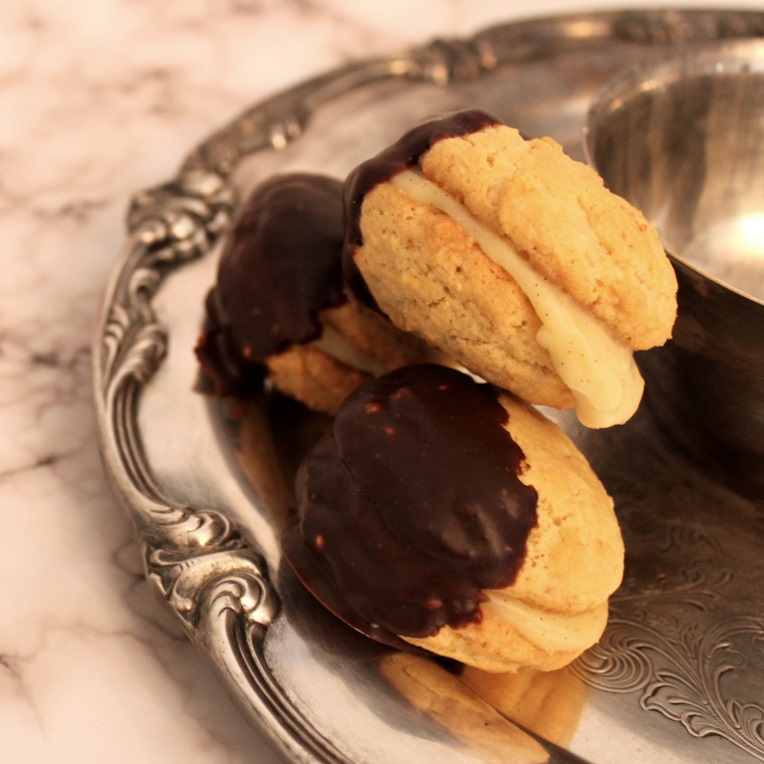
Boston Cream Pie Cookies


Today I am thinking about the subject of opinions. Opinions can be requested as needed and they can be constructive at times. However, we all have to deal with the unwanted and the overload. There is a percentage of people that abuse the use of opinions. These are the people that want to control you, believe they know what you want and believe they know what is best. In the company of these people, bear in mind that you are the only person that has to be with you for the rest of your life, so do and think what you want. Also, be confident that as you do that, these people are continuing to use their time in futility trying to control you.

The control factor also can be linked to the practice of following recipes. You can move forward and make the exact recipe and be content with the instructions or you can alter them a bit as you see fit. Altering them can turn out to be a good thing or a bad thing, but you run the same risk with following a recipe. I have made some desserts I have been unhappy with and followed the recipe to a "T".

This recipe makes a little over 1 dz sandwich cookies and contain all the great flavors of the traditional Boston Cream Pie. The cookies strongly resemble the flavor of "Nilla" wafer cookies and while they bake up crisp, sandwiching them with the vanilla custard tends to soften them up as time goes by. Below is the recipe for the cookies I baked, in the tips and notes you will find further information for creating the original recipe.

Boston Cream Pie Cookies
adapted from Rosie's Bakery Cookie Book

Ingredients/Vanilla Custard
2 tsp vanilla extract
1/4 cup plus 2 tbs heavy whipping cream
1 cup milk
1 egg yolk
3 tbs cornstarch
1/4 cup plus 2 tbs sugar

Ingredients/Cookies
2 tsp vanilla extract
2 egg yolks
1 whole egg
1/2 tsp orange zest
1/2 cup or 1 stick plus 1 tbs of butter
1 cup plus 1 tbs sugar
1 cup flour
1 cup plus 2 tbs cake flour
3/4 tsp baking soda

Ingredients/Chocolate Glaze
2 oz unsweetened chocolate
1/2 cup heavy cream
1 tbs and 1 tsp unsalted butter
1/4 cup plus 2 tbs confectioners sugar

Start by making the filling. Pour 1/2 cup plus 1 tbs milk into a medium sized saucepan. Add the cream and stir. Measure out the sugar and mix into the milk mixture. Place saucepan over medium heat and stir until sugar is dissolved. Then heat until it reaches a boiling point and remove. Set aside.

Take out a small bowl and whisk together the remaining milk and cornstarch. Once the cornstarch is blended into the milk and no lumps remain, add the egg yolk. Whisk until incorporated into the liquid. Pour this mixture in a steady stream into the saucepan with the sugar/milk blend, stirring as you pour. Then place saucepan over medium heat again and let filling cook, stirring constantly until it reaches the consistency of pudding. Remove from heat and whisk in the vanilla extract.

Lastly, pour the filling into a heat proof bowl and cover the surface with wax paper or plastic wrap. Place in refrigerator for approx 2-3 hours, depending on the size of the bowl.

You can make the cookies while the filling is setting up in the refrigerator. Start by taking out a mixer, preferably a stand mixer, and a large bowl. Fill the bowl with the butter, sugar, orange zest and vanilla extract. Cream the ingredients together with the mixer at medium speed, stopping at intervals to scrape down the sides of the bowl. This process should take 3 minutes. Then add each egg yolk, beating for 30 seconds after each addition. Lastly, whisk in the whole egg and set the mixture aside.

Preheat the oven to 400 degrees and prepare baking sheets by lining with parchment paper.

Using a medium size bowl, sift together both types of flour and baking soda. Then fold into butter/sugar batter. Once there are no more streaks of flour in the batter, take out a scoop or a spoon and place rounded tablespoons of dough on the baking sheets, spacing about 1 inch apart. Place pan in preheated oven and let bake for 10-11 minutes or until golden brown on the edges.  Let cookies cool on pan for about 2 minutes, then transfer to rack to completely cool.

Then take out your filling from the refrigerator when the chilling time is completed. Stir to make sure mixture is spreadable. Using a rounded tablespoon, scoop up some filling and smooth evenly on the flat side of one cookie. Then top with another cookie and press down lightly, making sure that the size pairing is the same. Continue with this process until all cookies are now sandwiched together with the filling.

The final component will be the chocolate topping. Melt the butter in a small bowl in the microwave. Then add the chocolate, breaking or chopping into chunks. Take out a small saucepan and fill with the cream and heat until it just comes to a simmer. Remove and pour the hot cream over the chocolate butter mixture. Let set for 2 minutes then whisk until all the chocolate is melted and mixture is smooth. Add the confectioners sugar and stir, creating a smooth, shiny chocolate coating.

At this time, you can dip the sandwich cookie in the chocolate or drizzle it on top. Once all the cookies are coated, place on wax paper lined baking sheets and put in refrigerator for chocolate to set. These can be kept in the refrigerator for storage, but should be served at room temperature.

Tips and Notes:
1. I rarely use salt in recipes, but the original has 1/4 tsp which is added to the cornstarch/milk mixture and the cookies have 1/2 tsp of salt sifted with the flour and baking soda.

2. I used orange zest, but the original recommends lemon zest.

3. Should you want these to be more like whoopie pies, follow the original instructions that include incorporating 1/2 cup and 2 tbs of buttermilk prior to adding the sifted ingredients. This should create a cake-like texture, while making the cookies thinner with the additional liquid.

4. If you like the idea of banana pudding, try using banana custard instead of vanilla.
                                  **LAST YEAR: Sierra Nugget Cookies**

Sunday, September 15, 2013

Peanut Butter Sandwich Cookies


Peanut butter is something that is always around in my kitchen.  I usually have not only the creamy but the crunchy as well.  With such an abundance of peanut butter, I thought it was fine time that I bake something with it.

Like most bloggers, we all have something in our mind of what we do like and what we do not like when it comes to certain baked goods.  Regarding sandwich cookies, these did have some good qualities.  The cookies were less greasy than most homemade peanut butter cookies.  I think this can be attributed to the dry oats in the cookie batter.  As far as the filling, it was very creamy-unlike the solid type of filling you get with oreo cookies.  Homemade should always be better anyway.

There are special steps in this recipe and the simple fact that they are sandwich cookies keep them out of the quick fix recipe category. However, I feel that the time is well worth the results.  Be sure to read through all the recipe so you will know how much time is involved in creating these delicious cookies. This recipe makes about 2 dz large sandwich cookies

Peanut Butter Sandwich Cookies
adapted from the Dahlia Bakery Cookbook

Ingredients/ Peanut Butter Cookies
2 eggs
1 tsp vanilla extract
1/3 cup natural chunky peanut butter (well mixed)
1 cup and 2 tbs butter (softened)
1 1/2 cups flour
1 tsp baking soda
1/2 tsp baking powder
3/4 cup sugar
2/3 cup packed brown sugar
1 2/3 cup old fashioned oats
1/4 tsp salt

Ingredients/Cookie Filling
1/2 tsp salt
2 tbs powdered sugar
1 1/2 cups creamy peanut butter (whichever brand-Jif, Skippy etc)
2 tbs honey
6 tbs butter (softened)

For the cookie batter, place butter and peanut butter in bowl of a stand mixer.  Add both types of sugars.  Then beat on medium high speed for 1 minutes.  Scrape down sides of bowl, beat for another minute and repeat for one last minute. 

Add one egg and beat on medium low speed for 30 seconds.  Do the same with the additional egg. Lastly, beat in the vanilla extract and set aside.

In another bowl sift together baking soda, baking powder, salt and flour.  Then mix in the oats. Using a wooden spoon, fold the dry ingredients into the wet batter until no dry streaks remain.

Prepare 2 baking sheets by lining with parchment paper.  Scoop out a heaping tablespoon of batter and place it on the prepared sheet.  Continue with this process, only making sure that the scoops of batter are not touching.  You will space them properly just prior to baking.  Chill the scooped batter by placing the pans in the fridge for at least 2 hours.

While the scoops are chilling, the filling can be made.  Place all filling ingredients in a bowl and beat for about 30 seconds with a hand mixer to make sure it is all blended.  Then cover bowl of filling with plastic wrap and also place it in the refrigerator to chill.

During the last 15 minutes of the chilling time, preheat your oven to 375 degrees.  Once the scoops have firmed up from the chilling stage, remove pans from refrigerator.  Place each scoop of batter on the parchment lined pan, filling each pan with 8 scoops.  Also, each cookie sheet should be double panned (one baking sheet inside another) prior to going in the oven.

Bake pans of cookies for about 10-12 minutes, stopping at the halfway point to rotate each pan set.  Once the cookie turns a golden hue, remove and place pans on cooling rack to sit for 10 minutes.  Then transfer cookies to the rack to finish cooling.  Once completely cool, they are ready to be sandwiched.

Match cookies by size in pairs.  Take the bowl of filling out of the fridge. Place a scoop of filling (measuring right under 2 tsp) on the flat side of one of the paired cookies.  Press the other, flat side down, on top of the filling.  Repeat the process until all the sandwich cookies have been assembled.

Tips and Notes:
1. Mixing up the natural peanut butter before measuring is important to the texture of the cookies
2. The longer the chill time for the filling the harder it becomes, which could make the assembly process more difficult.
3. Someone raided my stored cookies from the freezer and they still were soft enough to eat.
4. If you want a little extra with your cookie, try adding chocolate by drizzling it on top or dipping one half of each in chocolate before sandwiching.
                                           **LAST YEAR:Peach Tarte Tatin**
                                                     

Wednesday, February 27, 2013

Chocolate Caramel Sandwich Cookies


I really do not make sandwich cookies all that often.  I believe it is the time factor.  My attitude is that if you are going bake something that requires a lot of time, make sure that the results are well worth it. 

These proved to be a worthwhile endeavor.  You will not find this type of cookie sitting on the grocery shelf, which makes it unusual. The flavors and textures really compliment each other.  Between the crumbly rich chocolate of the cookie and the buttery chewy caramel, these bite size morsels really do hit the spot.

This recipe states that it makes 30 cookies, but for some reason I ended up with nearly double that amount.


Chocolate Caramel Sandwich Cookies
adapted from Bon Appetit/Nov 2010 issue

Ingredients/Caramel
1/4 cup butter (cut into cubes)
2 1/4 cup of sugar
1 tbs light corn syrup
1/3 cup of honey
2 tbs vanilla extract or a lengthwise split vanilla bean
1 3/4 cup heavy whipping cream

Ingredients/Cookie
1 cup plus 1 tbs sugar
2/3 cup natural cocoa powder
1 1/2 cups of flour
1 egg
3/4 cup or 1 1/2 sticks of butter
1/4 tsp salt

Prepare an 8X8 square cake pan by brushing oil on the interior of the pan.  Then line the bottom with parchment paper and brush the surface of the paper with oil as well.

To make the caramel, fill a medium size saucepan with the sugar, cream, honey and corn syrup.  If using vanilla bean, scrape the seeds into the mixture.  Place pan over medium heat and stir until the sugar dissolves.  Increase the heat and stop stirring.  Using a candy thermometer as a gauge, let the mixture come to a boil and cook until it registers about 250 degrees.  This should take about 8 minutes.

Remove pan from heat and add butter.  If using vanilla extract, add it at this time.  Stir until butter is completely melted and mixture is smooth.  Pour into prepared cake pan.  Let caramel cool completely.

While that is cooling, the cookies can be made.  Sift together flour, salt and cocoa powder in one bowl.  In another bowl, cream together the butter and sugar until fluffy.  Add the egg and beat for 15 seconds and then scrape down sides of bowl.  Beat for an additional 15 seconds.  Using a wooden spoon or spatula, fold in the sifted ingredients.

Form the dough into a flat disc and cover with plastic wrap.  Place in refrigerator for 30 minutes. Line 3 baking sheets with parchment paper and preheat the oven to 350 degrees.

Once the dough has chilled, roll out to a 1/4 inch thickness and cut out rounds using a 1 1/2 inch  cookie cutter.  Place each round 1 inch apart on cookie sheet.  Bake cookies for about 12 minutes.  They should have a firm center when done.  Remove baked cookies from pan and place on rack to cool. Repeat the process until all the dough has been converted to cooled cookies.

Invert caramel filled pan onto smooth clean surface.  Peel off parchment paper.  Take a 1 inch round cutter and cut out caramel disks.  Place each disk on the bottom side of a cookie and top with an additional cookie, with bottom side facing caramel.  Press lightly and repeat process until all cookies are sandwiched together.
                           **Last Year: Maui Pine Cream Pie**


Wednesday, April 25, 2012

Amadeus Cookies

Well we all have the traditional recipes in our family that are handed down from generation to generation.  However, how often is it that you come across a recipe that is so good that it makes you want to start your own tradition?  For me it is not that often.  However, after baking and tasting these particular cookies, I am convinced to make them every year at Christmas. So those classic cookies will need to give way so these gems can appear on the holiday cookie tray.

I know you are wondering what makes these so great.  It is hard to pinpoint one singular thing about them so I will cover all of the elements. The outer part is a shortbread type of cookie, which can stand alone in taste.  The filling is a unique blend of pistachios, almond paste and cherry brandy.  This amazing filling is what really makes these cookies extra special.  In fact, I found myself doing probably too much taste testing of that element!

Also, if that is not enough there is a suggestion to dip these halfway into a chocolate glaze.  Due to the Texas weather and that these cookies will be going to Ft Hood, I declined on dipping these in chocolate.

So if you are looking for some special and unique cookies, I hope you will try these. This recipe makes about 2 dozen.

Now before we get to the recipe, I wanted to give a special thanks to a few bloggers that passed the Versatile blogger award to me:

Jodie at Binomial Baker  -  This blogger just states that she is a college student cooking her way through life.  However, you will not find the typical college fare at her blog.  I wished when I was in college I had a friend preparing food like she does. From Lemon gnocchi to Chai Tea Muffins her recipes are sure to please.  

Bloggy Writer at Food Lovers Club -this blogger is fairly new to the scene, but she is off to a great start.  I already have bookmarked her Apple and Walnut Ice Cream as well as the Pan Smoked Chicken Breasts.

Take a moment and check out their sites if you haven't already!

Now for the recipe.

Amadeus Cookies
adapted from Saveur Magazine, Feb 2009

Ingredients/Cookies
3/4 cup or 1 1/2 sticks of butter
2 egg yolks
1/2 tsp salt
1 3/4 cup flour
3/4 cup confectioners sugar

Ingredients/Filling
3.5 oz of almond paste, chopped (I used half of 7 oz box)
1/2 cup unsalted shelled pistachios
1/2 tsp vanilla extract
2 tbs cherry liqueur or cherry brandy
1 tbs sugar

To make the cookie dough, beat together butter and sugar until fluffy.  Then add the 1/2 cup of flour and salt, then mix until no dry streaks remain.  Beat in egg yolks, one at a time for 30 seconds.  Then, using a wooden spoon fold in the remaining flour, forming a dough.

Once all the flour is incorporated, take out 4 sheets of wax paper.  Each should be about 12 inches long.  Separate the dough into 2 sections.  Place one piece on a sheet of wax paper and shape into a flat disk.  Then cover with another sheet of wax paper.  Repeat the process with the other piece of the dough.  Then stack the two disks on top of each other and place stack on baking sheet and refrigerate dough for 1 hour.

During this time you can make the filling.  Fill a large bowl of a food processor with the sugar and the pistachios.  Cover and process for about 45 seconds or until the nuts are ground into small pieces.  Add the almond paste and process again for 45 seconds.  Pour in the cherry liqueur and the vanilla extract and pulse until all liquids are equally distributed into filling.  Set mixture aside.

After 45 minutes have passed of chilling time for the dough, preheat the oven to 325 degrees and line baking sheets with parchment paper.

Dust a flat surface lightly with flour.  Take out one of the disks of dough and roll into a 1/8 inch thickness using a rolling pin.  Cut out circles with a round cutter, about 1 3/4 in diameter. Place cut outs 1 inch apart on prepared baking sheet.  Bake in oven until edges turn golden, which is about 20 minutes.  Pans will need to be rotated at the halfway point.  Remove pan and transfer cookies to a cooling rack.  Continue with this process until all dough has been formed and baked into cookies.

Once cookies have cooled, pair them up so they sandwich well together.  Place one cookie in each pair with the underside facing up.  On each underside, place 1 tsp full of filling and flatten it slightly.  Then press the other matching cookie on top.  After this, you can dip the cookies in melted chocolate if you prefer.  Then place back on rack to let the glaze solidify.
                    **LAST YEAR: Dark Chocolate and Orange Muffins**                 


Monday, April 2, 2012

Cypress Egg Cookies

I was looking at all the celebrations that people do for Easter Sunday.  The main thing is was the Easter Egg hunt with the kids.  I found that the largest Easter egg hunt was conducted in 2007 at Cypress Gardens in Winter Haven FL.  In attendance were nearly 10,000 kids on the hunt for about half a million eggs.  I am thinking of how crazy it would have been, but no doubt both the kids and parents have a wonderful memory of the event!

Now on to these cookies.  The cookies are a blend of ground almonds and almond paste.  The paste gives them a crispy edge but they are chewy inside.  This makes them a great palette for the filling which is a blend of melted Mounds Bars, coconut vodka and chocolate.

The cookies are great on their own, but the rich filling does enhance the overall taste..  They are pretty good size and it only takes one to squelch my craving for the sweet.  This recipe makes 36 sandwiched cookies, but it will vary depending on the size of the cutter and how thick you want the filling to be between the cookies.

Cypress Egg Cookies
by Flourtrader

Ingredients/Cookies
3 cups flour
1/4 cup ground almonds
8 oz almond paste
1/2 tsp almond extract
1/8 tsp salt
1/2 cup butter
2 eggs
1 cup sugar
various colored sugars for sprinkling (optional)

Ingredients/Filling
15 mini Mounds candy bars, chopped
1/2 cup semi sweet chocolate chips
2 tbs coconut flavored Vodka (if  not you can use 2 tbs heavy cream)

To make the cookies, line two baking sheets with parchment paper.

In a medium size bowl, beat together almond paste and sugar for 2 minutes on medium speed.  Place sugar,eggs and extract in with the mixture and beat for another 2 minutes.

In a separate bowl, whisk together the flour, salt and ground almonds.  Fold the dry ingredients into the sugar/almond batter until no dry streaks remain.  Separate dough into two rounds.

Roll each piece of dough between 2 pieces of wax paper to a thickness of about 1/8 inch.  Place covered dough on baking sheets and put in freezer to chill for 20 minutes.   During this time, preheat the oven to 350 degrees.

One the dough has chilled, remove and cut into desired shapes.  My cutter was about 2/12 inches wide by 3 inches in height.  Place the cookies on the parchment lined baking sheets about 1/2 an inch apart. If you opted for the sugar sprinkling, proceed with that process now.

Place the cookie sheet in the oven and bake until done.  Edges will be a golden hue.  This should take about 12-15 minutes.  Remove from oven and let cool on pan for 1 minute then transfer to rack to finish cooling.  Continue with the process until all the dough has been baked.

Set up the double boiler, filling bottom cavity with water to start on the filling.  Fill the top cavity of the pan with the filling ingredients listed above.  Let the mixture cook down until the chocolate is melted and smooth with thin strands of coconut.  Remove from heat and let cool for 20 minutes.

With a knife, smooth about about 2 tsp of filling on the underside of a cookie leaving a little outer edge border. Then press another cookie over the top (underside goes on top of filling), forming a sandwich. Press down slightly to seal together.   Continue with this process until all cookies are sandwiched together.  Cookies can be served at room temperature or refrigerated.
                            **LAST YEAR: Pretzel Dogs**