Foodbuzz

Sunday, October 26, 2014

Banana Nutella Bars


I have made banana bars before, but I felt that they needed a stronger, additional flavor.  Chocolate would have been a nice pick, but when I saw this recipe using Nutella, I had to make them.  It is easy to find people that do not eat Nutella because of nut allergies.  However, finding someone that purely does not like the taste is not that easy.

I have been on a banana kick lately.  Especially because it seems to be the main component of smoothies.  I recently had an "Elvis" smoothie but it was more like a milkshake- Peanut butter cup ice cream, bananas, protein powder and low fat milk.  Very filling and very good.

Back to the bars...this recipe had compliments concerning the great moist texture of the cake part and , of course, there were requests for more icing.  The recipe comes from the UK so there are quite a bit of modifications. The first being baking in a 9 inch square pan vs 7 inch.  A seven inch pan is too small for the number of servings I needed.  I have a seven inch pan but have not found much occasion to use it.  The second would be the measurement type (cups vs grams) and amount.

Banana Nutella Bars
adapted from uktv.co.uk

Ingredients/ Bars
1/2 cup plus 5 tbs butter
4 eggs
3 pureed medium size ripe bananas ( should yield about 1 cup)
1 tsp vanilla extract
1/2 cup brown sugar
1/4 cup white sugar
1 cup self rising flour
3 tbs Nutella

Ingredients/Icing
1tbs plus 1 tsp cocoa
1 cup powdered sugar
1tbs plus 1 tsp butter
2 tbs milk
2 tbs Nutella
2/3 cup coarsely chopped hazelnuts

Preheat oven to 350 degrees.  Prepare a 9 inch square pan by greasing the interior and lining the bottom and 2 sides with parchment paper.  Leave some overhang on the sides to use as handles to pull the bars out of the pan after they cool.

Using a stand mixer, beat the butter until smooth.  Then add both sugars and the extract and beat on medium high for about 1 minute.  Mixture should be fluffy.

Add one egg and 1/4 of the flour and beat until incorporated, about 30 seconds.  Add the next egg and beat again for 30 seconds.  Continue with adding the rest of the eggs, beating 30 seconds after each addition.  Using a wooden spoon, fold in the remaining amount of flour, until no dry streaks remain.

Stir in the pureed bananas.  Measure out the batter and pour half into the prepared pan.  In a small bowl, warm the Nutella in the microwave for about 10 seconds.  Then dot or drizzle the Nutella onto the first layer of batter in the pan.  Then use a toothpick or small knife to marble it evenly.  Add the second layer of batter and smooth the top.

Place pan in oven and bake until done, about 45-50 minutes.  When done, cake would have just started to pull away from the edge of pan, but you can use a toothpick tester to detect when done as well.  Place pan on rack to cool.

Melt the butter in a small bowl and set aside.  Using the bowl of a standard mixer, sift cocoa and powdered sugar together.  Then add the melted butter, stir until blended.  Once blended, add the milk and Nutella. Beat on medium speed, until the mixture is smooth.

Pull the cooled cake out of the pan by using the excess parchment paper sticking above the sides of the pan.  Then remove parchment and place on a cake board or serving platter.  Smooth the Nutella icing on top.  Lastly, evenly scatter the chopped nuts on top of the Nutella icing.  Now its ready to cut and serve.

Tips and Notes:

1. The more ripe your bananas are the stronger the flavor, so keep that in mind when you are shopping for bananas or considering the ones that have been sitting on the counter awhile.

2. The recipe could have used more Nutella between the layers, but consideration must be made regarding the sinking factor.  The nut spread is thicker than the cake batter.  You want the layer of Nutella in between the batter, not at the bottom.
                                    **LAST YEAR: Chocolate Sugar Cookies**


Sunday, October 19, 2014

Pineapple Cottage Cheese Pufflets


Through the years of blogging, I have seen lots more dairy products incorporated into recipes.  Goat cheese has been cropping up in pies and even ice cream.  However, one dairy product that never comes to mind is cottage cheese.  I am not one to eat cottage cheese on its own, but I was curious about how it would do as an ingredient.

It turns out that cottage cheese adds some wonderful flavor to pastry.  To me, these little pufflets remind me of a fried donut.  While a fried donut is good, a filled, fried donut is even better- so I decided to go all out and reach for some pineapple jam at the grocers for filling these dainty pastries.  A lot of my recipes in the past have used raspberry jam, so pineapple was a good change.

As far as taste, let me first state that this recipe comes from Dorie Greenspan.  In the preface to the recipe, she made a note that these were addictive.  Turns out that she was absolutely right.  This recipe has landed on my "keeper" list.  I had to put these baked morsels away up before they were all eaten by my company, exclaiming they could not stop.  I am glad I saved some dough back and put in the freezer for another time.

Lastly, do not let the above picture fool you in size.  These are little filled pastries made with 2-3 inch squares of dough folded in half. Using a 2 1/4 inch square cookie cutter, this recipe makes about 4 dz pastry cookies.  Be sure to allow for the chill time of 3 hours or more for the dough when planning to make these.

Pineapple Cottage Cheese Pufflets
adapted from Baking From My Home to Yours

Ingredients
1 tsp vanilla extract
1 cup or 2 sticks of butter (room temp)
3/4 cup or 8 oz cottage cheese
1/4 cup pineapple jam (or any favorite jam, marmalade or preserves)
2 tbs sugar
1/4 tsp salt
1 2/3 cup flour
confectioners sugar (for dusting)

First, the butter, salt and sugar will need to be creamed together.  Place those ingredients in the bowl of food processor or bowl for a hand or stand mixer.  Run the food processor or mixer on medium high for one minute.  Then scrape down bowl and run again for another minute.  The mixture will turn from lumpy to smooth.  Add the cottage cheese and vanilla extract to the bowl and repeat the beating process as outlined in the previous sentences.

Fold in the flour in 3 increments with a wooden spoon or the pulse function on your food processor.  Once a dough is formed and there are no streaks of flour, it is ready to be chilled.  Place dough on plastic wrap and form into a flat rectangle, then cover completely and place in refrigerator for a minimum of 3 hours.

While the dough is chilling, dust a flat surface with flour. Line 2 baking sheets with parchment paper.  15 minutes prior to taking the dough out of refrigerator, preheat the oven to 400 degrees.

Remove dough and divide in half.  Place one half on the floured surface and cover one half with plastic wrap and return to the refrigerator.  Dust a rolling pin and lightly dust the surface of the dough.  Roll out until the dough is only 1/8 " thick.  Then cut the dough using a square cookie cutter.  The square cutter can range anywhere from 2 1/4 inches to 3 inches.  The dough should be cut and rolled into about 2 dz cookies, if you are using a 2 1/4 cutter and less with a larger cutter.

Place the dough squares about 1/2 an inch apart on the prepared cookie sheets.  Place about 1/4 tsp of jam off center onto each dough square.  Moisten all  the dough edges with water using your fingers. Then fold dough over and press down to seal.  The end result is little pastries that look like miniature turnovers.  Also, since the dough does puff during baking, poke the center of each with a toothpick to allow the air to escape. 

Take one filled baking sheet and put in oven and let bake until done.  When done, the pastries will be golden brown on the edges. The bake time is approximately 10-15 minutes.  Once the pastries are done baking, remove pan and transfer pufflets to a cooling rack.  While still warm, dust with confectioners sugar.  Complete the same forming, filling and baking process until all the dough is baked into pastries.  Then finish dusting the baked pufflets with confectioners sugar.

Tips and Notes:
1. Be careful using the jam filling, taking care so that you do not overfill the pastry and the dough edges are sealed.  If any filling seeps out it will either carmelize or burn. The measurement of jam suggested above is based on the 2 1/4 inch square cookie cutter.

2. The recipe states you can create the pufflets in advance and freeze them.  Just pull them out of the freezer and bake, adding only 2 more minutes for baking.  Advance freezing can be up to 2 months as long as they are sealed tightly.

3. If I made these again, I would probably make them larger so I could use more filling.

4. A flat, floured surface is the easiest method for rolling. Rolling between 2 sheets of wax or plastic wrap (as the recipe suggests) makes for easy clean up, but there is more chance that the dough may stick, especially to the sheet that covers the top of the dough.

5. These can be served warm or room temperature.

                               **THREE YEARS AGO: Cinnagrog Pie**

Sunday, October 12, 2014

After Eight Cupcakes


The so called "after dinner mint" in the form of creme de mint and dark chocolate has always been just a tease to me.  At restaurants, I find myself looking at the little green foiled morsels and passing on getting one.  My thought has been....let's not get started on those because one does not satisfy.  As far as the red/white peppermints, I can deal with one of those.  A simple breath freshener.

Since most restaurants are not creating chocolate mint desserts nor do they have any plans to, time to get to work in the kitchen!  These cupcakes are all about those extra components.  You have the chocolate mint cake part, which is tasty enough to stand alone.  Moving on, you will find the baked in goodness of cream de mint/chocolate chips studded on top.  Then, the slight crunch from the minty butter cream frosting that supports a pool of ganache.   Yum..but wait, (l almost forgot)- the cupcake is finalized by floating a mini peppermint patty on top.  

This recipe makes about 1 dozen cupcakes. The original instructions for creating the cupcakes are stated below, however the tweaks I enlisted for success are at the end. After reading this post all the ways through, the other initial step would be to have all your ingredients out and ready for use.

After Eight Cupcakes
adapted from Cupcakes Galore

Ingredients/Cupcakes
3/4 stick or 6 tbs butter
2 eggs
2/3 cup half and half 
Mint extract
1/2 cup sugar
2 tsp baking powder
1 tsp salt
1 1/3 cups flour
1/3 cup unsweetened cocoa powder
1/2 cup miniature chocolate mint chips

Ingredients/ Frosting
2 tbs milk
Mint extract
1 1/2 sticks or 3/4 cup butter(cubed and at room temperature)
2 cups powdered sugar
Green food coloring (optional) 

Ingredients/Topping 
2/3 cup heavy cream
5 oz dark chocolate
1 dz mini peppermint patties

Prepare a one dozen cavity muffin tin by greasing the upper edge of the cavities and lining with cupcake papers.  Preheat oven to 350 degrees.

In a medium size bowl, sift together flour, salt, baking powder and cocoa powder.  Set aside.  Place butter and sugar in another bowl and beat for two minutes on medium high or until fluffy. Add in one egg and beat for 30 seconds. Repeat with the second egg.

Using a wooden spoon, mix in sifted ingredients and half and half in increments.  Stir in 1/3 of the flour mixture, then 1/3 cup of half and half and repeat, ending with the last 1/3 of the sifted ingredients.  Stir in a few drops of mint extract.

Fill cupcake papers evenly with batter.  Sprinkle the top of each cavity of batter with the chocolate mint chips.  Place muffin tin in oven and bake for 20-25 minutes, turning pan at the halfway point. Cupcakes are done when tester comes out clean.

Let cupcakes rest in pan for 2 minutes then transfer to a rack to finish cooling.

For the frosting, add the butter to a large bowl and beat until smooth.  Add 1/2 cup of powdered sugar and mix with a wooden spoon.  Continue to add 1/2 cups of powdered sugar and stirring until all is blended together.  Then stir in the milk and mint extract.  Lastly, add a few drops of green food coloring if desired. Spread frosting evenly on top of cooled cupcakes.  Let sit in a cool place until the frosting has hardened.

For the ganache, set up a double boiler and let it come to a simmer.  Then add chocolate and cream to the top pot.  Once the chocolate is completely melted and the cream is mixed in, remove from heat.   Let the ganache cool for about 20 minutes.  Then dip the tops of the cupcake in the chocolate, making sure that there will still be a frosting border around the edge of the cupcake.  Lastly, top each with a miniature chocolate mint patty.  Once the chocolate has completely set up, they are ready to serve.

Tips and Notes:

1. To make sure the mint flavor is easily distributed in the batter and frosting, mix it with the cream or milk instead of adding separately.

2. Sift the powdered sugar into the batter, it will eliminate issues with lumps in the frosting.

3. For a better presentation, use the back of a spoon dipped in water and make well in the center of the frosting on the cupcake, then spoon the ganache into the well.

4. Dip the tops of the peppermint patties in the ganache before putting on top for a more blended look of the two.

5. The amount of frosting was spot on, however, due to the method change in topping the cupcakes with ganache, I ended up with extra.  The rule is you can always make more, but you cannot go back and separate your mixture into its original state, so start with 1/2 the recipe of the ganache.  That would be 1/4 cup and one tablespoon or 2.5 oz of dark chocolate and 1/3 cup of heavy cream.

6. No need to buy all the separate types of dairy.  Skip the half and half and use a mixture of 1/3 cup of heavy cream and 1/3 cup of milk in your cupcake batter.
                            **LAST YEAR:Pineapple Coconut Squares**

Sunday, October 5, 2014

Pistachio Schoolboy Cookies


These particular cookies are french and the title has been translated from "Petit Ecolier" (Little Schoolboy).  My original intention was to make pistachio bars, but I found this recipe a little more interesting.

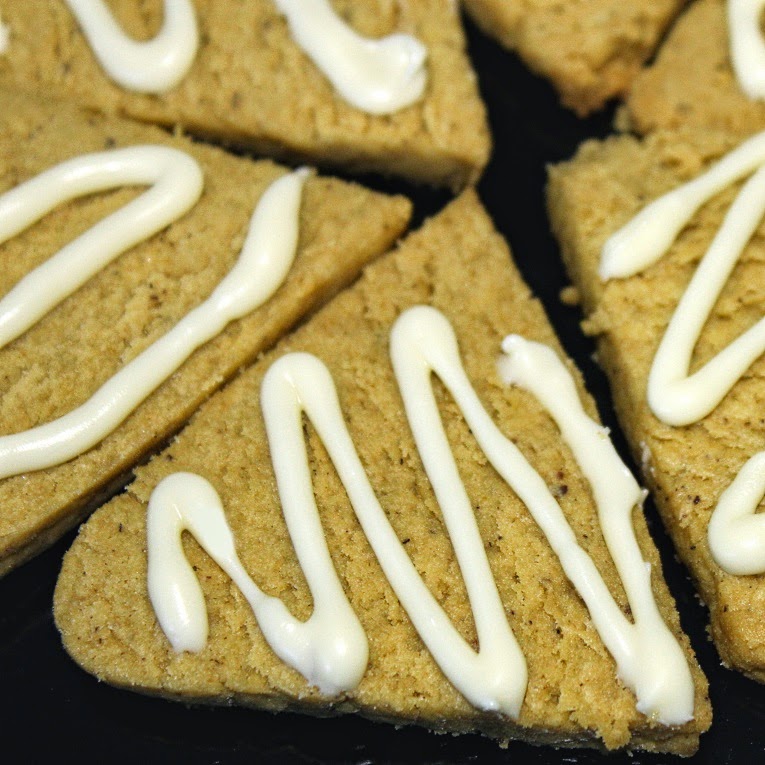
The cookie itself is like a shortbread and has very little sugar in it.  The topping of the white chocolate is the added sweetness.  Originally, the recipe stated to cut into squares and place chocolate pistoles or callet squares of dark chocolate on top. Since I was unable to easily find this type of  formed chocolate, I used a cut up chocolate bar.  I also opted for white chocolate instead of dark.  The chocolate was to be placed on top of the cookie after baking.  The chocolate did not melt as expected, so my modicfication was to melt the chocolate in a double boiler.  Then I used a squirt bottle to drizzle on white chocolate.  The recommended chocolate must much thinner than the regular chocolate bars. Also, I did a triangle instead of square shape.

Pistachio cookies are not commonplace, however that does not change the fact that these are delicious enough to add to your list of tea time treats.  In addition, they are basically a slice and bake cookie, so they do not require a lot of time to make.  This recipe makes about 3-4 dozen cookies.

Pistachio Schoolboy Cookies
adapted from Love N Bake via Amercianalmond.com

Ingredients
4-6 oz white or dark chocolate (see note in 2nd paragraph above)
3 cups flour
1/4 cup sugar
1/2 cup pistachio nut paste
1 and 1/2 egg (1/2 egg = 2 tbs whisked egg)
1 1/2 sticks or 6 oz butter
1 tbs milk
1/4 tsp salt
1/2 tsp vanilla or almond extract

Place butter, salt, pistachio paste and sugar in the bowl of a stand mixer.  Cream together until smooth, stopping occasionally to scrape down the side of the bowl.  Then add the milk, extract and eggs and beat until all is blended together.

Then using a wooden spoon, stir in the flour in one cup increments until no dry streaks remain.  Then divide the dough into 4 equal pieces.  Form each piece into a log 1 1/2 inches in diameter.  Wrap the logs in plastic wrap, place on cookie sheet and put in the refrigerator for about 1 hour, or until firm.

While the dough is chilling, prepare 2 cookie sheets by lining with parchment paper.  Preheat the oven to 375 degrees.

Once dough is firm, take out one log and unwrap.  Place on cutting board and slice dough into rounds 1/4 to 1/3 of an inch thick.  Place each slice on prepared cookie sheet, about 1 inch apart.  Bake cookies for about 8-10 minutes.  They will be set and be lightly toasted on the bottom when done.  Remove pan from oven.  If using the specialty chocolate, place one square on top of each cookie.

Let cookies rest on pan for 2 minutes and transfer to cooling rack.

Repeat this process until all dough logs are sliced and baked into cookies.  If drizzling the cookies,  the process can be started once all cookies are baked and cooled.  Set up a double boiler and melt chocolate.  Drizzle on cooled cookies by using a fork or a squirt bottle.  Let cookies rest until chocolate is set prior to serving or storing.

Tips and Notes:
1. If you are in a hurry, cooled cookies with chocolate can be placed in refrigerator to help the chocolate set up faster.

2. For something less sweet, just sprinkle some sparkling sugar on top prior to baking. These will be perfectly dunkable in tea or coffee.

3. Be sure to really mix up the pistachio paste prior to using it.  The kind I purchased was just like natural peanut butter- upon opening, there was a pool of oil on top.

4.  Be aware that the cookies do not expand much or change color upon baking.

5. For even more festive looking cookies, instead of drizzling chocolate on top, try dipping 1/2 of cookie into chocolate and sprinkling on finely ground pistachios.  Place on wax paper to let set up.
                                    **LAST YEAR:Chocolate Caramel Candy**