Foodbuzz

Sunday, June 26, 2016

Chocolate Babka


I have a confession to make concerning holiday baking. Unlike most people, I do not have a secret stash of recipes that are on reserve for just the holidays. Sometimes special recipes are better received as a surprise than received when expected. Answering that question of "what is this for?" with "just because" always elicits a smile.

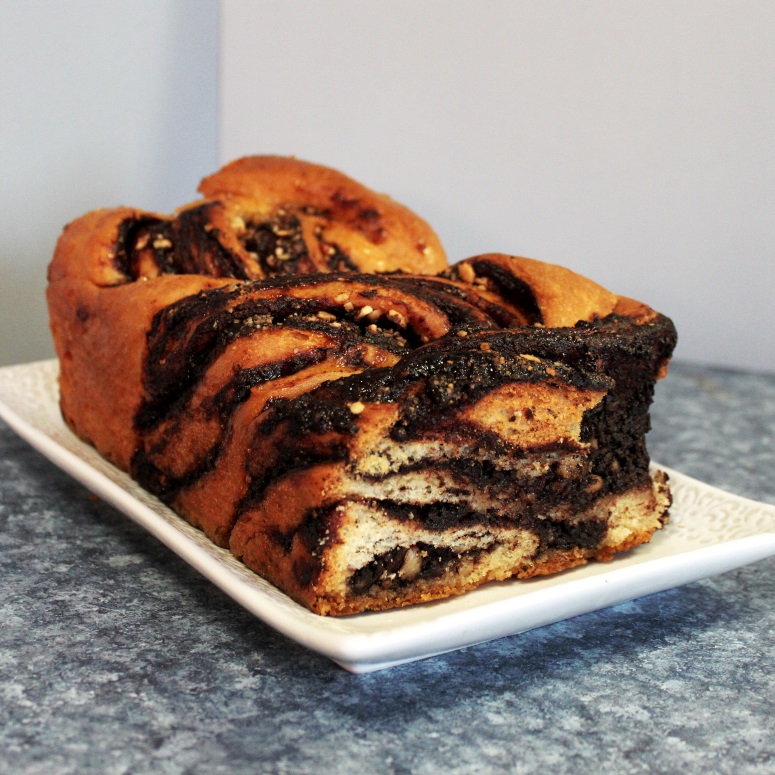
Today, I bring you a delicious recipe for chocolate babka. Since there are numerous recipes for this tasty and stunning dessert, I had to go through an evaluation process regarding the filling. After reviewing recipes with brownie bits, cinnamon and streusel, I came to the conclusion that I wanted a rich, dark chocolate filling. After all, this item should be more upscale and different from a coffee cake.

This particular babka recipe was exactly what I was looking for. It has just the right amount of decadent dark chocolate filling with a wonderful crunch of hazelnuts. Also, the Amaretto syrup soak does give the outer edges of babka a delicious texture. Regarding the dough, it actually stems from a donut recipe which lies somewhere between bread and cake.

Most of the time in this recipe is rise time and the chilling process for the dough. It rises 2 hours, chills overnight and then is formed and rises again 2 hours before baking. The recipe is in grams, so if you work in cup measurements, you will need a conversion chart. It makes 2 loaves, using two 5X10 inch loaf pans.

Chocolate Babka
adapted from Violet Bakery

Ingredients/Dough
3 eggs
125 grams butter
120 milliliters warm water
50 grams sugar
1 package yeast
2 tsp sea salt
500 grams flour

Ingredients/Filling
200 grams dark chocolate (60-70% cocoa bar or chips)
60 grams cocoa powder (I used dutch, but since type not specific either is acceptable)
160 grams butter
160 grams brown sugar
1/2 tsp sea salt
160 grams finely chopped and toasted hazelnuts

Ingredients/Syrup Soak
160 grams sugar
200 grams water
4 tsp honey
2 tbs Amaretto
pinch of salt

For the dough, you will need a stand mixer fitted with a dough hook. Pour the yeast in the bowl and whisk in the sugar. Then add the warm water. Let sit for 2 minutes to dissolve and then stir. Sprinkle in the salt and then add the flour in 100 gram increments, running the mixer about 1 minute and scraping down the sides after each addition. Add the eggs, one by one and beat for 1 minute after each addition. Once all the eggs are blended, beat mixture for about 10 minutes on medium speed. While the mixer is running cut the cold butter into cubes.

After the 10 minutes of beating, beat for an additional 10 minutes, this time dropping the cubes of butter into the dough. The end result will be a big ball of dough that has pulled away from the sides of the bowl. Pull out a medium size bowl and oil the interior. Transfer the dough to this prepared oiled bowl. Cover with plastic wrap and let rise in a warm place for 2 hours. Then, eliminate the air in the dough by punching down with your fist. Cover again and place in refrigerator to chill overnight.

The next morning, prepare 2 loaf pans by buttering the interior and lining the bottom and long sides with parchment paper. Set aside.

Now it is time to make the second component of this dessert. With the exception of the hazelnuts and salt, place all the filling ingredients in a medium saucepan. Set the saucepan over medium heat and whisk until every thing is melted and blended together. Set aside to cool for about 20 minutes.

Prepare a flat surface by lightly dusting with flour.  Divide the dough in half, placing one piece on the flat surface and returning the other piece to the refrigerator. Using a floured rolling pin, roll out the dough on the flat surface into a 12 inch by 12 inch square. Spread half the filling onto the dough, leaving about 1/4 inch border, and sprinkle with 1/4 tsp salt. Then sprinkle half of the nuts on top.

Roll the dough up tightly, like a jelly roll with the seam on the bottom. Lightly press the top of the roll to make sure the bottom seam is sealed. Using a sharp knife, cut the roll lengthwise, forming 2-12 inch ropes. Twist the ropes together into one piece and place in prepared pan, folding under the ends. Repeat this process to form the other loaf.

Lightly cover each loaf with plastic wrap and let rise for about 2 hours. During rise time, prepare the syrup soak by putting all the ingredients in a saucepan. Then place over medium high heat and let come to a boil. Remove and stir. Set aside to cool.

Preheat the oven to 350 degrees. Place both loaves in the oven and bake for 30 minutes. Then check on the loaves to make sure they are not getting too brown on the surface. At this time, you can lightly cover with foil if the loaves have the desired hue. Bake for another 15 minutes or until tester comes out clean.

Remove loaves and place on cooling rack and immediately pour half of the syrup over top of each warm babka. Let cool completely before taking out of pan.

Tips and Notes:
1. Do not expect the filling to be smooth after melting everything in the saucepan, mine was grainy but was not that texture after baking the bread.

2. Both doughs should have an even amount of rise time in the last session. Form one into a jelly roll and set aside. Then form the other. Slice each into 2 pieces and then twist each and place in pan. Cover and  set the timer for 2 hours

3. Having the filling exposed to the surface does not harm the flavor of the filling. You can have a toasty bread-like surface or a surface with many threads of chocolate. For the most exposure of chocolate filling, twist each dough log with cut side face up.

4. There is a lot of syrup, but it soaks in quickly, so there is little chance of it running off the sides.
                                        **Last Year: Butternut Cookies** 

Sunday, June 19, 2016

Circus Cookies


This post is dedicated to my Dad, the sugar cookie connoisseur of the family. To this day, my Dad can never get enough homemade sugar cookies. Dad, here's hoping that your day is better than expected, filled with lots of love and of course- many sugar cookies! Happy Father's day!

Making these little animals sure did transport me back to the days of childhood. The sweet, yet distinctive smell of homemade cookies filled the house while I peered over the counter to watch as my mom rolled out and cut the dough into different shapes. 

After the cookies came out of the oven, I was ready to eat. I was quickly told that they were not ready to eat. Disappointed, I thought that she made it up as a story to get me to go away, after all, the cookies were baked. Stubbornly, I sat and watched just to see what she was talking about.

Then my mom reached for a big white bag of powder and put several cups in a bowl. She added a few more ingredients and beat it all together. She moved to the cupboard, opened it and pulled out several containers. Some of the containers held brightly colored sugar and some had a rainbow of colored grain-like looking things in them. I curiously watched the artwork unfold as my mom iced and decorated the cookies.

This was the first indication to me that there was way more to baking than just making something that tastes good.

This particular recipe has its pros and cons in preparation, but these crisp little cookies have a almond-vanilla flavor that is unbeatable. Also, the almond bark coating is a must if you want the exact replica of the circus cookies that you find in the pink bag at the grocers. Note that the cookie dough must chill at least 8 hours, so allow for this time. The recipe makes about 4 dz little cookies. Be sure to read the tips at the end.

Circus Cookies
adapted from the Cooking Channel

Ingredients
1 egg
1 tsp vanilla extract
1/2 tsp almond extract
1/2 cup of butter
1/4 cup plus 2 tbs sugar
3/4 cup flour
1/4 tsp baking powder
1/8 tsp salt
1/2 lb almond bark or white chocolate coverture
sprinkles for decorating

Start the night before (or 9 hours prior to baking) by making the dough. Sift together the flour, salt and baking powder in a small bowl and set aside. Place the butter and sugar in a mixing bowl and beat together until fluffy and light in color. Add the extracts and egg to the mixture and blend on low speed with the mixer. Stop in increments to scrape down the sides. Once all is blended, fold in the sifted ingredients.

Shape the dough into a flat disc and cover with plastic wrap. Refrigerate dough for at least 8 hours or overnight.

When the dough is done chilling, preheat the oven to 325 degrees and line 4 baking sheets with parchment paper. Place the baking sheets in the refrigerator.  Prepare a flat surface by dusting with flour and dust a rolling pin as well.

Take a piece of dough (about 1/4 of the mass) and place on flat surface. Re-cover the remaining dough and place in freezer. Remove 1 baking sheet from refrigerator.

Roll out the dough on the flat surface to a 1/8 inch thickness. The dough will be very soft and has a tendency to stick. Be generous on the flour. If the dough sticks to the flat surface, dust the top of the dough and use a bench scraper to scrape off and flip the dough. Dust again and roll out to proper thickness. Dip the cutting part of the cookie cutter in flour and cut out one shape. Keeping the dough in the cutter, move the cutter over the baking sheet and lightly press dough out of the cutter onto the sheet. Repeat process until baking sheet is filled and put filled baking sheet in freezer.

Continue rolling and cutting the dough until all is formed into shapes and placed on a baking sheet. Remove one sheet from the freezer to the oven. Bake until cookies have golden edges. Cookies take about 12-13 minutes to bake. Remove from oven and let cool for about 2 minutes then transfer to rack to finish cooling. Bake the rest of the cookies as instructed above.

For the icing, melt the coverture or almond bark in a double boiler. Once melted, you can ice the cookies by using a knife or dipping them.  If you choose to dip them, make sure you have a sheet of wax paper on a flat surface in order to place the dipped cookie on. If you just choose to ice the top, they can be placed back on the cooling rack . After dipping or frosting about 4 of the cookies, decorate with sprinkles if desired. Continue with the process until all cookies are iced/dipped.

Before storing, make sure that icing has set/hardened on the cookies.

Tips and Notes:

1. The emphasis on the amount of flour when rolling and the butter to flour ratio in this recipe, had me concerned so I added 1/4 cup more of flour when making the dough.

2. The cookies came out thin and crisp, but the icing seemed to be too heavy for the cookie. If I made these again, I would adjust for a thicker cookie.

3. I like more cookie than icing, so I did not dip the whole cookie in the icing. The top or half dipped is fine for a good icing to cookie ratio.

4. I was expecting a thinner consistency of the almond bark, but remembered that it is considered as a candy coating rather than icing.

                                       **LAST YEAR: Pesto Potato Rolls**


Sunday, June 12, 2016

Pineapple & Spice Cupcakes


I think sometimes that the health industry has gone too far.  Especially in the area of supplements/pills that you can take that have healthy benefits. I am not sure of whatever happened to actually eating something natural as opposed to taking a pill.

As I strolled through the "healthy supplement" aisle at the drug store, I saw cinnamon pills. Maybe I am wrong, but I do not think there are a lot of people that hate the taste of cinnamon. Think about it: cinnamon toast, cinnamon rolls. Yes, doesn't just the thought make you want to take a cinnamon pill instead? I think not. I also saw cardamom pills.

Today's recipe contains cardamom. It is one of the many wonderful spices brought to us by India that has lots of health benefits. I imagine right now in southern India, there is someone looking across their backyard which is filled with wild cardamom. Most of us are not so lucky and actually have to pay to have some of the same.

So, for these special cupcakes,we start with a base of cardamom cake. After that, I have added a pineapple curd filling. Then topped them off with a frosting that has a unique blend of goat cheese and butter nut flavoring. Since you are not here to taste these, I will give you the run down of what your taste buds are missing.... first you taste a lightly spiced cake. Then there is a pop of the tart flavor of pineapple. After that comes the frosting, which is tangy but is followed by a chaser of nutty flavor. If you are unfamiliar with butternut, I think it tastes about like Frangelico liqueur. The last part your taste buds experience is the crunchy walnuts on top. Enough said, so lets head to the kitchen!

Pineapple & Spice Cupcakes

Ingredients/ Pineapple Curd
adapted from Alaska From Scratch

1/3 cup sugar
3 egg yolks
pinch of salt
2 tbs cornstarch
2 tbs butter
1 cup of strained pineapple puree

Ingredients/Cardamom Cupcakes (makes about 20-22 cupcakes)
adapted from Chowhound

3/4 cup or 1 1/2 sticks butter
2 egg whites
2 eggs
3/4 cup milk
2 tsp vanilla extract
1 1/2 cups sugar
2 cups cake flour
2 tsp baking powder
1/2 tsp ground cardamom
1 1/2 cups sugar

Ingredients/Goat Cheese Frosting
from Flourtrader

6 oz goat cheese (room temp)
2 tbs milk
1 tsp butternut flavoring
2 cups powdered sugar
3/4 cup butter (room temp)
1/2 -3/4 cup toasted chopped walnuts

Start by making the pineapple curd. Whisk the egg yolks together in a medium size bowl. Then sift in the cornstarch and stir. Add the pineapple puree and the sugar. Mix together and empty into a mid-size saucepan. Place the saucepan over medium heat and stir constantly. As it heats up, it will thicken. Once your spoon leaves a streak in the bottom of the pan, it is done cooking. It will be as thick as custard. Remove from heat and add butter. Stir until the butter is melted into the mixture. Let cool to room temp, empty into bowl and cover. Place in refrigerator until ready to use.

For the cupcakes, preheat the oven to 350 degrees. Grease the top edge of 12 muffin cavities of a muffin tin(s) and place paper liner in each cavity.

In a small bowl, sift together baking powder, flour, cardamom and salt. Set aside. Place butter and sugar in the bowl of a stand mixer and cream together by beating for about 3 minutes, taking a moment or two to scrape down the sides. Mixture should be fluffy and pale.

Add one egg white and beat for 30 seconds. In separate intervals, repeat the process with the remaining egg whites and each egg. Once completed, scrape down the sides of the bowl. Then beat again, this time on low. As you continue to beat, add the extract and then slowly stream in the milk. The end result will be a curdled-looking batter.

Remove the bowl from the stand mixer. Using a wooden spoon or spatula, fold the sifted ingredients into the batter. Then fill the lined cavities with the batter, using an ice cream scoop or spoon. The cavities should be about 2/3 full. Place tins in oven and bake for 8 minutes, rotate and bake for an additional 8-12 minutes more, or when tester comes out clean.

After baking, place tins on rack for about 2 minutes to cool. Then take cupcakes out of tin and place on rack to completely cool.

As they cool, you will make the frosting. Place the goat cheese and the butter in the bowl of a stand mixer and beat until smooth and creamy. Add the milk and butternut flavoring and beat again for 10 seconds. Stop and scrape down the sides, then repeat the process 2 more times. Lastly, you will add the powdered sugar in 1/2 cup intervals, beating to combine and scraping down the sides at each interval until all the powdered sugar is combined into the dairy frosting.

To assemble, use a pairing knife and core out a hole in the center of your cupcakes. Then fill a piping bag (coupled with a large tip) with the pineapple curd and fill each cupcake. Once all the cupcakes are filled, frost the cakes as desired and sprinkle with toasted walnuts. Now they are ready to serve.

Tips and Notes:

1. Regarding the pineapple puree, it took about 3/4 of a peeled, cored, chopped pineapple to make 1 cup. The pineapple was pureed in a blender and pressed through a sieve.

2. I had some left over after making the cakes. I consider the curd the best part of the cupcakes, so I easily found a use for the rest of it. You can also put a layer of curd on top of the cupcakes before frosting to use all of it up.

2. The recipe states that the batter makes 2 dozen. Mine, when filling the cavities as instructed came out to make 20.

3. These are not fancy, decorated cupcakes. However, if you desire something more like that, add more confectioners sugar to the frosting to get it thick enough to pipe onto the cupcakes. Of course you also will have to increase the recipe ingredients.

4. I used the Lorann brand of flavoring, which is much stronger than the regular flavoring so you will need to add more if using another brand.

5. Do not overbeat when adding the milk and extract, this will put more air into the batter and makes for a flatter cupcake.
                                      **LAST YEAR:Pecan Cream Cups**


Sunday, June 5, 2016

Mojito Bars


There are many stories of how the mixed drink the Mojito came about. The one that I chose to believe is that it started in Cuba as a way to curb the harshness of straight rum. However, even without the rum, the blend of lime and mint is nothing but tropical and refreshing.

These bars mimic that wonderful flavor. There is the tartness of the lime and the butter pecan flavor of the crust, followed by a subtle cooling mint. The little squares are just the thing to pull out of the fridge when you need a break from the hot, humid weather.

Mojito Bars
adapted from State Fair Recipes

Ingredients/Crust
1 cup chopped pecans
1 cup or 2 sticks butter (room temp)
3/4 cup sugar
1 3/4 cup flour

Ingredients/Filling
1/2 cup key lime juice
1 tbs mint (snipped into fine pieces)
2 tbs key lime zest
2 tbs milk
1/4 cup rum (optional)
4 eggs
1 1/2 cups sugar
1/2 tsp baking powder
1/4 cup flour
1/4 tsp salt
Powdered sugar and mint leaves (for topping)

Prepare a 9x13 inch baking pan by lining the interior with foil, leaving some over hang on the longest sides. Preheat the oven to 350 degrees.

For the crust, pulse together the nuts, sugar and flour in a food processor. Then cut the butter into 1/4
inch cubes. Drop the butter cubes into the dry mix and process until mixture forms a mixture that can be compressed into a dough.

Empty dough into prepared pan and press down, evenly covering the bottom interior of the pan. Prick the dough with a fork to keep crust from bubbling up when baking. Place in oven and bake for 20-25 minutes or until edges are golden brown.

During the baking process, the filling is to be made. Start by sifting together the baking powder, flour and salt. In another bowl, whisk together the remaining ingredients (less the items listed for topping). Then stir in the sifted ingredients.

Once the crust is baked, remove and pour the filling mix into the pan. Place pan back in oven and bake until edges start to brown. The bake time is 20-25 minutes.

Place pan on rack to cool completely. To serve, lift foil edges and pull out of pan. Pull foil away from sides of bars. Cut into squares and dust with powdered sugar and mint leaf (if desired).

Store bars in refrigerator until ready to serve.
                          **LAST YEAR: Strawberry Cream Cheese Coffeecake**