Foodbuzz

Sunday, August 30, 2015

Boo Boo Pie


Sorry, but there is no back story here as to how this recipe got its name. We can only speculate that it was a mistake or "boo boo" that actually turned out to be a delicious error. Errors can prove to be a good thing in certain cases. After all, chocolate chip cookies stem from the act of someone trying to compensate for a missing ingredient in a recipe.

If you love Mounds candy bars, then you have come to the right place. This recipe is basically a sweet combo of a rich chocolate brownie and chewy coconut. Not only will it squelch your craving for something sweet, you will not be spending very much time in the kitchen to create this. Another plus is that the ingredient list is very basic. Now let's get into the details....

Boo Boo Pie
adapted from Recipe Goldmine

Ingredients
3 eggs
1 tbs vanilla extract
1/2 cup butter
3/4 cup sugar
3 oz unsweetened chocolate
2 2/3 cup sweetened coconut or 1 7 oz bag
1/2 cup flour
1 14.5 oz can sweetened condensed milk

Grease the interior of a 9 inch pie pan.

Empty the bag of coconut into a bowl. Using a fork or clean hands, separate the coconut so there are no clumps. Once all the clumps are loosened, pour in the sweetened condensed milk. Mix together and then let sit for at least 1 hr so the coconut can soak up some of the milk.

While the coconut is soaking, start on the brownie part of the recipe. Set up the bottom part of your double boiler by filling 2/3 full of water and placing over medium high heat. Once water comes to a simmer, place top pot on top and fill with butter and chocolate. Let ingredients melt together, stirring occasionally until smooth and blended. Remove from heat. Preheat the oven to 325 degrees.

Take out a medium size bowl and fill with eggs, sugar and vanilla extract. Stir with a wooden spoon until evenly mixed. Then mix in flour. Lastly, pour in the melted butter and chocolate blend. Mix together to form a smooth chocolate batter.

Empty the chocolate batter into the prepared pan. Smooth the top and make sure the batter is even in the pan. Go back to the bowl of coconut and sweetened condensed milk and stir.  Then spoon the coconut mixture on top, but leave a 1/2 inch border around the edge so the brownie batter can form a crust.

Place pan in oven and bake for about 25 minutes. Let cool completely before slicing.

Tips and Notes:
1. The thickness of the coconut mixture is personal preference. The center of the pie, with the recipe as is, produces a sticky but soft texture. For something more solid, cut back on the sweetened condensed milk.

2. Bear in mind that the center sets up when cooling, but it should be somewhat solid coming out of the oven, not too jiggly.

3. Due to the liquidity of the chocolate batter, smoothing out the coconut filling evenly can be difficult. To insure that the coconut layer is even, spoon it onto a sheet of wax paper and smooth it into an even 8 1/2 inch round. Then place it in the freezer until it becomes a solid mass. Remove and peel off wax paper and center on brownie batter and lightly press down. Since the coconut mixture is frozen, you will need to increase the baking time. 
                             **TWO YEARS AGO: Creme Fraiche Coffee Cake**

Sunday, August 23, 2015

Honey Glazed Berry Scones

When it comes to combining fresh blueberries or blackberries to dough, it is hard for the end result not to look like a bruised lump or have tinges of purple. That is why most bread recipes use dried fruit. There is nothing wrong with dried fruit, but you cannot deny the "gummy bear" type of texture when biting into a chunk of dried fruit. Some recipes remedy this by including a "plumping" or soaking interval for the dried fruit prior to mixing it into the dough, which is a beneficial process.

In light of this information, I decided that frozen fruit is the best choice when you are making a sweet bread type of recipe. The frozen aspect keeps the fruit from tie dying your dough into a purple lump. Also, baked in frozen fruit rates higher on the texture scale than dried fruit.

Dark colored berries, if you did not already know, are the healthiest to eat. I do try to eat fruit for breakfast. However, adding them to cereal, smoothies or yogurt all the time can get boring after awhile. It was time to have something a little different and these scones were the choice. Chock full of a double helping of berries and honey sweetened crust, there was no denying the fact that this chosen difference made my breakfast a little bit more special. Not only did the bread/berry combo turn out to be irresistible, but the honey glaze does double duty with adding sweetness and also keeping the scones from drying out. This recipe makes about 8-12 scones, depending on the cutter size.

Honey Glazed Berry Scones
adapted from A Passion For Baking

Ingredients/Scones
2 tsp of vanilla extract
1 egg
1tbs of lemon juice
1 cup whipping cream
3/4 cup or 1 1/2 sticks of butter (cut into cubes)
1/2 cup of sugar
4 tsp baking powder
1/2 tsp baking soda
1/2 tsp salt
3 1/2 cups of flour
1/2-3/4 cup frozen blackberries
1/2-3/4 cup frozen blueberries

Ingredients/Topping
1/4 cup of milk or melted butter (for brushing prior to baking)
1/3 cup honey
1/4 cup unsalted butter

Start the process by stacking 2 baking sheets together and lining the bottom of the top sheet with parchment paper. Preheat the oven to 425 degrees.

Using a liquid measuring cup, fill with the tablespoon of lemon juice and then the whipping cream. Stir and set aside.

Sift together the flour, baking soda, salt and baking powder in a medium size bowl. Stir in the sugar. Pour the blend into a food processor and drop in the chunks of butter. Pulse until no more dry streaks remain. This should result in a coarse, sand like mixture. 

Transfer dough back into medium size bowl and make a well in the center. Fill the well with the egg, lemon/cream mixture and vanilla. Blend with a wooden spoon until no dry streaks remain. The dough should be able to hold its shape but also be soft. Then fold in the berries.

Prepare a flat surface by dusting lightly with flour. Take dough out of bowl and knead. This process may require more flour to insure that the dough does not expand after cutting. Flatten and shape dough so it is only 1 inch thick. Cut into desired shape (rounds, squares or triangles) and place on parchment lined baking sheet about 1 inch apart.  Brush the top of each scone with the melted butter or milk.

Bake for about 16-19 minutes. Scones are done when they are golden brown on top. While the scones are baking, prepare the glaze.  Fill a liquid measuring cup with honey and butter. Place cup in microwave and heat on high for 45 seconds. Stir mixture and then return to microwave and heat for an additional 45 seconds.

Remove scones from oven when done and place baking sheet on a cooling rack. Then brush lightly with the glaze. Let the scones sit for about 15 minutes and then coat the surface generously again with the rest of the glaze.

Tips and Notes:
1.The purpose of stacking 2 pans together insures that the bottom of the scones do not brown too fast.

2.The frozen fruit should be in separate pieces but not thawed out.

3. Because of the size of the blackberries and the fact they are frozen, the best way to cut the dough is with a sharp blade. It insures a sharp cut into the fruit and also makes for a good height on the scones when baked. 

4. Due to the glaze, the scones will stay moist and flavorful for up to 4 days.

5. Using a food processor is recommended, but you can blend with a mixer and have the same results.
                                   **LAST YEAR:Banana Walnut Tart**   

Sunday, August 16, 2015

Raspberry Lager Cupcakes


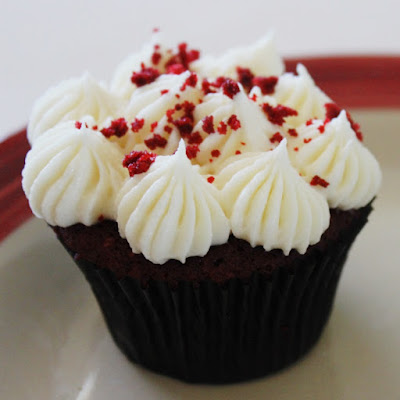
Red velvet cupcakes are always ranked as one of the favorites when it comes to baking contests.  Something about the color and that touch of cocoa really appeals to the majority of cake and cupcake lovers. With that appeal, you run across numerous recipes that have been modified from the original.  One thing I have seen is the color change; blue velvet, green velvet...etc.

However, this is one twist that does not involve a change of color. This recipe is actually a red velvet recipe with a fruity, boozy twist. It incorporates raspberry beer. Even though raspberry and chocolate is a delicious combination, my first concern was about the raspberry flavor. I did not want it to taste "artificial", so I took some time to find a naturally flavored beer. I came across a Belgium beer, Lindeman's Frambois Lambic. Other than being naturally flavored, the size of the bottle (25 oz) was a benefit since the recipe calls for more than 12 oz of beer.

This recipe scored very high in flavor and texture. As you can see by the bottom picture, the cake was nice and moist. The brush of raspberry syrup on top gave them an extra pop of delicious fruit flavor. Also the obvious, but perfect, choice of topping is the cream cheese frosting.This recipe makes about 2 dozen cupcakes, but you may try 1 1/2 times the recipe if you are bringing this to a potluck or family get together. You definitely want to make sure no one is left out when it comes to eating one of these special cupcakes.....

Raspberry Lager Cupcakes
adapted from Just a Pinch website

Ingredients/Cupcakes
1 tsp vanilla
1 oz red food coloring
2 eggs
1 tbs apple cider vinegar
1/2 cup vegetable oil
1 cup raspberry beer
1 3/4 cup sugar
1/2 cup or 1 stick butter (room temp)
3/4 cup of regular flour
2 cups cake flour
3 tbs cocoa powder
1 tsp baking soda
1 tsp salt

Ingredients/Topping
3-4 cups powdered sugar
8 oz cream cheese (room temp)
8 oz butter (room temp)
1 tsp vanilla
24-30 fresh raspberries for garnish (optional)
1 crumbled cupcake for sprinkling

Ingredients/Soaking Syrup
1 1/2 cups raspberry beer
8-10 fresh raspberries, mashed

Start by making the soaking syrup.  Fill a saucepan with the beer and mashed raspberries.  Bring the mixture to a slow boil and stir. Let it cook down to about 1/2 of the original amount. This should take about 7-10 minutes.  Place strainer over a heat proof bowl and strain liquid. Use the back side of a spoon to separate the fruit from the seeds, scraping the inside of the strainer. Once strainer holds nothing more than seeds, set bowl of strained liquid aside to cool and discard seeds.

To make the cupcakes, begin by greasing the top edge of your cupcake cavities and insert paper liners for approximately 2 dozen cupcakes. Preheat the oven to 350 degrees.

In a small bowl, mix together raspberry beer and food coloring. Set aside. Then fill the bowl of a standard mixer with the oil, butter and sugar. Beat on medium speed, occasionally scraping down the sides, for about 3 minutes or until mixture is light and fluffy. Drop in one egg and beat for 30 seconds. Add the other egg and beat again. Pour in cider vinegar and vanilla extract and blend liquids into batter until incorporated.

Using a third bowl, sift together 2 types of flour, cocoa powder, salt and baking soda. Fold 1/3 of this mixture into the batter. Pour in 1/2 of the raspberry beer/food coloring liquid. Stir until thoroughly blended. Repeat this process, using 1/2 of the remaining dry ingredients and all of the liquid. Lastly, fold in the last bit of the dry ingredients.

Using a scoop, fill each lined cupcake cavity with batter. Fill to approx. 2/3 full. Place both pans in oven and bake for 10 minutes and rotate pans. Bake for an additional 7-10 minutes or until tester comes out clean. Let cupcakes cool in pans about 5-7 minutes and then carefully transfer to cooling rack. Wait another 5 minutes and then brush lightly with soaking syrup. The brushing step will be in two sessions, about 3 minutes apart. This will give it time to soak in prior to the second session.

Cupcakes can be frosted once completely cooled.

For the frosting, add the cream cheese and butter to the bowl of a stand mixer. Then beat until no lumps remain and both ingredients are completely blended and creamy. Add the vanilla extract and beat again for about 1 minute, scraping down sides of bowl. Remove bowl from stand mixer and sift in 1 cup of powdered sugar. Place bowl back in stand mixer and beat until no dry ingredients remain. Continue with the process, adding the powdered sugar until frosting reaches the desired consistency.

Take one of the cooled cupcakes (preferably the ugliest, misshapen one) and place in mixer or food processor and process until you have fine crumbs.

Pipe frosting onto top of cupcakes and then sprinkle cupcake crumbs on top.  If desired, place 2 raspberries on center of top, just prior to serving.

Tips and Notes:
1. You will have some leftover soaking liquid.  Be sure not to "oversoak" your cupcakes, this will make them very fragile to handle and insure that they will fall apart when someone trys to eat them later.

2. How much food coloring or if you use any is personal preference.

3. The soaking liquid idea can be beneficial in instances where the flavor has baked right out of the cupcake for some reason. The recipe will need to be tweaked more, but you have a way to save these particular cupcakes from the error bin. Making a syrup with the flavoring and brushing on top will add back what was baked out.
                                       **Last Year: Citrus Syrup Tea Cakes***

Sunday, August 9, 2015

Citrus Snap Cookies

There are some treats that never really appear unless it is the holidays. Cut out cookies usually are reserved for the Christmas holidays. The shapes made are usually those of the occasion: bells, Christmas trees, gingerbread men...etc. I guess because of the time involved, it is only the holidays that motivates some people to make these type of cookies.

Well, just to be clear....these particular cut out cookies are not for the Christmas holidays. Made with a myriad of fruit zest and juices, they are most appropriate around spring or summer. That is when citrus fruit is the most plentiful and perfectly ripe.

No holiday to motivate you? Consider it a holiday when the kids go off to school! Or better yet, make the kids first day a little bit nicer by tucking a few of these away in their lunch bag.

The fun part about cut out cookies is the opportunity to make them unique. Choose whatever shape and decorate however you want. The cookies pictured above are in the shape of a butterfly, have just white glaze with sprinkles. With all the different colors of sugars, gel pens and different miniature decorations ( I even saw little "minions") the style possibilities are limitless. This recipe makes about 2 - 2 1/2 dozen.

Citrus Snap Cookies
adapted from Orlando Edible Feast 
 
Ingredients/Cookies
3 tbs fresh lemon juice
3 tbs fresh orange juice
3 tbs fresh lime juice
2 tsp lemon zest
2 tsp orange zest
2 tsp lime zest
1 cup or 2 sticks softened butter
1 cup confectioners sugar
2 cups flour
1/2 tsp salt

Ingredients/ Glaze & Topping
1 lb confectioners sugar
1 tsp lemon zest
1 1/2 tbs lemon juice
1/2 cup plus 2 tbs pasteurized egg whites

For the cookies, line 2 baking sheets with parchment paper. Pull out 2 small bowls. Mix the three kinds of zest together in one bowl. In the other bowl, combine all juices.

Fill the bowl of a stand mixer with the sugar and butter. Cream together, beating on medium high for about 3 minutes. Then add the juices, zest and salt. Beat until evenly distributed.

Remove bowl from mixer stand and fold in one cup of flour. Once blended, fold in the additional cup. Place a long sheet of plastic wrap on a flat surface. Gather dough into a ball and place in the middle of the plastic sheet. Flatten into a disc, about 1/2 an inch thick. Fold plastic over the dough, making sure all is covered. Then place in refrigerator to chill for about an hour for the dough to firm up.

While dough is chilling, preheat the oven to 325 degrees. Place a piece of parchment paper on a flat surface and dust with flour, this will be your rolling area. Also, place parchment paper underneath a cooling rack.

Once dough is firm, take out of refrigerator and divide in half. Keep one to work with and put the other, covered, back in the refrigerator. Roll dough out onto prepared surface, ending with an 1/8 inch thickness of dough. Cut into desired shapes and transfer to parchment lined baking sheets, spacing about 1/2 inch apart. Then place filled baking sheet in refrigerator. Dough will need to chill again for about 10 minutes.

After the chilling time is complete, place sheet in oven and let cookies bake for about 10-15 minutes, or until cookies are a light golden color on the edges and the bottom. Remove cookie sheet and place on cooling rack. After about 2 minutes, transfer cookies to rack. Let cool completely before frosting or decorating.

Repeat the process of forming and baking with the dough scraps and the remaining dough in the refrigerator.

For the glaze, mix all ingredients together and spoon glaze onto tops of cookies. After about 3 minutes, put topping of your choice onto glaze (sprinkles, sugar, dragees, etc.). Give the glaze time to completely harden prior to storage.

Tips and Notes:
1. The standard way to form these type of cookies, is to cut them out and then transfer to baking sheet. Instead of this method, you can roll out dough on parchment paper that fits the interior of the baking sheet. After rolling, parchment is then transferred to cookie sheet and shapes are cut out. Place pan in freezer for 10 minutes. Pull out pan and remove cold dough from around the cut shapes. Then place in oven to bake. By eliminating the transfer step from the standard process, you eliminate any possibility of losing the shape of the cookie.

2. The glaze can be as thin or thick as you want. The thicker it is, the less it will run off and drip on the parchment below the rack.
**LAST YEAR:JD's Birthday Cake**                    **2 YEARS AGO: Grand Marnier Cake**  

Sunday, August 2, 2015

Almond and Marzipan Roulade


I wonder how much of the population can be self sustaining. How many people can just go outside and get everything they need in the way of food right off their land? For some, the possibility exists, but is lacking in motivation. Most of us would probably would buy something rather than going to all that trouble.

However, other cultures seem to be doing it much more that we do in the US. This particular recipe stems from an article in Saveur called the "promised" land. It refers to the richness of the land in Northern Israel as well as several chefs residing there. One chef left a thriving bread business with a chain of bakeries, looking for a simpler, more satisfying life. Now, he is surrounded by an overabundance of fresh produce with a garden that seems to have a little of everything. Also, he is teaching culinary classes in his home.

This almond roulade recipe is definitely a keeper. One of the factors is that it is easy to make, but looks difficult as well as stunning. The marzipan brings just the right amount of sweetness to the rich, buttery bread. Another factor that impressed me was the touch of lemon zest on top and how the syrup on top completely changed the texture. Upon removing it from the oven, it looked to be crusty, almost as if it would flake into crumbs when cut. Yet, after topping it with the syrup, the surface softened. The syrup also seals the bread, keeping it from drying out with time.

If you are like the majority of the people in the US, you are not self sustaining. However, the idea can be quite appealing if you look at it with the right perspective. Imagine sitting on your back patio, enjoying a slice of this delicious breakfast pastry with coffee, while your overlook your own garden paradise.

Almond Roulade
adapted from Saveur Magazine, May 2013

Ingredients
1 cup buttermilk
4 eggs yolks (3 for dough and 1 for brushing surface)
Juice and zest of 1 lemon
1/2 cup warm water (separated into 1/4 cups)
1 1/4 cups softened butter
12 oz marzipan
1 cup sugar ( separated into half cups)
1 - 1/4 oz package active dry yeast
2 cups cake flour
2 cups all purpose flour
1 cup whole almonds (toasted and chopped)
1 tsp kosher salt
1 tbs coarse sugar

In a medium size bowl, sift together both types of flour and salt. Then stir in the yeast. Form a well in the center of the dry ingredients and set aside.

Take out another bowl and add buttermilk, 1/4 cup warm water, 1/2 cup of the sugar and 3 egg yolks. Mix together until evenly blended. Cut butter into 1/4 inch cubes. Pour buttermilk mixture into well of dry ingredients. Then drop in butter cubes. Stir with a wooden spoon until it becomes a solid dough mass.

Prepare a flat surface by dusting with flour and grease the interior of a medium size bowl. Take the  dough and knead for about six minutes on the floured surface. Form dough into a ball and place in prepared bowl and flip one time. Cover bowl with plastic wrap and refrigerate dough. It can be refrigerated overnight, but must be chilled for a minimum of 2 hours.

After chilling process is over, preheat the oven to 350 degrees. Line a baking sheet with parchment paper.  Remove dough from refrigerator and place on floured surface. Roll out dough and form a rectangle, measuring 11x16. Then sprinkle chopped almonds evenly over surface, leaving a 1 inch border on all edges. Lightly pat down almond pieces into dough to stick.

Divide marzipan into 2 pieces. Roll each piece into a rectangle measuring 5x8. Place each piece, side by side on top of the almond studded dough, leaving only a 1 inch border. Press down lightly to adhere. Start rolling the dough up, jelly roll style from the long end. Once completely rolled, the dough should be facing with the seam in the center of the bottom of the log. Pinch and tuck the ends under, downward like the bottom seam. Place log, seam side down on the baking sheet.

Brush the surface of the dough with egg yolk and then sprinkle the coarse sugar evenly on top. Place in oven and bake until golden brown. Log should be cooked completely in about 1 hour.

45 minutes into the baking time, prepare the syrup topping. Fill a saucepan with the remaining 1/4 cup of water and 1/2 cup of sugar and place over medium high heat. As the saucepan heats up, stir the ingredients together. Then let come to a boil and cook for 1-2 minutes.  Remove from heat and mix in lemon juice and zest.

Once loaf is completely baked, remove from oven and brush syrup topping over the top.  Let cool slightly before serving.

Tips and Notes:
1. The recipe refers to almond paste and marzipan as one in the same, but there is a difference.  Almond paste has more almonds and less sugar. I used almond paste, but which almond ingredient you use is personal preference.

2. For a less "chunky" filling, use sliced almonds (like I did). The sliced nuts are thinner and made for easier slicing.
                                            **LAST YEAR: Cinnamon Bun Pie**