Foodbuzz

Sunday, April 26, 2015

Apple Cinnamon Bundt Cake


I guess we all have a desire for lots of flavor without all the fat and calories. After years of blogging desserts without regard to calories or fat, I decided I would try a lighter recipe. I know that several other countries believe that American desserts contain too much sugar for the palate. It is about personal taste and what you are used to.  I know people that prefer a salty snack over sugary.  Dieting, in my book, is about portion size control when it comes to eating desserts. After all, it is easier to eat less than to change your whole realm of eating habits. Moderation is another key.

This particular recipe is a bundt cake filled with cinnamon, apples and ground walnuts. The cake part has vanilla beans in it. However, the results prove that the filling is the real flavor in this cake.

For my taste, the cake part seemed to eggy and did not offer much flavor. The ratio of eggs to flour  seems unbalanced. As you can see by the picture, the cake part looks very spongy. This is not typical of most bundt cakes. In addition, I was disappointed that you cannot taste the flavor of the vanilla beans in the cake. Since I am not someone that creates low fat/calorie recipes, I am at a loss with how to get to a more flavorful cake, while still retaining its low cal/fat attributes.

If you are a low fat/low calorie guru and enjoy tweaking recipes, then you are welcome to grab this one up and start experimenting. Myself, on the other hand, will go back to sweet indulgences.

Apple Cinnamon Bundt Cake
adapted from Cooking Light/Nov 2011

Ingredients/Filling
1 cinnamon stick ( 3 inches long)
1/2 cup apple cider
1 tbs dark brown sugar
1 1/2 cups diced, peeled apple (tart style, like Granny Smith)

Ingredients/Streusel
1/2 tsp ground cinnamon
1 tbs flour
2 tbs dark brown sugar
1/2 cup walnuts

Ingredients/Cake
2 eggs
1 egg yolk
1/2 cup fat free milk
3/4 cup 2% reduced fat Greek Yogurt
1/2 cup butter, softened
1/4 tsp salt
2 tsp baking powder
1 tsp baking soda
9 oz or about 2 cups flour
1 vanilla bean, split lengthwise
powdered sugar (optional, for dusting top of cake)

Start by preparing the bundt pan by coating the interior with a baking spray with flour or greasing and then dusting with flour.  Make sure all the crevasses are completely covered.  Set aside and then preheat the oven to 350 degrees.

For the filling, place all the filling ingredients in a small saucepan. Cook over medium high heat.  Once the mixture reaches a boil, turn temperature down to medium and let simmer. As it simmers, stir occasionally. The liquid will evaporate as it cooks. After 20 minutes, there should be very little liquid and the apple quite tender. Remove from heat and let cool to room temperature. Divide mixture in half and set aside.

The next step is the streusel. Fill the bowl of a food processor or blender with all the streusel ingredients. Pulse the mixture until it reaches a coarse, sandy texture. Just like the apple mixture, divide in half and set aside.

The cake process starts by sifting the flour, baking soda, baking powder and salt together. Then take out another bowl and fill with the butter and sugar. Using a stand mixer or hand held mixer on medium speed, cream the two together by beating for about 3 minutes. Add one egg and beat for another 30 seconds.  Add the other egg and beat again for 30 seconds.  Repeat with the egg yolk.

Take the split vanilla bean and scrape the seeds into the sugar/egg batter and blend until evenly distributed. In a separate bowl create a dairy mixture by whisking together yogurt and milk.  Fold 1/3 of the sifted ingredients and into the sugar/egg batter.  Stir in half of the dairy mixture.  Repeat the process of adding the dry and wet ingredients, ending with the dry ingredients. Divide the batter into thirds.

Take 1/3 of the batter and spoon into the bottom of the prepared bundt pan.  Top the batter with 1/2 of the apple ingredients, making a row in the center of the batter.  Then top with 1/2 of the streusel mix, still making a center row.  Add another layer of batter (using the next 1/3 measurement), spooning in and smoothing out. Layer the center row with the remaining apples and top with the last of the streusel.  Spoon the rest of the batter on top and smooth with a spatula.

Place the filled pan in the oven and bake for 20-30 minutes. A toothpick test resulting in moist crumbs indicates that the cake is done.  Let cool in pan 20 minutes and then invert onto cooling rack.  Once completely cool, dust with powdered sugar if you prefer.

Tips and Notes:
1. The recipe did not specify making a center row of filling and apples, I added this instruction to insure that it would not reach the edges to cause sticking to the pan.

2. Act quickly when assembling, batter rises quickly once the dry ingredients are incorporated.
                          **LAST YEAR:Cherry Almond Cobbler Cookies**  

Sunday, April 19, 2015

Charlevoix Cookies


One of the flavors in this recipe is maraschino cherry. In researching cherries, I found that the trees were first were planted by the French along the Saint Lawrence Seaway. That seaway reaches into the Great Lakes area from Canada.  Based on this tie, there are 2 areas called Charlevoix. The first is a town in the far northern area of Michigan and the other is in Quebec. While both are along water and offer fishing and plenty of hiking areas, the Canadian location has mountains along the seaway.

Now that the background of the name has been covered, lets get into the details of this petite sandwich cookie. The cookie part has the flavor of almond and it has a soft texture with a slight crunch of desiccated coconut and almond flour. For an even bigger pop of flavor, the bottoms of the cookies are dipped in chocolate and then sandwiched together with a maraschino cream.

They are small and are perfect for popping in your mouth whole. That way you get the full experience of all the textures and flavors. In addition, bigger cookies would be quite messy after one bite. If you like chocolate covered cherries, then you are reading the right post.

This recipe yields about a dozen sandwich cookies.

Charlevoix Cookies
by Flourtrader

Ingredients/Cookies
1 stick or 1/2 cup butter
1 egg white
1 tsp almond extract
1/4 cup and 1 tbs powdered/confectioners sugar
1/4 cup and 1 tbs desiccated coconut
3/4 cup flour
2 tbs almond flour
1/4 tsp baking powder
1/2 cup chopped semi-sweet chocolate or chocolate chips

Ingredients/Filling
1/4 cup butter
1 1/4 cup powdered sugar
1/2 tsp vanilla extract
1 tbs maraschino juice

Prepare two baking sheets by lining with parchment paper. Also, preheat the oven to 350 degrees. Cream together butter and powdered sugar until smooth. Beat the egg white into the batter, running the mixer on medium high for about 30 seconds. With the mixer on low speed, stir in the coconut and almond extract for another 30 seconds. Set aside.

Using a separate bowl, sift together the regular flour and baking powder. Then whisk in the almond flour.  Fold the dry mixture into the wet batter, using a spatula. Scoop out the batter into rounded teaspoons and place each on the prepared baking sheet, about one inch apart. Place in oven and bake for about 15 minutes, rotating pans halfway thru the baking process. Cookies are done when lightly browned on edges and bottom. Let cool completely on pan.

While the cookies are cooling, line 2 more baking sheets with parchment paper. Place in the freezer.  Set up a double boiler and fill top pot with chocolate. Place over medium high heat and stir occasionally until all the chocolate is melted. Take one of the baking sheets out of the freezer.

The chocolate coating process is the next step. Using a wooden spoon, scoop up some of the melted chocolate and then place a cookie on top of the chocolate, flat side down. Transfer to cold baking sheet by placing on the parchment paper, chocolate side down. Continue with the process until both baking sheets are full, placing each in the freezer when complete.

Next, prepare the filling by starting with creaming the butter and powdered sugar together. Once mixture is smooth beat in vanilla extract and maraschino juice. If the consistency is too thick, add more juice as needed.

Take out one baking sheet of cookies and match pairs together by size and shape.  Then sandwich each pair together with a few teaspoons of filling.

Tips and Notes:
1. Clear vanilla extract instead of dark will help retain the pink from the maraschino cherry juice, but you can add food coloring if you are unable to find clear vanilla extract.

2. The usage of the chocolate and filling is not an exact science, so some may be left over. The chocolate can be stored for later use. If you are concerned about excess filling, try halving the filling ingredients then see how far it goes when assembling the cookies.

3. The addition of the egg white results in a curdled looking batter, but that is normal.

Also, I did listen to an old song during my research into cherries. That oldie is called "Life is just a Bowl of Cherries". A nice reminder not to take things too seriously, laugh a little and enjoy it!
                                    **LAST YEAR:Minnies Chocolate Chip Supreme Cookies**

Sunday, April 12, 2015

Chocolate Banana Muffins

Well contrary to what the song says, it is not "all about the base." That is, when it comes to muffins. These muffins reinforce what we all know to be true -- muffin tops are the best part of the muffin!

When I read the recipe instructions for these treats, I envisioned a big baked glop as the end result and also some cooked batter on the baking sheet. After all, I have never filled muffin tin cavities to the top with the batter and this recipe stated fill to just over the rim. That's right-- just over the rim! However, since the author made special notes regarding a lawsuit tied to a bakery stealing one of her muffin recipes, I decided to follow the instructions as stated.

I am sure glad I did. To my pleasant surprise, the muffins turned out with a huge top and did not stick or tear when removing from the muffin tin. The inside was very moist and packed with lots of flavor. The baked treats are composed of 2 types of chocolate, bananas and nuts. Prior to baking, they are topped with chewy coconut and ground nuts held together by a little butter. These are a tasty way to start the day, but too good to be segregated to breakfast. They make for a tasty afternoon snack as well. The recipe yields about 16 to 18 muffins with lovely, large tops.

Chocolate Banana Muffins
adapted from The Best of Better Baking

Ingredients/Topping
2 tbs packed brown sugar
4 tbs or 1/2 stick of unsalted butter, cubed and softened
1 1/2 cups sweetened shredded coconut
1/2 cup of finely ground nuts- pecans or macadamia

Ingredients/Muffins
1/2 cup sour cream
1 tbs strong brewed coffee
1/2 cup vegetable oil
1 tsp vanilla extract
1 cup banana purée (about 2 ripe bananas)
4 eggs
1/2 cup or 1 stick of butter
1 cup packed light brown sugar
3/4 cup granulated sugar
1/2 cup chopped pecans or macadamia nuts
4 oz chopped white chocolate
1/2 semisweet chocolate chips
3 3/4 cup flour
3/4 tsp baking soda
1/2 tsp salt
4 tsp baking powder

Start by preheating the oven to 425 degrees. Grease the top edge of 18 cavities of muffin tin(s). Line the cavities with paper liners. Line baking sheet (s) with parchment paper. The recipe recommends that most of the mixing in this recipe be done by a food processor. At this time, set up your equipment accordingly.

Using a medium size bowl, sift together flour, baking soda, baking powder and salt . Set aside. For the topping, fill the bowl of a food processor with all the filling ingredients. Cover and pulse for about 15 seconds. Transfer topping into a bowl and set aside for later use. Clean the food processor bowl.

Using the same processor bowl, fill with both types of sugar, butter and oil. Pulse until mixture is smooth. Add the vanilla extract and coffee, pulsing again until blended.  Add the eggs, one at a time, processing each completely into the batter. Lastly, pulse in the sour cream and the banana puree.

Transfer batter from the food processor to the bowl of sifted ingredients. Fold together until no dry streaks remain. Then mix in both types of chocolate and nuts, making sure all is evenly distributed into the dough.

Fill the muffin cavities with the batter by using a large ice cream scoop. The cavities should be filled to just over the rim. Scoop out about 1 1/2 tbs of the topping and flatten into a disc with your hands and place on top of each cavity of batter and press lightly. Put each pan on the prepared baking sheet.

Place the pans in the oven, using the top and middle shelves. Then reduce the temperature to 400 degrees. Bake the muffins until tester comes out clean and top springs back when lightly touched.  Be sure to rotate the pans at the halfway point of baking. The recipe recommends 20-22 minutes, but mine took about 30 minutes. Let muffins cool in pans for about 15 minutes before transferring to a rack to finish cooling.

Tips and Notes:
1. Timing is everything and baking time will vary depending if you are using a dark pan or not. The recipe states be careful not to over bake, but my issue was the opposite- making sure they were completely baked.

2. The author instructed cooling time in muffin pan as 5 minutes, but I stated 15 minutes in the above recipe. This change was made to insure that they would retain the same shape when pulled out of the oven. Even with the increased wait time, the muffins did not stick to the pan when transferring each muffin to the cooling rack. 
                           **LAST YEAR:Black Walnut Madeira Cake**


Sunday, April 5, 2015

Honey Bunny Crunch Frozen Custard

Recently, I found 4 baby rabbits laying the grass. They did not even have their eyes open yet, so I guess their mother fell victim to a predator. I scooped them up and put them in a box.  Luckily, there was someone close by that had a daughter that was involved in rabbit rescue, so I gave them to him.  Last I heard was that they were coming along quite well and were starting to get fur and did open their eyes.

Since it is Easter Sunday and the rabbits were still on my mind, I decided to name this frozen custard accordingly. In the early stages of creation, I was thinking of a custard base made with some kind of cereal soak.  The soak idea stems from Christina Tosi's cereal milk, as sold at the Milk Bar. Since there are quite a bit of cereals that are heavy in sugar, I wanted something that was not so sweet.  Then it came to me - crunchy honey oat granola bars. After soaking, I added honey.  This gave it more flavor and reduced the amount of processed sugar. 

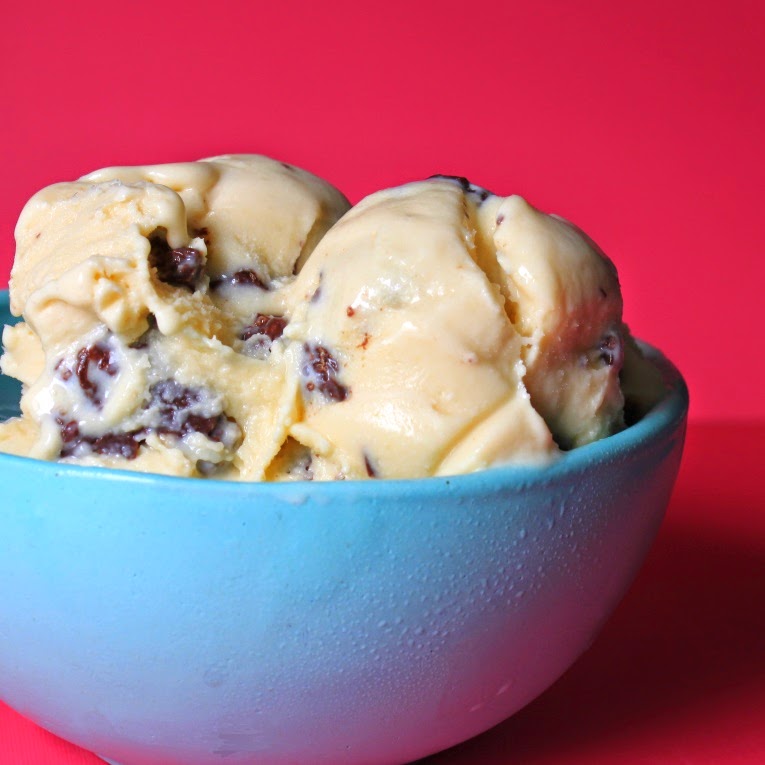
The end result is a base with a honey oatmeal flavor. Quite tasty by itself, but I could not resist to put some crunch into the smooth cream. Chopped up granola bars coated in dark chocolate were the perfect add in. The reason it is referred to as custard is that it does not freeze hard like your standard ice cream.  After 2 days in the freezer it still remained soft.  Not like soft serve ice cream, but not like regular ice cream either.

It is that time of year. The time to get outside more- so go to the lake, fire up the grill, have a picnic and enjoy some homemade frozen custard! You will need to plan ahead due to the steep time of 3 hours and the time it takes to freeze. This recipe makes about 1 quart of ice cream.

Honey Bunny Crunch Frozen Custard
by Flourtrader

Ingredients
1 cup and 2 tbs milk
2 1/4 cup cream
2 cups chopped crunchy honey oat granola bars, divided (about 10 bars)
1 cup semi sweet chocolate chips
2 tbs invert sugar (recipe:dessert components)
3 eggs (room temp)
1/4 cup 2 tbs sugar
1/2 cup 2 tbs honey
1/4 tsp vanilla extract

Pour milk and cream into a saucepan. Add one cup of chopped granola. Place over medium high heat and let come to a boil. Remove from heat and cover.  Let sit for 3 hours for flavors to meld.

During that time, set up a double boiler over medium high heat and line a baking sheet with parchment paper. Place semi sweet chocolate chips in the top pot and let melt, stirring occasionally. Once all is melted and smooth, stir in the chopped granola. After coating all the pieces, empty onto the parchment paper.  Separate all the pieces with a fork, making sure no big clumps remain.  Place sheet in the refrigerator for chocolate to set up.

In a bowl of a stand mixer, whisk the eggs and sugar together. Go back to the saucepan of the cereal cream and strain the liquid into a bowl. Discard the cereal and pour the liquid back into a saucepan.  Add honey and invert sugar (if using) and place over medium heat. Stir and cook mixture until all is melted and completely mixed in with the cream. Remove from heat.

Run the mixer on low, slowly whisking the egg/sugar batter.  As you continue to whisk, pour a small, steady stream of the cream mixture into the eggs.  Continue with this process until all the cream has been mixed into the egg batter.  Lastly, whisk in the vanilla extract.

Transfer mixture back to saucepan and place over medium heat. Let the custard simmer for about 4-5 minutes or until thick enough to coat the back of a spoon. The temperature should reach 170 to 175 degrees. Then pour mixture into heatproof bowl, cover and place in the refrigerator. Let cool for at least 3 hours or overnight.

Check the chilled chocolate covered granola.  If you still see that the chunks are too large, chop into smaller pieces.  Place back in refrigerator until needed. Once the chilling time is complete for the custard, add to an ice cream maker and follow the manufacturers' instructions. Toss in the chilled chocolate covered granola chunks at the halfway point of the churning process.  After churning process is complete, transfer to cold custard to a bowl, cover and place in freezer.  Let freeze overnight or until desired consistency is met.

Tips and Notes :

1. If trying another cereal milk flavor, take into consideration the sugar content of the cereal and the elimination of the sweetness of the honey.  For peanut butter/chocolate fans, try Captain Crunch milk soak and add in chunks of Reese cups.

2. The invert sugar is not required if your custard will not be stored in the freezer a long time.  It is mainly used to prevent ice crystals from forming. Just increase the honey content by 2 tbs, which would give you a total of 3/4 of a cup of honey.

3. Do not use chewy granola bars, I used Nature Valley brand crunchy type.

Enjoy your Easter!