Foodbuzz

Friday, December 29, 2017

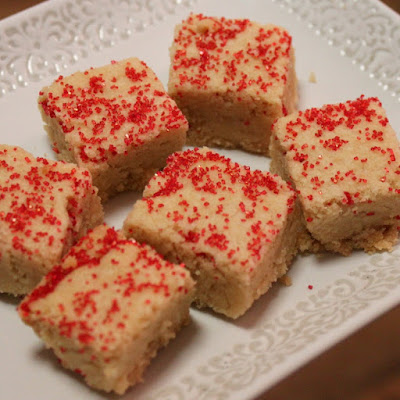
Shortbread Squares


If you have been the host for the holidays this year, I am sure you are ready for some time to relax and unwind. The manner in which we do this varies from person to person. Some of the methods people have chosen may be bizarre or unbelievable. You will not find me building small houses out of pennies or washing my car. My method is actually pretty simple- enjoying a hot cup of coffee or tea with a shortbread cookie while sitting in a comfortable chair. The whirlwind of stress and anxiety just melts away.

If you have not found the key to unwind yet or are just looking to take a break from your day, these cookies may be the right choice. Outside of that special buttery, melt in your mouth factor that shortbread cookies have to offer, they are easy to make with a few simple ingredients. A great return for such a little investment of time. This recipe makes about 10 dz one inch squares and uses a 9x13 inch pan.

Shortbread Squares
adapted from My Great Recipes

Ingredients
4 cups and 2 tbs of flour
2 cups or 1 lb of butter (room temperature)
1 cup sugar
Sprinkles, decorative sugar or powdered sugar for topping (optional)

Prepare a 9x13 inch cake by by buttering the interior. Preheat the oven to 275 degrees. Reserve a sheet of wax paper, a size just big enough to cover the bottom of the pan.

Cut the butter into cubes and place in the bowl of a stand mixer. Pour in the sugar and beat for about 2 minutes on medium speed, stopping at intervals to scrape down the sides of the bowl. Once the blend is smooth add all of the flour.

Combine the flour with the sugar mixture by using a wooden spoon. After all the flour is incorporated into the dough, empty it into the prepared baking pan.  Take the wax paper and use it as a barrier between your hands and the dough as you press the dough down to fit the pan. Make sure the dough is even and reaches all sides and corners.

Remove wax paper. Using the tines of a fork, make small indentations on the top of the dough. This will keep the dough from bubbling up when baked.

Place pan in oven and bake until golden on sides and bottom. This should take about 1 1/2 hours. After the bake time, turn the oven off and remove the pan. Cut the shortbread into squares or triangles (depending on your preference) about 1 inch wide. Place pan back in the oven and let rest until the oven has cooled.

As a last step, sprinkle sugar topping on the surface of the shortbread. Let cool completely before removing from pan.
                                     **LAST YEAR:Chocolate Tangerine Cannoli Cupcakes** 

Sunday, December 17, 2017

Savory Kalacs


Since it is getting so close to Christmas, wrapping gifts, decorating and planning is underway. Hopefully you have many helpful hands during all this activity, but everyone needs to take a snack break. With all the holiday cookie and dessert baking, something savory is a tasty change of pace.

The sunburst of twisted dough (pictured above) may take a few hours to make due to the rising time, but the end result is well worth it. Sandwiched in between the 2 layers of dough is the bold flavor of Gorgonzola cheese. To compliment the flavor of the cheese is a mixture of onions, pancetta and mustard. Not ordinary-but extraordinary..as well as unique. Not only will this satisfy your taste buds, but the great presentation makes it a feast for the eyes.

This recipe hails from a blogger in New Zealand, so measurements are in grams and milliliters. Baking temperature is in Celsius. Conversion charts to cups and ounces are available through the internet.

No matter what occasion- happy hour, football watching party or just a friendly get together, this appetizer is the one thing that should be on your table. So set the sugar aside and pull out the cheese- let's get baking! My tweaks on this process can be found in the tips and notes at the end. They are helpful hints to for you to have baking success with this recipe.

Savory Kalacs
adapted from atdownunder blogger 

Ingredients/Dough
4 tbs of olive oil
a few pinches of salt
1 tsp of sour cream
200 ml of milk (room temp)
300 g flour
15g of yeast

Ingredients/Filling
1/4 cup crumbled Gorgonzola (or your cheese of choice)
1 tsp mustard
2 heaping tbs of sour cream
2 green onions/scallions, sliced thin
25g pancetta, diced
salt and pepper to taste
nutmeg to taste (optional)

Topping
1 egg yolk, whisked or lightly beaten
1 tsp sunflower seeds

Prepare a baking sheet by lining with parchment paper. Set aside. Also, dust a flat surface with flour.

Sift the flour and salt into a large bowl and sprinkle the top with yeast. Form a well in the center. Using another bowl, whisk together the milk and the sour cream. Pour the liquid into the sifted ingredients. Fold mixture together until a dough is formed. Transfer to prepared surface and knead for about 5 minutes. Shape dough into a mound and cover lightly. Let rise for 20-25 minutes.

Once first rising time is complete, punch down dough and form a well in the center. Pour 2 tablespoons of olive oil in the center and knead for about 30 seconds. Make another well and fill with the remaining amount of oil. Knead the dough for 5 minutes. Form into a round disc and cover lightly. Let rise for another 30 minutes.

As it rises, create the filling by mixing all listed ingredients together in a small bowl and set aside.

Preheat the oven to 200 degrees Celsius. Punch down dough and divide into 2 equal pieces. Take the parchment paper from the baking sheet and roll out one piece of the dough into a circle, about 25 cm in diameter. Using a small spatula, spread the filling over the surface the dough, leaving a 1/2 centimeter border on the edge.

Lightly dust a flat surface and roll out the second piece of dough, measuring the same size as the previous one. Place this second piece, making sure to center it, over the dough with the filling on top.

Invert a drinking glass over the center of the disc, slightly indenting the dough. Score the dough into four equal pieces (like cutting a pie) using the back of a knife. Score the four pieces into two equal segments and then score each of the two segments into three equal portions. After scoring, cut through dough with the back of a knife, following the score lines.

Take each portion of dough (there should be 24) by the outer tip and twist three times. Remove the glass and brush the surface with the egg yolk. Top the center circle of dough (as marked off with the drinking glass) with sunflower seeds.

Place in oven and bake until it has a golden hue. This should take about 20-30 minutes. Remove from oven and invert onto large platter. Remove parchment paper and invert bread again, this time onto a cooling rack. Let cool completely.

Tips and Notes:
1. Filling ingredients were combined in a blender, to make it into spreading consistency.

2. I increased the ingredient amount by half to make sure there was enough to cover the dough

3. Take care to not stretch the dough when twisting, so it will remain the same diameter and hold together.

4. After cutting with the back of the knife, re-cut with a sharp knife. The back of the knife process is to make sure the dough does not stretch when cutting.


                                      **LAST YEAR:Chocolate Custard Tart** 

Sunday, December 10, 2017

Chestnut Pie


Gardeners and tree farmers are all too familiar with blight, which is a disease than can kill flowers, vegetables and trees. Overall, I believe that the most destruction it has caused would be the extinction of chestnut trees in the US.

Before the blight took over, chestnut trees were quite plentiful here. They spanned from Maine to Georgia and the amount of trees were too many to count. Sadly, blight can kill a tree in about 5 days. The Christmas song lyrics of "chestnuts roasting on an open fire" no longer applies here in the US. That is, unless you go to the expense of having them shipped to you from another country in order to roast them.

In scanning my pantry, I did find a can of chestnut puree from France. It was an import I ordered previously. With the holidays coming up, I decided to put it to use and make a chestnut pie. This pie is much like a pecan pie, without the chunks of nuts. However, the filling is not as sweet and has a thicker consistency. Regarding flavor, it has the unmistakable earthy taste of chestnuts with a touch of orange.

Outside of crust preparation, the pie comes together easily and only has about 6 ingredients. The crust is not par-baked so you can prepare the dough days before rolling and forming.

If you like chestnuts, do not be discouraged by the fact the trees are extinct in the US. Seek out the chestnut puree on line or at specialty grocers this season. You will be glad you went to the extra trouble. As always, reading the whole recipe along with the tips prior to creating are helpful in order for your efforts to be successful.

Chestnut Pie
adapted from Mrs Rowe's Southern Pies
Ingredients/Pie Pastry
2 1/2 cups flour
2/3 cup plus 2 tbs vegetable shortening
6 to 8 tbs milk
1 1/4 tsp salt
1 egg white (depending on form of pie edge)

Ingredients/Pie Filling
3 egg yolks
2 egg whites
1 cup heavy cream
1 tbs orange liqueur
1 tbs orange juice
1 1/2 cups sweetened chestnut puree ( about 1 pound)
ground nutmeg (optional for sprinkling)
sweetened whipped cream (optional for topping serving)

For the crust, start by whisking together the flour and the salt. Then add the shortening and use a pastry blender to cut and mix it in with the sifted ingredients. This will result in a dough that has several small, "pebble sized", clumps. At that point, sprinkle in 1 tablespoon of the milk and blend by folding the dough over several times with the fork. Once the liquid is absorbed, continue with the process by adding one tablespoon of milk at a time. Test for consistency at 6 tablespoons, mixture should easily clump together leaving no dry crumbs behind.

Dust a flat surface and a rolling pin lightly with flour. Flatten the dough into a disk and roll out to 1/8 of an inch thick. It should be between 13 and 14 inches in diameter. Once rolled out, carefully roll dough around rolling pin. Then unroll over the top of a 9 inch the pie plate or dish. Lightly press the dough into the plate, smoothing out evenly.

If you are using the fold under and shape type of edge, trim the dough, leaving a 1/2 inch overhang. If you intend to decorate edges with cut out dough, trim leaving only a 1/4 inch overhang.When adding decorative toppings to the edges with cut outs from the excess dough, be sure to brush top of dough edge in pan prior to placing the extra layer of the cut out dough on top. As you can see by the picture, the pie edge has layers of overlapping rectangles. This is the decorative edge that I created with the excess dough.

After you have formed the pie crust, mark the bottom with the tines of a fork to prevent bubbling up when baking. Then place in the refrigerator while you make the filling. Preheat the oven to 350 degrees.

The filling starts with 2 egg whites. Beat the whites until they are very stiff. Set aside. Using a large bowl, whisk the egg yolks together. Then stir in the cream, orange liqueur and orange juice. Add the chestnut puree and sugar. Using a wooden spoon, blend the mixture together until it comes together, creating a thick batter. Lastly, carefully fold in the egg whites.

Remove the pie crust from the refrigerator. Pour the filling in the prepared pie crust and smooth the surface until even. At this point you can opt to sprinkle the surface with some nutmeg, if you prefer. Place in oven and bake until center is set and a knife inserted into center comes out clean, about 45-50 minutes. Remove from oven and let cool for 1 hour on rack and then transfer to refrigerator for an additional hour to chill. Then it is ready to slice and serve. Feel free to top each serving with sweetened whipped cream.

Tips and Notes:
1. The original crust recipe was modified, so the above reflects a 1/4 increase in the amount of each pie crust ingredients. This gave me enough to do a nice edge on the crust. The original quantity did not roll out big enough to make a nice edge.

2. I used a stoneware pie dish instead of aluminum. The refrigeration time and the type of pan used added an extra 15 minutes to the baking time.

3. My decorative topping made the back crust too heavy and it collapsed upon serving. Next time I will just make a formed, fold over edge.

                                     **LAST YEAR:Oatmeal Raisin Sandwich Cookies*

Sunday, December 3, 2017

Samoa Bundt Cake


There are just some girl scout cookie flavors that are such favorites that they have crossed the cookie boundary into everything from mixed drinks to ice cream. The most common replicated flavor has been from the Samoa cookie. We just can't seem to get enough of that crunchy cookie base that is laden with caramelized coconut and chocolate made famous by the Girl Scouts.

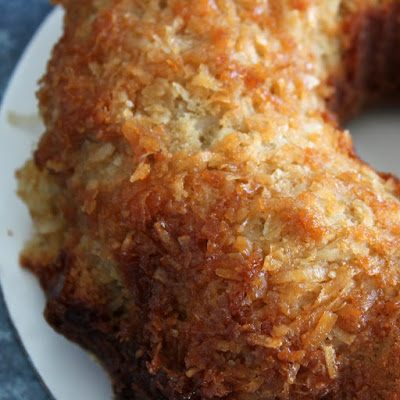
In this post, the flavor of the Samoa cookie can be found in a delicious Bundt cake. The cake has the tender crumb you know to be a great quality of the traditional Bundt. Each piece has a tasty blend of brown sugar and coconut flavor in the base with a caramelized coconut topping. The flavor is good enough to stand on its own. However, I could not resist to add some ganache drizzle to a slice.

While the cake was pretty tasty, there was a problem issue. The recipe calls for a blend of coconut/brown sugar and butter to be pressed into the bottom of the Bundt pan. I used a black bundt pan. After baking, quite a bit of the coconut stuck to the pan and the cake was difficult to release. The original recipe was posted noting that the pan used was a new, cast aluminum non-stick Bundt pan. Baking with this particular equipment turned out to be crucial to insure that the cake releases with a thick and toasty layer of coconut on top.

I would not make this recipe again without the specific type of cake pan as noted in the recipe. Cooking the coconut mixture in a saucepan until it caramelizes is another option. Then the cake batter can be split and the coconut mixture put in between the two cake layers. The coconut would bake with the mixture as a tunnel in the cake instead of on the surface. Another idea is to eliminate the recipe for the coconut topping and use another Bundt recipe that includes a coconut filling.

The recipe is listed below as I originally baked, adapted from the author. I have included the ganache topping recipe as well. Even though you may not have a non-stick cast aluminum pan, the website link below does have numerous Bundt cake recipes that can accommodate different types of Bundt pans.

Samoa Bundt Cake
adapted from Food Lust People Love 

Ingredients/Topping
1/2 cup brown sugar
1/4 cup melted butter
2 cups sweetened coconut

Ingredients/Cake
6 eggs, room temperature
1 cup canned unsweetened coconut milk
1 cup or 2 sticks of butter, room temperature
1 tsp vanilla extract
1 tsp coconut extract
1 1/2 cups brown sugar
1 cup white sugar
2 tsp baking powder
2 1/2 cups flour
1/2 tsp salt

Ingredients/Chocolate Glaze
1 tsp vanilla extract
1/2 cup heavy cream
4 oz chopped dark chocolate
pinch of salt

Start by melting a few tablespoons of butter. Brush the interior of a 12 cup Bundt pan (specific type of pan as noted above) with the melted butter and dust with flour. Tap out excess flour and make sure all areas are completely covered. Then place pan in refrigerator. Preheat oven to 350 degrees.

For the cake, place the butter and both types of sugar in the bowl of a stand mixer. Beat on medium high for about 5 minutes, scraping down the sides of the bowl in intervals. The mixture should be very light and fluffy after this process. Set aside bowl.

In another bowl, sift together the salt, baking powder and flour.

Add one egg to the butter/sugar mixture and beat for about 30 seconds and scrape down the sides of the bowl. Repeat this process, adding one egg at a time, until all 6 eggs are incorporated into the batter. Using a separate bowl, pour in the coconut milk and stir in both extracts. Pour the coconut mixture into the butter/sugar mixture and beat until thoroughly blended. Lastly, using a wooden spoon, fold in the sifted ingredients.

Fill the cake pan with the batter and place in oven and bake for about 60-70 minutes or until tester comes out clean. Place cake pan on a rack to cool for about 20 minutes and then invert onto rack and let cool completely before covering with ganache.

To make ganache, place chopped chocolate in a heatproof bowl. Then fill a saucepan with the heavy cream and place over medium high heat. Let the cream heat up just to the point of simmering and remove from heat. Stir in vanilla extract and salt. Pour mixture over the chopped chocolate and let sit, undisturbed for 2 minutes. Whisk until smooth and then pour over cake evenly, covering the top and letting drip down the sides. Once the ganache is set, the cake is ready to serve.
                                 
                                      
 Tips and Notes:
1. The ganache is optional, but remember that dark chocolate is a strong component and may overpower the flavor of the cake. You can put it on the side when serving so your guests can choose how much or how little they want.

2. Again, the success of the coconut topping requires the specific pan. The top surface of the cake will have a crispy chewy layer when baked, resulting in a mix of caramel and toasted coconut.

3. You are welcome to bake this in a 10 cup bundt pan. The pan is to be filled 3/4 full, so there may be batter left over. Also, baking time may need to be adjusted.

3. The cake lasts for about 3 days when stored in an air tight container.
                                    **LAST YEAR: Peanut Butter Bundt Cake**

Sunday, November 19, 2017

Favorite Cookie Round Up


With the holidays coming up, most bloggers are getting ready by digging up their favorite recipes from the past or searching for something new and delicious for cookie swaps or to surprise guests. This year, I decided to bring out some tasty gems from the past.

One the recipe I chose is a traditional favorite from the Hershey website that has not been posted previously. The others are in the blog history. As you know, all recipe books have indexes on types of cookies. I feel that this compilation covers most of the types listed. If I was limited to only making one of these recipes, it would be quite difficult since they all are wonderful in flavor as well as texture.

If you only have the time for one recipe, remember that there is no "wrong" choice here. Time to click on one of these links and get started in the kitchen!


Chocolate Covered Alfajores - Two tasty vanilla cookies sealed together with Dulce de Leche and dipped in chocolate. Caramel and chocolate with the crunch of a cookie- a nice package of what good is.

Spicy Date Filled Cookies - a decorative, crunchy round cookie filled with dates, nuts and spices. There is enough exotic flavor in one of these to transport you to another country.

Minnies Chocolate Chip Supreme Cookies - A monster cookie that has all the components to make these the ultimate treat for kids- toffee, milk chocolate, dark chocolate and nuts.

Peanut Butter Blossoms - this traditional combo of peanut butter and milk chocolate is so tasty that the recipe has remained as a keeper in a countless number of recipe boxes.

Maple Pecan Pinwheel Cookies - A nice example of format change. These gems have all the flavor of pecan pie in the form of a cookie- one layer of flaky crust and one layer of maple/brown sugar and pecans all rolled up in a round swirl.

Hmmm..after typing all of this I am hungry for some cookies!

Sunday, November 12, 2017

Eggnog Spice Cookies


There are days when patience wins out overall. I have been looking for eggnog for the last few weeks and it finally showed up at the grocers. Prior to this I even asked one of the clerks when it would be coming in and she answered that no one even tells her what creamers will arrive. 

However, today have my eggnog (not a creamer) and the grocery clerk is probably still stocking the store. The sweet holiday flavor of that beverage was just the thing I wanted to capture in the form of a cookie. The main issue was that it was a liquid and the flavor components of most cookies originate from powder or very little liquid.

The best way to enhance the flavor of any type of liquid is to boil it down. As it boils, the water evaporates off, leaving a stronger flavor behind. This was also the fix to having too much liquid in the cookie dough.

The final result to experimenting is a cookie that is soft and chewy, sort of like the texture of bar cookies. Since I like bar cookies, the fact that they did not have a crispy texture was not important. The dough retained the delicious and unmistakable flavor of eggnog after baking, which was exactly what I wanted. Now we are into the Christmas flavor category! To enhance this even more, I topped the cookies with a glaze that has a touch of gingerbread flavored whiskey and added some sprinkles of little gingerbread men. This recipe makes about 2 dz cookies.

Now it is time to start the festivities, so on to the recipe....

Eggnog Spice Cookies                                                                   
by flourtrader

Ingredients/Cookies
1/2 cup of eggnog
1 egg (separated)
1 1/2 tsp melted butter
2 tbs sour cream
1 3/4 cups flour
1 tsp baking powder
1/8 tsp nutmeg
1/4 tsp baking soda
1/4 tsp salt (optional)
3/4 cup sugar

Ingredients/Topping
3/4 cup powdered sugar
1 tsp whiskey (preferably gingerbread spiced)
1 tbs plus 1 tsp water
holiday sprinkles (optional)

Preheat the oven to 350 degrees and line 2 baking sheets with parchment paper. Also, dust a flat work surface with flour.

Fill a saucepan with eggnog. Place over medium heat and let simmer, stirring constantly. Let cook down until reduced to 1/3 cup. Remove from heat and let cool to room temperature.

Sift together flour, baking powder, baking soda, nutmeg and salt (if using). Set aside. Using a medium size bowl, whisk egg yolk. Add sour cream, sugar, cooled eggnog and melted butter and stir until blended together. Fold in half of the sifted ingredients until no dry streaks remain. Then add the remaining dry ingredients and blend into a smooth dough. The dough should be somewhat stiff and sticky.

Using a scoop or tablespoon, drop about 6 mounds of dough onto the floured surface. Form the mounds of dough into 5 inch logs. Cover one end of each log with a little of the egg white and shape the log into a circle and seal the ends together. Place on a baking sheet about 1 inch apart. Repeat the process again with 6 mounds, forming into circles.

Once the baking sheet is full of the shaped cookies, bake in oven for 9-12 minutes or until golden brown on the bottom. Let cool on sheet for 2-3 minutes and then transfer to rack to completely cool.

For the glaze, start by placing a sheet of parchment or wax paper on a flat surface.  Using a 2 inch deep bowl (like a pasta bowl) stir together water, powdered sugar and whiskey. Dip the top of each cookie into the icing and let the excess drip off and place on paper. Top with holiday sprinkles and let set until topping is dry.

Tips and Notes:
1. You can eliminate the whiskey topping by replacing with water and adding nutmeg and cinnamon. How much spice is according to your personal preference.

2. The dough circles are very light and delicate, so they had to be reshaped a little when transferred to the baking sheet. To remedy this, you can form the cookies right on the parchment lined baking sheet, just take care not to "over flour" the surface of the parchment.

3. If you prefer not to ice these cookies, you can use a sugary spice mix (cinnamon/nutmeg/sugar blend) on top prior to baking. Mix in 1 tablespoon  of water to the egg white and brush on top of each cookie. Sprinkle the spice mix on top of each cookie then bake as stated previously.

4. The flavor of these cookies does develop with time and are best eaten a day or two after baking.

5. The cookies (with the exception of the bottom) do not brown when baking. The surface appearance does not determine if they are done baking, it still remains white/ivory when done.

6. Due to the delicate nature of the cookies, do not attempt to place on cooling rack after dipping in icing. Once the icing has set up and dried, they may be too difficult to remove without breaking.
                             **LAST YEAR: Caramel Apple Blondie Cheesecake**
   

Sunday, November 5, 2017

Baklava Cake


I am not sure about other food bloggers, but there are times when I struggle with shortcut ingredients when creating and baking in the kitchen. The use of cake mixes and pudding mixes are a few examples of those type of ingredients. Additives in some ingredients can really change the end result and some (if implemented properly) can have no effect.

There are some ingredients on my list that will never have a substitute. One of them is heavy whipping cream. Even if I am using it as a topping to a dessert, nothing but the real deal will do.

This particular recipe has a shortcut which has impacted the texture in a positive way. It has all the flavor of traditional baklava, but is void of phyllo (filo) dough, which requires buttering each thin layer and stacking one on top of each other. Instead of phyllo dough, another dough component is created that bakes up into a moist cake. The new dough component comes together fairly quickly and is a lot easier to work with.

This wonderful cake has pulled together all the flavors that you would expect in a Middle Eastern dessert. The filling is a spicy combo of cinnamon, cardamon and walnuts while the cake layers support the exotic syrup made up of honey and rose water. The final element is a dusting of pistachios on top.

So if you are looking to try a traditional dessert from another country, this recipe for baklava cake is the perfect choice. You will not have to spend all day in the kitchen and your dinner guests will be impressed by its delicious flavor.

Baklava Cake
adapted from Persian Mama blog 

Ingredients/Dough
1 tsp baking soda
1 cup plain yogurt
8 oz or 2 sticks melted butter
2 eggs
1 1/2 tsp vanilla extract
1 cup sugar
4 1/2 to 5 cups flour

Ingredients/Walnut Filling
2 eggs (yolks separated from whites)
3/4 cup powdered sugar
2 tsp cinnamon
2 tsp cardamon
1 1/2 cups coarsely chopped walnuts
1 tsp cold water

Ingredients/Topping
1 tbs plus 1 tsp rose water
1 1/2 cups water
1 tbs and 1 1/2 tsp honey
1 1/2 cups of sugar
1/4 cup ground pistachios

Prepare a 9x13 cake pan by buttering the interior and dusting with flour. Preheat the oven to 350 degrees.

Fill a large bowl with all the first 6 ingredients listed above for the dough. Mix with a wooden spoon until combined into a smooth batter. Set aside.

To make the dry filling, whisk together the powdered sugar, cinnamon and cardamon. Then stir in the walnuts.

Take the bowl of the batter and fold in 1/2 cup of the flour. Continue with this process, adding the flour in increments, until a dough mass is formed. You may not need to add all 5 cups of the flour. The dough is the correct consistency when it no longer sticks to the inside of the bowl. Divide the dough equally in half.

Place a sheet of wax or parchment paper on a flat surface. Put 1/2 of the dough on top of the paper and cover with another sheet. Roll the dough out to form a rectangle that will fit in the bottom of the pan. Once rolled out, remove the top sheet of paper and roll the dough around the rolling pin or flip it into the pan. Press the dough down into the pan and make sure the dough is even from corner to corner.

Whisk the egg whites until they are foamy on the surface. Using a pastry brush, brush a light coat of the egg whites onto the surface of the dough. At this point, there will be some leftover egg whites, set aside. Take the dry filling mix and sprinkle evenly over the top of the dough. The little bit of remaining egg whites can be poured on top.

Roll out the second layer of the dough in the same manner as the first. Then carefully lay it evenly over the top of the filling and press down lightly. Make sure that all the filling is completely covered. Fill a small bowl with the egg yolks and water. Blend together to form an egg wash.

Using a sharp knife, carefully cut into the dough layers to form about 20 rectangular single servings. Brush the egg wash on top of each single serving, avoiding the cut edges. Place in oven and let bake until done. The cake is done when when each serving has a toasty, golden hue. The baking time is about 35-40 minutes.

While the cake is baking, the syrup topping can be made. Whisk together the water, sugar and honey in a small saucepan. Place over medium heat and let come to a boil. Let the mixture boil for about 3 minutes and remove from heat. Whisk in the rose water and set aside to cool until the cake is finished baking.

Remove the cake from the oven and place on a baking sheet. Cut the servings again with a knife, following the same lines as cut before. Pour the syrup over the top of the hot cake and let it soak in until completely absorbed by the cake. Sprinkle the ground pistachios over the top of the sticky cake. Place the pan over a rack to cool completely. Once it reaches room temperature, it is ready to serve.

Tips and Notes:
1. It is the rosewater that adds a unique flavor to the cake, so a substitute would change the flavor. Rosewater can be found on line or at a specialty store. If you are unable to find this ingredient, you can replace it with about 2 tsp of vanilla extract.

2. Be careful when brushing on the egg wash. It can pool together in puddles which will bake up into a yellow tinge on the surface of the cake. You do not have to use all the egg wash-just enough to cover each serving and leave a 1/4 inch border around the cut edge.

3. The drizzling of the remaining egg whites on the filling does not have to be perfect. There will not be enough left after you have brushed it on the surface of the first layer of dough to worry about drizzling it evenly.

4. This dessert can be stored in the freezer for serving at a later time. Separate it into individual servings and place in an air tight freezer container with a layer of parchment over the surface.
                                     **LAST YEAR: Chocolate Swirled Pumpkin Bars**

Saturday, October 28, 2017

Banana Bread Pudding


Today's post is all about the evolution of bread pudding. Back in the eleventh century, kitchens were quite a bit more frugal than they are today. There was a great effort in making use of leftovers and, in the case of bread pudding, that meant using stale bread. However, the up to date version is not perceived as frugal. In fact, this dessert has found its place on many of the menus at upscale restaurants.

While stale bread still remains as an ingredient in some recipes for bread pudding, plain baked bread or toasted breads are now considered acceptable. It is the "soaking" factor of the bread that creates the custard-like texture. Most bread puddings have a custard/bread base as the main component with little or no topping. 

As you can see by the picture, this recipe is not the standard. This bread pudding was made with cubed French toast/cinnamon swirl bread- it did not have to be stale or toasted. The recipe measurements were scaled down and it was still baked in a 9x13 inch pan. This change evened out the various textures and flavors of the dessert. The custard layer was about 1/2 inch thick, leaving room for all the special add in's to share in the spotlight. One bite contains quite a bit of delicious flavor as well as textures.

With creamy custard, crunchy pecans, soft bananas and a toasted topping of buttery brown sugar-it is hard to believe that this dessert originated as just a method to use up leftover/stale bread!

Banana Bread Pudding
adapted from The Disney Chef

Ingredients/ Bread Pudding
4 ounces or 2 large eggs
1/4 cup melted butter
6 oz or 3/4 cup of milk
1 1/2 tsp vanilla extract
5 ripe bananas
8 slices of cinnamon swirl bread (cubed)
1/4 cup granulated sugar
1/4 cup brown sugar
1/2 cup chopped pecans
1 1/2 tsp cinnamon
1/8 tsp nutmeg
1/4 cup sanding sugar (50/50 mix of white to brown sugar)

Ingredients/Vanilla Topping (optional)
1 1/2 tsp vanilla extract
3/4 cup milk
1 egg
1/2 cup whipping cream
2 tbs butter
2 tbs flour
1/4 plus 2 tbs sugar

Start by preparing the bananas. Cut one in half, setting one half aside.Take one half and 2 bananas and mash together. You can mash them by hand in a zip lock bag or mix them in a blender. Set the mashed bananas aside. Then slice the remaining bananas into rounds, about 1/4 an inch thick. Set these aside also.

Fill a medium size bowl with the eggs, butter, milk, vanilla extract, cinnamon, nutmeg, brown sugar and granulated sugar. Whisk together and then fold in the mashed bananas and pecans. Take out a 9x13 pan and add the bread cubes and sliced bananas. Mix together and then smooth out evenly in the bottom of the pan. Then pour the egg/sugar mixture over the layer. Let sit for 10 minutes and then stir, making sure that the pecans are evenly distributed and all the bread cubes are moistened. Let the flavors meld, undisturbed, for an additional 15 minutes. During this time, preheat the oven to 350 degrees.

Once the process is completed, brush the surface of the bread pudding with the butter and sprinkle the sanding sugar evenly over the top. Place in oven and bake for 25-35 minutes. Bread pudding is done when surface is a golden brown and liquids have caramelized.

To make the topping, place a saucepan over medium heat and add the butter. Once the butter is melted add the flour. Let cook and stir while the mixture thickens. At the stage it reaches the consistency of cake frosting, stir in the remaining ingredients. Continue to cook and stir for an additional 5 minutes or until it reaches the desired consistency of sauce. Pour over each serving of warm bread pudding.

Tips and Notes:
1. Should you want a thicker serving, double the recipe but use the same size pan and baking longer.
2. For more sauce, double the recipe except for the egg.
3. Feel free to experiment with applesauce & sliced apples or pumpkin puree and cubed fresh pumpkin.
4. Half the pecan ingredients and replace with raisins if preferred.
5. Watch the topping carefully as it cooks, it can quickly change from a sauce to a thick custard.
                                 **TWO YEARS AGO: Buttermilk Fig Cake** 

Sunday, October 22, 2017

Gingerbread Spice Cream Puffs


When spicy food is mentioned, we all envision different types of food. Traditionally, most spices are reserved for a specific category, either sweet or savory. However, the latest trends in food have many spices transcending over both categories. Today, there are recipes for rosemary lemon cake or chocolate chip cookies with cayenne pepper.

One spice that has always existed in both categories is ginger. There are so many savory recipes that use ginger-you can probably have a meal with every entree and side dish containing this spice. Also, finding a dessert that contains ginger is not a difficult task, especially around the holidays.

Let's not count the days until the holidays (it is a scary thought since there is so much to do and plan)! Instead of counting days, I decided to roll out a recipe for a "holiday" spiced treat-sort of a preview of things to come. This recipe is for little cream puffs or profiteroles that are filled with passion fruit cream. Instead of using plain pastry for the outer shell, I have added gingerbread spice to the dough. In addition to the spices in the dough, the puff shells, after baking, are topped with a sugary version of the same spice. The end result is a delicious combo of tart and spicy- something special to put you in the holiday spirit.....

There are many recipes for the profiterole shells, however, I experimented with one that had minimal ingredients. A recipe without sugar and milk.This was my first time in creating this type of pastry and the "puff" factor was an issue. I was expecting the dough to rise more in baking. While a pastry chef may consider creating cream puffs and easy task, a newbie should be prepared for trial and error. Due to the level of difficulty, additional attempts with the dough may yield the tall round profiteroles we recognize. However, bear in mind that the shape has no impact on the delicious flavor of these little gems.

The recipe makes a little over 3 dozen. Be sure to read through the whole recipe and the tips at the end prior to making these.

Gingerbread Spice Cream Puffs
by Flourtrader

Ingredients/Gingerbread Pastry Shells or Profiteroles
1 cup flour
1/2 tsp gingerbread spice mix (see recipe below)
1 cup water
4 eggs
4 ounces or 1 stick of butter
1/2 tsp salt (optional)

Ingredients/ Passion Fruit Cream
2/3 cup sugar
1/3 cup passion fruit puree
4 egg yolks
2 tbs plus 2 tsp butter (melted)
1 1/4 cup whipping cream

Ingredients/Topping
1/4 cup melted butter
1/4 cup sugar
1 tbs plus 1 tsp gingerbread spice mix

Ingredients/Gingerbread spice mix (adapted from Genius Kitchen)
1 tsp cinnamon
1 tsp ginger
1/2 tsp ground cloves
1/2 tsp allspice
1/2 tsp nutmeg

The first step is making the passion fruit curd. Start by filling a saucepan with the sugar, puree and egg yolks. Whisk together and place over medium heat. Continue to whisk while the mixture is cooking. With time, the sugar will dissolve and it will thicken into a pudding-like consistency. The cooking process should take about 12-15 minutes. Test for correct consistency by checking to see if it is thick enough to coat the back of a spoon. Remove from heat and pour in melted butter. Stir until butter is melded into batter. Empty saucepan into a heat proof bowl and cover the surface of the fruit curd with plastic. Place in refrigerator to cool completely before using.

Prepare for the profiteroles by lining two baking sheets with parchment paper. Also, in order to pipe the dough, assemble a piping bag with a coupler fitted with a plain decorating tip. The opening of the piping tip should be no bigger than 1/4 an inch. Preheat the oven to 400 degrees.

Fill a saucepan with the water, spice mix, salt and butter. Let the mixture come to a boil and then remove from heat. Add the flour and beat with a wooden spoon until a dough forms. When ready, you will notice that the dough no longer has a shine to it and it does not stick to the sides of the bowl. Transfer the dough to a mixer and add one of the eggs. Beat on medium speed for about 2 minutes. Repeat the process with the additional eggs, adding one by one. The end result will be a batter thick enough to hold its shape.

Fill the piping bag with some of the dough. Pipe tablespoon size mounds onto the baking sheet, spacing about an inch apart. Place in oven to bake until puffed and golden brown, about 27-35 minutes. Let cool on parchment paper for about 3 minutes, then transfer to rack to completely cool. Continue until all the batter has been baked into profiteroles. Clean the coupler and decorating tip. Set these tools aside for additional use in this recipe.

Once the final batch of profiteroles has completely cooled, take a small paring knife or wooden skewer and punch a hole in each one. The whole should be located in the center of the bottom of each pastry. Then you are ready to create the additional elements.

Beat the heavy whipping cream in a medium size bowl until it forms stiff peaks. Take the passion fruit curd out of the refrigerator and measure out 1/2 cup plus 2 additional tablespoons. Fold that amount into the whipped cream. Assemble another piping bag with the same coupler and decorating tip as used previously. Fill the bag with the passion fruit cream. Pipe the cream into the profiteroles, filling until the cream starts to overflow the hole. Follow this process to fill all the pastries.

Lastly, the topping will be completed. Using a small bowl, stir together the gingerbread spice mix and the sugar. Take each of the filled profiteroles and dip in the butter, covering the top surface only. After dipping in the butter, dip into the sugar mixture and place upright on a serving plate. After topping these little gems, they are ready to serve!

Tips and Notes:
1. The bake time on the standard profiterole recipes span from 20 minutes to 40 minutes- so keep an eye on these when baking. The pastries will lose their sheen and be light and dry with toasted edges when done.

2. Due to the additional of spices, the pastry shells bake up darker in color than the standard.

3. The pastries have some height to them but are always flat on the bottom.

4. If not serving immediately, store in refrigerator.

5. The spice has a more prominent flavor the next day. If you do not opt for the topping but still want a gingerbread flavor-increase the amount of spice and try a recipe that includes milk and sugar in the dough.

6. A single profiterole is about 2 bites which is a lot smaller than a cream puff.

7. Consistency is important when making the dough. If you find that it is too liquid, add a little more flour if needed. Additional time beating the dough will also help.

8. You will have about 3/4-1 cup of passion fruit curd left over. It is delicious as a cake or cupcake filling or just poured over ice cream.
                                 **LAST YEAR: Mini Sweet Potato Cakes**


Friday, October 13, 2017

Oatmeal Pumpkin Cookies


Sometimes a person is in the mood for cookies. Today's wishes are not for chocolate chip cookies or buttery shortbread, but something a little bit more healthy. Something more along the lines of oatmeal cookies would squelch my craving.

Not just any oatmeal cookies will do. Seasonal flavors would have to be included with this cookie recipe. I came across a recipe that included pumpkin puree and spices-which just what I was looking for. For even more seasonal flavor, I tweaked the recipe a bit to include dried cranberries and walnuts.

The cookies turned out to be chewy in texture with a bit of crunch from the walnuts. Also, they are a very hearty cookie full of fall flavor. As you know, oatmeal cookies fall under comfort food-so for that special category I consider this recipe a keeper. Another bonus is that the time it takes to create these cookies is minimal. The recipe makes about 2 dozen.

Oatmeal Pumpkin Cookies
adapted from Food Network

Ingredients
1/2 cup canned pumpkin puree
1 tbs maple syrup
1 tsp vanilla extract
1/3 cup vegetable oil
1/2 cup granulated sugar
1/4 cup raw sugar (extra for sprinkling)
2/3 cup of oats (old fashioned, not quick cooking)
1 tsp cinnamon
1/4 tsp allspice
1/2 tsp baking soda
1 cup flour
1/2 cup dried cranberries
1/4 cup walnuts (chopped)

Preheat the oven to 350 degrees and prepare 2 baking sheets by lining with parchment paper.

Sift the flour, cinnamon, allspice and baking soda into a medium bowl. Stir in the oats and set aside. Take out another bowl and fill with both types of sugars, vegetable oil, pumpkin puree, maple syrup and vanilla extract. Stir until thoroughly combined together. Then fold in the sifted ingredients in 1/3 increments. Mix just until no more dry streaks remain.

Lastly, add the dried cranberries and chopped walnuts. Stir together until evenly distributed throughout the batter.

Using a scoop, place mounds of the dough on one of the baking sheets, spacing 1 inch apart. Dip the bottom of a glass in water and flatten each mound, creating a 2 inch diameter with the dough. Then sprinkle on some of the raw sugar.

Bake each pan of cookies in the oven separately until done. Cookies should be firm and lightly browned on the edges when done, approximate baking time is 17-20 minutes. Once done, remove from oven and transfer cookies to a rack and let cool.
                             **LAST YEAR: Triple Caramel Mudcake**

Sunday, October 8, 2017

Maple Pumpkin Cheesecake


The end of this month marks the day of Halloween. For a lot of countries it is a day of remembrance for those that have passed. There are several different traditions across the world, however, in the US a lot of us will be creating jack-o-lanterns. If you are unfamiliar with the US tradition of making jack-o-lanterns, the pumpkin is scraped out or removed of all the seeds and then the shell is cut and carved into a design (usually a scary face) and then a candle is put inside and lit to have a glow.

The jack-o-lantern originated from a story about of a man named jack who passed away but never went to heaven or hell. The devil gave him a burning coal to light his way and Jack carved out a turnip to place it inside to use for a lantern. Even though the story started with a carved turnip, things eventually evolved into using a pumpkin for the carving. However, outside of Halloween, today there are quite a number of fruits and vegetables that are used in the art of food carving.

You might not be an artist, but you can still have a successful pumpkin carving session this year by bringing out a delicious pumpkin cheesecake for the grand finale. The silky spicy filling topped with a maple sauce and crunchy nuts will have your guests wanting seconds - even if they have to carve another pumpkin for it!

This recipe makes one 9 inch cheesecake or 16 individual ramekin servings.

Maple Pumpkin Cheesecake
adapted from Food Network

Ingredients/Crust 
1 1/3 cup graham cracker crumbs
1/4 cup sugar
5 tbs butter, melted

Ingredients/ Filling
1 (15 oz) can of pumpkin puree
3 tbs maple syrup
1 (14 oz) can sweetened condensed milk
24 oz of cream cheese (room temp)
3 eggs (room temp)
1 tsp nutmeg
2 tsp gnd cinnamon
1 tsp ground nutmeg
1/2 tsp fine sea salt

Ingredients/Topping
2/3 cup maple syrup
1 cup heavy cream
3/4 cup pecan pieces

Whisk together the graham cracker crumbs and sugar. Then pour in butter and mix again until it reaches a sandy texture with no dry streaks. Empty into a spring form pan and press evenly in the bottom of the pan. Set aside.

Preheat the oven to 325 degrees.

Fill a bowl of a stand mixer with the cream cheese. Beat on high speed, stopping at intervals to scrape down the sides of the bowl until the mixture becomes smooth and silky. This should take about 2 minutes. Add one egg and beat for about 30 seconds, or until incorporated into the cream cheese. Repeat the same process with the remaining eggs. Then pour in the syrup and sweetened condensed milk and beat for 30 seconds.

Add the pumpkin puree and beat for another 3 seconds. Lastly, beat in the salt, nutmeg and cinnamon. Pour the filling into the pan, it should be the consistency of cake batter. To remove large air bubbles, tap the pan lightly on the counter.

Place in oven and let bake for about 1 hour and 15 minutes or until done. Cheesecake is done when it is no longer glossy on top and is solid in mass with the exception of a slight jiggly center. Remove from oven and let cool completely and then cover with plastic wrap and place in refrigerator for 1 hour.

The topping, used only at the time of serving, can be made in advance and refrigerated. Pour the cream and syrup in a saucepan and stir together. Then place over medium high heat and let come to a boil. Let the mixture cook, stirring occasionally, for about 25 minutes. The end result will be a thick sauce. Mix in the pecans. Pour into a heat proof bowl and let cool for about 20 minutes. Then cover and place in refrigerator to get cold.

Once you are ready to ladle the topping over the cheesecake, take a moment to mix together again.

Tips and Notes:
1. I found that due to the mixing, this yields a lot of batter. When using rings or ramekins, fill each leaving only 1/4 of an inch from the top edge.

2. The spices are just right for my tastes, however, feel free to add more to filling or add spices to graham crumb mixture.

3. For a more pourable topping, cut down on the cook time and test for the right consistency.
                                      **TWO YEARS AGO: Caramel Apple Nut Pie**

Sunday, October 1, 2017

Butterscotch Walnut Cupcakes

Fall has arrived and with it comes the change in the leaves. Some people head up north to witness the change, the locals call them "leaf peepers". Around here in central Texas there is the dreaded thought of raking all those leaves. The people that do not have trees in their front yard will be looking to pass blame for all the leaves in their yard.

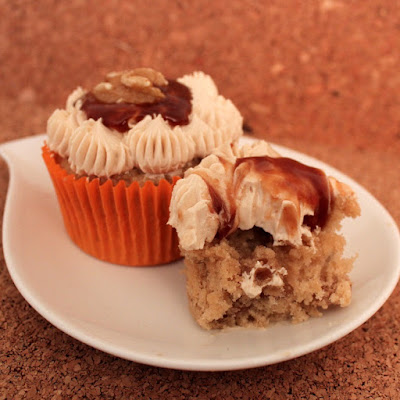
As for me, I am looking forward to fall baking. Gingerbread, pumpkin pie are only a few things that come to mind. The heavier, bold flavors are going to be more prominent in desserts, which brings me to these butterscotch walnut cupcakes. The textures and flavor combination makes this recipe a keeper. The moist texture comes from walnut oil which also adds a nutty flavor to each cupcake. The buttercream is made with gelatin and less sugar than most, giving it a lightness. The caramel on top with the walnut turns up the sweetness along with adding some more crunch.

The recipe below makes about 2 dozen cupcakes.

Butterscotch Walnut Cupcakes

Ingredients/Cupcake
By flourtrader

2 1/2 cups cake flour
2 tsp baking powder
2 eggs
1 1/2 cups light brown sugar
1/4 cup granulated sugar
3/4 cup walnut oil
1 cup chopped toasted walnuts
1 1/2 cups half and half
2 tsp vanilla extract

Ingredients/Caramel

Click on this link Caramel recipe

Ingredients/Buttercream
adapted from Cooking Channel

1 1/4 cup or 2 1/2 sticks butter
2 tbs plus 1/4 cup water
1 tsp powdered gelatin
1 cup light brown sugar
1/4 cup half and half
1 tsp vanilla extract
24 whole walnuts for topping

Prepare 2 cupcake tins (12 cavity each) by filling each cavity with paper liners. Toss the walnuts in about 1/2 cup of flour and use sieve to remove excess flour and set aside. Preheat the oven to 350 degrees.

Separate the yolks from the eggs and place the whites in the bowl of a stand mixer. Beat the whites until they reach soft peak stage. Continue to mix and slowly pour in the granulated sugar until stiff peaks are formed. Set aside.

To make the cupcakes light, take out a large bowl and sift the cake flour first and then measure it out. Sift it a second time with the baking powder. Stir in the brown sugar until evenly distributed. Add the vanilla, egg yolks, half and half and walnut oil and stir together. Then mix in the chopped walnuts.

Add 1/3 of the egg white mixture to the batter and fold it in, continue in 1/3 increments until all is incorporated into the batter.

Using a scoop or spoon, fill each cupcake cavity about 3/4 full of batter. Bake until tester comes out clean, about 15-18 minutes. Place pans on rack to cool about 2 minutes and then transfer cupcakes to rack to completely cool before frosting.

Make the caramel by following the link in the ingredient list above. Set aside to cool.

For the buttercream, start with the gelatin. Sprinkle the gelatin powder over the 2 tablespoons of water and stir. Set aside to bloom for about 5 minutes.

Fill a saucepan with the remaining amount of water, brown sugar and half and half. Stir together and place over medium heat. Stir mixture until the sugar is dissolved. This should take about 5 minutes. Add the gelatin mixture and change to low heat setting. Mix and let cook until gelatin has dissolved. Set aside to cool.

Place the butter in the bowl of a stand mixer and beat until the butter becomes silky in texture, stopping occasionally to scrape down the sides of the bowl. Pour in gelatin mixture and beat on medium high speed. The beating time ranges from 10 to 15 minutes. During this time, there will be several texture changes, so do not be alarmed if it curdles or looks grainy. The end result will be a fluffy buttercream.

Once the buttercream is created, pipe decoratively onto cooled cupcakes. Then place a dollop of caramel in the center surface of the top. Lastly, finish with a walnut in the center.

Tips and notes:
1. Feel free to put your own spin on this recipe by variation of nut oil ingredient.

2. Some of the cupcakes will sink a little upon cooling but the buttercream will remedy the appearance.

3. The smaller the pieces of nuts in the batter, the less chance they will sink to the bottom of the cupcake. Dusting the walnut pieces with flour is an important step.
                             **LAST YEAR: Banana Rum Coffee Cake**


Sunday, September 24, 2017

Almond Frangipane Cookies

One of the things I have learned in baking is that there is a vast difference between the recipe favorites of the home baker versus the professional. Most home bakers prefer items that yield tasty results without a huge investment of time. The items created by professionals usually contain more than one component and require extra effort due to presentation. However, do not let the word professional deter you. There are lots of recipes created by professionals that can be made at home- as long as someone is willing to expend the time.

As you can see by the picture, these cookies are far from those big wonderful chocolate chip cookies you find in the cookie jar. They are made up of 2 components, buttery shortbread and frangipane. Once the two cookies are sandwiched together, they are topped with almond slices and a glaceed cherry half. Then the bottoms are coated with white chocolate and colored sugar. All of that flavor is packed into a cookie that is only about 1 1/2 inches around.

In summation, you have something bite sized with a flaky texture from the cookie and chewiness from the frangipane. Then there are all the "extras" that come from the bottom coating and the topping. If this recipe appeals to you, please read all the tips and notes at the end which will help you to be successful in the kitchen. This recipe makes 2-2 1/2 dozen and uses ounces as a unit of measure.

Almond Frangipane Cookies
adapted from Dessert Professional

Ingredients/Butter Cookie
2 egg yolks
4.3 oz powdered sugar
6 oz unsalted butter (cut into cubes at room temp)
11.8 oz cake flour

Ingredients/Frangipane Filling
1 egg
4 oz almond paste
2 oz butter
.42 oz or 1 1/2 tsp of sugar
.17 oz or 1 tsp cake flour

Ingredients/Top and Bottom Coating
2.1 oz water
1 oz honey
2.7 oz sugar
3.5 oz white chocolate
4 oz sliced almonds
24 glaceed cherries (cut in half)
2.4 oz colored sugar

The first component to create are the cookies. Start by filling the bowl of a stand mixer with the butter and sift in the powdered sugar. Beat on medium high speed until fluffy, stopping at intervals to scrape down the sides. This should take about 3 minutes. Then beat in the egg yolks until fully blended, about 30 seconds. Fold in the flour in three increments.

Once the dough is created, take out plastic wrap and roll out onto a flat surface-about 2 feet long. Place the dough on the plastic wrap and form into a rectangle, cover and place in refrigerator to chill for about 1 hour.

During the chilling time, preheat the oven to 350 degrees. Grease the interior of 2 small/ 12 cavity mini muffin tins or use non stick or silicon pans. Take this time to form the other components of the cookies. For the filling, place butter, sugar and almond paste in the bowl of a stand mixer. Beat at medium speed for a total of 15 minutes, stopping to scrape down the sides of the bowl every 5 minutes. Add the egg and blend in on low speed. Lastly, use a wooden spoon to blend in the flour. Set aside.

For the top coating, fill a saucepan with the honey, water and 2.7 oz sugar and place over medium high heat. Let the mixture come to a boil and let cook for about 1 minute. Let cool and pour in a small bowl and set this by the bowl of sliced almonds and the bowl of halved glaceed cherries.

Lightly dust a flat surface with flour and prepare a baking sheet by lining with parchment paper. Take the dough out of the refrigerator and roll out into a square, about 1/8 inch thick. Place it on the prepared baking sheet and put in the oven and par-bake for about 4 minutes, or until edges have a golden hue. Remove the pan and start cutting out 1 1/2 inch rounds. Once all the dough has been cut, then the assembly can start. There should be a minimum of 48 rounds.

Stack the rounds together in pairs. Place one dough round from each pair into the muffin tin cavities. Spoon a dime sized amount of the frangipane filling on top. Then top with another round, pressing lightly to form a sandwich cookie. Place 3 or 4 almond slices decoratively on the surface of the cookie rounds and put a cherry half in the center (see picture). Brush lightly with honey glaze and place in oven to bake until golden. Cookies will take approximately 12-15 minutes to bake. Let cool in pans for about 2 minutes, then carefully use a spoon to scoop the cookie out. Place on cooling rack to cool completely. Repeat the process of forming/baking/cooling until all cookie rounds are baked sandwich cookies.

For the bottom coating, melt the white chocolate in a double boiler until smooth. Set up a bowl by filling with the colored sugar. Take each cookie and carefully dip the bottom into chocolate, using a small spatula to scrape off any excess. Then dip chocolate coated side into colored sugar and place on parchment paper. Continue until all cookies have a bottom coat. Once the chocolate has completely set up, the cookies are ready to serve.

Tips and Notes:
1. There was too much filling left over, so try starting with half the recipe and then making more, if needed. The recipe suggests piping this onto the cookie, but I did not feel it was thick enough to be piped, so I used a spoon.

2. The glaze was too watery and did not add as much of a golden hue to the cookie when baked, so the recipe should be tweaked more-perhaps less water. Brushing on the glaze and keeping the almonds and cherry from moving was difficult, so I glazed the surface prior to adding the almonds and cherry. I just dipped the almonds in the glaze to put on top and did not due anything to coat the cherries.

3. I did not complete the bottom coating, so I have no comment on this component in regards to what it added to the cookie in flavor. I found the cookies without the bottom coating to be delicious without the added sweetness. Carefully consider the bottom coating. White chocolate is very sweet, so it may overpower the rest of the flavors of the cookie. The level of sweetness in any dessert is a personal preference.

4. Some of the frangipane filling ended up baking outside the edges of some of the cookies. If you notice this when removing the pans from the oven, use a butter knife to run around the outer edges of the cookies and then let cool.

5. The main idea for presentation is to make the top look like a flower with the almonds the petals and the cherry in the center. Due to the small size of the cookies and various sizes of sliced almonds, I chose just to do the three slices. How many slices you use is a personal preference.
                                      **LAST YEAR: Chocolate Chip Tahini Cookies**

Sunday, September 17, 2017

Apricot Sweet Rolls


In today's world there are a special group of people that are always studying the exchange rate of money. As a result of the study, exchanges take place with the participants expecting to cash in on the conversion.

I feel that the non-monetary or barter system can be a little more interesting. Instead of money-let's consider exchanging sustainable items. Someone fixes your car and they receive 3 watermelon plants. Another example is that you receive 3 chickens a day in return for your work. I know, you are thinking that money is better, but exchanging that for chickens or watermelons requires you to depend on a store. If it was readily available right outside the door, it would not only be fresher but probably better for the environment.

Which brings me to a story about the main item in this recipe-apricots. Some time ago there was a doctor who declined to take any money from his patients. Instead he asked them to plant a apricot tree on his land. In the end, he had a large apricot orchard. This was not just because he liked the taste of apricots, he knew that he could capitalize on the medicinal qualities of the fruit.

So, if you are a blogger or baker remember that outside of the delicious taste of things- there are other factors that you can capitalize on with food. In the meantime, head for the kitchen and make a tasty batch of these sweet rolls. With almonds and apricots, you can enjoy all that wonderful flavor and also get the medicinal qualities found in the fruit as an extra bonus. This recipe makes 1 dozen rolls.

Apricot Sweet Rolls
adapted from Bake from Scratch Magazine

Ingredients/Filling
1/2 cup sliced almonds
1/4 tsp ground cinnamon
1 cup dried apricots
1/3 cup granulated sugar
1 tbs butter (quartered into pieces)

Ingredients/Glaze
vanilla bean/split and seeded
1/4 cup light brown sugar
1/4 cup water

Ingredients/Sweet Rolls
4 cups flour
1 tsp salt
2 1/4 tsp yeast
1/3 cup sugar
1 cup warm milk (divided into 3/4 and 1/4 cups, heated to 110 degrees)
1 large egg
1/4 cup sour cream
1 1/2 tsp almond extract
1/3 cup melted butter

Start on the filling by placing the apricots in a small saucepan. Add water, making sure that the dried apricots are under about 1 inch of water. Place over high heat and let come to a boil. Then change the temperature to low and let the apricots cook. Once the apricots are soft, remove from heat. It should take about 20 minutes of cooking time.

Place a colander or sieve over a small bowl and drain the apricots. Pour 2 tablespoons of the liquid into a small container and discard the rest. Set the apricots and the reserved liquid aside.

Add the remaining filling ingredients to a food processor or blender. Then add the apricots and reserved liquid. Pulse the mixture together, so that all the apricots are broken up into smaller pieces. The end result should be the consistency of jam. Let the jam cool completely and then cover and place in refrigerator.

The next step is to create and form the dough. Sprinkle the yeast into 3/4 cup of the warm milk and stir. Let sit for at least 10 minutes or until ready to use. Take out a medium sized bowl and sift together 3 2/3 cup of the flour and salt, set aside.

Fill the bowl of a stand mixer with sugar, butter, sour cream, remaining milk (1/4 cup), egg and almond extract. Add 1/2 of the sifted ingredients and mix on low speed. Continue beating and add in the yeast blend, stirring once again prior to adding. Once these elements are combined, blend in the remaining sifted dry ingredients.

Change out the beater blade on the mixer to a dough hook. Switch the speed to medium and beat for about 4 minutes. The end result should be a smooth dough. If it remains sticky, blend in the additional 1/3 cup flour.

Prepare a large bowl by oiling the interior, either using a oil-soaked pastry brush or cooking spray. Also, line 2 baking sheets with parchment paper.

Form the dough into a circle and place in the oiled bowl and then flip over so the other side is oiled as well. Cover and set aside to rise in a warm place. It should take about an hour to double in size.

As the dough is rising, prepare the glaze by combining all ingredients in a saucepan and place over medium heat. Let the mixture come to a boil, take out the vanilla bean and remove the saucepan from heat. The seeds will remain as dark specks in the golden glaze. Let the glaze cool completely before using.

After the rising session, punch down dough and let stand for 5 minutes. Dust a flat surface lightly with flour. Empty the dough out onto the surface and roll out into a rectangle. Keep rolling until it reaches a size of 21 x 13 inches. Take the jam out of the refrigerator. Using a small spatula, spread the jam evenly over the surface of the dough. Do not leave any border and spread the mixture out, covering all of the edges.

Starting from one of the short sides, fold the dough into a letter size rectangle, resulting in a 13 x 7 inch mass. Extend the dough another inch, making it 13 x 8 inches. Sharpen the short edges of the dough by slicing off a half inch from each 8 inch side. Then cut the dough into 12 one inch wide strips. Carefully twist each strip and curl around to form a loose knot, tucking the ends underneath. Place all the formed strips on each baking sheet. There should be six pastries evenly spaced on each baking sheet. Let the pastry dough rise again for about 30 minutes, covering and placing in a warm area. During this second rising time, preheat the oven to 350 degrees.

Once the oven reaches the desired temperature, place one baking sheet in the oven and let the pastries bake until done. Let the pastries bake for about 7 minutes and check to see if they are getting to brown on top. If so, cover with foil at this time. Let the rolls bake an additional 8 minutes before using a tester to check if the pastries are done. Baking time could take up to a total of 20 minutes. The end result should be rolls that are golden brown on the surface. Remove from the oven and top with the brown sugar glaze. Follow the same instructions on the additional tray of rolls. Serve warm.

Tips and notes:
1. The additional rise time of the 2nd tray while the first is baking does not alter the end result. Both trays had the same texture and size.

2. The recipe states to add the sliced almonds after the filling is blended. However due to cutting and forming, I elected to add them prior to the blending.

3. The filling does not scorch when resting on the pan while baking.

4. The glaze does not add a lot of sugar to the surface, allowing the almond/apricot to be the primary flavor of the rolls.

                                                    **LAST YEAR:Hazelnut Praline Cakes**


Monday, September 11, 2017

Hibiscus Butter Cake


Things never seem to stay exactly the same. It is as if time is always redecorating. Sometimes the change happens quickly and sometimes they take time. Those shoes you loved in the store just were not the same at home and places you used to visit in the past are now unfamiliar.

In relationship to food, I have been told that your taste buds change with time. The things you once loved turn into a different flavor or your preferences change. However, I am happy to say that I still enjoy a good slice of cake-so time has not changed my taste buds that much. In addition, I still crave a taste of the unique and trendy flavors.

Which brings me to this recipe. I have been thinking about the taste of flowers; cherry blossom, geranium and hibiscus. I believe that the decision was locked in when I saw a jar of hibiscus flowers in syrup. The main use for the flowers were to drop into champagne filled glasses for an extra special occasion. I knew that syrupy flowers were not the right type of component for the cake. Then the idea of freeze dried came to mind, but the product was not easily found. What could be easily found was hibiscus tea leaves.

Then I went searching for methods of using tea in baking and landed on a recipe in which the methods were already tested and steeping the tea with melted butter was the winner.

This is a 3 layer six inch cake with lemon and the familiar berry/tart flavor of hibiscus. It is covered with a strawberry lemon buttercream and the layers are filled with both the buttercream and sweet strawberries. Nifty in size and deliciously unique in flavor- one slice is really worth trying.

Hibiscus Butter Cake
adapted from Oh Honey Bakes 

Ingredients/Cake
1 1/3 cup buttermilk
zest of 1 lemon
2 cups sugar
1 tbs baking powder
1/2 tsp salt
2 1/2 sticks of butter
5 tbs hibiscus tea
6 egg whites
3 1/4 cups flour

Ingredients/Jam
1 lb of strawberries
1/2 cup sugar
2 tbs lemon juice

Ingredients/Buttercream Icing
1/2 cup strawberry jam (from above recipe)
2 tsp lemon zest
1/4 tsp lemon extract
5 egg whites
1 1/4 cup sugar
1 1/2 or 3 sticks of butter (cubed)

In order to create the cake, start by infusing the tea with the butter. Place a saucepan over medium heat and fill with the butter. Then add the tea. As the butter melts in the pan, due to the tea leaves, it will turn a deep burgundy color. Let the mixture come to a boil and cover. Remove from the heat and let rest for about an hour for the hibiscus flavor to meld with the butter.

Once the resting interval is complete, place a sieve over a heat proof bowl. Pour the butter/tea mixture into the sieve and let the melted butter drain out while pressing into the tea leaves. Use a spatula to scrape any remaining amount of butter (clinging to the bottom of the sieve) into the bowl. Let the mixture come to room temperature before using.

As this cools, preheat the oven to 350 degrees. Grease the interior of three six inch cake pans and place parchment in the bottom of each pan. Grease the surface of the parchment paper as well. Fill each with about 1 tablespoon of flour and shake pan until the whole interior is covered and invert to empty out excess.

Fill the bowl of a stand mixer with the sugar and butter/hibiscus mixture. Cream the mixture together, beating at medium high speed until light and fluffy. Add each egg white (one at a time) and blend with the mixer for about 30 seconds. Continue with this same process until all 6 of the egg whites are blended into the batter. Fold in the lemon zest and set aside.

In another bowl, sift together the flour, baking powder and salt. Fold 1/3 of the sifted ingredients into the batter. Then stir in 1/2 cup of the buttermilk. Repeat the same process, starting with the dry blend and using all the remaining buttermilk. End by folding in the last amount of the sifted ingredients.

Measure out the batter and divide evenly into thirds. Fill each pan with a third, making sure the surface of the batter is even. To remove air bubbles in the batter, tap the bottom of the pan lightly on the counter. Place each in the oven and let bake for 20 minutes. After that interval, rotate and bake for about 5-10 minutes or until a tester comes out clean. Remove from oven and let cool for about 15 minutes. Run a knife around the interior edges of the pans and invert onto cooling racks. Once completely cooled, the layers can be assembled.

As the cake is cooling, start on the topping/icing. Core all the strawberries and set aside 4 whole strawberries for garnish. Chop the rest of the strawberries into 1/4 inch pieces. Separate out 1/2 cup of the chopped strawberries, empty into a bowl, and fold in 2 tbs of sugar. Cover bowl and place in refrigerator.

Fill a saucepan with the lemon juice, the remaining 1/2 of sugar and chopped strawberries. Place over medium heat and let cook for about 5 minutes over medium heat. The end result should should be thick, like jam. Remove from heat and drain into a heatproof bowl with a sieve, using a spoon the press out all the liquids. Cover bowl and let cool to room temperature.

For the buttercream, set up a double boiler using a bottom pot an adding water, filling it 1/4 inch full. Let the water come to a simmer. Take out a metal bowl and fill with the egg whites and sugar. Place the filled metal bowl over the pot of simmering water. Whisk the mixture until it is no longer grainy and the sugar is dissolved or until it reaches 140 degrees. It should have a foamy consistency when ready.

Empty the egg white/sugar mixture into a bowl of a stand mixer. Using a whisk attachment, blend the ingredients on high speed for about 10 minutes. After 10 minutes, check the temperature of the outside of the bowl to determine if it has reached room temperature. If so, switch the mixer blade to the paddle attachment and low speed. As the icing continues to be mixed, start dropping in the cubes of butter until all is blended into an icing texture.

Take the strawberry jam out of the refrigerator and beat into the sugar/butter mixture. Once blended, stir in the lemon extract and lemon zest.

To assemble the cake, start by trimming the domed layers into a flat surface. Place one of the layers on a plate and cover sides and top surface with buttercream. Then divide the remaining mixture of strawberries and sugar in half. Spoon half of the mixture evenly onto the layer covered in buttercream. Then top with another layer of cake and repeat the process of covering the layer. Place the last layer on top, making sure the cake is level. Frost the sides and top with the remaining butter cream and slice the 4 strawberries vertically, leaving about 3 cm uncut at the bottom. The strawberries can be fanned out and placed on the center of the cake. 
  
Tips and notes:
1. This recipe yields a very tall cake. I kept one layer as a small cake and stacked and frosted only two layers.

2. The buttercream will curdle when blending, which is to be expected. It may take a while of mixing to get to the proper consistency, so be patient.

3. Bear in mind that butter cakes are more dense than regular cake. However, it still retains a moist texture.

4. If you are topping the cake with the berries, do that right before slicing and serving.

5. Even though the tea leaves have a rich berry tint to them, the cake layers have a white interior. 

6. The hibiscus flavor becomes more prominent after 1 day.
                              **LAST YEAR: Vanilla Bean Scones* 

Sunday, August 27, 2017

Sawmill Toffee


Today there is a cool breeze outside and the temperature is much cooler than what Texas normally has in August. Even though the temperature may switch back to 100 degrees and hotter in a few days, the thoughts of autumn and winter are on my mind.

Pumpkin, gingerbread and spices are definitely the foods for the cooler weather. Along with that are the special holiday treats that only seem to appear once a year. One of those treats is homemade fudge. My mother used to make fudge around the Christmas holidays. I recall my sister and I having to take turns to beat the fudge until it reaches the correct consistency. At the time, it seemed like it took an eternity for it to get to that point-especially when both of us were ready to eat when we were recruited for the task!

Unlike many fudge recipes, this one is quick and easy. You will not have to experience the task of "beating until it reaches the correct consistency". Instead, butter is creamed with sugar and the rest is simply mixed in.

Needless to say, the name of this recipe is very misleading. It should be named fudge instead of toffee. When served from a frozen state, it has that same silky texture that we expect when indulging in a piece of fudge. In addition, each piece has an occasional crunch from the pecans. Also, when flipped out of the pan, you have a thick dusting of graham cracker crumbs on top. Like most fudge, each bite packs in the big flavor we all love- rich, sweet chocolate.

Sawmill Toffee
adapted from Bon Appetit-Favorite Restaurant Recipes

Ingredients
2-3 tbs butter (melted)
3 eggs
1 tbs orange liqueur
8 oz unsweetened chocolate (melted/cooled)
1 1/4 cups or 2 1/2 sticks butter (room temp)
1 1/2 cups graham cracker crumbs
1 lb powdered sugar
Whipped cream (optional for serving)

Start by preparing a 10X15X1 inch pan by buttering the interior. Then take out a bowl and whisk together the melted butter and the graham cracker crumbs. Once all the crumbs have been damped by the butter, empty contents into pan. Press the mixture evenly in the bottom of the pan, using the back of a spoon or small spatula. Cover pan with plastic wrap and place in refrigerator to cool for at least an hour.

Take out another bowl and fill with only 1 cup or 2 sticks of butter (kept at room temperature). Beat the butter until it is smooth, stopping occasionally to scrape down the sides of the bowl. This should take about 2 minutes. Set aside.

Using a sieve or sifter, empty the powdered sugar into a large bowl. Then add 1 cup of the sifted sugar to the butter mixture and beat on low. Once no more dry streaks remain, beat for about 30 seconds on medium speed. Repeat this process until all the powdered sugar has been incorporated into the butter. Set aside.

Then fill a saucepan with the remaining 1/4 cup of butter and place over medium heat. Once melted, pour in the pecan pieces. Stir the mixture until the pecans release a butter-nut aroma, indicating that they are completely toasted. This should take up to 5 minutes. Once toasted, empty the nuts into a small bowl to cool.

Go back to the butter/sugar mixture and add one egg. Beat for 30 seconds. Continue adding and beating each egg into the batter, one at a time. Pour in the melted chocolate and whisk or stir until it is completely distributed throughout the mixture. Lastly, fold in the toasted pecans.

Remove the graham cracker lined pan from the refrigerator. Also, fill a small bowl with some cold water. Using a large ladle, scoop out chocolate fudge and drop into top right section of the pan. Continue with large scoops until all the fudge is in the pan. Then smooth out the fudge evenly by dipping a spatula or knife into the water and sliding over the surface.

To complete the process, take a pastry brush and dip it in the orange liqueur and brush over the surface. Then take a knife and make cuts in the surface to mix in the orange liqueur. Lastly, smooth out the surface again. Cover and place in freezer for about 3 hours to set.

Once set, it is ready to cut, flip and serve. Prior to serving you can top with a scoop of whipped cream if desired.

Tips and Notes:
1.The graham coating is very loose and powdery. In order to remedy that, add some additional melted butter until it clumps into a more solid mass. However, remember that this is to be more of a dusting and not a baked hard crust, like you would have with a cheesecake.

2. I am big on crunchy pecans, so if I was to make this again I would increase the amount used in this recipe.

3. The original recipe states to chill the fudge. Tasting the consistency of it chilled in the refrigerator vs chilled in the freezer, I much preferred the freezer. The refrigerator did not get the mixture to set up as firm as fudge.

4. The brushing of the liqueur on top did not lend any flavor to the fudge. Should you want to experience the taste of it in the fudge, try increasing the quantity and experimenting with mixing it in the batter. You can also separate the batter in half, making one layer and brushing it with the liqueur. Then cut it in with the knife, as instructed in the original recipe. Top with a second layer of fudge and follow the same instructions.

5. Bear in mind that the pieces of fudge are between 1/2 to 1/4 inch thick, they are not like the 1 inch cube size of most fudge pieces.


                                   **LAST YEAR:Polish Poundcake**

Sunday, August 20, 2017

Boston Cream Pie Cookies


Today I am thinking about the subject of opinions. Opinions can be requested as needed and they can be constructive at times. However, we all have to deal with the unwanted and the overload. There is a percentage of people that abuse the use of opinions. These are the people that want to control you, believe they know what you want and believe they know what is best. In the company of these people, bear in mind that you are the only person that has to be with you for the rest of your life, so do and think what you want. Also, be confident that as you do that, these people are continuing to use their time in futility trying to control you.

The control factor also can be linked to the practice of following recipes. You can move forward and make the exact recipe and be content with the instructions or you can alter them a bit as you see fit. Altering them can turn out to be a good thing or a bad thing, but you run the same risk with following a recipe. I have made some desserts I have been unhappy with and followed the recipe to a "T".

This recipe makes a little over 1 dz sandwich cookies and contain all the great flavors of the traditional Boston Cream Pie. The cookies strongly resemble the flavor of "Nilla" wafer cookies and while they bake up crisp, sandwiching them with the vanilla custard tends to soften them up as time goes by. Below is the recipe for the cookies I baked, in the tips and notes you will find further information for creating the original recipe.

Boston Cream Pie Cookies
adapted from Rosie's Bakery Cookie Book

Ingredients/Vanilla Custard
2 tsp vanilla extract
1/4 cup plus 2 tbs heavy whipping cream
1 cup milk
1 egg yolk
3 tbs cornstarch
1/4 cup plus 2 tbs sugar

Ingredients/Cookies
2 tsp vanilla extract
2 egg yolks
1 whole egg
1/2 tsp orange zest
1/2 cup or 1 stick plus 1 tbs of butter
1 cup plus 1 tbs sugar
1 cup flour
1 cup plus 2 tbs cake flour
3/4 tsp baking soda

Ingredients/Chocolate Glaze
2 oz unsweetened chocolate
1/2 cup heavy cream
1 tbs and 1 tsp unsalted butter
1/4 cup plus 2 tbs confectioners sugar

Start by making the filling. Pour 1/2 cup plus 1 tbs milk into a medium sized saucepan. Add the cream and stir. Measure out the sugar and mix into the milk mixture. Place saucepan over medium heat and stir until sugar is dissolved. Then heat until it reaches a boiling point and remove. Set aside.

Take out a small bowl and whisk together the remaining milk and cornstarch. Once the cornstarch is blended into the milk and no lumps remain, add the egg yolk. Whisk until incorporated into the liquid. Pour this mixture in a steady stream into the saucepan with the sugar/milk blend, stirring as you pour. Then place saucepan over medium heat again and let filling cook, stirring constantly until it reaches the consistency of pudding. Remove from heat and whisk in the vanilla extract.

Lastly, pour the filling into a heat proof bowl and cover the surface with wax paper or plastic wrap. Place in refrigerator for approx 2-3 hours, depending on the size of the bowl.

You can make the cookies while the filling is setting up in the refrigerator. Start by taking out a mixer, preferably a stand mixer, and a large bowl. Fill the bowl with the butter, sugar, orange zest and vanilla extract. Cream the ingredients together with the mixer at medium speed, stopping at intervals to scrape down the sides of the bowl. This process should take 3 minutes. Then add each egg yolk, beating for 30 seconds after each addition. Lastly, whisk in the whole egg and set the mixture aside.

Preheat the oven to 400 degrees and prepare baking sheets by lining with parchment paper.

Using a medium size bowl, sift together both types of flour and baking soda. Then fold into butter/sugar batter. Once there are no more streaks of flour in the batter, take out a scoop or a spoon and place rounded tablespoons of dough on the baking sheets, spacing about 1 inch apart. Place pan in preheated oven and let bake for 10-11 minutes or until golden brown on the edges.  Let cookies cool on pan for about 2 minutes, then transfer to rack to completely cool.

Then take out your filling from the refrigerator when the chilling time is completed. Stir to make sure mixture is spreadable. Using a rounded tablespoon, scoop up some filling and smooth evenly on the flat side of one cookie. Then top with another cookie and press down lightly, making sure that the size pairing is the same. Continue with this process until all cookies are now sandwiched together with the filling.

The final component will be the chocolate topping. Melt the butter in a small bowl in the microwave. Then add the chocolate, breaking or chopping into chunks. Take out a small saucepan and fill with the cream and heat until it just comes to a simmer. Remove and pour the hot cream over the chocolate butter mixture. Let set for 2 minutes then whisk until all the chocolate is melted and mixture is smooth. Add the confectioners sugar and stir, creating a smooth, shiny chocolate coating.

At this time, you can dip the sandwich cookie in the chocolate or drizzle it on top. Once all the cookies are coated, place on wax paper lined baking sheets and put in refrigerator for chocolate to set. These can be kept in the refrigerator for storage, but should be served at room temperature.

Tips and Notes:
1. I rarely use salt in recipes, but the original has 1/4 tsp which is added to the cornstarch/milk mixture and the cookies have 1/2 tsp of salt sifted with the flour and baking soda.

2. I used orange zest, but the original recommends lemon zest.

3. Should you want these to be more like whoopie pies, follow the original instructions that include incorporating 1/2 cup and 2 tbs of buttermilk prior to adding the sifted ingredients. This should create a cake-like texture, while making the cookies thinner with the additional liquid.

4. If you like the idea of banana pudding, try using banana custard instead of vanilla.
                                  **LAST YEAR: Sierra Nugget Cookies**