Foodbuzz
Showing posts with label apple. Show all posts

Friday, March 2, 2012

Caramel Apple Cakes

I decided this go around I wanted to do a project, not just a regular cake.  I had saved this recipe a few years back from a Disney website but never made it. That site actually has some pretty cool crafty ideas for cupcakes as well as cakes.  This particular recipe was actually for one giant cake.  I made this with a mini ball pan instead and it made about 8 cakes.

The cake part is a spice applesauce cake.  The taste is wonderful and the aroma when baking was enough to make anybody hungry.  This would be a good cake, even if you did not want to got to all the trouble to make the "caramel apple look".  The cakes are covered with caramel and rolled in finely chopped walnuts. I used a specialty caramel-Celtic Sea Salt.  It was not packed with salt, but every once in a while a bite would yield a salty, crystal crunch.

I have listed the original cake recipe for the large caramel apple cake as well as instructions for the mini cakes. I did have a lot of fun making them!.  Also, I finished off my baking session by eating the cut out slice from the one mini cake above, which was the perfect ending to a day in kitchen!  We have visitors coming this evening, so the cakes will be served then.  I have included some helpful tips at the end of this recipe should you decide to make these.


Caramel Apple Cake
adapted from Family Fun Go website 

Special Equipment:
1 ball cake pan  or  2 oven safe 1 1/2 quart bowls (2 mini ball pans)
1 large craft stick (1 package of lollipop sticks)

Ingredients/Cake
2 cups unsweetened applesauce
2 tsp vanilla extract
2 eggs
1 cup vegetable oil
1 1/2 cups light brown sugar
2 tsp cinnamon
1/2 tsp allspice
2 tsp baking soda
1 tsp ground cloves
1 tsp salt
3 1/2 cups flour

Preheat the oven to 350 degrees.  Grease and flour the top edge as well as the cavities of your pans.

Sift together the cinnamon, allspice, baking soda, cloves, salt and flour.  Set aside.  In another bowl, beat together the eggs, sugar, vanilla extract, applesauce and vegetable oil until smooth.  Fold in the sifted ingredients.

For the mini ball pans, fill  cavities 2/3 full and bake for about 18-22 minutes.  For the big cake, bake for 60-70 minutes.  Cakes will be done when tester comes out clean.

Once the cake is done and removed from oven, let cool in pan for 10 minutes.  Then invert onto cooling rack and let cool completely.  Then trim the flat sides of cake or cakes so the two pieces match together, forming a ball.

Ingredients/Topping
3/4 cup finely chopped toasted walnuts
60 caramel candies
2 tbs water

In a microwave safe bow, place unwrapped caramels and add the water.  Microwave in 30 second intervals, stirring after each interval for about one and a half minutes. The mixture should drip off of a spoon.

Place about a tablespoon of caramel in the middle of  8 of the mini cakes or 1/4 cup in the middle of one half for the large cake. Place 1 sheet of wax paper on a flat surface for the large cake and 2 sheets for the minis. Place cake or cakes on top of one sheet.  Spoon the warm caramel over the top, letting it drip down the sides.  Continue until all is covered except for the part directly on top of the wax paper.  Wait 20 minutes for the caramel to cool on the large cake and then scatter nuts along the bottom half of the large cake.  If making minis, let cool for 10 minutes and scoop with a spatula.  Then roll the bottom half of the cakes in the nuts to coat.  Place mini cakes back on clean sheet of wax paper.

Cover the large craft stick with wax paper and insert into top center of the cake.  For the mini's insert one lollipop stick into top center of each cake.

To serve, mini cakes, have guests remove stick and cut with a knife to eat.  The large cake, just remove stick and cut slices.  Each slice should be split again from the top or bottom half of the cake, unless you want to serve long half moon slices.

Tips:
Do not use the center stick to move the cake, it will not hold.
Cooling time is crucial on the caramel, you want the nuts to stick but not to drip off with the caramel
Excess caramel will be on the wax paper.  To create less waste, scoop and re-heat to pour over cake or cakes again.
Since the bottom half of the cake is round, you may have to spoon the caramel to get that part all coated.
The best way to plate these and also help in moving them from one place to another is to take a jumbo muffin paper and cut about an inch off the top and place one cake on top.  Also you can just take a standard cupcake paper and fan it open.

                  **LAST YEAR::Peanut Butter Pretzel Cookies**
 

Wednesday, October 12, 2011

Elsa's Apple Slices

For me, fall flavors conjure up recipes that were put in cookbooks years gone by. I imagine that on certain days, you could roll into a small town where the air would be filled with the aroma of sweet apples baking as women prepared desserts for the upcoming fair or bake sale.  Families would gather their generations together and take off to the pumpkin fields to make sure that they got the best pick that resulted in the most amazing pie baked by their mothers or grandmothers.

Even though it is an era gone by, treasured pumpkin and apple pie recipes continue to be handed down and made year after year.   This particular recipe stems from the pages of a faded brown notebook that was created around the turn of the century.  The notebook was owned by a Baroness of high society that lived in Vienna.

One of the reasons that I made this was because having a whole pie around the house is too much for our small family, so the slice is a better way to go.  I did enjoy the taste and texture of this dessert.  The outside is like a thin cookie instead of a flaky pastry.  In regards to the filling, I like it because it has very little ingredients. That short list makes for a fairly pure taste of apples, which is exactly what I was looking for.

I changed the original order in which the components are made.  Since it is important that the dough be the right temperature,  it is best that the filling is made and cooling first. If the dough spends too much time in the fridge (waiting for the filling to get cool) it will crack when you roll it out.  This recipe results in about 15-20 slices, depending how thick you cut the slices.

Elsa's Apple Slices
adapted from Viennese Kitchen Cookbook

Ingredients/Filling
2 oz raisins
grated zest of one lemon
1 2/3 lb of apples (peeled cored and grated)
1/2 cup sugar

Ingredients/Dough
5 1/2 tbs unsalted butter (cubed)
1/4 cup sugar
1 tsp baking powder
1 1/2 cups flour
1 egg

Ingredients/Assembly
1 beaten egg white
powdered sugar for topping
whipping cream (optional)

To make filling, place grated apples in a fry pan over medium to low heat.  Stir and let apples cook until all moisture is gone.  This took about 8-10 minutes.  Remove from heat and place in heatproof bowl and place on trivet in fridge to cool.

Now you can start on the dough.  Firstly, make sure all your ingredients are cold.  Sift together the flour and baking powder into a food processor bowl.  Add butter cubes and pulse food processor several times, until mixture turns into coarse crumbs.  Pour sugar into the processor bowl and pulse until evenly blended.  Lastly, pulse the egg into the batter until it turns into a dough.  Remove dough and shape into a ball.  Cover with plastic wrap and place in fridge to chill for 30 minutes.

During this time, take out a baking sheet (approx 10X15) and cut a piece of parchment to line the sheet.  Lightly flour surface of parchment and set aside.  You will not line your pan with it just yet. Preheat the oven to 325 degrees.

Once the dough is properly chilled, remove from fridge and place on the parchment paper. Roll dough out to a thickness of 1/4 inch.  You should have a rectangle that is about 7X16.  Take the sheet of parchment paper with the dough on top and lay it on the baking sheet.  You will have a little overhang on the length.

Remove the apples from the fridge and stir in sugar, lemon zest and raisins.  Spread the apple filling down the center of the dough, leaving a one inch border on the short ends and a 1 3/4 inch border on each side of the length.  Your filling should measure about 3 X 14.

Fold in the 1 inch border on the short ends. Then fold one long end of the dough over the center of the filling.  Brush all folded in edges with egg white.  Fold the remaining end over the first, overlapping in the center.  Press down center seam to seal.  Make sure all the filling is sealed well on the center and ends.  You do not want the filling to seep through any openings while baking.

Place baking sheet in oven and bake for 40-45 minutes.  Surface will have a golden hue when done. Remove pan and let pastry cool on baking sheet.  Once completely cooled, sprinkle with powdered sugar and cut into slices with a sharp knife.  If desired, spoon a scoop of whipped cream on top when serving.
                              **LAST YEAR: Kahlua White Chocolate Brownies**

Monday, July 4, 2011

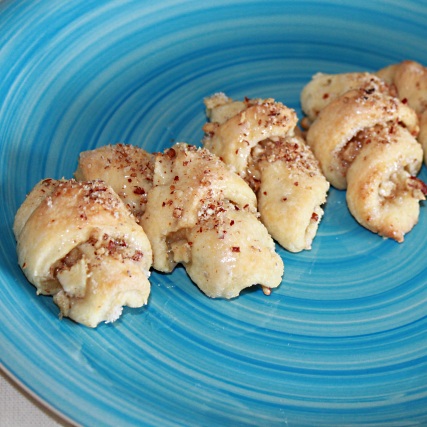
Austrian Apple Twists

Happy 4th everyone!  These little twists are a great way to start the day. They are filled with apples, nuts and cinnamon. While having apple pie for breakfast may not be an option, these pastry twists will give you all the same flavor.

I have made this type of pasty several times and there are many variations out there with different names.  Today, I decided to use up an apple that I had in the fridge, since it would be a change of pace from all the summer berry recipes.

The dough has an overnight chilling process, so there is minimal work for the baking process in the morning.  You can make about 16 of these, enjoy them for breakfast and then finish making the rest of them. These can be frozen after baked, but do not glaze them- the glaze will not do well in the freezer.  This recipe makes 64 twists.

Austrian Apple Twists
adapted from recipelink.com

Ingredients/Twists
3 cups flour
1 package of dry yeast
1 cup butter (room temp)
3 egg yolks ( beaten in a small bowl)
1 cup sour cream

Ingredients/Filling
1/2 cup toasted and finely chopped pecans
1 medium tart apple (I used Granny Smith)
3/4 tsp ground cinnamon
1/2 cup sugar
1/8 tsp produce protector (to keep apple from browning)

Ingredients/Icing
1 cup confectioners sugar
1/4 cup finely chopped pecans
1/4 tsp vanilla extract
4 teaspoons (or more) of milk

The night before: in a medium bowl, whisk together the flour and the yeast.  Then add the butter in small pieces.  Using a pastry cutter, blend the butter into the flour mixture until it resembles coarse crumbs.  Set aside.

Take another bowl and whisk the sour cream and the egg yolks together.  Once blended, pour into the flour mixture and combine by stirring with a wooden spoon or use clean hands.  When a dough is formed and no flour streaks remain, separate it into 4 sections.  Shape each into a ball and place in plastic bag and refrigerate overnight.

Peel, core and chop the apple into small chunks.  Then mix in the produce protector, cover and refrigerate.

The next day, preheat the oven to 350 degrees and line 2 baking sheets with parchment paper.

Stir together the sugar, pecans and cinnamon in a small bowl. Then place a waxed sheet of paper on the counter and sprinkle with flour.  Take out I piece of dough from refrigerator and roll out with a floured rolling pin.  The end result should be a disc measuring 9 inches in diameter.

Leaving a 1/4 inch border on the outer edge of the dough disc, sprinkle to top evenly with 1/4 of the apple chunks and 1/4 cup of the cinnamon mixture.  Lightly press filling into dough.  Cut dough into 16 wedges.  Roll each wedge from the wide end to the opposite point, pinching to seal point.  Place on baking sheet, point side down.  Bake until lightly browned, which is about 16-20 minutes.

Remove and place on rack to cool.  Repeat this process with the other 3 remaining dough balls in the refrigerator.  If you do not plan to freeze them, follow the process below to ice the twists.

After the pastries have cooled, place a piece of wax paper under the rack to catch the drippings from the icing.  In a small bowl, whisk together confectioners sugar, milk and extract.  Should you feel that the icing is too thick add a little milk until desired consistency is achieved.

Drizzle the icing on top of the twists and then sprinkle with pecans. Once icing is set, these are ready to serve and eat-enjoy!