Foodbuzz
Showing posts with label pie. Show all posts

Wednesday, June 13, 2012

M & R Pie

Well I have been looking all over the net concerning pies trying to come up with a name for this one.   Interestingly enough, I came across a site called Pies Across America.  It is actually a program set up by two people, Micah and Rick with the idea of sending pies out to people that are in need of some uplifting, such as those affected by natural disasters.  Their base site is in Facebook which I am not a member of, so I am not sure how active the site is.

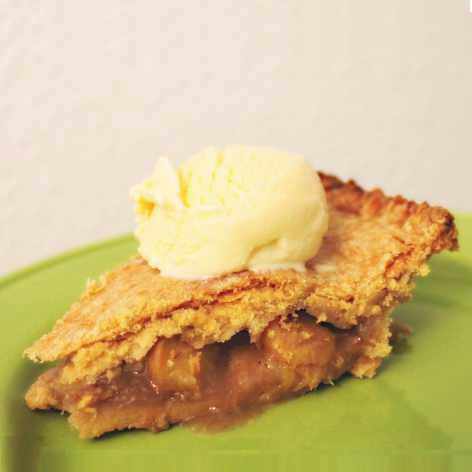
I have really been on a peach kick lately, I think it was all started with a mixed drink called a Peach Freeze.  Frozen pureed peaches was the base of the drink and it was heavenly.  This particular pie is full of spices and sliced ripe peaches.  In addition, for a little extra zing, I have added some peach schnapps as well.  Also, pecan pieces were lightly pressed into the bottom of the pie crust before filling.  One slice topped with a scoop of vanilla really makes for a great summer dessert.

M&R Pie
by flourtrader

Ingredients
Pie crust for 9 inch double crust pie
1/4 cup chopped pecans
8-10 peaches, peeled and cut into chunks
1/2 cup sugar
2 tbs flour
1 tsp ground cinnamon
1/2 tsp ground nutmeg
1/4 tsp ground cloves
3 tbs peach schnapps
3 tbs cold unsalted butter, cut into small pieces
sugar for sprinkling

Prepare pie crust dough as directed and cover and place dough disks in the fridge to chill prior to rolling.  Place a sheet of wax paper on a flat surface and lightly dust with flour.  Using a rolling pin, roll dough out to a 13 inch circle.  Then invert and center dough over pie pan and peel off wax paper and tuck the pastry into the pan.  Do not stretch the pastry, but flatten against the pan.  Then lightly press the pecan pieces into the bottom of the dough.  Leave overhang and place back in fridge for 15 minutes.

Then fold the peaches, cinnamon, nutmeg, cloves, sugar and flour together in a separate bowl.  Stir in the peach schnapps.  Take the pie pan out of the fridge and fill the pie pan with the mixture, making sure it is all even.  Then drop the small pieces of butter in places on top of the filling.

Take out the the second piece of dough and place on floured wax paper. Roll into an 11 inch circle.  Moisten the top edge of the dough in the pie pan and invert 2 piece of dough over the top.  Press to seal.  Make a decorative top edge according to your personal preference.

Sprinkle sugar over the top of the dough.  Then make steam vents in the top of the pie with a paring knife.  Place in oven and let bake for 30 minutes.  Then lower heat to 350 degrees and rotate pie 180 degrees and bake for an additional 30 minutes.

Remove and place on rack to completely cool.
                       
Tips and Notes:
1. amount of filling will vary, depending on the size of your peaches.  Mine were fairly small
2. Peach flavors develop more within time, so waiting a day before serving would be better
                        **LAST YEAR: Aztec Treasure Cookies**
 

Friday, April 13, 2012

Fried Apple Pies

In the kitchen with pastry again, but this time instead of a big pie, I opted for these hand held fried pies.  I had a request from one of my husbands friends, so I happily obliged.  These are perfect for a lunch box or transporting anywhere.  Had it been a slice of pie, I am sure it would not have stayed together by the time lunch rolled around.

Do not let the picture fool you.  These pies are not runny, the pool on the plate is the caramel sauce that I poured on top of the whipped cream I put in the center of the plate.  I know some of you are wondering about the star shape with 4th of July coming up, but I am sorry to say that Williams Sonoma does not carry this product any more. It is called a pocket pie mold and  the shapes they sell now are a heart, apple and a 3 pack of mini molds.

These pies really did hit the mark in what I wanted.  The filling was not too saucy, more like just a clump of apples with a touch of spices.  That clump was about the closest you can get to eating a bowl of fresh chopped apples.  One bite gives you a cinnamony, flaky crunch of the fried pastry and a pop of real apples inside.  I think the key to having some texture to the filling instead of mush is the choice of apple.  I chose Honey Crisp, but there are a lot of good varieties out there, just make sure that they are very firm and tart. 

I have not included the pastry recipe, for there are a lot varieties already out there along with different personal preferences.  Also, since the recipe is for hand-shaped pies and most people do not have the molds, the recipe below has the hand made method.  It makes 6 hand pies.

I will be away from home today due to appointments in the city, so I will catch up with my blogger friends tomorrow. I wish you all a wonderful weekend. 

Fried Apple Pies
adapted from Bubby's Homemade Pies

Ingredients/Pie
pie dough for an 8-10 inch double crust pie
1/4 tsp ground cinnamon
pinch of cloves
2 tart firm apples, peeled cored and chopped into 1/2 inch chunks (mine for 1/4 inch chunks)
2 tbs light brown sugar
1 tbs unsalted butter
juice from 1/2 lemon
pinch of salt
2 tbs whiskey (optional)
cooking oil, for frying

Ingredients/Topping
1/2 cup sugar
1 tbs cinnamon (more or less, depending on your preference)

Place a saucepan over medium heat and melt the butter.  Then add the apple chunks and stir, making sure that all pieces are coated with butter.  There will not be a lot of butter in comparison to the apple chunks, but coat them the best you can.

Turn the heat down to low and add the remaining pie ingredients, except for the pie dough and the cooking oil.  Cover and let cook at a simmer for about 25 minutes.  The recipe states that after this time the mixture will be light a chunky applesauce, but my apples still held their shape.  The cook time will vary, depending on your choice of apples and also your personal preference on what kind of texture you want your filling to have. The longer you cook the more mushy the apples become, so use your own judgement.

Then take a wooden spoon and roughly stir the mixture, breaking up the apples into smaller chunks.  Remove from stove and place filling in a heatproof bowl and let cool for 10 minutes.  Cover with plastic wrap and place in fridge to chill for at least 2 hours before using as a pie filling.

Divide the dough into 6 equal pieces.  Roll one piece into a 6 inch square and place 3 tbs of apple filling in the center of 1/2 of the square.  Fold the other half over the filling and seal with some water.  Then seal the top two edges together the same way and repeat with the bottom two edges of pastry.  Take each sealed edge and fold it inwards, about 1/4-1/2 inch.    Using a fork dipped in water, crimp down the sealed edges, sealing completely and making sure you are not too close to the filling. Place pie on a wax paper lined baking sheet.

Repeat the filling and forming process, until all 6 pies are made and placed on the baking sheet.  Then freeze for 3 hours or more before frying the pies

Fill a 10-12 inch round pan or skillet with oil to reach a depth of 1 1/2 inches.  Place over medium high heat.  Then fill a shallow bowl or plate with the sugar and cinnamon.  Stir to make sure the cinnamon is blended well.  Also, take another baking sheet and line with paper towels.

Once a thermometer registers that your oil is 375 degrees, remove the pies from the freezer.  Place 2 or three pies into the oil and let one side fry to a deep golden brown.  Then turn and let the other side do the same.  With a slotted spoon or slotted spatula, remove one pie and place in the bowl of cinnamon sugar. Toss the sugar over the face up side, turn pie over and do the same on the other.
Place coated pie on paper towel lined baking sheet.  Then remove the other pie from the oil and continue with the frying and coating process for the other frozen pies.

These can be served warm or cold.  Also, you can top them with ice cream or put some whipped cream with caramel syrup on the side.  Enjoy!
                                   LAST YEAR: Cinnamon Walnut Horns


Friday, March 30, 2012

Grapefruit/Lime Citrus Pie

I had a few re-dos to get to the final product above.  My time in the kitchen was not as smooth as expected, but I finally ended up with the results I expected.  I guess I just was having an "off" day.

The crust mix, made of a chopped macadamias and vanilla cookie crumbs turned into nut butter the first go around!  I ran the food processor for too long. I tried to salvage it, but once it gets to that point, there is no going back.  On the second try, I pulsed my nuts in with the cookie crumbs and did not pulverize them, I just did some pulses.

Also, I got in a hurry with the gelatin and assumed that one envelope was 1 tsp of gelatin instead of measuring. Ha-I found out that I created a recipe for a lime rubber ball!  The whole sprinkling thing had to be done over again.

The above pie is made with a citrus blend, but the primary citrus used is grapefruit.  The filling texture was light as air with that special tartness that only citrus can deliver. It was a nice change from the heavier key lime pies or cheesecakes.  Also, since the crust has no flour in it, the flavor and crunch of the macadamias enhanced each bite. I do have a weakness for citrus, but even those that like the occasional taste of a tart dessert will be pleased. This recipe calls for a 9 inch deep dish pie pan, but I used a 9 inch springform pan instead.

Grapefruit Citrus Pie
adapted from Bon Appetit

Ingredients/Crust
1/4 cup butter, melted
3/4 cup ground vanilla wafers
7 oz roasted macadamia nuts
1/4 cup dark brown sugar, packed

Ingredients/Filling
1/4 cup fresh lime juice (from about 3 limes)
2 cups fresh pink grapefruit (from about 3 grapefruits)
1/4 tsp unflavored gelatin
1/4 cup whipping cream (for first addition)
1 1/4 cup whipping cream (for second addition)
1/4 cup plus 1 tbs sugar
9 oz imported white chocolate (Lindt, Callebaut)

Ingredients/Topping
7 thin lime slices, halved
8 oz imported white chocolate curls or just 1 oz for grating on top (optional)
2 tbs sugar
1 cup whipping cream

To make the crust, preheat the oven to 350 degrees. Fill a food processor with ground vanilla wafers and then add the macadamia nuts and pulse until the nuts are chopped.  You want nut chunks not powder, so do not overdo it.  Empty mixture into a small bowl and add the brown sugar and melted butter. Stir until mixture becomes clumpy and there are no dry crumbs.  Press mixture into a 9 inch springform pan or a 9 inch deep dish pan.  Bottom and sides must be evenly covered.
Bake for about 10 minutes or until it turns a golden hue.  Remove and let cool completely before filling.

For the filling, pour grapefruit juice and 1/4 cup of sugar into saucepan and place over high heat. Once mixture comes to a boil, set the timer for about 15 minutes.  The remaining amount of the mixture after cooking should be about 3/4 cup.  Remove saucepan from heat and set aside.

Take out a small bowl and fill with the lime juice.  Then sprinkle the gelatin over the top of the juice and let sit to absorb for 10 minutes.  Place the saucepan of grapefruit back on the heat, this time at a low temperature.  Add the lime/gelatin mixture, white chocolate and 1/4 cup of whipping cream.  Stir the mixture until all the white chocolate has melted.  Pour into a heatproof bowl and place in refrigerator to set up and cool. This should take about 2 hours, but stop and give the mixture a good stir after every 1/2 hour.

On the last 15 minute stirring interval,  pour the remaining 1 1/4 cup of whipping cream in a bowl and add 1 tbs of sugar.  Beat cream on high until stiff peaks form.  Then stir in chilled grapefruit mixture until all is blended.  Pour filling into prepared pan and smooth over the top, making sure everything is even.  Place in fridge for at least 4 hours or overnight to chill prior to  topping.

After the pie is completely chilled, then you can top it.  Again, beat together the cream and sugar until it has a stiff peak consistency.  Fill piping bag and pipe about 15 rosettes along the outer edge of the pie.  Then, with the rounded edge facing upward, put a lime slice between each rosette. Place the chocolate curls on top or grate white chocolate (if desired) on the top center of the pie.  Refrigerate until ready to serve.     
               **LAST YEAR: Chestnut Pound Cake**

Monday, February 27, 2012

Maui Pine Cream Pie


I recently went to a luncheon and started thinking about the different things that people brought.  Yes, we all should be happy that everyone brought something, but the buying a baked good from a grocery store always puzzles me.  I never see anyone bringing in McDonalds to pot lucks and to me both acts are equal to the same thing.  How do people arrive at McDonalds not being acceptable for the main course, but a grocery store cake is for the dessert? Different thoughts I guess.

The sad thing is that I heard someone state at how bad the store made cake tasted compared to the homemade.

Now, the question is if you do not bake or cook, what would be good to bring?  I would probably bring non food items such as plates, napkins or cups. They are always in need of those at pot lucks.

Anyway, onto the details on this recipe.  This is a pineapple cream pie with macadamia nuts.  The bottom is a cream cheese layer and the top is pineapple custard.  You cannot see the distinct layers, I think it is due to the colors of both layers being so close in hue.  The filling is a unique blend and the crust has lemon zest and finely chopped macadamia nuts which gave it a extra flavor.  The topping is whipped cream with sugar zest and macadamia nuts sprinkled on top.

I found this pie to be a tasty blend of textures as well as flavors.  One bite gives you the delicious smooth taste of pineapple and cream cheese, yet you do get a crunch from the macadamias and a taste of real fruit from the pineapple.  Definitely a great tropical treat in my book.  This recipe is for one 9 inch pie.

Maui Pine Cream Pie
adapted from The Cooking Contest Cookbook

Ingredients/Pie Crust
1/2 cup butter flavor shortening
2 tsp lemon zest
3-4 tbs cold milk
1 1/2 tsp finely chopped macadamia nuts
2 tbs sugar
1/2 tsp salt
1 1/2 cups flour

Sift together the sugar, salt and flour.  Using a pastry blender, cut in the shortening until the mixture is pea sized crumbs.  Then mix in the lemon zest and the nuts, stirring until evenly distributed.  Then add the milk, tossing together with a large fork until the mixture forms a dough.  Cover and refrigerate for 15 minutes.  Preheat the oven to 350 degrees.

Lightly flour a flat surface and roll out dough into a circle.  The dough should extend one inch beyond the size of the edge of an upside down pie pan.  Fold up into quarters or roll dough around the rolling pin and then place in pie pan. Press dough into pan.  Fold the top edges under and flute or mold the top edge of the crust how you prefer.  Then prick the bottom with a fork to make sure the crust does not bubble when baking.

Place crust in oven and bake until done, which is about 15-20 minutes.  Crust is a golden brown when done.  Remove and let cool completely before filling.

Ingredients/Pineapple Cream Filling
1 tsp vanilla extract
2 cups of milk
1 tbs water
4 egg yolks, lightly beaten with a fork
1 (20 oz) can of crushed pineapple juice ( in light syrup)
1/3 cup cornstarch, packed
1 cup sugar
1/4 tsp salt
2 tbs butter

Drain the pineapple from its juice.  Discard the juice and measure out one cup of the pineapple and reserve the rest for the cream cheese layer.  In another bowl, stir together egg yolks and water. Then mix in the cornstarch until all is smooth. Set aside.

Fill a saucepan with milk, sugar, salt and 1 cup of the pineapple.  Stir and then place over medium heat and let cook.  Continue to stir and cook, until the mixture simmers and is right on the brink of boiling.  Turn the heat down to low and slowly pour in the egg yolk mixture, whisking the mixture at the same time ( I had some extra help for this task) . Once the egg yolk is mixed in continue to whisk and let cook.  Continue with this process until the mixture is the consistency of pudding.  Then stir in the butter and vanilla.  Once the butter is melted, remove from heat.

Pour into a heat proof bowl and cover.  Place in fridge for a minimum of 30 minutes, stirring at two intervals.  I left mine in for 3 hours, so extra time does not hurt the outcome.

Ingredients/Cream Cheese Filling
1/2 cup powdered sugar
reserved pineapple ( see first paragraph under pineapple filling section)
1/2 tsp vanilla extract
1/3 cup finely chopped macadamia nuts
8 oz cream cheese (softened)

Beat together the cream cheese and sugar until smooth.  Add the remaining ingredients and beat until evenly distributed.  Cover and place in fridge while you make the topping.

Ingredients/Toppings
1 tsp grated lemon zest
1/4 tsp powdered sugar (I used more to get sprinkling consistency)
1 cup heavy cream
1/4 cup finely chopped macadamia nuts

Whip the cream until it forms stiff peaks.  Set aside.  In a small bowl mix together the zest and the powdered sugar until you have the right consistency for sprinkling.

To assemble
Remove bowls from fridge.  Take the cream cheese mixture and spread it over the bottom of the pie crust.  Then cover with the pineapple custard, smoothing the top.  Then spread the whipped cream over the top.  Sprinkle the sugar zest and macadamia nuts over the top.  Cover and let chill for about 3 hours prior to serving.
              **LAST YEAR: White Chocolate Kiss Cookies**

Monday, January 23, 2012

High Octane Mini Pies & A Shout out

There are certain foods that when ate just seem to taste good, but they do not keep you full for very long.  Perhaps it may be that scrumptious donut you had for breakfast or that chicken egg roll for lunch.  While you taste buds may be happy, you are looking for something to fill the void a few hours later.  The resolve to this situation is grains.  Whole grains do have some staying power so incorporating more of them in your diet can keep you from snacking in between meals.

Which brings me to the name of this pie.  High octane is a factor that can increase the horsepower of your car.  Now considering the first paragraph here, I decided that a high octane pie must have some whole grain in it.  The mini pie contains oatmeal, so it does give you some fuel to keep going.

Outside of oats, I have included some chocolate chips, coconut and macadamia nuts.  The combo is does make for a tasty pie and you get a myriad of texture in one bite.   This pie is delicious at any temperature, but I have to say it is very rich when served warm.  If that is not enough, you can always top it with whipped cream or serve a small piece with ice cream on the side!

Speaking of sides,  I have a side note here to give a special shout out to some very nice blogger friends who gave me some awards recently.  One is Becky over at Baking and Cooking.  She has been blogging since April of 2010 and does have some power in the kitchen.  She is also not lacking in versatility either! The other is Sudha at Wit wok and wisdom. Sudha has been blogging since February of 2010.  As you go through her blog, you notice that she does temper the sinfully sweet posts by following them with a very healthy dish.  We all need a little more balance to our diet!  If you do not know of either of these bloggers, today it is a great time to get to know them, so pop on over.  I am sure you will be inspired and find something that suits your taste! 
Now on to this recipe....

High Octane Mini Pies
by flourtrader

Ingredients
six 4 inch mini pies shells par baked (plain pie pastry recipe can be found here )
3/4 cup mini semi sweet chocolate chips
1 cup of coconut
1 cup of chopped salted macadamia nuts
2 eggs
1/2 cup brown sugar
1/2 cup granulated sugar
3/4 cup light corn syrup
1/2 cup butter (softened)
3/4 cup quick oatmeal
1 cup milk

Preheat the oven to 350 degrees.  In a medium size bowl, cream together the butter and both sugars.  Then beat in the eggs for about 30 seconds.  Then add the corn syrup and milk, beating for another 30 seconds.

Then using a wooden spoon, fold in the oatmeal, coconut, choc chips and nuts until evenly distributed.   Then pour the filling into each pie crust, making sure each is filled evenly.  The filling should be just below the lip of each pie crust.

Place mini pies on cookie sheet and bake for 25-30 minutes or until top outer edges of filling are browned. A knife should come out clean when inserted into the center of one of the pies.  Let cool completely before removing from pies from each pan.

Thursday, December 29, 2011

Hendrix Pie

While I was cooking the filling for this pie, the batter was turning a purple color.  The thought that came to mind was the old song of Jimmy Hendrix called "Purple haze"  Even though he was before my time of delving into listening to lots of music, I do remember the tunes from this legendary singer and guitar player.  Some things, no matter how young you are, stick in your head.  So I decided to let that memory pop out, at least to name this creation.

This pie is made up of fresh pomegranate juice (I have the t-shirt stains to prove it), cream cheese and sweetened condensed milk. On top is a layer of sweetened sour cream. The base is made of ground almonds and graham cracker crumbs.  It is not shown in the picture, but the final serving on this does have a pomegranate syrup drizzled over it.

My husband was trying to get me to come inside with the fruit, but I did not feel like scrubbing that wretched stain of the fruit from ceiling to floor.  Best to let that fruit stain the outdoors rather than my kitchen cabinets.  The juice actually did get into my eye, but its attempt to stain that failed.

Anyhow after tasting the pie, I would say that the pomegranate flavor in the filling is subtle. However, the syrup and seeds does give it the extra zing of pomegranate bliss.  My favorite part was the bite with the fresh seeds on top. The sweet-sour topping as well as the almond crust did add some extra notes of tasty flavor.

Hendrix Pie
by flourtrader

Ingredients/Crust
4 tbs melted butter
3 tbs sugar
3/4 cup graham cracker crumbs
1 cup ground almonds

Ingredients/Filling
1/2 cup plus 2 tbs fresh pomegranate juice (I used 1 large pomegranate)
1/2 flour
1/8 tsp salt
1 tsp sugar
1 8oz package cream cheese (room temp)
3 egg yolks
1 can sweetened condensed milk
2/3 cup cold water

Ingredients/Sour Cream Layer
8 oz sour cream
2 tbs sugar
pomegranate seeds for decorating edge (optional)

Ingredients/Syrup
1/4 cup fresh pomegranate juice
3 tbs sugar

Preheat oven to 350 degrees.  Butter the inside of a 9 inch pie pan.

For the crust, mix together graham crumbs, sugar and ground almonds.  Stir in melted butter until all ingredients are no longer dry.  Pour in prepared pie pan and press crumbs evenly in bottom and on sides.  Bake in oven for 7 to 10 minutes or until slightly golden on edges.  Remove and let cool.

To make filling, beat cream cheese in a medium sized bowl for 1 minute.  Add the sweetened condensed milk and beat until thoroughly blended into the cream cheese.  Mixture should be smooth.  Set aside.

Prepare a double boiler with water and place bottom pan over heat and let come to a simmer.  While this is heating up, take the top pan (not placed over heat yet) and fill with the egg yolks.  Whisk until mixture is smooth and then add the water, whisking for another minute.  Add the salt and flour, teaspoon of sugar and continue to whisk together.  Then add the pomegranate juice and stir until all is blended.  At this time, I noticed that there were some lumps of flour in the batter.  I poured the batter into a bowl, cleaned the pot and then placed a sieve over the top pot of the double boiler and strained the mixture from the bowl into the pot.  The flour lumps that remained in the bottom of the sieve were pushed through using a spoon.

Place the top pan of batter over the bottom pan of simmering water.  Whisk the mixture constantly and cook for about 2 minutes.  Mixture should be like a thick pudding.  Once you reach that consistency, remove the pan and turn the heat down to medium.  Pour the cream cheese mixture into the batter and whisk for one minute to blend.  Then place the bowl back over the pan of water.  Cook and whisk the mixture again for about 5 minutes or until batter is very thick and smooth.

Remove pan and pour batter into graham cracker crust.  Smooth the top and then place it in the refrigerator for 3-4 hours or until set.

During this time you can make the sour cream topping.  Beat together the sour cream and the sugar until well blended.  Once the filling has set, pour the sour cream topping over the pie and smooth out using an offset spatula.  Place pie in refrigerator for another hour, then decorate the edges with pomegranate seeds.  Place pie in fridge for another three hours before serving.

One hour prior to slicing, you can make the syrup.  Place both juice and syrup in a small sauce pan and heat until sugar is dissolved.  Pour into heat proof bowl and place in fridge to cool.

To serve, cut with a sharp knife and place on plate.  Then drizzle with cooled syrup.
                   **LAST YEAR: Limoncello Cream Cheese Tarts**

Monday, October 17, 2011

Cinnagrog Pie

 When I saw vanilla spice eggnog in the grocery store, I could not pass it up.  Regular eggnog is good by itself but the extra spice sounded like it would be better.  Also, for the same cost as plain, why not?

I decided that I would make an eggnog pie, but I wanted to have another extra flavor in there.  I started considering all the fall spices and decided on the cinnamon.  Instead of just adding this spice to the pie, I thought about a layer of a cinnamon cream pie.  The best ingredient for that would be Biscoff spread.

After trial and error, I came up with a pie that has a Biscoff cream cheese layer topped with an eggnog rum cream.  The crust is made out of ground Biscoff cookies and I sprinkled the top with the crumbs as well.

My original intent was to swirl the two, however, the consistency variation did not allow for that, the eggnog cream is lighter than the biscoff. That is how I arrived at the layers.  I was a little worried about the eggnog layer, because when I tasted the batter before putting it on the pies the rum was very strong.  The chilling overnight cause the flavor to dissapate, so the true flavor comes with time. I have included the measurement for rum extract for those that do not like alcohol. This recipe makes 6 mini pies, 4 1/2 inch in diameter or one 9 inch pie.

Cinnagrog Pie
by flourtrader

Ingredients/Crust
1 1/4 cup ground Biscoff cookies (plus 1/2 cup extra for sprinkling on top)
1/4 cup plus 2 tbs melted butter
2 1/2 tbs sugar
3/4 tsp nutmeg

Ingredients/Biscoff Filling
8 oz cream cheese (softened)
1 cups  heavy cream (whipped)
1/2 cup sugar
1/3 cup Biscoff spread

Ingredients/Eggnog Filling
1 1/2 tsp of unflavored gelatin
1 tbs conrstarch
2 tbs cold water
1/4 cup sugar
6 tbs rum or 3/4 tsp rum extract
1 cup heavy cream, whipped
1 cup eggnog

For the crust. Preheat the oven to 375 degrees. Mix together cookie crumbs, sugar and nutmeg.  Then stir in the melted butter.  Press the crumbs evenly into the bottom and up the insides of your pie pan(s).  If making mini pies, place pies on a baking sheet.  Place baking sheet or 9 inch pie pan in the oven and bake for 10-15 minutes.

Remove pie pan(s) and let cool on rack.

For the Biscoff filling, beat together the cream cheese, Biscoff spread and sugar until smooth.  Then fold in the whipped cream.  Fill each of the cooled pie crusts halfway with the filling, smoothing the top.  Place in fridge to chill while you prepare the next layer of filling.

For the eggnog filling, put the water in a bowl and sprinkle the gelatin on top and set aside.  In a medium saucepan, stir together the cornstarch, sugar and eggnog.  Place over medium heat and cook, continuing to stir.  Once you can run your finger through the mixture on the back of a spoon and it leave a streak, it is done cooking.  My cook time was about 8 minutes.

Remove from heat and stir in the gelatin. Then use a sieve placed over a heat proof bowl and pour the mixture into the sieve.  You may have some cornstarch and/or gelatin that is left in the bottom of the sieve but push it through with a spoon and scrape all off of the bottom outside into the bowl.  Chill the mixture in the fridge until it turns into a pudding like consistency, about 30-40 minutes.

Then fold in the whipped cream and rum.  Take this batter and finish filling the pies.  Sprinkle the cookie crumbs on top of the pie(s). Let chill overnight before serving.
                             **LAST YEAR:Almost Tortuga Rum Cake

Wednesday, October 12, 2011

Elsa's Apple Slices

For me, fall flavors conjure up recipes that were put in cookbooks years gone by. I imagine that on certain days, you could roll into a small town where the air would be filled with the aroma of sweet apples baking as women prepared desserts for the upcoming fair or bake sale.  Families would gather their generations together and take off to the pumpkin fields to make sure that they got the best pick that resulted in the most amazing pie baked by their mothers or grandmothers.

Even though it is an era gone by, treasured pumpkin and apple pie recipes continue to be handed down and made year after year.   This particular recipe stems from the pages of a faded brown notebook that was created around the turn of the century.  The notebook was owned by a Baroness of high society that lived in Vienna.

One of the reasons that I made this was because having a whole pie around the house is too much for our small family, so the slice is a better way to go.  I did enjoy the taste and texture of this dessert.  The outside is like a thin cookie instead of a flaky pastry.  In regards to the filling, I like it because it has very little ingredients. That short list makes for a fairly pure taste of apples, which is exactly what I was looking for.

I changed the original order in which the components are made.  Since it is important that the dough be the right temperature,  it is best that the filling is made and cooling first. If the dough spends too much time in the fridge (waiting for the filling to get cool) it will crack when you roll it out.  This recipe results in about 15-20 slices, depending how thick you cut the slices.

Elsa's Apple Slices
adapted from Viennese Kitchen Cookbook

Ingredients/Filling
2 oz raisins
grated zest of one lemon
1 2/3 lb of apples (peeled cored and grated)
1/2 cup sugar

Ingredients/Dough
5 1/2 tbs unsalted butter (cubed)
1/4 cup sugar
1 tsp baking powder
1 1/2 cups flour
1 egg

Ingredients/Assembly
1 beaten egg white
powdered sugar for topping
whipping cream (optional)

To make filling, place grated apples in a fry pan over medium to low heat.  Stir and let apples cook until all moisture is gone.  This took about 8-10 minutes.  Remove from heat and place in heatproof bowl and place on trivet in fridge to cool.

Now you can start on the dough.  Firstly, make sure all your ingredients are cold.  Sift together the flour and baking powder into a food processor bowl.  Add butter cubes and pulse food processor several times, until mixture turns into coarse crumbs.  Pour sugar into the processor bowl and pulse until evenly blended.  Lastly, pulse the egg into the batter until it turns into a dough.  Remove dough and shape into a ball.  Cover with plastic wrap and place in fridge to chill for 30 minutes.

During this time, take out a baking sheet (approx 10X15) and cut a piece of parchment to line the sheet.  Lightly flour surface of parchment and set aside.  You will not line your pan with it just yet. Preheat the oven to 325 degrees.

Once the dough is properly chilled, remove from fridge and place on the parchment paper. Roll dough out to a thickness of 1/4 inch.  You should have a rectangle that is about 7X16.  Take the sheet of parchment paper with the dough on top and lay it on the baking sheet.  You will have a little overhang on the length.

Remove the apples from the fridge and stir in sugar, lemon zest and raisins.  Spread the apple filling down the center of the dough, leaving a one inch border on the short ends and a 1 3/4 inch border on each side of the length.  Your filling should measure about 3 X 14.

Fold in the 1 inch border on the short ends. Then fold one long end of the dough over the center of the filling.  Brush all folded in edges with egg white.  Fold the remaining end over the first, overlapping in the center.  Press down center seam to seal.  Make sure all the filling is sealed well on the center and ends.  You do not want the filling to seep through any openings while baking.

Place baking sheet in oven and bake for 40-45 minutes.  Surface will have a golden hue when done. Remove pan and let pastry cool on baking sheet.  Once completely cooled, sprinkle with powdered sugar and cut into slices with a sharp knife.  If desired, spoon a scoop of whipped cream on top when serving.
                              **LAST YEAR: Kahlua White Chocolate Brownies**

Monday, May 9, 2011

Strawberry Kuchen

There are some foods that I would say I am a purist about.  For instance, I do not put butter on brioche or biscuits that are already buttery.  Also, if a steak is good, I do not want to slather steak sauce on it, I would like to actually taste the meat.

Which brings me to my father.  He loves strawberries and is very particular about them.  Buy the smallest you can get, he says, they are the sweetest.  Funny thing, because it is obvious that the farmers are trying to grow bigger strawberries.

The most popular strawberry pie is actually a cold one with a transparent red glaze.  Not being real keen on the glaze or cold part, I opted to find something different.  This particular recipe hit the spot.  It is served slightly warm and the strawberries cook in their own juices.

There are few recipes that celebrate the pure flavor of strawberries.  Strawberry shortcake is one for a cold dessert and this Kuchen is the other for a warm dessert.  The simple ingredients combine to make a juicy concoction of strawberries surrounded by a buttery crust.

Strawberry Kuchen
courtesy of sundaynitedinner.com

Lemon zest from 1 lemon
5 cups of halved strawberries
1/2 cup butter (cubed)
1/2 cup sugar plus 2 tbs
1 cup flour plus 2 tbs
1/8 tsp salt
1 tbs white vinegar
1/2 tsp vanilla extract

Take out a 9 inch springform pan.  Preheat the oven to 400 degrees.

In a small bowl, sift together 1 cup of flour, salt and 2 tablespoons of sugar.  With a pastry cutter, cut in the butter cubes until no dry spots remain.  Mixture should be crumby without any dusty flour at the bottom of your bowl.  Pour in the vinegar and shape into dough form.

Place dough in sprinform pan and flour hands and fingers.  Press on the dough to form a 1/4 inch bottom with 1 inch high sides.  Set aside.

In a medium size bowl, combine the 2 tablespoons of flour and the rest of the sugar.  Then add the lemon zest and vanilla extract, stirring until evenly combined.  Fold in 3 cups of the strawberries, making sure that sugar mixture evenly coats pieces and there is no loose sugar in the bottom of the bowl.  Spoon strawberry mixture into prepared springform pan.

Place pan on center rack in oven and set timer to 40 minutes.  After timer goes off, check and see if strawberry juices have thickened up.  It should be like syrup.  If not place back in oven to cook for an additional 5 minutes and check again.  Original recipe states that baking time will be 40-50 minutes.

Once the juices have reached the correct consistency, remove pan from oven and place on cooling rack.  Let cool in pan for at least 30 minutes. After cooling, run a small knife around the inside of the pan, between the inside crust and pan.  Remove the sides of springform pan by opening the side latch.

Take the remaining strawberry halves and place them on top of the filling.  Serve while warm and (if desired) add a scoop of vanilla ice cream.

Monday, April 4, 2011

Blueberry Hand Pies

I have been watching America's Next Restaurant where 3 investors are looking for a new fast food idea from contestants. One of the big things they seem to be looking for is something you can eat on the go.

There is one contestant that does not believe that people walk around and eat.  Well, in this busy society a lot of people do not have enough time for a sit down meal, so creating a move able feast has quite a bit of popularity.

I guess if we all believed like that contestant, there would be a number of  things that would not exist. There would be no reason to have sandwiches or burgers.  Also, food trucks would be unheard of. All the foods we would eat would have to be cut from piece of a bigger item.

Maybe it is not so much walking around, but the issue of food safety. Perhaps it's because of the horror stories about the restaurant buffet line, but getting that eighth or ninth piece of something that has sat out for awhile is not something I really want. I am sure you will agree that having something individually prepared is always safer.

These blueberry hand pies are great for lunchboxes and a snack on the go. With a flaky crust and a filling that is not too sweet (filling recipe only has 1/4 cup sugar), they hit the spot without being overly indulgent. If you are not worried about that, these pies can be served with ice cream. This recipe makes for 9 or 10 baked hand pies. Feel free to substitute any frozen berry of your choice.

Wild Blueberry Hand Pies
courtesy of A Southern Grace   
Ingredients/Dough
4 tbs buttermilk
1/2 cup or 1 stick of butter (cold and cubed)
1/2 tsp vanilla extract
1 tbs sugar
1/2 tsp salt
1 1/4 cup flour
1 egg yolk
1 tbs water

Ingredients/Filling
1 tsp lemon zest
1 tbs and 1 1/2 tsp cornstarch
1/4 cup sugar
1 tsp lemon juice
2 cups frozen blueberries (or raspberries, blackberries)

Ingredients/Topping
cinnamon & sugar
 or vanilla bean sugar (you can add ground vanilla to sugar or grind bean into sugar)

Prepare two baking sheets by lining with parchment paper.  Set aside.

To make the pie dough, sift together salt, sugar and flour in a large bowl.  Add the cubed butter and cut into flour mixture with pastry cutter or fork until it becomes sandy and crumbly in texture.

In a small bowl mix together the buttermilk and vanilla extract.  Then pour into dry ingredients and mix with a wooden spoon until a dough is formed.  Roll dough into a ball and place on a big sheet of plastic wrap.  Flatten into a disk and cover with plastic wrap and place in fridge.  Set timer for 30 minutes.

When the timer goes off, set for another 30 minutes.  During this additional 30 minutes of chilling time, you will make the filling.  Take out a non stick pot and add all the filling ingredients.  Put pot over low heat and stir with a wooden spoon, making sure all ingredients are blended.  The berries will release all their the juices in about 4 minutes time.

Increase the heat to medium high and continue to stir.  The juice will thicken as you stir.  Once you can clear a gap in the bottom of the pot with your spoon without having the blueberry mixture running together to cover the gap, it is pie filling consistency.  Mine took about 7 minutes. Remove pot and pour filling into a heat proof bowl. Set aside.

After dough has chilled, take out half and roll onto a floured surface.  Roll it out big enough so you can cut out 5 circles that are 4-5 inches in diameter.  Cut the circles and save the scraps for patches, in case the blueberry filling runs out while you are forming the pies.

Place each circle on prepared baking sheet about 2 inches apart.  Then put about 1 heaping tablespoon of filling in the middle of each circle.

In a small bowl, mix together the egg yolk and water to make egg wash.  Brush the egg wash on 1/2 of the rim of each pie dough piece.  Then fold over and seal edges.  You can do this by using a fork or sealing with fingertips.  I used my fingertips and stood the dough up like a taco to seal.  Then I laid the hand pie back on its side. This process helped keep the filling from oozing out.  Should some ooze out, do not forget about using the dough scraps to patch these areas.

Once the 5 pies are formed, place in fridge and set timer for 30 minutes.  Also, cover and place the bowl with the remaining egg wash in the fridge. Then preheat oven to 375 degrees.  As those pies are chilling, you can take the other half of the dough and form the rest of the pies as stated above.

When the timer goes off, take out the sheet with the first set of formed pies.  Cut 2 small slits in each..  Brush top and sides of pie with egg wash.  Then sprinkle on the topping.

Bake in oven for 16-18 minutes. Filling is bubbling and pie edges are toasted when done.  Let cool on pan for 5 minutes and transfer to rack to finish cooling.

Friday, March 11, 2011

Date Bar Pie


All of us recognize the "Toll house" name to be associated with chocolate chips, cookies and Nestle.  However, not many know about the history behind this name.

There was a place called the Toll House Inn located in Massachusetts back in 1709.  Then in 1930, a new inn was built under the same name.  Apparently one night the owners wife, Ruth Wakefield, ran out of butter and tried to use chocolate in her cookies. She thought that the oil or grease in the chocolate would make up for the missing butter.  That is how chocolate chip cookies got started.

As time passed,  the inn got sold a few times while the original owners were busy publishing cookbooks.  In 1984, on New Years Eve, the place caught fire and burned.  The fire started in the oven and went up through the oven vent (very laden with grease).  Now all that is left is the sign and several very good recipes.

This particular pie recipe stems from the original date bars as created by Ruth.  The oatmeal cookie crust compliments the not too sweet date filling. It is also a very easy pie to make that does not require a lot of ingredients.  Date bars are not all the rage these days, so a few may not have ever eaten this.  However, as vintage as it is, it will bring back childhood memories for some.

Date Bar Pie
adapted from the book Pie, Pie, Pie

Ingredients/Filling
3 tbs rum
3/4 cup of water
1/2 cup brown sugar
1/8 tsp salt
3 cups whole pitted dates
1 apple

Ingredients/Crust
1 1/2 cups quick cooking oats
1/2 cup brown sugar
3/4 cup flour
3/4 tsp baking soda
1/4 tsp salt
10 tbs or 1 1/4 sticks of butter

Start with a large heavy saucepan.  Chop all the dates and put in saucepan.  Then core, peel and grate the apple.  Add the grated apple to the saucepan also.  Add the 3/4 cup of water, brown sugar and then salt.  Place saucepan on medium heat and cook all ingredients, stirring constantly.  The mixture should cook into a thick, syrupy filling that resembles the texture of pecan pie filling.  That should take about 5-7 minutes.  Set aside and let cool for 15 minutes.

Then stir in the rum.  If you feel the filling is too stiff, stir in a tablespoon or two of water.  Some dates are drier than others, so the water may be needed.  Set filling aside again.

Butter or grease the pie tin and preheat the oven to 375 degrees.

Take a large bowl and sift together flour, baking soda and salt.  Add brown sugar and oats, stirring with a wooden spoon.  Then melt the butter in a microwave and pour into dry mixture.  Stir with a wooden spoon, making sure all the butter is evenly distributed. It should be crumbly.

Measure out 1 cup of the brown sugar crumbs and place in the pie tin.  Press it evenly over the bottom (not sides).  Then fill the tin with the date filling, smoothing out with a spoon.  Lastly, sprinkle on the rest of the crust mixture.

Bake pie for 35-40 minutes.  The topping should be a brown, solid crust when the pie is done. Cool in pie tin set on a rack for 45 minutes prior to cutting.  Pie can be served warm or at room temperature.

Saturday, February 19, 2011

Brandy Alexander Pie

After Wall Street closes for the day, you will find a group of well dressed men with loosened ties hanging out at the nearest bar to the financial district.  They will be at the table with smouldering cigars in the ashtray and several brandy snifters full of Cognac.

Cognac, if you don't already know, is very expensive and coveted by the upper class.  Actually back in 2007, a truck was hijacked filled with $168,000 worth of Cognac.  Unfortunately for the hijackers, they are now in cell block D serving several years sentences.

I opted to use brandy in this recipe instead of Cognac.  Due to baking more than drinking, thieves will only find the low grade spirits at my house.  Also, the Wall Street crowd will not be here anytime soon.....

Brandy Alexander Pie
adapted from newyorktimes.com    

Ingredients
3 eggs (separated by yolks and whites)
1/4 cup chocolate liquor or creme de cacao
1/4 cup brandy or Cognac
1 envelope unflavored gelatin
1/2 cup cold water
2/3 cup sugar (divided by third cups)
1 tsp salt
1 1/2 cup graham cracker crumbs
1/3 cup melted butter
Chocolate curls or grated chocolate for garnish

Preheat the oven to 350 degrees.  In a small bowl, mix together melted butter and graham cracker crumbs with a fork.  Place crumb mixture in a 9 inch pie pan and press crumb mixture evenly on bottom and up the sides.  Bake the crumb crust for 10 minutes. Remove pan and place it on a rack to cool.  Turn off oven.

Fill a saucepan with the 1/2 cup of cold water and sprinkle the gelatin over it.  Whisk in the egg yolks, 1/3 cup of sugar and salt until all is combined.  Place pan over low heat (do not boil) and continue to whisk until mixture thickens and the gelatin dissolves. Remove from heat.

Blend both liquors into the gelatin mixture with the whisk. Pour into a medium size bowl and place in refrigerator.  Pie filling will need to be cooled until it becomes pudding consistency. The filling should mound up when pushed with a spoon. This should take anywhere from 15 to 30 minutes, so it will need to be checked for consistency after 15 and every five minutes after.

During the cooling time, prepare the other ingredients. With an electric mixer, beat the egg whites in a bowl until they are stiff.  Add the remaining 1/3 cup sugar and continue to beat until mixture forms firm peaks.  Set aside. In other bowl, still using the electric mixer, whip the cream until light and fluffy.

Lightly fold the egg whites into the chilled pie filling. Then add the whipped cream, still folding until all is blended together. Place pie filling in prepared pie crust, smoothing out evenly into pan. Garnish with chocolate curls or grated chocolate. Chill pie in fridge for at least 4 hours or more prior to serving.

Friday, December 10, 2010

Cranberry Fudge Pie


Red fruits are my favorite-strawberries, cherries and cranberries.  Also, when it comes to pies and these particular fruits, cherry is the only one that I prefer in a baked pie.  The others I serve cold as a topping on cheesecake or as a cold pie.

This particular pie recipe is unique in the combination of cranberry and fudge. Since cranberries are so acidic, you have to be careful about the amount and richness of the chocolate that is used.  White chocolate or bittersweet chocolate would diminish the cranberry flavor. The semi-sweet chocolate ganache was right on the mark. 

You will find the recipe to be very easy.  The end result is a very elegant and decadent pie, which is perfect for the holidays. Also, it does not take a big slice to satisfy, so you can get 8-10 servings instead of the normal 6-7 slices you would get out of a baked pie.

Cranberry Fudge Pie
adapted from King Arthur Flour  

Ingredients
3/4 cup chopped walnuts or pecans
1 cup semi-sweet chocolate chips
1/2 cup dried cranberries
1 1/2 cups fresh or frozen cranberries
3/4 cup cranberry juice
6 tbs melted butter
2/3 cup heavy cream
pinch of salt
1 3/4 cup graham cracker crumbs
1/4 cup confectioners sugar
1 cup granulated sugar

Preheat the oven to 375 degrees.  Mix together confectioners sugar, graham cracker crumbs and melted butter. Press into a 9 inch pie pan, completely covering bottom and sides evenly.  Bake in the oven for 7-8 minutes until set.  Remove pan to let cool and turn off oven.

To make the filling, you will need to heat up water in the bottom pan of a double boiler.  Once the water comes to a boil, fill top pan of boiler with heavy cream and chocolate chips. Stir mixture until chips have melted and cream is no longer separate.  This will take about 4-5 minutes.

Pour the hot chocolate mixture over the graham cracker crust in the pie pan.  Smooth until chocolate is level in the bottom of the pan.  Sprinkle nuts evenly over the bottom.  Place pan in fridge to cool for 2 hours

While pan is cooling, you can make the filling.  In a small saucepan mix granulated sugar, salt and cranberry juice.  Set stove to temperature to medium high and place saucepan over heat.  Bring to a boil and then turn temperature down to medium.  Add the dried cranberries and let cook for about 5 minutes.

Then add the whole cranberries and let cook for about 5-7 minutes, stirring occasionally.  Most of the berries would have burst in the cooking process and the mixture should have started to thicken.  Pour mixture in a heat resistant bowl and place bowl in fridge to cool.

Once the graham cracker/chocolate pan has chilled for 2 hours, the cranberry filling should be cool enough to use.  Spoon the cranberry filling on top of the chocolate nut layer.  Smooth out the filling and make sure that it covers all the chocolate/nut layer. Place pan back in fridge for at least 1 hour prior to serving.

Monday, September 27, 2010

Fried Peach Pies


This is the last chance for peaches this year, they are still at the grocery stores so I decided to make these fried pies.  The shape comes from a pocket pie mold that I ordered from Williams-Sonoma.  However, you can fold yours over instead of using the mold.  The important part here is the taste.  Individual desserts are now more popular than ever and serving these are much more convenient than cutting a whole pie.  This recipe makes 10 pies.

Fried Peach Pies
adapted from the book Screen Doors and Sweet Tea
Ingredients for Pastry
3/4 cup of milk
6 tbs vegetable shortening
3/4 tsp salt
2 cups flour
2 tsp baking powder
1 egg beaten with 1 tsp water (set aside for sealing edges of pie)

Sift all dry ingredients together.  With a pastry cutter, cut in the shortening until mixture is a coarse meal with the largest clump being pea sized.  Using a fork, add the milk until all liquid is combined.  Take out of bowl and lightly knead for 1 minute and return to bowl.  Cover bowl and refrigerate.

Ingredients for filling
1 tsp lemon juice
1 tsp corn starch
1/2 tsp ground allspice
2 tbs cider vinegar
1/2 cup light brown sugar
2 cups chopped, peeled peaches

Add the peaches, brown sugar and allspice to a saucepan.  Set pan on stove at medium heat and stir constantly until sugar is dissolved and peaches are juicy, about 5 minutes. Remove from heat.

Then pull out a small bowl and mix together cornstarch and vinegar.  Once the cornstarch is dissolved, add to peach mixture and put saucepan back on medium heat and stir constantly until thickened.  This should take about 10 minutes.  Stir in lemon juice and transfer mixture to a bowl to cool.

Ingredients for topping:
1 tsp cinnamon
4 tbs granulated sugar

Combine cinnamon and sugar in a medium plate or pasta bowl.  Set aside.

Take your pastry dough out of the fridge and roll out very thin, 1/8 inch.  Then cut in 10 circles, using a 6 inch plate as a guide.  Place 2 tbs peach filling at the center of the circles.  On the edges of each pastry circle, brush 1/2 inch line of egg mixture.

Fold dough in half over the filling, pressing out any air pockets.  Then seal your pie by making indentations on the edges of the cut dough with the ends of a fork.  Then make one punch on top of the dough with the fork for air to escape while the pie is frying.

Heat 1 inch of canola oil in a skillet (I used an electric skillet) to 375 degrees.  Put paper towels on a baking sheet to absorb the oil of the pies.

To fry the pies, place only two pies in the skillet with pierced side up.  Fry two minutes and then turn, frying an additional two minutes on the other side.  Remove and place on paper towels for a quick absorption of oil. Then then roll in cinnamon mixture.  Put on plate to cool. Continue this process until all 10 pies are completed.  If serving immediately, pies will need to cool at least 5 minutes first.