Foodbuzz

Friday, March 30, 2012

Grapefruit/Lime Citrus Pie

I had a few re-dos to get to the final product above.  My time in the kitchen was not as smooth as expected, but I finally ended up with the results I expected.  I guess I just was having an "off" day.

The crust mix, made of a chopped macadamias and vanilla cookie crumbs turned into nut butter the first go around!  I ran the food processor for too long. I tried to salvage it, but once it gets to that point, there is no going back.  On the second try, I pulsed my nuts in with the cookie crumbs and did not pulverize them, I just did some pulses.

Also, I got in a hurry with the gelatin and assumed that one envelope was 1 tsp of gelatin instead of measuring. Ha-I found out that I created a recipe for a lime rubber ball!  The whole sprinkling thing had to be done over again.

The above pie is made with a citrus blend, but the primary citrus used is grapefruit.  The filling texture was light as air with that special tartness that only citrus can deliver. It was a nice change from the heavier key lime pies or cheesecakes.  Also, since the crust has no flour in it, the flavor and crunch of the macadamias enhanced each bite. I do have a weakness for citrus, but even those that like the occasional taste of a tart dessert will be pleased. This recipe calls for a 9 inch deep dish pie pan, but I used a 9 inch springform pan instead.

Grapefruit Citrus Pie
adapted from Bon Appetit

Ingredients/Crust
1/4 cup butter, melted
3/4 cup ground vanilla wafers
7 oz roasted macadamia nuts
1/4 cup dark brown sugar, packed

Ingredients/Filling
1/4 cup fresh lime juice (from about 3 limes)
2 cups fresh pink grapefruit (from about 3 grapefruits)
1/4 tsp unflavored gelatin
1/4 cup whipping cream (for first addition)
1 1/4 cup whipping cream (for second addition)
1/4 cup plus 1 tbs sugar
9 oz imported white chocolate (Lindt, Callebaut)

Ingredients/Topping
7 thin lime slices, halved
8 oz imported white chocolate curls or just 1 oz for grating on top (optional)
2 tbs sugar
1 cup whipping cream

To make the crust, preheat the oven to 350 degrees. Fill a food processor with ground vanilla wafers and then add the macadamia nuts and pulse until the nuts are chopped.  You want nut chunks not powder, so do not overdo it.  Empty mixture into a small bowl and add the brown sugar and melted butter. Stir until mixture becomes clumpy and there are no dry crumbs.  Press mixture into a 9 inch springform pan or a 9 inch deep dish pan.  Bottom and sides must be evenly covered.
Bake for about 10 minutes or until it turns a golden hue.  Remove and let cool completely before filling.

For the filling, pour grapefruit juice and 1/4 cup of sugar into saucepan and place over high heat. Once mixture comes to a boil, set the timer for about 15 minutes.  The remaining amount of the mixture after cooking should be about 3/4 cup.  Remove saucepan from heat and set aside.

Take out a small bowl and fill with the lime juice.  Then sprinkle the gelatin over the top of the juice and let sit to absorb for 10 minutes.  Place the saucepan of grapefruit back on the heat, this time at a low temperature.  Add the lime/gelatin mixture, white chocolate and 1/4 cup of whipping cream.  Stir the mixture until all the white chocolate has melted.  Pour into a heatproof bowl and place in refrigerator to set up and cool. This should take about 2 hours, but stop and give the mixture a good stir after every 1/2 hour.

On the last 15 minute stirring interval,  pour the remaining 1 1/4 cup of whipping cream in a bowl and add 1 tbs of sugar.  Beat cream on high until stiff peaks form.  Then stir in chilled grapefruit mixture until all is blended.  Pour filling into prepared pan and smooth over the top, making sure everything is even.  Place in fridge for at least 4 hours or overnight to chill prior to  topping.

After the pie is completely chilled, then you can top it.  Again, beat together the cream and sugar until it has a stiff peak consistency.  Fill piping bag and pipe about 15 rosettes along the outer edge of the pie.  Then, with the rounded edge facing upward, put a lime slice between each rosette. Place the chocolate curls on top or grate white chocolate (if desired) on the top center of the pie.  Refrigerate until ready to serve.     
               **LAST YEAR: Chestnut Pound Cake**

Wednesday, March 28, 2012

Brownie Chunk Cookies

Well the last few days have been very hectic. The recipes that I chose to do for donation each had 2 components.  One you had to bake first to include in the batter later. This particular cookie is basically a chocolate chip cookie batter with big chunks of fudgy brownies and walnuts.  The brownies, after baking, have to be refrigerated overnight before they are used in the batter.

I really liked the cookies, especially because of the fudgey brownies.  I thought it was a nice change of pace from the standard chocolate chip cookies.  I am glad that I have some brownie chunks left over so I can make some more soon.  Due to the amount slated for donation, there was only one for me to taste and it has left me wanting more.

The recipe makes about 20-24 large cookies.  The brownie recipe is actually double the amount you need for the batter,  I just made up the cookie batter twice to take care of the extra brownie ingredient. The recipe below reflects the original amounts.

Also, I have received some more sweet accolades in the form of awards, but I have decided to just cover two in this post and the rest I will do later.

The Versatile Blogger Award was given to me by:

Emily-at Life On Food: this particular blogger is a well seasoned photographer and cook!  Having been in the blogosphere since 2009, her wonderful easy going personality jumps off the page.  Her blog name is really fitting. With recipes, restaurant reviews and what I ate Wednesdays, Emily shares her day of food with you with a sprinkling of her travels and outdoor adventures.  A few gems I found on her blog were: "Please meet the Mexican pizza" and "chocolate love".

Peter-at Chef Peters Kitchen : This blogger is fairly new to the scene having started his blog in December of 2011 and has just popped up on Foodbuzz this month.  With a taste for the spicy, Peter comments that he is still learning.  However, I do think we can learn a thing or two about food preparation on his site.  I particularly liked the Jacked up Turkey Burgers  as well as New York Deli Rye.

If you do not know these two yet, pop on over and introduce yourself, your stomach will be glad you did!  Thanks again you two for passing this award on to me! Now on to the recipe.

Brownie Chunk Cookies
adapted from Bon Appetit

Ingredients/ Brownies
(only half needed for cookie batter recipe below)
4 eggs
1/2 cup butter
2 tsp vanilla extract
5 oz unsweetened chocolate, chopped
2 cups of sugar 
1/4 tsp salt
1 cup flour

Prepare a 9X13 inch pan by lining with foil and leaving two sides overhanging to use as handles to later lift out the brownies.  Preheat your oven to 350 degrees.

In a small bowl, sift together the salt and flour.  Set aside.  Place a saucepan over low heat.  Fill with butter and chocolate, stirring until all is melted and smooth. Remove from heat and let cool for 15 minutes.

Stir in sugar and vanilla extract until completely blended. Transfer mixture to a large bowl.  Blend in the eggs completely and then fold in sifted ingredients.  Spoon batter into prepared pan and smooth the top.

Place in oven and bake until tester indicates moist crumbs.  Recipe states it should take 20 minutes, however mine took about 28 minutes.  Remove pan and let cool completely.  Then cover and place in refrigerator overnight to chill.

Ingredients/Cookie Batter
1/2 recipe for chilled brownies (above), cut into 1/2 inch chunks
1 cup butter
2 eggs
2 tsp vanilla extract
1 cup chopped walnuts in 1/2 inch pieces
2 1/2 cups flour
1 tsp baking soda
1/4 tsp salt
1 cup brown sugar
1/2 cup granulated sugar

Prepare 2 baking sheets by lining with parchment paper.  Preheat oven to 350 degrees.

In a medium sized bowl, sift together baking soda, salt and flour.  Set aside.  Then cream together the butter and both types of sugars until fluffy.  Then beat in eggs, one at a time until incorporated into sugar mixture.  Then stir in vanilla extract.

Fold in sifted ingredients until no dry streaks remain. Then stir in the walnuts and lastly fold in the brownie chunks.

Using a 1/4 or 1/3 cup or scoop,  drop batter onto baking sheet.  Each should be spaced about 2 inches apart.  Also, if the batter is sticking to the scoop, use some non-stick spray in the process.  Using damp fingers, lightly press down the top of the batter so each dollup is about 1 inch thick.  Do not press too much or you will smash the chunks and your cookie will be very flat after baking.
You want these to have some height to them and have big brownie chunks.

Bake until cookie edges turn golden about 15-20 minutes.  Let cool completely on baking sheets and then enjoy!
              **LAST YEAR: Pom Guava Mini Cheesecakes**
  

Monday, March 26, 2012

Miami Mango Cake

This go around I did want to use a fruit in baking that I had not tried yet, which was mango.  I was not even sure it was the right season.  After some research I found that March is the start of the season for Mexico, but May is the start of the season in Florida.

When I came across this recipe, the first thing that surprised me was that the cake has no butter in it. Also, it had quite a bit of mango.  This let me to believe that there was an error in the recipe.  In my mind I pictured this soupy batter that would never even bake up to a solid mass.

I forged ahead and popped the pan into the oven to bake.  I kept peeking through the window on the oven door to see the progress of it.  It actually got quite brown, most likely due to all that fruit.

All in all, the finished product is a wonderfully moist cake.  Even though the walnuts are optional they added another layer of texture in the bite.  Also, the sweet cream cheese icing really pairs well with the cake.

Some days your instinct is not on the right track and this was one of those times.  The cake was a hit at the luncheon, so it will be something that I will make again.

Now I am off to make 12 dz cookies for donations, so I will be baking up a storm!

Miami Mango Cake
adapted from Three Guys from Miami

Ingredients/Cake
2 1/2 cups mashed/pureed mangoes  (approx. 3 large mangoes)
2 eggs
1 tsp vanilla
1/2 tsp natural mango extract (I added this into the recipe, so it is optional)
1 cup chopped walnuts, optional
2 cups flour
2 cups sugar
2 tsp baking soda
1/4 tsp salt

Ingredients/Frosting
2 tsp vanilla
3/4 cup powdered sugar
1/2 cup butter
8 ounces of cream cheese

Ingredients/Topper
12-15 walnut halves
1/2 batch of above frosting
1/2  cup or more powdered sugar
2-4 drops of orange food coloring

To make the cake, grease the inside of a 9X13 inch pan.  Preheat the oven to 350 degrees.

Sift together the flour, baking soda and salt.  Set aside.  In another bowl cream together the sugar and the eggs.  Then beat in the extracts.  Add the mango in 1/2 cup intervals, beating after each addition. 

Then, using a wooden spoon, fold in the sifted ingredients until no dry streaks remain.  If you opted for nuts, stir them in at this point.  Pour the batter into the pan.  It will be easy to pour and will even out on its own.  Bake until a tester comes out clean, which is about 35-40 minutes.  Let cool in pan.

Take out a medium size bowl for the frosting.  Beat together the butter, vanilla extract and cream cheese. Once blended, sift confectioners sugar into mixture and then beat again until smooth and creamy.  Then frost the top of the cooled cake.

For the orange/walnut topper, make 1/2 a batch of the frosting and beat in orange food coloring.  Then sift in another 1/2 cup of the powdered sugar and beat again.  If it is not your desired consistency or color continue to add drops of food coloring and tablespoons of powdered sugar, beating after each addition. Mixture should be smooth and creamy with no streaks of food coloring or powdered sugar.

Cut the cake into serving pieces and then pipe a swirl on the top center of each piece. Place one walnut on top, pressing down lightly.  Then you are ready to serve.
               **LAST YEAR: Shrimp Cakes**

Sunday, March 25, 2012

Rainmakers and Bloggers

I think it is pretty cool how food bloggers have such a giving nature.  It is a very large community, but they do have a tendency to reach out and give you that "personal touch".  That is something that can really make your day.  I have recently been honored by a handful of sweet bloggers that have passed along awards to me.  You might say they are raining down. While I have received awards in the past, each and every one is a special honor to me.  I would like to thank those people in this post.

I received the Versatile Blogger award from:

Kayle at The Cooking Actress
Recently cast in a movie called "You Can't kill Stephen King"  this blogger does find time outside her career to bring us some of her talent from the kitchen.  A few examples of them I found are Four Layer Cookie bars and Butter Baked Chicken.   One hour in her kitchen would definitely be a great place to learn and enjoy some awesome food.

Kristina at Whipped Baking
While she has only been blogging since November 2011, she has been making life sweeter for a lot of bloggers.  She does have a few savory posts out there, but she mostly likes to bake.  Between the Snickerdoodle cupcakes and graham cracker snack cake-she does know how to put a sweet ending to a meal.

Connie at The Smitten Foodie
This blogger is a cook at a residential/summer camp, so she knows her way around a kitchen.  Her blog just started in Nov of 2011, but it does showcase her talent for savory as well as sweet creations quite well.  One winner I landed on when looking in her archives was Braised Short Ribs with Blue Cheese Polenta.

Sofie at The German Foodie has graciously awarded me the Liebster award.  This blogger is really baking up a storm of delicious German food at her blog.  How delicious you wonder? Well considering she has signs that say "don't eat" in her kitchen, that tells you all you need to know.  You will find everything from pastry/ bread tutorials to English Pub food to get your mouth watering.

Kim at A Little Lunch recently passed along the Sunshine Award to me.  Kim's writing does have a way of making you feel like you have known her for a long time.  She does have some awesome photography of not just food platings but nature as well.  Her blog post titles really do pull you in.  A few of my favorites are " A Charlie Brown Christmas" and "Life's too Short not to eat Breakfast."

If you have read through this and are lucky enough to have dropped by their blog, then you are already in the circle of enjoyment.  However, to the ones that have not had the pleasure, I encourage you to drop by and say hello.

Thanks again sweet friends and enjoy the rest of your weekend!   


Friday, March 23, 2012

Colonsay Isle Cookies

Off the coast of Scotland are a few islands. One of which is called the Isle of Colonsay.  In Gaelic, or Celtic language of Scotland, the word for hazel is coll.  There was a discovery of a big pit (over 9000 years old) of burned hazelnut shells on the beach of that island, indicating that hazelnut harvests had been going on for quite some time.  That pit did not represent just a few burned hazelnut shells, but hundreds of thousands.  Apparently all the people back then were vegan since there was no deer or wild game on the island.

These particular cookies do have the flavor of hazelnut.  They are made of a mix of three flours-hazelnut, rice and all purpose.  The rice flour gives it extra crispness. The real "pop" of hazelnut flavor comes from a hazelnut cream extract. The particular brand I used is LorAnn which is 3 to 4 times the strength of standard extracts.

I find that the texture is somewhat like a Lorna Doone cookie.  It is crisp on the outside but disintegrates into soft crumbs in your mouth.  Due to its texture, this cookie is not one that you would want to ship and send to anyone.  It is too delicate.  Also, with time the cookie does lose its crispness after a few days at room temperature. The recipe makes about 3 dozen 2 1/2 inch cookies.

Colonsay Isle Cookies
by Flourtrader

Ingredients/Cookies
1/2 cup rice flour
1/2 cup hazelnut flour
1 cup all purpose flour
1/2 tsp baking powder
5 tsp hazelnut liqueur
1/2 tsp hazelnut cream flavoring or 2 tsp hazelnut extract
3/4 cup vegetable shortening
1/2 cup sugar
1 egg

Ingredients/Drizzle
1/4 cup of Nutella or hazelnut spread
2 tbs butter
3 tbs milk (or more)
3/4 cup confectioners sugar
1/4 tsp hazelnut cream flavoring or 1 tsp of extract

To make cookies, sift together rice flour, all purpose flour and baking powder.  Then stir in hazelnut flour.  Set aside.  In another bowl, beat together shortening and sugar until fluffy. Add egg, liqueur and extract and beat for 30 seconds.  Then fold in sifted ingredients until no dry streaks remain.  Cover and chill for 1 hour.

After 30 minutes of chilling time, preheat the oven to 350 degrees.  Spray 2 cookie sheets with non stick spray.

Lightly flour a flat surface and roll the dough out to 1/8 inch thick.  The dough will still be very soft.  I used a method of rolling out and using a sharp spatula to slide under the dough occasionally to make sure it was not sticking.  After rolling it out, I used the spatula one last time under the dough and then I cut out the cookies.  Some people prefer to put the rolled dough on the cookie sheet and then cut so the cookie does not have to be moved once it is cut. They just take away the dough around each cookie and remove it from the sheet.  Besides personal preference, the detail of the cookie cutter and consistency of dough is to be taken into consideration.

Place the cut out cookies one inch apart on the prepared cookie sheets.  Bake until lightly browned on the edges or until done.  This should take about 8-12 minutes.  Once baked, transfer to a wire rack set over a piece of wax paper to cool.

For the drizzle, I used a squirt bottle but you can just as well use a fork.  Place butter and hazelnut spread in a saucepan.  Put pan over medium heat and stir until all the butter is melted and blended with the hazelnut.  Remove from heat and sift in confectioners sugar.  Stir mixture and then add 1 tbs of milk and mix together.  Continue to add milk by tablespoon until you reach the desired consistency.

Then drizzle glaze over cookies, letting excess drip onto the wax paper underneath the rack.  Wait at least 1-2 hours for drizzle to set up and then serve.
        **LAST YEAR: Chocolate Frosted Butter Cupcakes**


Wednesday, March 21, 2012

Oatey Naptime Muffins

This particular muffins contain lemon verbena leaves and oats.  For those that do not know much about them, the leaves are known to be a sedative.  While they did not knock me out when I ate a few, I was feeling a little tired.  I really had no idea about this until I had already created this recipe! I learned something when I looked into the origin of this tea.

I have been wanting to infuse tea in a baked good for sometime now.  The muffin is not real sweet by itself, so the lemon glaze is a perfect topper.  However, you may opt to add fruit to the batter, which would also be very complimentary.  Since it is already lemony, adding blueberries or blackberries is a great choice. Also, these could be served with fruit coulis. Since the muffin is made of oats, that ingredient does impact the texture of the muffin.  They are fluffy with a chewiness from the oats.

If you like lemons and enjoy lemon verbena tea, than I think you will like these. Also, they may help someone who has trouble sleeping.  A word of caution, do not make big plans for the few hours after eating, except maybe plan on a nap!

Oatey Naptime Muffins
by flourtrader

Ingredients/ Muffin
1 tbs plus 2 tsp lemon verbena tea leaves
1/3 cup butter
3/4 cup milk
1 egg
1/2 tsp vanilla extract
1 tsp vegetable oil
2 tbs lemon zest
2 1/2 tsp baking powder
1/2 tsp baking soda
1/4 tsp salt
1 cup of oats
1 cup of flour
1/2 cup sugar

Ingredients/Glaze (optional)
juice of 2 lemons
1/2 to 3/4 cup of powdered sugar

Preheat oven to 350 degrees.  Grease top of 12 muffin cavities and line with cupcake papers or butter and flour the inside of the cavities.

Sift together the baking powder, soda, salt and flour.  Then stir in the oats and 2 tsp of the tea leaves.  Set bowl aside. Beat together butter and sugar until creamy.  Add the egg, mixing until completely blended.Then beat the zest, vanilla extract and vegetable oil into the batter.

Pour the milk into the saucepan and place over medium high heat.  Add 1 tablespoon of tea leaves.  Let come to a simmer and cook for 3 minutes, stirring constantly.  Remove from heat and let cool until it comes to room temperature.  Then pour milk through a sieve, straining out all the tea leaves.

After this process, stir in 1/3 of the sifted dry ingredients into the batter.  Mix in half of the milk tea.  Continue with this process, ending with the final 1/3 of the sifted ingredients.

Using a spoon or an ice cream scoop, fill 12 muffin cavities evenly with the batter.  Place in oven and bake 18-23 minutes or until tester comes out clean.  After 2 minutes of cooling, transfer muffins to a rack.  Let cool completely.

To make glaze, fill bowl with the juice from one lemon only and then sift in the powdered sugar.  Stir until no dry streaks remain and all is blended.  Take a skewer and poke a 1/2 inch deep hole in the tops of the muffins.  Divide the glaze into two bowls.  Stir in the juice of the second lemon to one of the bowls of glaze.

With the thinner glaze (one with juice from 2nd lemon), brush over the tops of all the muffins.  Let soak into the muffins for about 30 minutes.  Then drizzle the thicker glaze over the top and let set for another 30 minutes.  Then they are ready to enjoy!

Monday, March 19, 2012

Fraternity Brunch Bars

When I went to college, my mother said that several of her friends could not believe she let me go to the one I picked.  The college has a lot of great academics, however, it also has been labeled as a big party school.

One of the memories I have is when the sorority girls were to help out the pledges at a fraternity on a raid to the the frat house.  We all gathered together, with one pledge advising us how to get into the house and what to do.  I think this was to be a raid with water balloons.  The plan was to take over, surprising the Frat brothers in the middle of the night.  The pledge leader urged everyone on and said "Let's go troopers" and proceeded to slip a large trash bag over his head.  Funny, the tough guy thought his head would poke right through the bottom, but he struggled to get it over his head and finally took it off and found some scissors  After that silliness, we were not so sure he should have been the leader.  So here we were ready to go.  Some had old clothes on, some with rain ponchos and others with zip lock bags on our heads to protecting our hair.

We moved in towards the back of the house. I opened the window to the room with the pool table and started climbing in. Halfway in, I felt the window sash hit me in the back.  At that time I quickly realized that someone had leaked our plans.  Luckily, another trooper had managed to invade the house and help me in.

Then the chaos ensued! Things flying down the hall, people running every which way. Not a single soul was surprised, they were all up and waiting  The worst was when they pulled out the fire extinguishers.  If you have never seen the effects of the spray, it is made to saturate every tiny crack and hole, even the ones so small we do not know exist.   I can remember seeing several white coated people. One poor guy with glasses looked like he was sprayed right in the face!  He had made little circles on his eye glasses so he could peer out through all that powder.

Our attire quickly become mottled with food as well as extinguisher powder.  However, one guy clearly was not bothered by this. He was the one fraternity brother that was getting the best of everyone.  I believe it was due to the initial shock of his nakedness that caught us off guard. One girl finally exclaimed with a forceful tone "Dude you really need to get some clothes on!"

Needless to say the raid was a failure.  We all finally retreated back outside and went to get some sleep.  Sadly the pledges were stuck cleaning up the mess the next day.

So for all the crazy college fraternities members as well as pledges, I dedicate these bars. The things that make these unique is the malt powder as well as the rum.  This bar has all the same qualities of a blondie, but thinner with a kick of rum.  I still am undecided if the malt taste is evident, but you can be the judge.

Fraternity Brunch Bars
by flourtrader

Ingredients
1/4 tsp salt
1/4 tsp baking soda
1/2 tsp baking powder
1/2 tsp ground vanilla beans
1 1/2 cups flour
3/4 cup chopped toasted walnuts
1 egg
2 tbs malted milk powder
1/2 cup dark rum
1 cup brown sugar,  packed
1/4 cup shortening

Preheat oven to 350 degrees. Grease and flour the inside of a 9X13 pan.

Sift together the salt, baking powder, baking soda, flour and vanilla bean powder.  In a separate bowl beat together shortening, sugar and egg. Set aside.

In a small saucepan, add rum and malt powder.  Place over medium high heat and stir.  Let mixture start to boil and then remove from heat. Give it one last stir and then pour into the egg mixture, blending until all ingredients are mixed together.

Mix the wet batter into the sifted dry ingredients.  Blend until smooth and and then fold in the nuts. After thoroughly mixing, spread evenly into pan.  You can use a damp knife or damp clean hands to help spread it evenly.

Bake for 18-20 minutes or until done.  Center will be firm to the touch when done.  Remove from oven and let cool completely in pan.  Then cut and serve.
                                **LAST YEAR: Caramel Streusel Bars**
 

Friday, March 16, 2012

Boozy Coconut Almond Ice Cream

Well I am so glad it is Friday.  I am off early to San Marcos for the weekend.  My mom, sis and I will be spending some fun time shopping at the huge outlet malls.  I do need to get me some new clothes between losing weight, torn hems and bad zippers-it is fine time for it.

So let me wish all a great St Patricks day and for those that do not celebrate this day, have a wonderful weekend.  Enjoy some time with family, friends and good food.

Now in reference to good food, as you can see I have a recipe here for some delicious ice cream. The actual booze you put in it is personal preference.  I used creme de cacao, which a white chocolate liqueur.  The recipe below is the one as stated in the book and it suggests creme brulee liqueur.  I did not have any and it is another obscure one that is not found at every liquor store.

This ice cream is one that had me wanting more.  It is delicious by itself , but the idea of topping it with chocolate sauce has me thinking of a frozen Almond Joy-yum!  I definitely need to go back and transfer it into little cups for individual servings for a pot luck. It will be hard to part with it. The recipe makes about 1 quart.
 
Boozy Coconut Almond Ice Cream
adapted from Glorious Liqueurs

Ingredients
1/4 cup of Liqueur Brule (or your preferred liqueur)
2/3 cup of chopped and toasted almonds
approximately 2 cups of milk
6 egg yolks
2 cups heavy cream
1/2 cup of sugar
1 2/3 cups of flaked sweet coconut, divided

Preheat the oven to 325 degrees.  Line one baking sheet with parchment paper.  Spread one cup of coconut on baking sheet.  Toast coconut for a total of 5 minutes, but stir coconut ever 1 minute interval to keep from burning.  Remove pan and turn off oven.

Place a saucepan over medium heat and fill with milk and toasted coconut.  Stir and heat the mixture until it is scalding.  Remove and let cool for 30 minutes.  Then strain mixture through a sieve and discard the coconut.  Reserve only 1 cup of the remaining milk.  The recipe states that you may need to add some more milk to reach one cup, but I had to discard some.

Take the one cup of the cooled scalded milk and place it back in the saucepan.  Add sugar and cream.  Place it over medium heat and let come to a simmer and remove.  Set aside.

Whisk the egg yolks together in a large bowl until just blended.  Then whisk in 1/3 of the warm milk sugar mixture.  Then slowly pour it in with the rest of the simmered milk/sugar mixture.  Put saucepan back on low heat and whisk.

Continue to mix and whisk the mixture until it thickens and coats the back of a spoon.  It should be close to a pudding consistency.  Pour into a heat proof bowl and cover the surface of the custard to prevent a skin from forming.  Place in refrigerator to chill for about 4-5 hours, mixture should be cold before further use.

Remove custard from refrigerator and stir in the liqueur until blended.  Then fill your ice cream machine and follow manufacturers instructions.  Stir in the remaining coconut and the nuts during the last 5 minute interval.  Empty the ice cream into another container, cover and freeze to your desired consistency.  I like my ice cream pretty frozen, so the picture was taken after freezing overnight.
                        **LAST YEAR: Cajun Boudin**


Wednesday, March 14, 2012

Pine Nut and Mozzarella Bread Rolls

Again I have brought out the pine nuts for another recipe.  It has been awhile since I have eaten homemade dinner rolls, but I was in the mood for something with some flavor, instead of just plain bread.  While there are are lot of herbed breads and rolls out there, I still wanted something different but I did not want to go so far as to have an extreme ingredient in them.  By extreme, I mean something that you have to special order or go to a gourmet shop to get.

I was flipping through some cookbooks and came across this recipe.  While this recipe did not have any picture to entice me, it still had some interesting ingredients.  I have made bread with cheddar, but never mozzarella.  And yes, that is mozzarella in the photo-not butter!

While these rolls were not eye catching on the surface, I do believe that the inside makes up for that!  The fluffy bread, stringy mozzarella and crunchy pine nuts did come together to make a tasty bread roll.  In fact, I ate one and then tucked them away for dinner.  I did crave several more, but I left the house to so some things outside to take my mind off of these.  It was not easy, especially since I was the only one the actually knew how many I made.  The original recipe below makes about 16 rolls. It is best not to reveal this number when you make them.  That way you can enjoy a few by yourself without inquiring minds!

Before you get into this recipe, I just wanted to give a shout out of thanks to Lacy at NY City Eats for passing along an award called: Irresistible Sweet Blog.  I was so happy to receive this particular one!  Lacy is a culinary graduate and I would like to see her succeed and find her special place in the culinary world. She does have creative talent for flavor fusion and is very comfortable making savory as well as sweet dishes. A few that come to mind are Lobster Eggs Benny and the Boozy Apple Pear Tart. So stop on in and say hi to Lacy at NY City Eats, I am sure her creations will make you appreciate the Big Apple a little bit more!

 Pine Nut and Mozzarella Bread Rolls
adapted from Baking Bread: Old and New Traditions

Ingredients/ Sponge

1/3 cup wheat bran (I ground up bran cereal)
3 cups all purpose or bread flour
1 tbs or 1 package yeast
2 1/2 cups of warm water

Ingredients/Bread Dough
1 recipe of prepared sponge (above)
8 oz mozzarella, cut into 1/2 in cubes
1 1/2 to 2 cups warm water
1/4 cup olive oil
1 cup pine nuts
2 tsp salt
Egg wash-1 egg, 1 tbs water, pinch of salt

To make sponge, fill the bowl of a stand mixer with the warm water and sprinkle the yeast on top, then stir until it dissolves.  Add the rest of the sponge ingredients and beat, using the paddle attachment for about 1 minute.  The mixture should be smooth with no dry streaks of flour.  Cover and let set at room temperature for a minimum of 4 hours.  You can make it up to 3 days ahead and then refrigerate after the 4 hours.  Let come to room temp before using to make dough.

To create the dough, add the olive oil, 1 cup of flour and salt to the sponge mixture.  Beat at medium speed for about 1 minute.  Continue to add flour in 1/4 cup intervals, beating for 1 minute after each addition.  The dough should come to a point where it pulls away from the sides of the bowl.

Change out the batter blade to a kneading hook and knead, using the mixer on medium for 2 minutes. Then form dough into a ball and place in a greased bowl and turn to coat the top.  Cover and let rise at room temp until tripled in volume about 2-2 1/2 hours.

During the rise time, preheat the oven to 325 degrees.  Place pine nuts in oven and let toast for about 8-10 minutes.  Remove and set aside to cool.  Turn off oven. Also, line two baking sheets with parchment paper.

After dough has tripled, punch down.  Lightly dust a flat surface and roll out dough to a large rectangle.  Sprinkle pine nuts evenly over the surface, then press lightly to adhere.  Then place the cheese cubes evenly on the surface, pressing them down also.

Fold the dough over and knead so that the cheese and pine nuts are evenly distributed.  Then separate the dough into 16 pieces and shape into a tight round.  Make sure that the cheese chunks are sufficiently covered by the dough.  Place each piece one inch apart on the prepared baking sheets.

Cover rolls lightly with plastic wrap and let rise for 45 minutes. During this time, preheat the oven to 400 degrees.

 After the rising time, remove plastic wrap. Then take a pair of kitchen shears and snip the top of the roll in a row of three snips.  Place pans in oven and bake for 10 minutes. Rotate pans from front to back and top to bottom after the 10 minutes and bake for another 5 minutes. Remove bread from oven.

Stir the egg wash with a fork so it has a little froth.  Then brush egg wash across the top of all of the bread rolls.  Place them back in the oven to bake until done, about 5-10 minutes more.

These are best eaten the same day they are baked.

Observances:
My dough was sticky to work with the whole time
For a high rise roll, it is important that the dough is made small and tight when put on baking sheet
It is inevitable that some mozzarella will seep out in baking, but due to parchment it will not burn and does not harm the taste.
These rolls do not turn very brown when baking.
                 **LAST YEAR: Date Bar Pie**                   
  

Monday, March 12, 2012

Stoutly Gingerbread Cookies

These cookies have two very special components that make perfect for St Patrick's.  First is the cake part which is made with Guinness, molasses and spices.  The second is the decorated part in which the idea comes from the brain of Darla at Bakingdom.com.

This is my first time at using fondant, so I still do need some more practice.  I was hoping that I could use disco dust on the border of the fondant, but I ran out of room.  Hopefully with more practice I will be at ease and be able to make my cookies more eye catching in the future.

Regarding the taste of the cookies, they are great without any topping.  Not so pretty, but very tasty.  I did leave a few dozen plain to enjoy with coffee or tea. The dough is a good base and can be personalized to your own tastes (ie sandwich cookies, drizzled with chocolate, etc)

In the listing below, I have included the original recipe along with the Bailey's glaze recipe.  Also, you will find the link to Darla's specific post which is an excellent tutorial on how to use regular rubber stamps and fondant to make some festive looking cookies.

This particular recipe does yield quite a number of cookies, depending how big or small you want to make them.  It was published with the thought that gingerbread men would be made, so it states that it makes 20 six inch cookies. Also, using the Guinness requires you to start the night before on making these.

Stoutly Gingerbread Cookies
adapted from The Sophisticated Cookie

Ingredients/Cookies
5 cups flour
1 tsp nutmeg
1 tsp baking powder
1 tsp ground cloves
1 tbs ground cinnamon
1 tbs ground ginger
1/4 cup of Guinness Stout
1/2 cup blackstrap molasses
1 egg
1 cup butter, softened
3/4 cup packed light brown sugar

 Put Guinness in a small bowl and cover with a paper towel.  Let sit overnight in a cool place.

The next morning, sift together the flour, baking powder and all 4 spices and set aside.  In another bowl, cream together the butter and sugar until light and fluffy.  Then take the bowl of Guiness and stir in the molasses.  Once blended, add it to the butter/sugar mixture and beat for 30 seconds.  Then beat in the egg until everything is blended.

Beat 1/3 of the sifted mixture into the batter.  Add another 1/3 and beat until no dry streaks remain.  Then knead in the last 1/3 of the sifted ingredients until all is blended.  Cover and chill for one hour.

While chilling, preheat the oven to 350 degrees and grease or line cookie sheets with parchment paper.

Once chill time is complete, take and roll out dough on a lightly floured surface.  Dough should be rolled to an 1/8 inch thickness.  Cut out dough with the cookie cutters of your choice.  I used a square biscuit cutter.  Transfer cut outs to cookie sheet, spacing about one inch apart.  Place in oven and bake until done.  Baking time is about 12-15 minutes.  Cookies are done when they are firm to the touch.  Let cool before icing or frosting.

Ingredients/Glaze
1/2 cup powdered sugar
2 tbs Baileys Irish Cream

Place irish cream in a bowl and sift powdered sugar into the bowl.  Mix until no dry streaks remain. Then lightly ice cookies with the glaze.

Decorated Stamp Fondant
The things I found out when trying to complete the process:
-The cookie is thin, so the fondant needs to be thin.
-the less handling of the fondant the less risk of fingerprints and tearing.
-I used a bench scraper to move the fondant squares
-the less detailed the stamp the better
-finding that "perfect" size as well as less detail of a stamp is not very easy
So without further delay, here is the link to Darla's tutorial: Stamped Halloween Cookies
                   
                               **LAST YEAR: Honey Almond Cakes**


Friday, March 9, 2012

Virginia Matties

Since these cookies are not exactly the traditional Madeleine cookies, I did not to call them that.  The flavor of these cookies are peanut butter and chocolate, I did some research and found out that the first peanut farm in the US was in Virginia, so I named them accordingly.

When I set out to do these, I wanted a cookie that really had some pop of peanut flavor.  With all the different flours out there, I could not resist in trying the peanut flour.  I have used nut flours before with wonderful results.

The peanut flour really did the trick.  I made these with regular flour and peanut to compare.  I have to say that I would not make these without the peanut flour.  It adds such a depth of flavor to these, it was well worth seeking out and finding this unique ingredient.

Virginia Matties
by flourtrader

Special Equipment
2 madeleine pans, 12 cavities each

Ingredients
1/4 cup plus 2 tbs creamy peanut butter
6 tbs butter
1/4 cup sugar
1/2 cup peanut flour
1 tsp vanilla extract
1/4 tsp salt
2 eggs
6-8 oz of bittersweet chocolate

Preheat oven to 350 degrees.  Grease pan cavities with melted butter.

Sift together flour and salt, set aside.  In a separate bowl, whip eggs for about 1 minute or until frothy.  Add the sugar and whip for 5 minutes.  Mixture should become pale and thick.

Place a saucepan over medium heat and melt butter.  Add the peanut butter and extract, mixing until smooth.  Remove from heat and set aside.

Add 1/3 of the flour mixture to the whipped eggs and stir until blended.  Continue with this process for 2 more intervals until all the flour is mixed in.  Then pour in the peanut butter and stir until smooth.

Fill each cavity 3/4 full with the batter and smooth the top.  After all 24 cavities are filled place each pan on top of a cookie sheet.  Put in oven to bake for 7 minutes.  Then rotate pans from top to bottom and back to front.  Bake for an additional 6-7 minutes.  Tops will spring back when lightly touched.

Remove and invert onto rack to finish cooling. 

Once the cookies have cooled, set up a double boiler and melt chocolate.  Dip the cookies or drizzle chocolate on top. Place on wax paper.  Let cookies set for about 2 hours for the chocolate to harden and then they are ready to eat.

Tips:
Only make enough batter for pans you can fill and bake at one time.  Due to the melted butter in the batter, leaving it sit and letting it cool will cause it to seize.

If you have a non-stick pan, lightly spray with cooking spray.  Over doing it will make for a greasy cookie.

Make sure your batter is smoothed out in the cavities.  Uneven batter will produce cookies that do not lay flat.
                       **LAST YEAR: Cheddar Soda Bread**     

Wednesday, March 7, 2012

Black Pond Cupcakes

With the white around the black, this made me think of wintertime and black ice, hence the name of these cupcakes.

I was wanting to actually make a cupcake out of the traditional flavors of  cheesecake, which is berries and cream.  The cake part actually is includes of cream cheese and ground vanilla beans.  The topping is quartered berries tossed in a heated sugar sauce and around the pond is a cream cheese whipped icing.

It all comes together in a wonderful bite of fluffy cake, creamy icing and juicy berries!  I will be making these again.  I am so happy they turned out, because I was really worried about them being dense with the cream cheese in there.  I cannot wait to see the faces when I donate these!  This recipe makes about 1 1/2 dozen cupcakes.

Black Pond Cupcakes

Ingredients/Cake
by flourtrader

4 eggs
1 1/2 cups sugar
1 tsp ground vanilla beans
3/4 cup plus 2 tbs vegetable oil
1/2 lb cream cheese
2 tbs baking powder
1/2 tsp salt
2 cups flour

Preheat oven to 300 degrees.  Grease top edge of 18 muffin cavities and line with cupcake papers.

Sift together flour, baking powder, salt and ground vanilla beans.  Set aside.  In another bowl, beat 4 eggs on high speed for 3 minutes.  Fill a third bowl with the sugar, oil and cream cheese, beat for about a minute.  Then beat in the eggs until blended.  Lastly, fold in the sifted ingredients.

Using an ice cream scoop or a large spoon, put batter into each cavity, filling about 3/4 full.  Place in oven and bake until tester comes out clean.  This should take about 20-25 minutes. Let cool in pans for 2 minutes and then place on rack to finish cooling.  Do not top until completely cool.

Ingredients/Fruit topping
by flourtrader

2 pints of blackberries*
2 tsp of cornstarch
1 tbs sugar
1/4 cup plus 2 tbs water
1 tsp lemon juice
1 tsp vanilla extract

Rinse and quarter the blackberries and place in a bowl.  In a small saucepan, mix together all other ingredients and place over medium high heat.  Stir as the mixture cooks and once it comes to a boil, remove pan from heat.  Toss berries in sauce and then drain in a colander.  Place about one tablespoon of berry mixture in the center of each cupcake, making sure you leave a border around the outside edge.

*You made need more, depending of how much topping you want on your cupcakes.

Ingredients/Whipped Cream Icing
adapted from All Recipes

1 eight oz package reduced fat cream cheese (room temperature)
1/2 cup of white sugar
1 tsp vanilla extract
1/2 tsp almond extract
2 cups of heavy or regular whipping cream

Combine all ingredients, except the whipping cream, in a large bowl by using a regular or stand mixer.  While the mixer is still running, slowly add the cream.  Continue to whip until stiff peaks form.

Using a large tip and piping bag, pipe a border around the outside edge of cupcakes, encompassing the fruit topping.
                               **LAST YEAR:Key Lime Crumb Cake**

Monday, March 5, 2012

Amber Tweed Bundt Cake

Have you ever had a hobby that you started and then went all out and then straight to the point of burn out?  Well I certainly did when I go my sewing machine years ago.  I did save a lot of money, making my own clothes, but my machine is retired now. I probably made at least 50 sets of clothes, if not more.

One thing I do still have a love for is all the wonderful fabrics out there.  One of them, of course, is tweed.  I made a lot of lined business suits for work and I had a thing for the heavier fabrics.  However my tastes are not perfectly suited for the climate since I live in Texas.

I do remember finding my favorite fabric mecca in Dallas.  I walked in and there were bolts stacked to the ceiling of a vast array of fabrics. Woolens, silks, cottons-you name it, they had it.  I used to spend hours in there just trying to decide!  Then I found another specialty place that had unusual and really stylish buttons, so I frequented there often too.

That was many years ago and now that I am blogging, I am waiting to find the same in a kitchen shop.  Until then, I will make due ordering from here and there and shopping at various places.

This particular bundt cake is speckled with chopped cinnamon chips and has no sugar in it.  It is sweetened with honey. The cake is moist with a tender crumb and goes well with a cup of coffee or tea in the morning.  For a dessert, it can be served with cinnamon whipped cream and your favorite berries.

Amber Tweed Bundt Cake
by flourtrader

Ingredients
1 2/3 cups honey
1 tsp salt
1/2 cup plus 4 tbs butter
1 tbs baking powder
1 tsp cinnamon
3 egg yolks
1 egg
1 1/4 cup whole milk
1 cup chopped cinnamon chips
3 cups of flour

Preheat oven to 325 degrees.  Melt 2 tbs of butter and brush the inside of a 10 cup bundt pan.  Then dust with flour.

In a medium size bowl, sift together the baking powder, salt, cinnamon and flour.  Set aside.  In another bowl, beat 1/2 cup and 2 tbs of butter until smooth and creamy.  Add the honey and beat for 2 minutes.  Add one egg yolk and beat for 30 seconds until blended.  Follow the same process for each egg yolk and the egg, beating after each addition.

Then fold 1/3 of the sifted ingredients into the batter.  Add 1/2 a cup of milk and stir until blended.  Fold in another 1/3 of the sifted ingredients and then stir in 3/4 cup milk.  Take the chopped cinnamon chips and stir it into the last 1/3 of the sifted ingredients.  Fold that into the batter.

Pour or spoon the batter into the prepared pan.  Bake for 55-65 or until tester comes out clean.  Cake is done when top springs back when lightly touched.  Let cool in cake pan for 20 minutes and then invert onto rack to finish cooling.


                    **LAST YEAR: Thin Mint Cupcakes**

I am off to the doctor today to take care of this nasty sinus infection, so I will try to catch up with all of you later this afternoon!

Friday, March 2, 2012

Caramel Apple Cakes

I decided this go around I wanted to do a project, not just a regular cake.  I had saved this recipe a few years back from a Disney website but never made it. That site actually has some pretty cool crafty ideas for cupcakes as well as cakes.  This particular recipe was actually for one giant cake.  I made this with a mini ball pan instead and it made about 8 cakes.

The cake part is a spice applesauce cake.  The taste is wonderful and the aroma when baking was enough to make anybody hungry.  This would be a good cake, even if you did not want to got to all the trouble to make the "caramel apple look".  The cakes are covered with caramel and rolled in finely chopped walnuts. I used a specialty caramel-Celtic Sea Salt.  It was not packed with salt, but every once in a while a bite would yield a salty, crystal crunch.

I have listed the original cake recipe for the large caramel apple cake as well as instructions for the mini cakes. I did have a lot of fun making them!.  Also, I finished off my baking session by eating the cut out slice from the one mini cake above, which was the perfect ending to a day in kitchen!  We have visitors coming this evening, so the cakes will be served then.  I have included some helpful tips at the end of this recipe should you decide to make these.


Caramel Apple Cake
adapted from Family Fun Go website 

Special Equipment:
1 ball cake pan  or  2 oven safe 1 1/2 quart bowls (2 mini ball pans)
1 large craft stick (1 package of lollipop sticks)

Ingredients/Cake
2 cups unsweetened applesauce
2 tsp vanilla extract
2 eggs
1 cup vegetable oil
1 1/2 cups light brown sugar
2 tsp cinnamon
1/2 tsp allspice
2 tsp baking soda
1 tsp ground cloves
1 tsp salt
3 1/2 cups flour

Preheat the oven to 350 degrees.  Grease and flour the top edge as well as the cavities of your pans.

Sift together the cinnamon, allspice, baking soda, cloves, salt and flour.  Set aside.  In another bowl, beat together the eggs, sugar, vanilla extract, applesauce and vegetable oil until smooth.  Fold in the sifted ingredients.

For the mini ball pans, fill  cavities 2/3 full and bake for about 18-22 minutes.  For the big cake, bake for 60-70 minutes.  Cakes will be done when tester comes out clean.

Once the cake is done and removed from oven, let cool in pan for 10 minutes.  Then invert onto cooling rack and let cool completely.  Then trim the flat sides of cake or cakes so the two pieces match together, forming a ball.

Ingredients/Topping
3/4 cup finely chopped toasted walnuts
60 caramel candies
2 tbs water

In a microwave safe bow, place unwrapped caramels and add the water.  Microwave in 30 second intervals, stirring after each interval for about one and a half minutes. The mixture should drip off of a spoon.

Place about a tablespoon of caramel in the middle of  8 of the mini cakes or 1/4 cup in the middle of one half for the large cake. Place 1 sheet of wax paper on a flat surface for the large cake and 2 sheets for the minis. Place cake or cakes on top of one sheet.  Spoon the warm caramel over the top, letting it drip down the sides.  Continue until all is covered except for the part directly on top of the wax paper.  Wait 20 minutes for the caramel to cool on the large cake and then scatter nuts along the bottom half of the large cake.  If making minis, let cool for 10 minutes and scoop with a spatula.  Then roll the bottom half of the cakes in the nuts to coat.  Place mini cakes back on clean sheet of wax paper.

Cover the large craft stick with wax paper and insert into top center of the cake.  For the mini's insert one lollipop stick into top center of each cake.

To serve, mini cakes, have guests remove stick and cut with a knife to eat.  The large cake, just remove stick and cut slices.  Each slice should be split again from the top or bottom half of the cake, unless you want to serve long half moon slices.

Tips:
Do not use the center stick to move the cake, it will not hold.
Cooling time is crucial on the caramel, you want the nuts to stick but not to drip off with the caramel
Excess caramel will be on the wax paper.  To create less waste, scoop and re-heat to pour over cake or cakes again.
Since the bottom half of the cake is round, you may have to spoon the caramel to get that part all coated.
The best way to plate these and also help in moving them from one place to another is to take a jumbo muffin paper and cut about an inch off the top and place one cake on top.  Also you can just take a standard cupcake paper and fan it open.

                  **LAST YEAR::Peanut Butter Pretzel Cookies**
 

Wednesday, February 29, 2012

Chocolate Phantoms


These cookies are definitely on the rich dark side of chocolate.  I bought some specialty chocolate that was 70% cocoa and used it in this recipe, so these are very intense.    This recipe has its good and its bad, however there is no mistaking the great chocolatey taste.  I would say that these are as close as you are going to get to actual fudge in the form of a cookie.

The down side of these is that they only last for a few days.  Also, since the batter is made with very little butter, it sets up very fast and gets hard to deal with near the end of the baking session.  It actually turns into a hard fudge consistency. The recipe states to use a heaping teaspoon for the dough, yet the macadamias are left whole in the batter which makes that size difficult.  Chopping the nuts into quarters would make things easier. The up side is that due to their richness, they go a long way.  Also, they are less difficult to make than fudge.  This recipe makes about 5 dz  ( 1 1/2 inch) cookies.

As a side note, Easy Foodsmith has been kind enough to pass the "blog on Fire Award" to me.  If you are wondering about this blog, let me fill you in on a typical dinner at her place: pom limeade, saffron chicken tikka, chickpea salad with pomegranate and twisted potato bread.  Lastly, a slice of chocolate banana zebra cake for dessert!  While you probably cannot eat there, you sure can find some great recipes to prepare and enjoy at your house.  So stop in and visit Easy Foodsmith .

Chocolate Phantoms
adapted from Rose's Christmas Cookies

Ingredients
8 oz of bittersweet or semisweet chocolate bars
1 1/2 cups semisweet chocolate bars, chopped
1 1/2 cups unsalted macadamia nuts
2 eggs
1 tsp vanilla extract
2 tbs unsalted butter
1/4 tsp baking powder
3 tbs flour
1/2 cup sugar

Preheat the oven to 350 degrees,  Line baking sheets with parchment paper.

In a small bowl, sift together the flour and baking powder.  Set aside. Prepare a double boiler with water and place over medium heat.  Fill the top section with the chocolate bar pieces and the butter.  Stir until both the butter and chocolate are melted and blended.  Remove the bowl from the heat.

Fill another bowl with the sugar, eggs and vanilla extract.  Beat for about 15 seconds until it is a creamy consistency.  Slowly pour the melted chocolate into the batter and beat.  Once all the ingredients are well blended, fold in the sifted ingredients.  Lastly, stir in the chocolate chips.

Drop batter by heaping teaspoons onto baking sheet measuring about 1 inch wide.  Also, they should be and mounded as high as possible and placed about 1 1/2 inches apart.  Place in oven and bake for 6 minutes.  Rotate pans (top to bottom, front to back) and bake for an additional 3-4 minutes.

They will come out of the oven very soft and have to cool completely on the pans.  Remove from pans and serve.
                        **LAST YEAR: Inside Out Burgers**

Monday, February 27, 2012

Maui Pine Cream Pie


I recently went to a luncheon and started thinking about the different things that people brought.  Yes, we all should be happy that everyone brought something, but the buying a baked good from a grocery store always puzzles me.  I never see anyone bringing in McDonalds to pot lucks and to me both acts are equal to the same thing.  How do people arrive at McDonalds not being acceptable for the main course, but a grocery store cake is for the dessert? Different thoughts I guess.

The sad thing is that I heard someone state at how bad the store made cake tasted compared to the homemade.

Now, the question is if you do not bake or cook, what would be good to bring?  I would probably bring non food items such as plates, napkins or cups. They are always in need of those at pot lucks.

Anyway, onto the details on this recipe.  This is a pineapple cream pie with macadamia nuts.  The bottom is a cream cheese layer and the top is pineapple custard.  You cannot see the distinct layers, I think it is due to the colors of both layers being so close in hue.  The filling is a unique blend and the crust has lemon zest and finely chopped macadamia nuts which gave it a extra flavor.  The topping is whipped cream with sugar zest and macadamia nuts sprinkled on top.

I found this pie to be a tasty blend of textures as well as flavors.  One bite gives you the delicious smooth taste of pineapple and cream cheese, yet you do get a crunch from the macadamias and a taste of real fruit from the pineapple.  Definitely a great tropical treat in my book.  This recipe is for one 9 inch pie.

Maui Pine Cream Pie
adapted from The Cooking Contest Cookbook

Ingredients/Pie Crust
1/2 cup butter flavor shortening
2 tsp lemon zest
3-4 tbs cold milk
1 1/2 tsp finely chopped macadamia nuts
2 tbs sugar
1/2 tsp salt
1 1/2 cups flour

Sift together the sugar, salt and flour.  Using a pastry blender, cut in the shortening until the mixture is pea sized crumbs.  Then mix in the lemon zest and the nuts, stirring until evenly distributed.  Then add the milk, tossing together with a large fork until the mixture forms a dough.  Cover and refrigerate for 15 minutes.  Preheat the oven to 350 degrees.

Lightly flour a flat surface and roll out dough into a circle.  The dough should extend one inch beyond the size of the edge of an upside down pie pan.  Fold up into quarters or roll dough around the rolling pin and then place in pie pan. Press dough into pan.  Fold the top edges under and flute or mold the top edge of the crust how you prefer.  Then prick the bottom with a fork to make sure the crust does not bubble when baking.

Place crust in oven and bake until done, which is about 15-20 minutes.  Crust is a golden brown when done.  Remove and let cool completely before filling.

Ingredients/Pineapple Cream Filling
1 tsp vanilla extract
2 cups of milk
1 tbs water
4 egg yolks, lightly beaten with a fork
1 (20 oz) can of crushed pineapple juice ( in light syrup)
1/3 cup cornstarch, packed
1 cup sugar
1/4 tsp salt
2 tbs butter

Drain the pineapple from its juice.  Discard the juice and measure out one cup of the pineapple and reserve the rest for the cream cheese layer.  In another bowl, stir together egg yolks and water. Then mix in the cornstarch until all is smooth. Set aside.

Fill a saucepan with milk, sugar, salt and 1 cup of the pineapple.  Stir and then place over medium heat and let cook.  Continue to stir and cook, until the mixture simmers and is right on the brink of boiling.  Turn the heat down to low and slowly pour in the egg yolk mixture, whisking the mixture at the same time ( I had some extra help for this task) . Once the egg yolk is mixed in continue to whisk and let cook.  Continue with this process until the mixture is the consistency of pudding.  Then stir in the butter and vanilla.  Once the butter is melted, remove from heat.

Pour into a heat proof bowl and cover.  Place in fridge for a minimum of 30 minutes, stirring at two intervals.  I left mine in for 3 hours, so extra time does not hurt the outcome.

Ingredients/Cream Cheese Filling
1/2 cup powdered sugar
reserved pineapple ( see first paragraph under pineapple filling section)
1/2 tsp vanilla extract
1/3 cup finely chopped macadamia nuts
8 oz cream cheese (softened)

Beat together the cream cheese and sugar until smooth.  Add the remaining ingredients and beat until evenly distributed.  Cover and place in fridge while you make the topping.

Ingredients/Toppings
1 tsp grated lemon zest
1/4 tsp powdered sugar (I used more to get sprinkling consistency)
1 cup heavy cream
1/4 cup finely chopped macadamia nuts

Whip the cream until it forms stiff peaks.  Set aside.  In a small bowl mix together the zest and the powdered sugar until you have the right consistency for sprinkling.

To assemble
Remove bowls from fridge.  Take the cream cheese mixture and spread it over the bottom of the pie crust.  Then cover with the pineapple custard, smoothing the top.  Then spread the whipped cream over the top.  Sprinkle the sugar zest and macadamia nuts over the top.  Cover and let chill for about 3 hours prior to serving.
              **LAST YEAR: White Chocolate Kiss Cookies**

Sunday, February 26, 2012

In Gratitude

Just a little post here to say how much I appreciate my blogger friends. In the short while I have been blogging publicly, I have come across some amazing talents as well as personalities.

All of the bloggers represent a great group of giving people. From hosting charity events to advising of nutritional benefits, the food bloggers are reaching out in several ways.  Also, I cannot forget the big hand that is always there to lift the spirit of someone or assist a newbie in their struggle to get started.

In addition, I wanted to say a special thanks to the following bloggers that have reached out to me recently:

Sonali-has recently awarded me the Liebster as well as the Versatile blogger award.  She is the host of  the blog Only Fish Recipes ,  Just the name alone tells you what this woman specializes in!  She does have a way with seafood, so pop on in and say hello.  I am sure you will find something delicious.

Starr-has recently awarded me the Versatile Blogger award.  She is the host of the blog This Misfit Baker which does have a wonderful array of tasty recipes. Her site is vegan recipes, but I found some gems on her site and I have no dietary restrictions.  I recently ran across her Cinnamon Latte Squares-yum! Drop by her blog, it will be an enjoyable visit!

Carsley- this blogger is booming with enthusiasm and her blog offers you a wonderful trip to the Caymans with detailed posts of all the festivals and activities there, not to mention her wonderful dining experiences!  The name of her blog is The Deep Dish.  I was lucky enough to win a contest on her blog and received a delicious array of baked goodies from the Islands.  I have eaten some, but they are segregated for special days, so I can savor the tropical treats for days to come!

I hope that this post makes you three feel the big hug from me, thanks again.

Friday, February 24, 2012

Bleeding Heart Cakes

Well it has been some time since I used my spike pan, so I decided to pull it out for another go round.  This particular recipe has a little bit more work to it than just regular cupcakes, but I think it is well worth it.

The batter comes together with a mix of blood orange juice and zest, ground pecans, cinnamon and orange liqueur.  The inside heart is a blood orange segment that is coated in a mix of cinnamon sugar and pecans.  On top is a dusting of confectioners sugar and piped lattice icing with the flavor of blood oranges and cinnamon.

I really do like the distinctive taste of blood oranges. These little cakes definitely give you a pop of that great flavor with the orange segment cooked inside. This recipe makes a little over 1 1/2 dozen.

Bleeding Heart Cakes
by flourtrader

Ingredients/Filling
13 blood orange segments, pith and membrane removed
1 1/2 tsp cinnamon
1/4 cup ground pecans (I used a blender to grind mine)
1/4 cup sugar

To prepare your filling, line a baking sheet with waxed paper.  In a shallow bowl, mix together cinnamon, pecans and sugar.  Cut each segment in half, cutting the width.  Then roll each piece in the cinnamon mixture and place on the baking sheet.  Place in fridge while the rest is prepared.

Ingredients/ Cake batter
1/2 cup orange liqueur ( I used Grand Marnier)
1/2 cup blood orange juice
2 tbs blood orange zest
1/2 cup ground pecans
3/4 cup butter, room temp
3 eggs, whites and yolks separated
2 cups sugar
4 tsp baking powder
3 cups flour
1/2 tsp salt
1 1/2 tsp cinnamon

Preheat the oven to 350 degrees.  Prepare spike pans by greasing top edges of cavities and putting in cupcake liners, letting the spike poke through the center.

 In a medium size bowl, sift together flour, baking powder, cinnamon and salt. Stir in the ground nuts.  Set aside.  In another bowl, cream together the sugar, orange zest and butter.  Then beat in the egg yolks one by one.

In a small bowl stir together the orange liqueur and the orange juice.

Then fold in 1/3 of the sifted ingredients into the sugar mixture.  Mix in 1/2 of the orange liqueur and juice mixture.  Continue with the same mixing process, ending with the last third of the sifted ingredients.  Set aside.

In a small bowl, beat the egg whites until stiff peaks form.  Then fold the whites into the batter.  Using a scoop, fill each of the cupcake cavities with a heaping tablespoon of batter.  Then take the orange segments from the fridge and slide a piece onto the spike so it just touches the top of the batter.  Segment should be on its side rather than upright.  After all the segments are spiked, place another scoop of batter on top.  Cavity should be about 3/4 full.

Place pan in oven and bake for 12-18 minutes or until tester (poked outside of the orange segment in the center) comes out clean.  Mine took exactly 15 minutes.  Remove pan and let cool for 1 minute and then transfer to rack to finish cooling.

Ingredients/Lattice Icing
2-3 tbs blood orange juice
1 tsp cinnamon
1 tbs grated zest
1 cup powdered sugar (more for dusting)
3-4 drops of red food coloring
Stir together cinnamon and zest in a small bowl.  Sift in the confectioners sugar, then add 1 tbs orange juice and stir.  Add red food coloring and more orange juice until it reaches the desired consistency and color.  I used a squirt bottle to make the lattice, so my icing was not as thick as you would need if you piped it.

Once cupcakes are cool, dust with powdered sugar and frost, making a design on top of the cupcake with the icing.

             LAST YEAR: Boardwalk Cinnamon Rolls

Wednesday, February 22, 2012

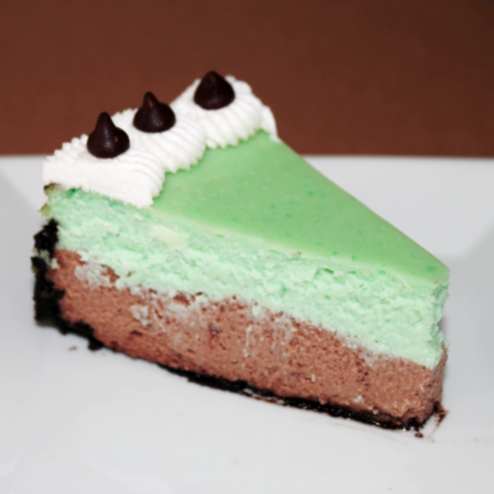
Jade and Suede Cheesecake

The colors and texture of this cake conjured up the name above. A layer of brown suede topped with a layer of bright jade.  I had in my mind the idea of a chocolate mint cheesecake.  However, I did not want to do the swirl thing and I did not want one blend of chocolate and mint together.  So I decided to make a two layer. cheesecake.

Upon thinking further, I decided it would be the perfect way to use some of my mint chips I got a few months ago.  However, I did have to contemplate on how to get these two layers of distinction in a baked cheesecake.  So if you are curious as to how I did it and if you enjoy the blissful combo of mint and chocolate, read on!

Before you get there, however, I would like to give a heartfelt word of thanks to the Choc Chip Uru for giving me the award below.  She is the host of an amazing blog called Go Bake Yourself  and hails from Australia.  Even though she is a teenager, she has bounded onto the blogging scene with some very delicious and creative posts.  If you do not know her, I encourage you to stop in and introduce yourself, for this blogger is coming up the ranks very fast!


Jade and Suede Cheesecake
by flourtrader

Ingredients/Crust
15 chocolate mint filled sandwich cookies, crushed (I used Oreo brand)
1/4 cup melted butter

Grease a  9 inch springform pan.  In a small bowl mix crushed cookies and butter until no dry crumbs remain.  Press mixture evenly into the bottom of the pan and about 1 to 1 1/2 inches up the sides.  Set aside.

Ingredients/ Filling
1/3 cup mint chips
1/3 cup semi sweet chocolate chips
24 oz cream cheese, room temperature
3 eggs
3/4 cup sugar
1/2 tsp vanilla extract
1/2 tsp mint extract
4 drops green food coloring
1 cup sour cream

In a large bowl, beat the sugar and the cream cheese together until smooth.  Then add the eggs and beat again.  Once all is blended, measure out two cups of the mixture into one bowl.  This leaves about two cups remaining in the mixing bowl. Cover and place one bowl in the fridge. 

Place a small heatproof bowl over a pot of water and fill with the chocolate chips.  Put over medium heat and let water simmer.  Stir chocolate until completely melted.  Remove from heat.

Add 1/2 cup sour cream and the vanilla extract to the cream cheese mixture.  Then pour in chocolate and stir until all is well blended.  Put mixture into the prepared crust and smooth the top until even.  Cover and place in the freezer for 30 minutes.

During the last 5 minutes of the chilling time, preheat the oven to 275 degrees.  Then start preparing the mint layer.  Melt the 1/3 cup of mint chocolate chips in the same manner as you did the chocolate.  Remove from heat.  Take the bowl of cream cheese mixture from the refrigerator.  Add 1/2 cup of the sour cream, mint extract, food coloring and melted mint chips.  Stir until all is evenly distributed.

Remove the cheesecake from the freezer and slowly pour the mint layer over the top. Then smooth it out, making sure it is even. Place pan in oven and bake for about one hour and 25 minutes.  When done, the top of the cheesecake should no longer be shiny. Turn the oven off and leave the cake to cool inside the oven.

Once cooled, place cake in refrigerator for about 6 hours.

Ingredients/Topping
1/4 cup whipping cream
1 1/2 tsp sugar
2 drops of mint extract
24-30 semi sweet chips

Place whipping cream, sugar and extract in a small bowl and beat until stiff peaks form.  Cut off a small corner of a plastic zip lock bag and put a piping tip in the bag, sticking out the corner.  Fill the bag with the whipped cream mixture.  Remove the cheesecake from the fridge and pipe a border of whipped cream around the edge of the cake.  Then place chocolate chips on top of each swirl of the piping.  Place the cheesecake back in the fridge to chill for another few hours.  Then you can slice and enjoy.

              **LAST YEAR:Tropical Cream Cheese Cookies**

Monday, February 20, 2012

Citrus Tri Stars

Well I definitely broke the rules on this one.  I recently got a cookie press and the directions said "not recommended for refrigerated dough".   I sat there wondering why.  Now, I can understand that if you took too long with refrigerated dough, it would become difficult to work with.  However, most of the time when I use this type of dough, I form the dough on one cookie sheet and then place the bowl back in the fridge while the one pan was cooking. So after deliberating on that, I disregarded the warning and forged ahead.

My main thoughts about making the dough is that it had to be stiffer than drop cookie dough and had to bake up with some height, unlike cut out dough. In addition, the dough could not spread like leavened cookies, they had to maintain their shape when baked.  Add ins in the dough is possible, but the particles must be small enough to go through the press.  That narrowed it down to three things, cocoa nibs, poppy seeds and milk crumbs.

I tried some of the batter with cocoa nibs and some with poppy seeds. The poppy seeds were smaller so they distributed better in the dough than the cocoa nibs.  Taste wise, I liked both of them. As far as the milk crumbs (see recipe here), it was an after thought. These cookies taste better the next day, for the lemon flavor develops more with time. This recipe makes about 5 dozen.

Citrus Tri Stars
by flourtrader

Ingredients
1 tbs lemon zest
1 tsp lemon juice*
2 cups of flour
1/4 tsp salt
1/3 cup shortening
1 cup sugar
2 eggs
2 tbs poppy seeds


Sift together the flour and the salt and set aside.  In a separate bowl, beat together shortening, sugar, eggs, lemon zest and lemon juice.   The fold in sifted ingredients  Lastly, fold in poppy seeds until evenly distributed.  Cover dough and refrigerate for 8 hours or overnight.

After chilling the dough, preheat the oven to 350 degrees and grease two baking sheets.  Remove dough and fill cookie press according to instructions.  Cover remaining dough and place back in fridge.  Press cookie dough out onto greased cookie sheets according to manufacturers instructions.

Place cookie sheet in oven and bake for 9-12 minutes or until lightly golden on bottom and edges.  Remove and let cool for 1 minute and then transfer cookies to cooling rack.  Repeat process, greasing cookie sheets after baking each batch.

*02/26/12  a taste tester has stated that there is not enough zip of lemon flavor in this cookie, so feel free to add lemon extract in place of the juice for a stronger lemon flavor.


                                 **LAST YEAR:Brandy Alexander Pie**